Quantcast
Channel: Category Name
Viewing all 10804 articles
Browse latest View live

How to create your own templates for dotnet new

$
0
0

You can now create your own templates for dotnet new. Creating and installing your own templates is an experimental feature at this point, but one that we are seeing significant interest in and that deserves more of your feedback before we enable it for broad use with .NET Core 2.0. The version of dotnet new shipped with the .NET Core 1.0 SDK has a new command line parameter --install. This is an undocumented feature, and is not currently included in the help output.

You can try the new template experience if you have the new SDK or Visual Studio 2017 installed. If you didn’t you can right now.

The goal of this post is to connect with developers who are interested in creating templates. If you maintain a library or framework project on GitHub, then you are a great candidate to be a template author. There are lots of other cases too, where creating templates makes sense. If you can create a sample, you can create a template. It’s not hard at all.

In the last update for .NET Core, we have updated dotnet new. This new version of dotnet new is now built on top of the new Template Engine, which is a library that we are developing. To learn more about how to use dotnet new see the docs. In this article, we’ll show how to create some custom templates and then use them from dotnet new.

Over the past several years we have seen a lot of interest in creating custom templates. We also heard that it’s too difficult to create and maintain templates with the existing tools. Because of that we wanted to make it easy to create, maintain and share templates. Let’s dive into the demos, and see how to create some templates. Everything that we cover here is in a GitHub repository at https://github.com/sayedihashimi/dotnet-new-samples.

I have a web project which I’d like to create a template out of. The template project can be found at Sayedha.StarterWeb. This is a modified version of the mvc template which is availables out of the box. Before you create a template out of this, let’s run the sample to see what was created. After running dotnet restore, and dotnet run, you can view the app at http://localhost:5000 (or if running in Visual Studio it will launch automatically when you run the app). The following screenshot of this app running on my machine (I’m creating these samples on a Mac, but you can use any platform).

runapp01

The app will look pretty familiar if you’ve created an app with this template in Visual Studio. There are also some strings that need to be replaced when you create a template out of this. For example the namespace is set to SayedHa.StarterWeb. This should be updated to match the project name created. Now let’s create a template out of this and then you can start adding the replacements that are needed.

How to create a basic template

To create a template from an existing project you will need to add a new file .template.configtemplate.json. You should place the .template.config folder at the root of the files which should become the template. For example, in this case I’m going to add the .template.config directory in the Sayedha.StarterWeb folder. This is the same folder that contains the .csproj project file. Let’s take a look at the content of the template.json file.

{
"author": "Sayed Ibrahim Hashimi",
"classifications": [ "Web" ],
"name": "Sayed Starter Web",
"identity": "Sayedha.StarterWeb",        // Unique name for this template
"shortName": "sayedweb",                 // Short name that can be used on the cli
"tags": {
    "language": "C#"                       // Specify that this template is in C#.
},
"sourceName": "Sayedha.StarterWeb",      // Will replace the string 'Sayedha.StarterWeb' with the value provided via -n.
"preferNameDirectory" : "true"
}

The contents of template.json shown above are all pretty straight forward. The sourceName field is an optional field that you should pay more attention to. I’ll tell you why." When a user invokes dotnet new and specifies a new project name, by using --name, the project is created, and the string value for sourceName will be replaced with the value provided for --name. In the template.json example above, sourceName is set to Sayedha.StarterWeb. This enables all instances of that string to be re-written by the user-provided value specified at the command line, with --name. This string is also used to subsitute the namespace name in the .cs file for the project. When a new project is created with the template, these values will be updated. We will discuss preferNameDirectory later. Let’s try out our template now and see that in action.

Now that we have created the template, it’s time to test it out. The first thing to do is to install the template. To do that, execute the command dotnet new --install <PATH> where <PATH> is the path to the folder containing .template.config. When that command is executed it will discover any template files under that path and then populate the list of available templates. The output of running that command on my machine is below. In the output you can see that the sayedweb template appears.

$ dotnet new --install /Users/sayedhashimi/Documents/mycode/dotnet-new-samples/01-basic-template/SayedHa.StarterWeb

    Templates                                 Short Name      Language      Tags
    Console Application                       console         [C#], F#      Common/Console
    Class library                             classlib        [C#], F#      Common/Library
    Unit Test Project                         mstest          [C#], F#      Test/MSTest
    xUnit Test Project                        xunit           [C#], F#      Test/xUnit
    Sayed Starter Web                         sayedweb        [C#]          Web
    Empty ASP.NET Core Web Application        web             [C#]          Web/Empty
    MVC ASP.NET Core Web Application          mvc             [C#], F#      Web/MVC
    Web API ASP.NET Core Web Application      webapi          [C#]          Web/WebAPI
    Solution File                             sln                           Solution


    Examples:
    dotnet new mvc --auth None --framework netcoreapp1.0
    dotnet new sln
    dotnet new --help

Here you can see that the new template is included in the template list as expected. Before moving on to create a new project using this template, there are a few important things to mention about this release. After running install, to reset your templates back to the default list you can run the command dotnet new --debug:reinit. We don’t currently have support for --uninstall, but we are working on that. Now let’s move on to using this template.

To create a new project you can run the following command.

$ dotnet new sayedweb -n Contoso.Web -o Contoso.Web
Content generation time: 150.1564 ms
The template "Sayed Starter Web" created successfully.

After executing this command, the project was created in a new folder named Contoso.Web. In addition, all the namespace elements in the .cs files have been updated to be namespace Contoso.Web instead of namespace SayedHa.StarterWeb. If you recall from the previous screenshot there were two things that needed to be updated in the app: the title and the copyright. Let’s see how you can add these parameters to the template.

How to create a template with replaceable parameters

Now that you have created a basic template, let’s see how you can customize this a bit by adding parameters. There are two elements in the home page that should be updated when the template is used.

  • Title
  • Copyright

For each of these, you will create a parameter that can be customized by the user during project creation. To make these changes the only file that you will need to modify is the template.json file. The following snippet contains the updated template.json file content (source files are located in the 02-add-parameters folder).

{
    "author": "Sayed Ibrahim Hashimi",
    "classifications": [ "Web" ],
    "name": "Sayed Starter Web",
    "identity": "SayedHa.StarterWeb",
    "shortName": "sayedweb",
    "tags": {
        "language": "C#"
    },
    "sourceName": "SayedHa.StarterWeb",
    "symbols":{
        "copyrightName": {
            "type": "parameter",
            "defaultValue": "John Smith",
            "replaces":"Sayed Ibrahim Hashimi"
        },
        "title": {
            "type": "parameter",
            "defaultValue": "Hello Web",
            "replaces":"Sayed Web"
        }
    }
}

Here you have added a new element symbols with two child elements, one for each parameter. Let’s look at the copyrightName element a bit closer. When creating a parameter, the type value will be parameter. The replaces element defines the text which will be replaced. In this case Sayed Ibrahim Hashimi will be replaced. If the user doesn’t pass in a value when invoking this template, the defaultValue value will be applied to that. In this case, the default is John Smith.

Now that you’ve added the two parameters you need, let’s test it with dotnet new. Since you changed the template.json file, you will need to re-invoke dotnet new -i again to update the template metadata. After installing the template again, let’s see what the help output looks like. After executing dotnet new sayedweb -h, in addition to the default help output you see the following.

    Sayed Starter Web (C#)
    Author: Sayed Ibrahim Hashimi
    Options:
    -c|--copyrightName
    string - Optional
    Default: John Smith

    -t|--title
    string - Optional
    Default: Hello Web

Here you can see the two parameters which you defined in template.json. The following is an example of invoking this template and customizing these values.

$ dotnet new sayedweb -n Contosog.Web -o Contoso.Web -c Contoso -t ContosoAdmin

This will result in the _Layout.cshtml file being updated. The <title> and <footer> elements are both updated.

<title>@ViewData["Title"] - Contoso</title>

<footer>
    <p>&copy; 2017 - Contoso</p>
</footer>

Now that you’ve shown how to add a parameter which replaces some text content in the source project, let’s move to a more interesting example by adding optional content.

Add optional content

The existing template that you have created has a few pages, including a Contact page. Our next step is to make the Contact page an optional part of the template. The Contact page is integrated into the project in the following ways.

  • Method in Controllers/HomeController.cs
  • View in Views/Home/Contact.cshtml
  • Link in Views/Home/Shared/_Layout.cshtml

Before you start modifying the sources the first thing you should do is to create a new parameter, EnableContactPage, in the template.json file. In the following snippet you can see what needs to be added for this new parameter.

"EnableContactPage":{
    "type": "parameter",
    "dataType":"bool",
    "defaultValue": "false"
}

Here you used "dataType":"bool" to indicate that this parameter should support true/false values. Now you will use the value of this parameter to determine if content will be added to the project. First let’s see how you can exclude Contact.cshtml when EnableContactPage is set to false. To exclude a file from being processed during creation, you need to add a new element into the template.json file. The required content to add is.

"sources": [
    {
        "modifiers": [
            {
                "condition": "(!EnableContactPage)",
                "exclude": [ "Views/Home/Contact.cshtml" ]
            }
        ]
    }
]

Here you’ve added a modifier to the sources element which excludes the Views/Home/Contact.cshtml if EnableContactPage is false. The expression used in the condition here, (EnableContentPage), is very basic but, you can create more complex conditions using operators such as &&,||,!,<,>=,etc. For more info see https://aka.ms/dotnetnew-template-config. Now let’s see how you can modify the controller and the layout page to conditionally omit the Contact specific content.

Below is the modified version of HomeController.cs file that contains the condition for the Contact method.

The following code block contains the contents of HomeController.cs. This shows how you can make the Contact method conditional based on the value of EnableContactPage.

using System;
using System.Collections.Generic;
using System.Linq;
using System.Threading.Tasks;
using Microsoft.AspNetCore.Mvc;

namespace SayedHa.StarterWeb.Controllers
{
    public class HomeController : Controller
    {
        public IActionResult Index()
        {
            return View();
        }

        public IActionResult About()
        {
            ViewData["Message"] = "Your application description page.";

            return View();
        }

#if (EnableContactPage)
        public IActionResult Contact()
        {
            ViewData["Message"] = "Your contact page.";

            return View();
        }

#endif
        public IActionResult Error()
        {
            return View();
        }
    }
}

Here you use a C# #if preprocessor directive to define an optional section in the template. When editing template source files, the idea is that the files should be editable in a way that allows the files to still be "runnable". For example, in this case, instead of modifying the C# file by adding elements which are invalid, the #if/#endif directives are used for template regions. Because of this each file type has its own syntax for conditional regions. For more info on what syntax is used for each file type see https://aka.ms/dotnetnew-template-config.

When this template is processed, if EnableContactPage is true then the Contact controller will be present in the HomeController.cs file. Otherwise it will not be present. In addition to the Contact method in the Controller, there is a link in the _Layout.cshtml file which be omitted if the Contact page is not created. The code fragment shows the definition of the navbar from the _Layout.cshtml file.

    <div class="navbar-collapse collapse">
        <ul class="nav navbar-nav">
            <li><a asp-area="" asp-controller="Home" asp-action="Index">Home</a></li>
            <li><a asp-area="" asp-controller="Home" asp-action="About">About</a></li>
@*#if (EnableContactPage)
            <li><a asp-area="" asp-controller="Home" asp-action="Contact">Contact</a></li>
#endif*@
        </ul>
    </div>

Here the tag helper element creating the Contact link is surrounded with a condition to check the value of EnableContactPage. Similar to the controller, if EnableContactPage is false then this link (along with #if/#endif lines) will not be present in the generated _Layout.cshtml file. The full config file is available at template.confighttps://github.com/sayedihashimi/dotnet-new-samples/blob/master/03-optional-page/SayedHa.StarterWeb/.template.config/template.json. Let’s move on to the next example, giving the user a set of choices.

Add a choice from a list of options

In the project the background color is set in the site.css, and site.min.css, to skyblue. You now want to create a new parameter for the template and give the user a choice of different background colors to choose from. To do this you will create a new template parameter, and define the available choices in the template.json file. The parameter name that you are going to create is BackgroundColor. Here is the snippet to create this new parameter.

"BackgroundColor":{
  "type":"parameter",
  "datatype": "choice",
  "defaultValue":"aliceblue",
  "choices": [
    {
      "choice": "aliceblue",
      "description": "Alice Blue"
    },
    {
      "choice": "dimgray",
      "description":"dimgray"
    },
    {
      "choice":"skyblue",
      "description":"skyblue"
    }
  ],
  "replaces":"skyblue"
}

Here we define the name of the parameter, the available choices, the default value (aliceblue), and the string that it replaces ‘skyblue’.

How to create projects with the name matching the directory

Earlier we saw a property in the template.json file, preferNameDirectory, which we skipped over. This flag helps simplify creating projects where the name of the project matches the folder name. Most project templates should have this parameter set to true.

For example, earlier you created a project with the command dotnet new sayedweb -n Contoso.Web -o Contoso.Web. This created a new project named Contoso.Web in a folder with the same name. This can be simplified by adding "preferNameDirectory":"true" in the template.json file. When a project is created using a template that has this set to true the project name will match the directory name (assuming that the --name parameter is not passed in). With this approach, instead of calling dotnet new with both -n and -o it can be simplified to the commands shown in the following code block.

    $ mkdir Contoso.Web
    $ cd Contoso.Web
    $ dotnet new sayedweb

When the project is created the name of the folder, Contoso.Web will be used as the project name, and it will be generated into the current directory.

Closing

In this post, we have shown how you can get started with creating your own custom templates for dotnet new. We are still working on enabling the end user scenarios where templates are acquired and used. In this release, the --install switch is hidden because it’s currently in preview. The syntax of this command is likely to change. After installing templates, to reset your templates back to the default list you can run the command dotnet new --debug:reinit In the following section, you’ll find some links to existing resources. Please share your comments here and file issues as needed. You can also reach me on twitter @SayedIHashimi We’re very excited to see the awesome templates that the community creates. In addition to this blog, we may post dotnet new related posts to the .NET Web Developer Blog.

Resources


Azure making IoT compliance easy

$
0
0

I am excited to announce the release of a whitepaper which emphasizes Microsoft’s leadership in customer advocacy, privacy protection, and unique data residency commitments.  Moreover, the heart of this whitepaper is compliance in relationship to the Internet of Things (IoT); an exploding industry and ever-present technology in our society.

At Microsoft, developing secure software is part of our DNA, rooted in decades of experience in developing secure software. This new whitepaper brings that experience to bear on how to think of an IoT solution. Compliance and privacy officers can download this paper (Microsoft Azure and Data Compliance in the context of the Internet of Things (IoT)) for guidance on how to use the capabilities built into the Azure IoT platform to achieve their governance goals. The paper describes how Microsoft addresses key security, privacy, and compliance principles in Azure, breaks down Azure’s IoT features, and provides recommendations for how customers can achieve a high level of security and data compliance in their IoT environment.

Azure making IoT compliance easy

Microsoft’s IoT offering (a.k.a. Azure IoT Suite) is an enterprise-grade set of services that enable customers to build and deploy an IoT solution quickly.  Advanced topics include data residency, encryption, and auditing.

Producing high quality guidance like this is part of our drive to ensure we are providing the best cloud technology for customers, while ensuring that it’s easy to use by both technologists and business stakeholders alike. 

You can find this Azure whitepaper as well as other useful guidance on the Microsoft Trust Center.

Scalable Telemetry Based Multiclass Predictive Maintenance Model

$
0
0

I recently presented Building a Scalable Telemetry Based Multiclass Predictive Maintenance Model in R at the ICDSE conference. This conference was inter-disciplinary where the attendees were primarily from academia and shared their scholarly research and innovation. Due to the nature of the conference, the focus was on the methodology used to solve their domain-specific problem rather than the tooling needed to solve a large-scale problem.     

My talk at the conference was focused on outlining how a user or an organization would build a Scalable Telemetry based Predictive Maintenance Model. To set the context, I described how we routinely come across IoT devices with sensors embedded all around us, which collect a lot of telemetry data over time. Then the natural next question was on how this data can be used to address business questions like, "When is my device going to fail?" Some tips on how the raw sensor data can be enhanced with additional machine related data and how to formulate and build a reasonable ML model were briefly discussed during the talk.

Finally, typical scenarios for an on-premise and cloud based solution was outlined with focus on SQL Server R Services and Azure Machine Learning Studio, as well as jupyter notebooks as example tools to develop and operationalize these models. To accompany my oral presentation, I wrote a short paper which describes the methodology in more detail. The audience was intrigued with the solution and hoped to use such a similar technique for the healthcare domain.  

Upcoming changes to the Microsoft Access Control Service

$
0
0

What is the Access Control Service?

The Microsoft Azure Access Control Service (or ACS) is a cloud-based service that provides a way of authenticating and authorizing users to gain access to web applications and services.

Changes to How Access Control Service Namespaces are Created

New ACS namespace creation will be restricted starting June 30th, 2017. If you need to create an ACS namespace beyond this date, you will need to call Azure customer support.

Azure Active Directory (Azure AD) and Azure AD B2C

ACS functionality is fully supported for existing namespaces. However, the future of ACS is Azure Active Directory. We are committed to improving and updating Azure Active Directory to natively support many of the scenarios enabled by ACS. We encourage you to explore the offerings that Azure AD B2C can provide today.

Contact Us

If you have questions or feedback about these changes or ACS in general, please do not hesitate to contact us at acsfeedback@microsoft.com.

Price reductions on L Series and announcing next generation Hyper-threaded virtual machines

$
0
0

For Microsoft Azure, we have a long standing promise of making our prices comparable with AWS on commodity services such as compute, storage, and bandwidth. In keeping with this commitment, we are happy to announce price reductions of up to 69% on our storage-optimized virtual machines, L Series. We are also excited to share more about our next generation of Hyper-Threaded virtual machines for general purpose and memory optimized workloads that are up to 28% lower in prices than the current generation.

Price reductions on L Series

We are reducing prices by 60% to 69% on our newly-launched L Series virtual machines, effective April 1st to match recent price changes from AWS. These VMs are storage optimized sizes, best suited for low latency workloads such as NoSQL databases including Cassandra and MongoDB. L Series offers virtual machines from 4 to 32 vCPUs, based on Intel® Xeon® processor E5 v3 family with 32 to 256 GiB memory, and from 678 GB to 5.6TB of SSD disk. 

New Hyper-Threaded VMs and Dv2 limited time promotion

In the next few months, Microsoft will be introducing a new generation of Hyper-Threading Technology virtual machines for general purpose workloads, Dv3, and a new family for memory optimized workloads, Ev3. This shift from physical cores to virtual cores is a key architectural change in our VMs that enables us to unlock the full potential of the latest processors. This new generation will introduce sizes with 64 vCPUs on Intel® Broadwell E5-2673 v4 2.3 processor and with 432 GiB of memory on the largest Ev3 sizes. By unlocking more power from the underlying hardware, we are able to harness better performance and efficiency, resulting in cost savings that we are passing on to our customers.

As our new Hyper-Threaded VMs become generally available in the coming months, we would like to give our customers the opportunity to take advantage of these savings early. These new Hyper-Threaded VMs will be priced up to 28% lower than Dv2 Series VMs, matching the comparable AWS instance prices. Starting today, you can provision a Dv2 Promo VM on our current generation hardware at the lower Dv3 and Ev3 VM prices, allowing you to take advantage of these cost savings now.

This promotion will be available until the launch of the Dv3 and Ev3 VMs later this year. We encourage you to deploy the Dv2 Promo VMs using Azure Resource Manager to simplify migration to the new VMs in the future.

Microsoft’s open approach to networking

$
0
0

At Microsoft, we’re focused on enabling our customers by supporting all the technologies they depend on, and collaborating across organizational and industrial boundaries to bring the best possible experience to the cloud. Microsoft embraces open source and partner ecosystems to scale our own development efforts and accelerate innovation. Products that include Visual Studio Code, .NET, and ASP.NET are being publicly developed on GitHub with contributions from both Microsoft and non-Microsoft developers. These products are targeting Windows, Mac, and Linux. Microsoft is a contributing member of open source communities, including the Apache Software Foundation, Linux Foundation, R Consortium, and Node.js Foundation.

For the Azure cloud platform, we serve customers on a vast worldwide scale, and they bring a wide range of technology needs with them. We must provide solutions with the unique flexibility to operate seamlessly across on-premises, hybrid, and cloud infrastructure, in an operating system–agnostic environment. Today, Linux virtual machines (VMs) comprise over 33 percent of all VMs running in Azure. Many partners in the Azure Marketplace run their workloads in Linux. Our HDInsight MapReduce service is built on Apache Hadoop and supports Spark, Hive, Apache Kafka, and Apache Storm. Meanwhile, the Azure Container Service (ACS) adopts open source container technologies like Docker, Apache Mesos, and Kubernetes to run both Linux and Windows containers. By doing this, ACS provides container orchestration that’s completely portable, while also being optimized for Azure.

In this blog, I will talk about how Azure network services is extending this commitment to open technologies in containers, switching, and partner ecosystems.

Open source software in Azure Network Services

Azure network services actively look for opportunities to contribute to existing open source projects, as well as open source Azure Networking services. Considering the importance of networking to fully realize the potential of containers, we just announced Microsoft Azure VNet for Containers.

Azure VNet for Containers

Azure VNet for Containers provides the best networking experience for containers that are running in Azure. It‘s an open source project in GitHub that links together open source container orchestrator engines and the Azure network services platform. The code, written in the Go programming language, works for both Linux and Windows. We’re eager to collaborate with developers across the world to improve and advance its capabilities.

Azure VNet for Containers connects the container to your Azure Virtual Network (VNet), thereby making available the rich Azure SDN stack to containers enabling direct connectivity between containers, VMs and other resources in the VNet. Azure networking features such as Network Security Groups, route tables, load balancing, on-premises connectivity etc. are now available to containers. The solution can be plugged into the Azure Container Service for a single click use or deployed manually in individual virtual machines.

The Azure VNet for Containers is composed of a network plug-in that provides the network interface for the containers and an IPAM (IP address management) plug-in that manages the IP addresses from the VNet. There are currently two popular plug-in models for containers: the Container Network Interface (CNI) model, adopted by Kubernetes, Apache Mesos, and others, and the Container Network Model (CNM) model, used by Docker and others. The Azure container network plug-in is implemented for both models. This is also designed to be integrated directly into the open source acs-engine.

ACS

Figure 1. Azure network services support for containers

With the availability of this plug-in, the power and features of Azure network services are natively available to all the major container platforms in an open and portable fashion.
SONiC

Software for Open Networking in the Cloud (SONiC) and Switch Abstraction Interface (SAI) are two contributions that we made to the Open Compute Project (OCP) that focuses on open source datacenter technologies. Like Azure VNet for Containers, SONiC also uses containerization for fast evolution.

SONiC source code, test cases, test bed setup, and builds are fully available on GitHub. SONiC consists of core services developed by Microsoft and the community. It builds on existing open source technologies such as Docker for containers, Redis for key-value database, protocols like Quagga BGP and LLDPD, and Ansible for deployment. We used the best work in the industry to build SONiC. It evolves quickly because we’re building it with existing open source projects. We contributed SONiC back to the community to propel the advance of open networking software in a wonderful, virtuous cycle.

Linux

Figure 2. SONiC is open sourced and is built on open source technologies

SAI provides a simple, consistent, and salable interface across different ASIC chips. With the support from major silicon vendors, the SAI community grew to 77 contributors from 9 companies. Community members actively engage in weekly discussions and workshops. In two years, we had seven releases. Six switch networking stacks(network operating systems), including SONiC, OS10, OPX, FlexSwitch and others, are built on top of SAI, which is starting to become the ASIC API standard.

Learn more by viewing our OCP Summit 2017 talks about SONiC and SAI. You also can learn more about our SAI and SONiC innovations in an earlier blog in this series, SONiC: The networking switch software that powers the Microsoft Global Cloud.

Rich partner ecosystem

Network virtual appliances (NVAs) in Azure support network functionality and services in the form of VMs. NVAs include web application firewall (WAF), firewalls, gateways/routers, application delivery controllers, IDS/IPS, WAN optimizers, SD-WAN solutions, and other network functions. Customers can deploy these NVAs through the Azure Marketplace into their VNets and deployments. Examples of open sourced NVAs include NGINX and pfSense. Over 90 percent of NVAs are based on Linux or FreeBSD.

We also use open source technologies in our own NVAs. We just announced the general availability of Azure Application Gateway WAF to protect applications from the most common web vulnerabilities, as identified by Open Web Application Security Project (OWASP) Top 10 vulnerabilities. Application Gateway WAF uses the OWASP ModSecurity Core Rule Set. These rules, managed and maintained by the open source community, conform to rigorous standards.

Optics

Typically, you don’t think of optical technologies in the context of openness. However, we’ve also innovated at the optical network layer. Microsoft has incorporated new optical technologies into the Azure network. Findings from ACG Research show that the Microsoft metro network solution will result in over 65 percent reduction in total cost of ownership and power savings of over 70 percent over five years. We’ve worked with several of our partners to make available to everyone the building blocks of the Microsoft implementation of open optical systems. Microsoft is working with our partners to bring even more integration, miniaturization, and power savings into future 400 Gbps interconnects that will power our network and benefit the entire industry.

Academic publications

Many of the underlying technical innovations in Azure Networking have their roots in Microsoft Research. We published in top peer reviewed academic forums the internal designs and algorithms of the Azure Networking SDN stack (SIGCOMM 2015), programmable virtual switching (NSDI 2017) , software load balancing (SIGCOMM 2013), network virtualization (SIGCOMM 2009), and innovative diagnostics and monitoring mechanisms. Our Azure networking services team has a deep passion for tackling the hardest networking scale problems in the world. We will continue to share our innovations in academic papers to receive critical feedback about our ideas, as well as to help the network community further advance, which in turn pushes us to be better.

Summary

Over the past few years, Microsoft has embraced, and is fully committed to, open source. Our motivation is simple. We want the best technologies in the world to be available and performant in Azure. We cherish opportunities to contribute to the open source community and to incorporate the communities’ advancements into our services. Considering the scale of the issues that we face daily running one of the world’s largest networks, we are very passionate about advancing state-of-the-art networking. By sharing code via open source projects and ideas via academic forums, we accelerate innovation. We’re a different Microsoft from years past. The cloud and open source are changing the world. This is an exciting time for all of us in networking as we all strive to help customers adapt and take full advantage of the cloud.

Read more

To read more posts from this series please visit:

Continuous Delivery Tools Adds GitHub Support and My Build Notifications

$
0
0

The Continuous Delivery Tools for Visual Studio shipped last month as a Microsoft DevLabs extension to experiment with some of the latest ideas for setting up and working with a DevOps pipeline. As with any experiment the goal is to learn and test our hypotheses. The enthusiasm and feedback has validated just how much opportunity there is to help developers continuously deliver value to their users. We’ve shipped several incremental updates that fix bugs and other minor usability improvements. Our latest update has several new improvements:

  • Support configuring a continuous delivery pipeline for a repository hosted on GitHub
  • Improvements that make it simpler to getting started
  • Notifications for all Builds you trigger manually, through a CI event or with a PR

Let’s walkthrough some of these improvements.

Configuring Continuous Delivery for a repository hosted on GitHub

After we released the extension one of the first items users asked about was how do I use this extension to setup a continuous delivery pipeline if my code doesn’t live in a Git repository on Visual Studio Team Services? GitHub and TFVC were the two most popular requests. This update adds support for Git repositories on GitHub and we’re looking at adding support for TFVC in the future.

If you have the GitHub extension for Visual Studio installed, the ‘Add to Source Control’ button in the status bar will setup a repo and push your code up to GitHub in a couple clicks.

github-extension

Then, right click on your ASP.NET project in Solution Explorer and select “Configure Continuous Delivery…”. The wizard has a new field to enter your GitHub Personal Access Token (PAT) so Team Services can listen for commits and trigger a build & release whenever code is pushed into the GitHub repository.

continuous-delivery

Another observation from the first release was some users were not able to successfully setup a Continuous Delivery pipeline. When we dug in to the data, we found many users were failing because they were missing one of the prerequisites needed to get everything setup on VSTS. Some common case were users running the wizard on projects that were not under version control or users who did not have an Azure Subscription. We’ve made some improvements to help users with those prerequisites and over time we’ll integrate them directly into the experience so it’s all one step.

Notifications for builds you trigger manually, through a CI or with a PR

We heard lots of feedback around what DevOps activities should produce a notification in the IDE as well as when and where they should appear. Some users wanted to track all CI results. Some users wanted only failures. Some wanted failure results for specific projects. It was clear throughout the feedback that configuration would be critical to meet the broad set of requirements. Notifications for events “I” triggered was as theme that resonated with most users we interviewed.

notifications

In this update, we’ve pivoted our notification experience to generate failed, fixed, or success notifications for all builds you triggered in Team Project for your active repository. Now you’ll see a notification the first time you Configure a Continuous Delivery pipeline using the extension and then every time you trigger a build which can happen automatically with a code push or pull request, or manually from Team Services. We’ve also started investigating how we can offer a more complete configuration experience on Team Services that will expand the set of notifications you can receive in the IDE.

It’s all about feedback

First, a thank you to everyone who has reached out and shared feedback and ideas so far. We’re always looking for feedback on where to take this Microsoft DevLabs extension next. There’s a Slack channel and a team alias vsdevops@microsoft.com where you can reach out to the team and others in the community sharing ideas on this topic.

Anthony Cangialosi-2 Anthony Cangialosi, Principal PM Manager, Visual Studio Platform IDE
@ACangialosi

Anthony has focused his career at Microsoft on building developer technologies. He is the program manager for Visual Studio’s Connected experiences and IDE. Anthony joined the Visual Studio team in 2001 and has contributed experiences across the IDE including VS’s identity infrastructure the Shell, the VS SDK, Ecosystem, VSIP, and mobile device development

New value in Office 365 Enterprise K1 for frontline workers

$
0
0

Today, we are announcing updates to the Office 365 Enterprise K1 plan—designed to enable your frontline workers to do their best work with tools for schedule and task management, communications and community, training and onboarding, and identity and access management.

Frontline workers are the heartbeat of many of the world’s largest industries, such as manufacturing, retail, healthcare and hospitality. They’re the people behind the counter, on the phone with customers, operating the production line, building products, and running the day-to-day operations. They are often the face of an organization to its customers. And as more companies invest in digital transformation, there’s a growing recognition of the importance of empowering frontline workers with modern productivity tools.

That’s why we have expanded the Office 365 Enterprise K1 plan to include the following additional products:

  • Microsoft StaffHub—Helps frontline workers manage their workday with schedule management, information sharing and the ability to connect to other work-related apps and resources. StaffHub was added to the K1 plan earlier this year.
  • OneDrive for Business with 2 GB of cloud storage—Provides employees a secure environment to store, manage and access files from virtually anywhere and on any device.
  • Skype for Business presence and instant messaging—Enables employees to communicate in real-time, along with the ability to participate in Skype Meeting Broadcast sessions.
  • Microsoft Teams—A hub for teamwork that connects employees to the people, tools and content they need to do their best work.
  • Office 365 Video—Provides employees with a secure, company-wide destination for posting, sharing and discovering video content.
  • Microsoft PowerApps and Microsoft Flow—Eases the automation of repetitive tasks and workflows.

These additional products build upon the core value already offered with the Office 365 Enterprise K1 plan and unlock important scenarios for frontline workers, including the ability to view and swap shifts, take advantage of video-based employee training and onboarding, exchange best practices across the company and even participate in live, company-wide town hall meetings. The Office 365 Enterprise K1 plan gives companies the tools they expect to manage employee access and the digital identity to meet today’s complex and constantly changing security and compliance requirements.

Broadcast company town halls to engage employees remotely.

Finally, we are excited by the response of our customers, like AccorHotels, who’ve already started to change the way they work with Office 365 and Microsoft StaffHub.

These new capabilities will begin rolling out to customers in the next several weeks. Please visit the Office 365 Enterprise K1 plan page to learn more, and check out the Microsoft Mechanics video below.

The post New value in Office 365 Enterprise K1 for frontline workers appeared first on Office Blogs.


Assigning multiple users to a task is now possible in Microsoft Planner

$
0
0

As of today, Microsoft Planner users can assign multiple people to a task—a feature that tops the list at planner.uservoice.com. Now, users can assign more than just one user to a task in Planner, and every user that is assigned the task will see it on their My Tasks page.

Our goal is to support additional collaboration, and we will continue to develop features and enhancements that our users want. Feel free to join the conversation about this feature and many others at our TechCommunity page. Also, please share your feedback with us about Planner features you would like to see at planner.uservoice.com.

—The Planner team

The post Assigning multiple users to a task is now possible in Microsoft Planner appeared first on Office Blogs.

Updated Maps Platform for Windows 10 Creators Update

$
0
0

We have updated the Maps platform for the Windows 10 Creators Update to give our maps a cleaner, more beautiful and realistic look so that it’s consistent between web and UWP apps. We are also making Road view look more authentic by adding layers of terrain, where previously the Road view appeared flat. In addition to a new 3D engine, we have delivered added features that our users requested for certain areas of visual improvements, like styling, offline capabilities, routing and others

Our updated data pipeline paves the way for improvements to our global map data. This also allows us to react more quickly to user feedback (e.g. when you report that a place is missing).  As with any journey, we expect to discover a few bumps along the way.

Please check out the latest in the Windows Maps app and keep your feedback coming!

Read the full post on the Windows Developer blog.

Announcing UWP Community Toolkit 1.4

$
0
0

The UWP Community Toolkit is on its fourth release today. The previous version was packed with new controls, so we decided to focus on stabilizations and improvements on existing controls and services in version 1.4.

Among the improvements: better accessibility for all controls according to our contribution rules. Now every control can be used with keyboard, mouse and touch inputs. We also ensured that the controls provide enough information for Narrator to make them compatible with screen readers.

We also introduced a new project (and a new NuGet package) called Microsoft.Toolkit.Uwp.DeveloperTools. The goal of this project is to provide support tools for developers. For this first version of the project we started with two controls:

  • FocusTracker: Can be used in your application to display information about the current focused control (name, type, etc.). This is extremely useful when you want to ensure that your application is accessible.
  • AlignmentGrid: Can be used to display a grid, helping you align controls on your pages.

Developer tools are not meant to be deployed with your app, but rather used during development to help improve the overall quality of your app.

Along with the above improvements and stabilizations, we also added new features to this release. Here are a few of the main additions:

  1. Carousel: A new control that presents items in a list, where the selected item is always in the center and other items are flowing ­around it. This reacts not only to the content but also to layout changes, so it can adapt to different form factors automatically. The carousel can be horizontal or vertical.
  2. ViewExtensions: ApplicationViewExtensions, StatusBarExtensions & TitleBarExtensions provide a declarative way of setting AppView, StatusBar & TitleBar properties from XAML.
  3. NetworkHelper: Provides functionality to monitor changes in network connection, and allows users to query for network information without additional lookups.
  4. Saturation: Provides a behavior to selectively saturate a XAML element. We also introduced the CompositionBehaviorBase to ease creation of new composition-based behaviors (Blur now uses this).
  5. Twitter streaming API support: Twitter Service was missing support for Twitter’s streaming service; we added support for live tweets and events.
  6. Search box for Sample App: The new Sample App allows you to search for a sample directly from the main menu.

This is only a partial list of the changes in UWP Community Toolkit 1.4. For a complete overview of what’s new in version 1.4, please read our release note on GitHub.

You can get started by following this tutorial, or preview the latest features by installing the UWP Community Toolkit Sample App from the Windows Store.

As a reminder, the toolkit can be used in any app (across PC, Xbox One, mobile, HoloLens and Surface Hub devices) targeting Windows 10 November Update (10.0.10586) or above. The few features that rely on newer OS updates are clearly marked in the documentation and in the Sample App.

If you would like to contribute, please join us on GitHub!

The post Announcing UWP Community Toolkit 1.4 appeared first on Building Apps for Windows.

Spring Into DevOps

$
0
0

Stack Overflow just released their annual community survey and it reminded us that a happy developer is a developer who can ship. Of course, nowadays shipping means having a great pipeline for continuous integration and continuous deployment. That allows you to continuously improve. For a long time now we’ve been working hard to make the DevOps experiences in VSTS best of breed. More recently we’ve also been trying to continuously improve content to help you learn about them.

Every week I talk to customers about their DevOps journeys. Most customers have mastered Agile and Version Control and appreciate the simpler experiences we’re bringing to them. Build Automation and Continuous Integration are much more common than they were. Most teams are starting to invest in some form of monitoring and telemetry so they can see what is really happening in production.
For many teams, continuous deployment is that next step in their process maturity to help them get better at DevOps. Therefore, we thought we’d have a push to de-mystify CI/CD during April to help people “Spring Into DevOps” (or maybe that should be “Fall into DevOps” if you are in the Southern Hemisphere?). We will focus on talking about how to go from continuous integration to continuous deployment. There’ll be several blog posts coming here over the month on this theme, but there are also many special events during the month to help you Spring Into DevOps. If you are hosting your own event in your local community, then please get in touch and tweet about it using the #SpringIntoDevOps hashtag.

What is DevOps?

If you’re new to DevOps, or want to explain it to your friends and colleagues, take a look at https://www.visualstudio.com/learn/what-is-devops/. We’ve posted informational content here to help you get started on building a DevOps mindset in your organization.

The DevOps Loop

Getting Started

Maybe you have decided that DevOps is the way to go and you want to take that next step with Continuous Integration and Continuous Delivery, here are some links to help you get started with applications in .NET, Java, Node, iOS, Android and more:

  • Build and Release – Implement continuous integration and continuous deployment to reliably deliver quality apps to your customers.
  • Test – Test continuously while you code, build, and deploy before releasing to production.
  • Package – Publish, discover, and install shared binary code from Team Build.
  • Deploy to Azure – Release apps to Azure services and Azure virtual machines.
  • HockeyApp – Distribute test releases for your mobile apps. Monitor usage and crashes.
  • Application Insights – Monitor performance and usage for your live web apps.

Live Events

There will be meetups and conferences this month and we would love to see you. If you are hosting your own live event, please let us know by tweeting about it using the #SpringIntoDevOps tag. We’d love to see you live, but check back for links to the recordings if you are not able to make them in person. We’ve posted these resources and registration links on http://aka.ms/SpringIntoDevOps.

Global Azure Bootcamp

Don’t forget that April 22 is also the Global Azure Bootcamp. There will be meet-ups happening in user groups all around the world with lots of DevOps content there to get your teeth into. You can find your nearest Global Azure Bootcamp here or learn how to set up your own.

Webcasts

If you can’t make the face-to-face events, then we have a few webcasts you might want to catch. We’d love to see you live, but check back for links to the recordings if you are not able to make them in person. Visit the Spring Into DevOps site for registration links.

Podcasts

If you prefer to listen, you’ll be hearing lots of #SpringIntoDevOps content on your favorite podcasts including .NET Rocks, RunAs Radio and RadioTFS. We’ll post links to individual shows here as they are published – but if you subscribe now to the shows you’ll get the episodes as they come out along with other great content.

Build

While we’ll be talking a lot during April about #SpringIntoDevOps the fun doesn’t stop in April. We’ve loads of great features coming out soon to make it even easier for your team to Spring Into DevOps. While the Build conference is now sold out, plan on watching the videos that come out of Build for the first look and some great new DevOps experiences coming soon – we’re really looking forward to seeing what you think.

Now is the Time to Spring Into DevOps

It has never been a better time to take that next step in your DevOps maturity and make it easy to get your software into production.  Concentrate on solving your customers’ problems, not the mechanics of getting the software into their hands. You might have already got your build automated and have some basic unit tests, but how do you get that software into a test environment for stakeholder feedback? How about pushing that software into your production environment? Please take the time this April to Spring Into DevOps and think about what you and your team could do to make it easier to build and deploy your code. Let us know what we can do to help and please share your success stories using the #SpringIntoDevOps hashtag.

Writing and debugging Linux C++ applications from Visual Studio using the “Windows Subsystem for Linux”

$
0
0

I've blogged about the "Windows Subsystem for Linux" (also known as "Bash on Ubuntu on Windows") many times before. Response to this Windows feature has been a little funny because folks try to:

  • Minimize it - "Oh, it's just Cygwin." (It's actually not, it's the actual Ubuntu elf binaries running on a layer that abstracts the Linux kernel.)
  • Design it - "So it's a docker container? A VM?" (Again, it's a whole subsystem. It does WAY more than you'd think, and it's FASTer than a VM.)

Here's a simple explanation from Andrew Pardoe:

1. The developer/user uses a bash shell.
2. The bash shell runs on an install of Ubuntu
3. The Ubuntu install runs on a Windows subsystem. This subsystem is designed to support Linux.

It's pretty cool. WSL has, frankly, kept me running Windows because I can run cmd, powershell, OR bash (or zsh or Fish). You can run vim, emacs, tmux, and run Javascript/node.js, Ruby, Python, C/C++, C# & F#, Rust, Go, and more. You can also now run sshd, MySQL, Apache, lighttpd as long as you know that when you close your last console the background services will shut down. Bash on Windows is for developers, not background server apps. And of course, you apt-get your way to glory.

Bash on Windows runs Ubuntu user-mode binaries provided by Canonical. This means the command-line utilities are the same as those that run within a native Ubuntu environment.

I wanted to write a Linux Console app in C++ using Visual Studio in Windows. Why? Why not? I like VS.

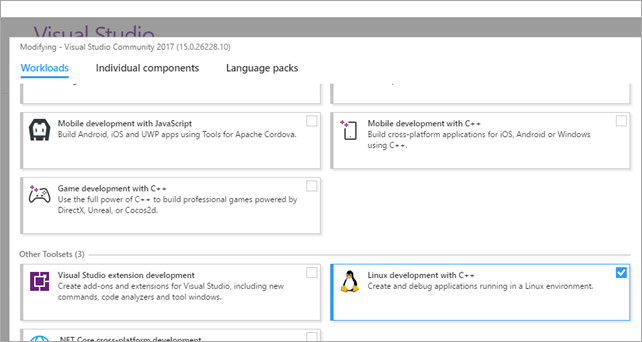
Setting up Visual Studio 2017 to compile and debug C++ apps on Linux

Then, from the bash shell make sure you have build-essential, gdb's server, and openssh's server:

$ sudo apt update

$ sudo apt install -y build-essential
$ sudo apt install -y gdbserver
$ sudo apt install -y openssh-server

Then open up /etc/ssh/sshd_config with vi (or nano) like

sudo nano /etc/ssh/sshd_config

and for simplicity's sake, set PasswordAuthentication to yes. Remember that it's not as big a security issue as you'd think as the SSHD daemon closes when your last console does, and because WSL's subsystem has to play well with Windows, it's privy to the Windows Firewall and all its existing rules, plus we're talking localhost also.

Now generate SSH keys and manually start the service:

$ sudo ssh-keygen -A

$ sudo service ssh start

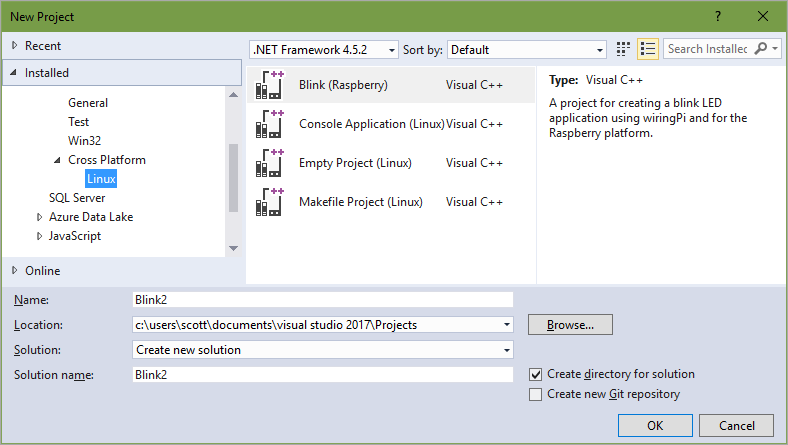
Create a Linux app in Visual Studio (or open a Makefile app):

File | New Project | Cross Platform | Linux

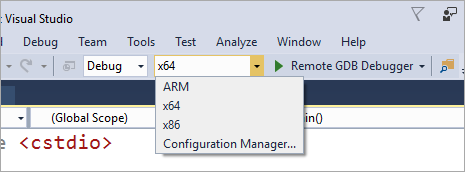
Make sure you know your target (x64, x86, ARM):

Remote GDB Debugger options

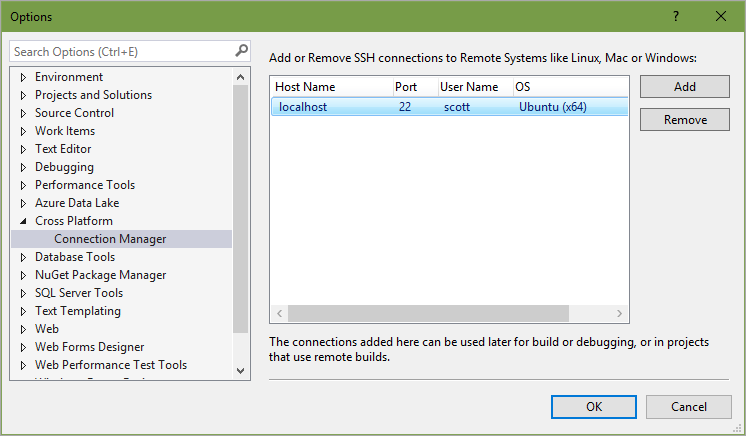
In Visual Studio's Cross Platform Connection Manager you can control your SSH connections (and set up ones with private keys, if you like.)

Tools | Options | Cross Platfrom | Connection Manager


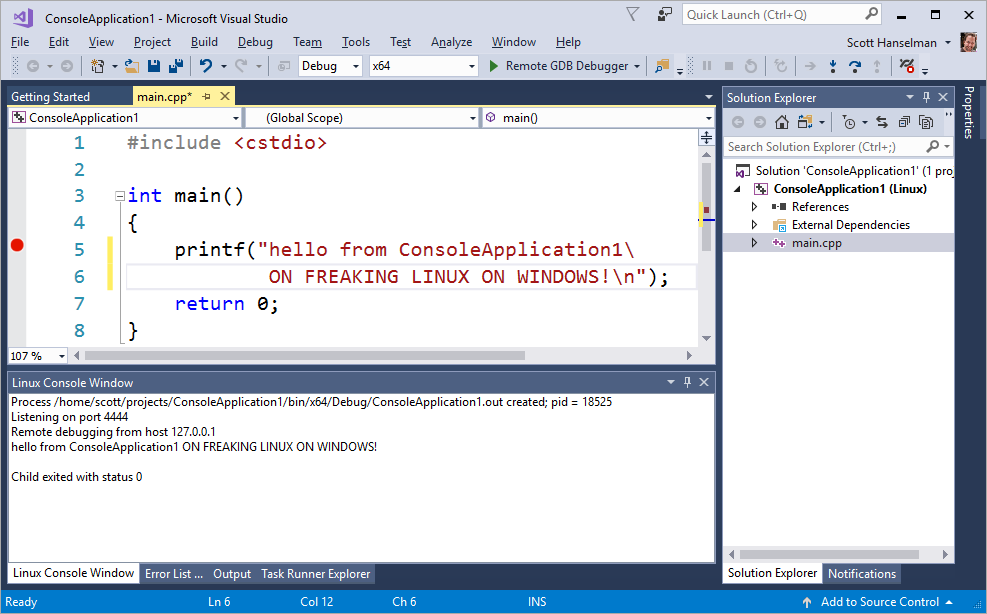
Boom. I'm writing C++ for LInux in Visual Studio on Windows...running, compiling and debugging on the local Linux Subsystem

I'm writing C++ in Visual Studio on Windows talking to the local Linux Subsystem

BTW, for those of you, like me, who love your Raspberry Pi tiny Linux computers...this is a great way to write C++ for those little devices as well. There's even a Blink example in File | New Project to start.

Also, for those of you who are very advanced, stop using Mingw-w64 and do cool stuff like compiling gcc 6.3 from source under WSL and having VS use that! I didn't realize that Visual Studio's C++ support lets you choose between a number of C++ compilers including both GCC and Clang.


Sponsor: Thanks to Redgate! Track every change to your database! See who made changes, what they did, & why, with SQL Source Control. Get a full version history in your source control system. See how.


© 2017 Scott Hanselman. All rights reserved.
     

Monetizing your app: Use Interactive Advertising Bureau ad sizes

$
0
0

Are you looking for ways to better monetize your app using ads? App developers can boost their ad revenue using simple optimizations while building and managing their app. In a series of blogs, including this one, we will offer tips that will help you better monetize your app.

Tip #1: Use Interactive Advertising Bureau (IAB) sizes for your ad.

As an app developer, you can choose the size of your ad based on the look and feel of the app itself. You should have an ad experience that blends well with your app – ads that do not fit in with the rest of the app experience perform poorly and yield low revenue for the developer. Also, you can choose to have multiple ads on a single page. This, however, has proven to result in lower engagement from the user and, hence, lower yield.

We recommend designing your ad using one of the IAB sizes. Most advertisers prefer to advertise in those sizes and more options are available to be shown on your app, which will increase the yield of your app. The most common IAB sizes are:

Mobile:

300 x 50

320 x 50

PC:

728 x 90

300 x 250

160 x 1600

300 x 600

These sizes are also documented in our MSDN Article.

Stay tuned for additional tips to increase ad monetization over the next few weeks.

The post Monetizing your app: Use Interactive Advertising Bureau ad sizes appeared first on Building Apps for Windows.

The Most Popular Languages for Data Scientists/Engineers

$
0
0

The results of the 2017 StackOverflow Survey of nearly 65,000 developers were published recently, and includes lots of interesting insights about their work, lives and preferences. The results include a cross-tabulation of the most popular languages amongst the "Data Scientist/Engineer" subset, and the results were ... well, surprising:

Most popular language

When thinking about data scientists, it certainly makes sense to see SQL, Python and R in this list. (I've only included the top 10 above.) But it's a real surprise to see JavaScript at the top of the list, and the presence of PHP is just unfathomable to me. I think it goes to show that the "Data Engineer" role is a very different type of job than "Data Scientist". Sadly, it's not clear what the relative proportion of Data Scientists to Data Engineers is in the survey, as it's not broken out elsewhere.

Nonetheless, there were several other interesting tidbits in the survey relevant to data scientists:

  • Overall, Python is the fifth most popular language, used by 32% of respondents. R ranks #15, used by 4.4% of respondents.
  • The top three databases are MySQL (44.3%), SQL Server (30.8%) and SQLite (21.2%).
  • The most popular platforms are Windows (41%), Linux (33%) and Android (28%).
  • AWS is used by 28% of respondents; Microsoft Azure by 11.4%.
  • Python is the "Most Wanted" language (indicated by 21% of respondents as a language they'd like to be using).
  • Oracle is the "Most Dreaded" database (63% of users would rather be using a different database).
  • Visual Studio is the most popular development environment within all developer categories except "Sysadmin/DevOps" (in which case it's vim).
  • In the US, R developers earn $100,000pa on average. For Python, it's $99,000. "Machine Learning specialist", "Developer with a statistics or mathematics background" and "data scientist" were the three highest-paying job categories in the US, all topping $100,000.
  • Developers consider Elliot Alderson from Mr Robot to be the most realistic portrayal of a programmer in fiction.

Fiction

You can find a complete analysis of the survey data, follow the link below.

StackOverflow: Developer Survey Results 2017


Announcing general availability of Azure HDInsight 3.6

$
0
0

This week at DataWorks Summit, we are pleased to announce general availability of Azure HDInsight 3.6 backed by our enterprise grade SLA. HDInsight 3.6 brings updates to various open source components in Apache Hadoop & Spark eco-system to the cloud, allowing customers to deploy them easily and run them reliably on an enterprise grade platform.

What’s new in Azure HDInsight 3.6

Azure HDInsight 3.6 is a major update to the core Apache Hadoop & Spark platform as well as with various open source components. HDInsight 3.6 has the latest Hortonworks Data Platform (HDP) 2.6 platform, a collaborative effort between Microsoft and Hortonworks to bring HDP to market cloud-first. You can read more about this effort here.

HDInsight 3.6 GA also builds upon the public preview of 3.6 which included Apache Spark 2.1. We would like to thank you for trying the preview and providing us feedback, which has helped us improve the product.

Apache Spark 2.1 is now generally available, backed by our existing SLA. We are introducing capabilities to support real-time streaming solutions with Spark integration to Azure Event Hubs and leveraging the structured streaming connector in Kafka for HDInsight. This will allow customers to use Spark to analyze millions of real-time events ingested into these Azure services, thus enabling IoT and other real-time scenarios. HDInsight 3.6 will only have the latest version of Apache Spark such as 2.1 and above. There is no support for older versions such as 2.0.2 or below. Learn more on how to get started with Spark on HDInsight.

Apache Hive 2.1 enables ~2X faster ETL with robust SQL standard ACID merge support and many more improvements. This release also includes an updated preview of Interactive Hive using LLAP (Long Lived and Process) which enables 25x faster queries.  With the support of the new version of Hive, customers can expect sub-second performance, thus enabling enterprise data warehouse scenarios without the need for data movement. Learn more on how to get started with Interactive Hive on HDInsight.

This release also includes new Hive views (Hive view 2.0) which provides an easy to use graphical user interface for developers to get started with Hadoop. Developers can use this to easily upload data to HDInsight, define tables, write queries and get insights from data faster using Hive views 2.0. Following screenshot shows new Hive views 2.0 interface.

hiveview

We are expanding our interactive data analysis by including Apache Zeppelin notebook apart from Jupyter. Zeppelin notebook is pre-installed when you use HDInsight 3.6, and you can easily launch it from the portal. Following screenshot shows Zeppelin notebook interface.

ApacheZeppelin

Getting started with Azure HDInsight 3.6

It is very simple to get started with Apache HDInsight 3.6 – simply go to the Microsoft Azure portal and create an Azure HDInsight service.

HDInsight in Azure portal 

Once you’ve selected HDInsight, you can pick the specific version and workload based on your desired scenario. Azure HDInsight supports a wide range of scenarios and workloads such as Hive, Spark, Interactive Hive (Preview), HBase, Kafka (Preview), Storm, and R Server as options you can select from. Learn more on creating clusters in HDInsight.

HDInsightClusterOption

Once you’ve complete the wizard, the appropriate cluster will be created. Apart from the Azure portal, you can also automate creation of the HDInsight service using the Command Line Interface (CLI). Learn more on how to create cluster using CLI.

We hope that you like the enhancements included within this release. Following are some resources to learn more about this HDI 3.6 release:

Learn more and get help

Summary

This week at DataWorks Summit, we are pleased to announce general availability of Azure HDInsight 3.6 backed by our enterprise grade SLA. HDInsight 3.6 brings updates to various open source components in Apache Hadoop & Spark eco-system to the cloud, allowing customers to deploy them easily and run them reliably on an enterprise grade platform.

High-DPI Scaling Improvements for Desktop Applications in the Windows 10 Creators Update

$
0
0

In the previous blog post about High-dots-per-inch (DPI) scaling improvements, we talk about how desktop applications can be blurry or sized incorrectly when run on high-DPI displays. This is especially noticeable when docking and undocking or when using remoting technologies such as Remote Desktop Protocol (RDP).

In the Windows 10 Anniversary Update we chipped away at this problem by introducing mixed-mode DPI scaling and other high-DPI-related APIs. These APIs made it less expensive for developers to update desktop applications to handle dynamic DPI situations (situations where desktop applications are expected to detect and respond to DPI changes at runtime). We’re still working on improving the high-DPI story for you and in this article we’ll go over some of the improvements coming in the Windows 10 Creators Update. Before we dive into that, here’s a quick recap of the issue:

The image above illustrates the types of issues you’ll see in Windows 10 when using multiple displays with different DPI values. In this case a low-DPI primary (“main”) display docked to a high-DPI external display. In this picture you can see:

  1. Some applications (Word) render blurry on the high-DPI display
  2. Some applications (PowerPoint and Skype for Business) are crisp but render at the wrong size
  3. Desktop icons are sized incorrectly on the high-DPI display
  4. Tooltips are sized incorrectly
  5. The desktop watermark is sized incorrectly

Note that these are just a few of the types of issues and that all the items that are too small in this picture could easily be too large if the display topology was reversed (high-DPI primary and low-DPI external display). Spoiler alert: many (but not all) of these issues have been fixed in the Creators Update.

Developer Improvements in the Creators Update

The high-DPI improvements in the Creators Update fall in two categories:

  • Improvements for desktop application developers
  • Improvements for end users

Let’s talk about the developer-focused improvements first. For Microsoft to be successful in reducing the number of blurry or incorrectly sized desktop applications that end-users see, updating desktop applications to handle dynamic DPI scaling properly needs to be as easy as possible for you. We are approaching this is by incrementally adding automatic per-monitor DPI scaling to desktop UI frameworks. Here are some of the improvements in the Creators Update:

Per-monitor DPI awareness V2

The Anniversary Update introduced the concept of mixed-mode DPI scaling which let you have different DPI-awareness contexts (modes) for each top-level window within a process, and these contexts could be different than the process-wide default. This enabled you to ease in to the world of per-monitor scaling by focusing on the parts of the UI that matter the most while letting Windows handle bitmap stretching other top-level windows. In the Creators Update we added a new awareness context, (DPI_AWARENESS_CONTEXT_PER_MONITOR_AWARE_V2) which we refer to as per-monitor version 2 (PMv2).

PMv2 is technically a DPI_AWARENESS_CONTEXT and not one of the process-wide DPI awareness modes defined in the PROCESS_DPI_AWARENESS enumeration. PMv2 is designed to provide per-monitor scaling functionality that is missing from the original implementation of per-monitor awareness. This context enables the following:

Child window DPI change notifications

When a top-level window or process is running in per-monitor (V1) mode, only the top-level window is notified if the DPI changes. If you want to pass this notification to child windows that have their own window procedures, it’s up to you to pass along this notification. With PMv2 all child HWNDs in an HWND tree are notified in a bottoms-up, then tops-down manner via two new messages:

WM_DPICHANGED_BEFOREPARENT (bottoms-up)

WM_DPICHANGED_AFTERPARENT (tops-down)

The WPARAM and LPARAM parameters are unused and zero for both of these messages. They are simply nudges to notify your child HWNDs that a DPI change is occurring and has occurred.

Scaling of non-client area

Prior to the Anniversary Update there was no way to have the Windows-drawn non-client area DPI scale (caption bar, system menus, top-level scroll bars, menu bars, etc.). This meant that if you created a per-monitor application you’d be left with incorrectly sized (too big or too small) non-client area after the DPI change without any recourse other than drawing all that stuff yourself. In the Anniversary Update we added an API that you could call to turn on non-client scaling, EnableNonClientDpiScaling but now with PMv2 you get this automatically.

Automatic DPI scaling for dialogs

Win32 dialogs (dialogs that are created from a dialog template via the CreateDialog* functions) did not DPI scale previous to the Creators Update. With PMv2 these dialogs will automatically DPI scale when the DPI changes. Be aware that Windows will only DPI scale the content that is defined in the dialog template. This means that additional content that is added or manipulated outside of the dialog template will not automatically scale.

Fine-grained control over dialog scaling

There are scenarios where you’ll want control over how Windows DPI scales dialogs or even children HWNDs of a dialog. When you want to opt a dialog or an HWND in a dialog out of automatic DPI scaling you can use SetDialogDpiChangeBehavior/SetDialogControlDpiChangeBehavior, respectively.


typedef enum DIALOG_DPI_CHANGE_BEHAVIORS {
    DDC_DEFAULT                     = 0x0000,
    DDC_DISABLE_ALL                 = 0x0001,
    DDC_DISABLE_RESIZE              = 0x0002,
    DDC_DISABLE_CONTROL_RELAYOUT    = 0x0004,
} DIALOG_DPI_CHANGE_BEHAVIORS;

BOOL WINAPI SetDialogDpiChangeBehavior(HWND hDlg, DIALOG_DPI_CHANGE_BEHAVIORS mask, DIALOG_DPI_CHANGE_BEHAVIORS values);
typedef enum DIALOG_CONTROL_DPI_CHANGE_BEHAVIORS {
    DCDC_DEFAULT                     = 0x0000,
    DCDC_DISABLE_FONT_UPDATE         = 0x0001,
    DCDC_DISABLE_RELAYOUT            = 0x0002,
} DIALOG_CONTROL_DPI_CHANGE_BEHAVIORS;

BOOL WINAPI SetDialogControlDpiChangeBehavior(HWND hWnd, DIALOG_CONTROL_DPI_CHANGE_BEHAVIORS mask, DIALOG_CONTROL_DPI_CHANGE_BEHAVIORS values);

NOTE: SetDialogControlDpiChangeBehavior only affects first-level children of a PMv2 dialog. If you have a more complex dialog tree you’ll have to handle the HWND scaling of child windows yourself.

With these APIs you can opt a specific window in a dialog (or the entire dialog itself) out of DPI scaling functionality. When your dialog is DPI scaled by the system a new font is sent to all HWNDs in the dialog. You might, for example, want to opt out of having Windows send a DPI-scaled font to a specific HWND. You could use SetDialogControlDpiChangeBehavior in this case.

Use GetDialogDpiChangeBehavior and GetDialogControlDpiChangeBehavior to query the scaling behaviors applied to a dialog or to specific dialog HWNDs, respectively.

Windows Common Control improvements

When a DPI changed in per-monitor version 1 (DPI_AWARENESS_CONTEXT_PER_MONITOR_AWARE) you could resize and reposition your HWNDs, but if any of these HWNDs were Windows common controls (pushbuttons, checkboxes, etc.) Windows would not redraw the bitmaps (which we refer to as “theme drawn parts” or “theme parts” because they’re drawn by UXTheme) for these buttons. This meant that the bitmaps were either too large or too small, depending on your display topology. There wasn’t really anything that you could do about this, short of drawing the bitmaps yourself.

PMv2 helps draw these bitmaps at the correct DPI. Below we’re showing how the bitmaps in common controls in per-monitor version 1 wouldn’t DPI scale properly and how they do DPI scale if they’re in a PMv2 context:

PMv1
 
Common Control theme parts rendering larger than expected when the window was moved from a high-DPI display (200% scaling) to a low-DPI display (100% scaling)
PMv2
 
Common control theme parts rendering at the correct size after the window was moved from a high-DPI display (200% scaling) to a low-DPI display (100% scaling)

Specifying DPI awareness fallback behavior

It is recommended that you specify the DPI awareness of your process in the application manifest. In the Anniversary Update we introduced a new DPI awareness tag, <dpiAwareness>. With this tag you can specify a fallback behavior for the process-wide default DPI awareness mode or context. This is useful in that you can specify different DPI awareness modes for when your application is run on different version of Windows. For example, the following manifest settings:


<dpiAware>True/PM</dpiAware>
<dipAwareness>PerMonitorV2, PerMonitor</dpiAwareness>

This will result in the following process-wide default on different versions of Windows:

Windows Version Applied process-wide DPI awareness mode default Default DPI awareness context for new windows
Vista System N/A
Windows 7 System N/A
Windows 8 System N/A
Windows 8.1 Per Monitor V1 N/A
Windows 10 (1507) Per Monitor V1 N/A
November Update (1511) Per Monitor V1 N/A
Anniversary Update (1607) Per Monitor V1 Per Monitor V1
Creators Update (1703) Per Monitor V1 Per Monitor V2

Programmatically setting the process-wide default context

SetProcessDpiAwarenessContext(…) lets you specify the default DPI awareness context for your process programmatically. SetProcessDpiAwareness wouldn’t accept a DPI awareness context so there was no way to specify PMv2 as your process-wide default awareness context programmatically.

End-user DPI-scaling improvements

In addition to the work that we’re doing to make it easier for you, as a developer, to update your desktop applications to be per-monitor DPI aware, we’re also working to make your life as a Windows user better where it comes to using Windows in mixed-DPI environments. Here are some of the improvements that are part of the Creators Update:

DPI-scaling overrides

There are times when a Windows desktop application is defined to run in a certain DPI-awareness mode, such as System DPI awareness, but for various reasons you’d need it to run in a different mode. One scenario for this is when you’re running desktop applications that don’t render well on a high-DPI display (this can happen if the developer hasn’t tested and fixed up their applications for the DPI scale factors seen on the latest hardware). In situations like this you might want to force the application to run as a DPI-unaware process. Although this would result in the application being blurry it would at least be sized correctly. There are situations where this can make an unusable application usable, albeit blurry. You can enable this functionality in the .exe properties:

There are three settings that you can specify:

Setting Effect
Application This forces the process to run in per-monitor DPI awareness mode. This setting was previously referred to as “Disable display scaling on high-DPI settings.”

This setting effectively tells Windows not to bitmap stretch UI from the exe in question when the DPI changes

System This is Windows’ standard way of handling system-DPI aware processes. Windows will bitmap stretch the UI when the DPI changes
System (Enhanced) GDI Scaling (see below)

“System (enhanced)” DPI scaling

While we want to make it as easy as possible for you to update your applications to handle DPI scaling properly, we fully recognize that there are many applications that can never be updated, for various reasons. For this class of applications, we’re looking at ways that Windows can do a better job of automatically DPI scaling. In the Creators Update you’ll see the first version of this work.

There is new functionality in the Creators Update that results in text and primitives rendering crisply on high-DPI displays for GDI-based apps only. For applications that are GDI-based Windows can now DPI scale these on a per-monitor basis. This means that these applications will, magically, become per-monitor DPI aware. Now keep in mind that this solution is not a silver bullet. There are some limitations:

  • GDI+ content doesn’t DPI scale
  • DX content doesn’t DPI scale
  • Bitmap-based content won’t be crisp
  • It won’t be possible for end users to determine which apps will benefit from this feature without trying it out on an app-by-app basis.

Even with all of these limitations, when this GDI scaling works it’s quite impressive. So much so that we’ve turned it on by default for some in-box apps. The Microsoft Management Console (mmc.exe) will be GDI scaled, by default, in the Creators Update. This means that many in-box Windows snap ins, such as Device Manager, will benefit from this feature in the Creators Update. Here are some screenshots:

A DPI-unaware application running on a Surface Book High-DPI display (200% DPI scaling) The same application being GDI scaled (“System (Enhanced)” DPI scaling)

Notice how the text is crisp in the GDI-scaled version of the application (on the right) although the bitmaps are blurry (because they’re being bitmap stretched from a low-DPI to high)

What’s more, this functionality can be turned on for non-Windows application in the exe properties via the “System (Enhanced)” compatibility setting under “Override high-DPI scaling behavior. Scaling performed by:” (under the compatibility tab of the properties for an exe. See the screenshot earlier in this post). Note that this option isn’t available for Microsoft applications that ship in-box with Windows.

Internet Explorer

Per-Monitor DPI awareness support was first introduced in Windows 8.1 but many in-box Windows applications did not properly adopt this DPI scaling model. One of the most notable offenders was Internet Explorer. In the Creators Update IE has been updated to dynamically DPI scale.

Before the Creators Update, if you moved Internet Explorer to a display with a different DPI or otherwise changed the DPI of the display that it was on (docking/undocking/settings change/RDP/etc.) the content of the web page you were viewing would DPI scale but the app frame would not. In the image below we’re showing Internet Explorer and Edge, side by side, while being run on a secondary display with 100% display scaling. In this scenario, the primary display was using a high-DPI scale factor and then the app windows were moved to the low-DPI secondary display. You’ll see that the Edge UI scaled down but the Internet Explorer frame still rendered at the scale factor of the primary display.

Notice:

  • The text in the navigation bar is huge
  • The navigation buttons are huge
  • The vertical scroll bar is huge
  • The minimize/maximize/close buttons are rendered at the correct size but are spaced out as if they were on the high-DPI display

Here is how things look in the Creators Update:

Desktop icons

One of the biggest complaints we’ve heard (and experienced ourselves) was that the desktop icons would not DPI scale if you were running in “extend” display mode with multiple displays containing different DPI/display scaling values. Updates in the Creators Update fix this issue. Here is what you’d see before the Creators Update:

And here is what you’ll see in the Creators Update:

Office sizing issues

Although this isn’t specifically tied to the Creators Update, Office 2016 with the latest updates no longer has issues with Skype for Business and PowerPoint being sized incorrectly in mixed-DPI configurations.

What we didn’t get to

Hopefully you’ll enjoy these improvements, both as a developer and as an end user. While we’ve done a ton of work and are hopefully moving the needle, so to speak, on how Windows handles dynamic DPI support there is still a lot of work ahead of us. Here are a few things that we still need to work on:

High-DPI developer documentation

As of writing this blog, the high-DPI documentation available on MSDN is horribly outdated. The guides for writing per-monitor DPI aware applications were written in the Windows 8.1 timeframe and haven’t seen any significant updates since then. Also, many Windows API have DPI sensitivities that are not documented. That is to say that some Windows API will behave differently if they’re being called from a system-DPI-aware context vs. a per-monitor DPI aware context. All of this will need to be cleaned up and well documented so that you’re not left guessing when trying to update your application. We’re working on it, so keep an eye out for some improvements here.

“Magic numbers”

There are things in Windows that when scaling to higher DPI, don’t get it quite right. The reason for this is lurking “magic numbers” in the code that assumes that the world is always running at 96 DPI. While, in the past, some of these “magic numbers” didn’t result in significant problems, as DPI increases these issues become more and more noticeable. We’ll need to scrub Windows for as many of these as we can find. A couple of places that you can see “magic numbers” in use are 1) the width of a Windows button border and 2) the padding in non-client menu bars (such as can be seen in Notepad). In the case of the menu bar, as you run Notepad on higher and higher DPI values, the space between each menu item decreases.

Child-window DPI scaling

In the Windows 10 Anniversary Update we introduced mixed-mode DPI scaling (sub-process DPI scaling) that enabled you to have different DPI scaling modes within each top-level window in an application. We do not, however, support child-window DPI scaling. There are many interesting scenarios where this could come in handy, such as when you’re hosting external HWND content that could be running in a different DPI awareness mode. If you don’t have the ability to control the code that generates that hosted content it would be nice to have Windows DPI scale it for you. Unfortunately, this is not supported today.

MFC

Although we’ve added per-monitor DPI scaling support to Win32, WPF and WinForms, MFC does not natively support this functionality.

Display settings page & mouse input

When you have multiple displays with different DPI/Display Scaling values, the Display Settings Page will show you a representation of your display topology. The displays are represented in terms of their resolution, whereas it might be more if they were represented per their physical/real-world dimensions.

Furthermore, when you have two displays that are nearly the same physical size but with different display scaling values (one 4K and one 1080p display, for example) and move the mouse between the displays you can hit “dead zones” where the mouse cannot move. Here it would be more intuitive to have the mouse movement reflect the physical size/dimensions of the displays, not the resolutions of the displays.

Dragging Windows

When you drag an application window from one display to a display with a different DPI, you’ll see an oddly shaped representation of the window. Part of the window will render at the wrong DPI for the display that it’s on, until you move enough of it to the new display. At that point the window snaps to the new DPI and looks odd on the display that it came from. It would be nice to have a smoother transition here.

The need to log out and back in

Most of all, the fact that you have to log out and back into Windows to get most applications to render correctly after a DPI change is a huge pain-point. We do not currently have a solution for this beyond having applications updated to support per-monitor DPI awareness.

Conclusion

Again, hopefully you’ll enjoy these improvements. We still have a long way to go but we are working on improving Windows 10 high-DPI functionality and support. Do you have any other ideas of things that you’d like to see in this space? If so, please leave a comment below or reach out @WindowsUI.

The post High-DPI Scaling Improvements for Desktop Applications in the Windows 10 Creators Update appeared first on Building Apps for Windows.

The week in .NET – On .NET on SonarLint and SonarQube, Happy birthday .NET with Dan Fernandez, nopCommerce, Steve Gordon

$
0
0

Previous posts:

On .NET

Last week, I spoke with Tamás Vajk and Olivier Gaudin about SonarLint and SonarQube:

This week, we’ll have Sébastien Ros on the show to talk about modular ASP.NET applications, as they are implemented in Orchard Core. We’ll take questions on Gitter, on the dotnet/home channel and on Twitter. Please use the #onnet tag. It’s OK to start sending us questions in advance if you can’t do it live during the show.

Happy birthday .NET with Dan Fernandez

We caught up with Dan Fernandez at the .NET birthday party last month to talk about the good old days and the crazy idea he had of giving away Visual Studio for free. Dan was also part of the original Channel9 crew and one of the best .NET evangelists out there. Happy birthday .NET!

Project of the week: nopCommerce

nopCommerce is a popular open-source e-commerce system built on ASP.NET MVC, Autofac, and Entity Framework. It’s been downloaded 1.8 million times, has more than a hundred partners, and is used by popular brands such as Volvo, BMW, Puma, Reebok, Lacoste, and many more.

nopCommerce

Blogger of the week: Steve Gordon

Steve Gordon‘s blog post are deep dives into ASP.NET. There’s no better place to learn about what’s going on when a request is processed by ASP.NET Core than his ASP.NET Core anatomy series. This week, we’re featuring two of Steve’s posts.

Meetups of the week: community lightning talks in Seattle

Lightning talks are a great way to keep things focused and fun. The Mobile .NET Developers group in Seattle hosts five of those on Wednesday night at 6:30PM.

.NET

ASP.NET

C#

F#

New F# Language Suggestions:

Check out F# Weekly for more great content from the F# community.

VB

Xamarin

Azure

UWP

Data

Game Development

And this is it for this week!

Contribute to the week in .NET

As always, this weekly post couldn’t exist without community contributions, and I’d like to thank all those who sent links and tips. The F# section is provided by Phillip Carter, the gaming section by Stacey Haffner, and the Xamarin section by Dan Rigby, and the UWP section by Michael Crump.

You can participate too. Did you write a great blog post, or just read one? Do you want everyone to know about an amazing new contribution or a useful library? Did you make or play a great game built on .NET?
We’d love to hear from you, and feature your contributions on future posts:

This week’s post (and future posts) also contains news I first read on The ASP.NET Community Standup, on Weekly Xamarin, on F# weekly, and on Chris Alcock’s The Morning Brew.

Team Services Large Account User Management Roadmap (April 2017)

$
0
0

As the use of Visual Studio Team Services continues to grow and the size of teams in the cloud grow, we have been working to better support user management scenarios in large accounts. We have heard the pains of administrators of large accounts, particularly having to manage the access of each user individually and not having an easy way to assign resources to certain sets of users. I want to share how we are improving those scenarios in the beginning half of this year.

As always, the timelines and designs shared in this post are subject to change.

Bulk Edit for Users

Today, administrators have to manage access levels, extensions, and group memberships individually. This works for our small accounts, but our large accounts are left at a loss for editing multiple users at once. This is where our new bulk edit feature will come into play. With bulk edit, you will be able to select multiple users and edit their access levels, extensions, or group memberships at once.

AAD Group Support

What a user has access to in a Team Services account is controlled by what of the following resources they have assigned to them:

  • Access Level: This controls what core features a user has visibility of (Basic features or Stakeholder features)
  • Extensions: Add-ons that customize the VSTS experience
  • Group memberships: These control a user’s ability to use features across VSTS

In Team Services today, AAD groups can be used to assign group memberships to the users in it. This makes it very easy to manage what specific actions a user can or cannot do in the product based on how you have categorized them in AAD.

We are taking this concept and bringing it to access levels and extensions as well. With this work, you will be able to assign access levels and extensions to groups. Adding someone to the AAD group will automatically grant them the correct access levels and extensions when they access the VSTS account.  As a result, you will no longer have to manage access levels and extensions on an individual basis.

Over the next year, we will be working to enable administrators to:

  • Assign extensions and access levels to AAD groups
  • Manage the resources of users via AAD groups
  • Set up AAD groups to automatically purchase necessary resources for new users

Future

We are working to deliver the features described above to Team Services within the first half of the year and are still working through what these improvements will look like on-premises. This is just the beginning of our improvements to the user management experience for administrators of large accounts. We are also working on prioritizing:

  • Supporting licensing-only and security-only administrators
  • Improved B2B invitation experiences
  • Improved project-level and team-level user management

We know we still have a lot more work to do in this space, and we look forward to hearing your feedback along the way.

Thanks,

Ali Tai

VSTS & TFS Program Manager


Integrating Smoke Tests into your Continuous Delivery Pipeline

$
0
0

We’re really glad to have Abel Wang help us out for #SpringIntoDevOps with this awesome blog contribution about verifying whether your deployment finished successfully by integrating smoke tests into your pipeline.  Thank you Abel!  — Ed Blankenship


Having a Continuous Integration (CI) and Continuous Delivery (CD) pipeline in Visual Studio Team Services enables us to build and release our software quickly and easily.  Because of the high volume of builds and releases that can occur, there is a chance that some of the releases will fail.  Finding these failures early is vital.  Using integrated smoke tests in your CD pipeline is a great way to surface these deployment failures automatically after each deployment.

There are two types of smoke tests you can run.  Functional tests where you write code that tests which verifies your app is deployed and working correctly, and automated UI tests that will actually exercise the user interface using automated user interface test scripts.  Both these types of smoke tests can be run in your CD pipeline using the Visual Studio Test task.

1

The Visual Studio Test Task can run tests using multiple testing frameworks including MSTest, NUnit, xUnit, Mocha and Jasmine.  The task actually uses vstest.console.exe to execute the tests.  For this blog post, I’ll be using MSTest, but you can use whatever testing framework you want with the correct test adapter.

Using MSTest, it’s very simple to create smoke tests.  At the end of the day, tests in MSTest (or any of the other testing frameworks) are just chunks of code that is run.  Anything you can do with code can be part of your smoke tests.  Some common scenarios include:

  • hitting a database and making sure it has the correct schema,
  • checking if certain data is in the database,
  • hitting a service and making sure the response is correct,
  • hitting URLs and making sure some dynamic content is returned back

Automated UI tests can also be done using MSTest (or another testing framework) with Selenium or Coded UI or whatever automation technology you want to use.  Remember, if you can do it with code (in this case C#) then you can get the Visual Studio Test task to do it.  For this blog, we will be looking at creating automated UI smoke tests.

The first thing we need to do is make sure your smoke test project is part of the solution that gets compiled in your automated build.  In this example, I have a solution that includes a web project, a MSTest project used for my smoke tests and some other projects.

2

For the automation scripts, I used Selenium with the Page Object pattern where I have an object which represents each page of my app and each page object has all the actions you can do on the page as well as the asserts that you can do on the page.  This creates some super clean smoke tests.

345

Make sure your build compiles your test project and the test project’s .dll is one of the build artifacts.  For this example, I set up my release steps to do the following:

  1. Deploy web app
  2. Deploy database schema changes
  3. Massage my configuration files so my Selenium tests hits my Dev environment and uses Google Chrome as the browser
  4. Add release annotations for Application Insights
  5. Run Selenium Tests

6

Setting up the Visual Studio Test task in the CD pipeline to run my automated UI smoke tests using MSTest is straight forward.  All it requires is setting some parameters.

7

For detailed descriptions on all the parameters you can set for the Visual Studio Test task, check out https://github.com/Microsoft/vsts-tasks/blob/releases/m109/Tasks/VsTest/README.md.  In my example, I am running tests contained in any .dll that has the word test in it.  I’m also filtering and only running tests that are in the TestCategory=UITests.  You have lots of options for how you want to categorize and structure your tests.

8

9

Automated User Interface Smoke Tests

Automated UI tests require a private VSTS build/deploy agent running in interactive mode. If you have not ever setup an agent to run interactively, there is a great walkthrough for installing and configuring agent for interactive mode.  Alternatively, you can actually run these same smoke tests using phantomjs (headless) which will work with the hosted agents in VSTS.  To run my smoke tests using phantomjs, just change the environment variable Token.BrowserType from chrome to phantomjs.

10

Now, when a release is triggered, after deploying my web app and database, I run my set of smoke tests using the Visual Studio Test task and all results are automatically posted back to the release summary and to VSTS.

1112

Smoke Tests for Mobile Continuous Delivery

The Continuous Delivery system in VSTS is so flexible, we can even configure it to run smoke tests in complex mobile scenarios.  In the following example, I have an app that consists of a website, multiple REST API services, a back-end database and a mobile app.  My release pipeline consists of:

  • Create or update my Azure Resource Group from an ARM template
  • Deploy Web App and Services
  • Deploy database schema changes
  • Do a web performance test
  • Run some Selenium Automated UI tests for smoke tests against the web site and services
  • Deploy my mobile app to my Dev Testers group using HockeyApp
  • Deploy and run my smoke tests against my mobile app using Xamarin.UITests in Xamarin Test Cloud using the Xamarin Test Cloud Task

13

Using smoke tests as part of your CD pipeline is a valuable tool to help ensure your deployment, configuration and resources are all working.  Release Management in Visual Studio Team Services is fully configurable and customizable to run any type of smoke tests that you want as part of the deployment steps.  The source code for the examples in this blog are in GitHub  here.


Abel Wang
Senior Technical Product Marketing Manager, Visual Studio Team Services

Viewing all 10804 articles
Browse latest View live


<script src="https://jsc.adskeeper.com/r/s/rssing.com.1596347.js" async> </script>