Quantcast
Channel: Category Name
Viewing all 10804 articles
Browse latest View live

Azure Analysis Services now available in West India

$
0
0

Last October we released the preview of Azure Analysis Services, which is built on the proven analytics engine in Microsoft SQL Server Analysis Services. With Azure Analysis Services you can host semantic data models in the cloud. Users in your organization can then connect to your data models using tools like Excel, Power BI, and many others to create reports and perform ad-hoc data analysis.

We are excited to share with you that the preview of Azure Analysis Services is now available in an additional region: West India. This means that Azure Analysis Services is now available in the following regions: Australia Southeast, Canada Central, Brazil South, Southeast Asia, North Europe, West Europe, West US, South Central US, North Central US, East US 2, West Central US, Japan East, West India, and UK South.

New to Azure Analysis Services? Find out how you can try Azure Analysis Services or learn how to create your first data model.


Faster and unrestricted power by Pivotal Cloud Foundry’s 1.10 now supports .NET

$
0
0

Microsoft .Net

Services and spans ms

No longer be held back, instead go beyond your limits by having Distributed Tracing, Isolated Segments and Shared Platforms for all apps: Java and .Net. The new PCF 1.10 provides Spring Cloud Sleuth which can be used for many different apps across frameworks. Deployment complexity is lowered, cut costs of maintenance and infrastructure by tying each isolated segment to the same foundry keeping roles and permissions in sync. Achieve greater efficiency as developers can use their preferred framework. Dive into more details at Pivotal.

Visual Studio for Mac to the Cloud and Beyond

$
0
0

In November, we announced Visual Studio for Mac, a fully featured IDE that we hope will help every Mac developer create mobile and cloud applications. We started with a solid foundation for mobile development using Xamarin, and cloud development using .NET Core.

Over the past few months we have been working on porting C# code that was originally designed to work on Windows to the Mac. Luckily for us, the architecture of Visual Studio is so good that reusing the code has been a breeze. This has been helped by both the love and dedication that our Mac and Windows teams have, to create a great developer experience for our users.

Here are some of the changes that we have made since then.

Web Editing

In the latest release, we have completed the work to bring the rich HTML, CSS and JSON editors to macOS. You will get the same code completion, indentation behavior, and validation that you get on Windows for those file formats. When you install the update today, you will get to enjoy the glory of an IDE with a state-of-the-art web editor.

Web Editor

.NET Core

We have polished and improved our .NET Core and ASP.NET Core support to make it even simpler to create your server code, either for your standalone web sites, or as a service backend for your mobile applications or your hosted services.

We have upgraded our debugger to make async debugging as natural and simple as regular code – just like you expect from Visual Studio on Windows.

Azure Publish

To complement our improved .NET Core support, you can now publish your applications directly to Azure from within Visual Studio for Mac. Using the same publishing profiles and commands that you are used to.

Azure Publish Dialog

C# 7

We also introduced support for C# 7.0, a big upgrade with many language improvements that you will love. The support is what you expect from Visual Studio with refactoring tools, live code checking and great IntelliSense.

It is hard to pick favorite features in C# 7. I love pattern matching and I love the new native tuple support. Local functions, while not immediately obvious, has made some of my own code simpler and cleaner.

Support for the latest Apple and Google platforms

As you have come to expect from us, we deliver first-class support for the latest versions of Apple and Google operating systems – including the just updated versions of macOS, iOS, tvOS and watchOS.

Additionally, we are taking away some of the complexity involved in managing the signing certificates and provisioning profiles for your Apple-based applications, by integrating with the popular open source Fastlane project.

Accessibility

Visual Studio now integrates with Apple’s macOS accessibility platform. We are committed to making the entire IDE accessible and we are very happy with the first steps that we have taken in this space.

Testing

I hope that you take some time to try out the new features in Visual Studio for Mac and share your experiences with us. My team is committed to delivering developer tools that delight developers. We want to hear from you, and find out what parts of the experience can be improved and how we can make you more effective mobile and cloud developers.

If you already have Visual Studio for Mac Preview installed, make sure you update to the latest version from within the app. If you haven’t tried out a preview yet, head on over to VisualStudio.com to download the latest one.

Use Visual Studio for Mac’s “Report a Problem” or “Provide a Suggestion” dialog (within the Help menu) to provide feedback. Also, don’t forget about our Visual Studio and Visual Studio for Mac community forums, which provide a great place to leave feedback and learn from other developers.

Enjoy!

Miguel.


Miguel de Icaza, Distinguished Engineer, Mobile Developer Tools

Miguel is a Distinguished Engineer at Microsoft, focused on the mobile platform and creating delightful developer tools. With Nat Friedman, he co-founded both Xamarin in 2011 and Ximian in 1999. Before that, Miguel co-founded the GNOME project in 1997 and has directed the Mono project since its creation in 2001, including multiple Mono releases at Novell. Miguel has received the Free Software Foundation 1999 Free Software Award, the MIT Technology Review Innovator of the Year Award in 1999, and was named one of Time Magazine’s 100 innovators for the new century in September 2000.

Disabling VBScript execution in Internet Explorer 11

$
0
0

VBScript is deprecated in Internet Explorer 11, and is not executed for webpages displayed in IE11 mode. However, for backwards compatibility, VBScript execution is currently still permitted for websites rendered in legacy document modes. This was introduced as a temporary solution. Document modes are deprecated in Windows 10 and not supported at all in Microsoft Edge.

To provide a more secure experience, both the Windows 10 Creators Update and Cumulative Security Update for Internet Explorer-April 11, 2017 introduce an option to block VBScript execution in Internet Explorer for all document modes. Users can configure this behavior per site security zone via registry or via Microsoft Easy fix solution. Enterprise customers can also configure this behavior via Group Policy.

Recommended Actions

As a security best practice, we recommend that Microsoft Internet Explorer users disable VBScript execution for websites in Internet Zone and Restricted Sites Zone. Details on how to configure this behavior can be found in KB4012494.

We also recommend that web developers update any pages that currently rely on VBScript to use JavaScript.

In subsequent Windows releases and future updates, we intend to disable VBScript execution by default in Internet Explorer 11 for websites in the Internet Zone and the Restricted Sites Zone. The settings to enable, disable, or prompt for VBScript execution in Internet Explorer 11 will remain configurable per site security zone, via Registry or via Group Policy, for a limited time. We will post future updates here in advance of changes to default settings for VBScript execution in Internet Explorer 11.

Staying up-to-date

Most customers have automatic updates enabled, and updates will be downloaded and installed automatically. Customers who have automatic updates turned off, will need to check for updates and install them manually.

― Maliha Qureshi, Senior Program Manager

The post Disabling VBScript execution in Internet Explorer 11 appeared first on Microsoft Edge Dev Blog.

Official Release of TFVC Support for Visual Studio Code

$
0
0

In the 1.116.0 release of the Visual Studio Team Services extension for Visual Studio Code, we have added support for Team Foundation Version Control (TFVC). TFVC support works for both Team Foundation Server 2015 Update 2 (or later) as well as Team Services. Its core features enable users to work with their TFVC repositories from inside of Visual Studio Code. Users can seamlessly develop without needing to switch back and forth from Code to the command line to perform common TFVC actions. The extension also includes additional features you otherwise wouldn’t get from the command line client, such as seeing an updated status of your repository’s related builds along with the capability to browse work items assigned to you or from your personal queries.

tfvc-viewlet

The following are the current features supported by the extension:

  • Execute all basic version control actions such as add, delete, rename, move, etc.
  • View local changes and history for your files
  • Include and Exclude changes (and move files between the two states)
  • Merge conflicts from updates
  • Check-in and update local files
  • Associate work items to check-ins
  • Provides an integrated TFVC Output window
  • Support for a TFS proxy
  • Supports workspaces created with Visual Studio (via tf.exe) or the JetBrains IDEs and Eclipse (via the Team Explorer Everywhere Command Line Client)

To start using the TFVC features, review the documentation and check out the TFVC Source Code Control for Visual Studio Code video which shows you how to configure and use the TFVC features. The extension supports TFVC across Windows, macOS and Linux (with separate configuration instructions for macOS and Linux; see video).

If you’ve never used the extension before, we also have a walkthrough to get you started.

If you would like to contribute to the extension, have a question or would like to provide feedback, visit our repository on GitHub.

Ruby on Rails on Azure App Service (Web Sites) with Linux (and Ubuntu on Windows 10)

$
0
0

Running Ruby on Rails on Windows has historically sucked. Most of the Ruby/Rails folks are Mac and Linux users and haven't focused on getting Rails to be usable for daily development on Windows. There have been some heroic efforts by a number of volunteers to get Rails working with projects like RailsInstaller, but native modules and dependencies almost always cause problems. Even more, when you go to deploy your Rails app you're likely using a Linux host so you may run into differences between operating systems.

Fast forward to today and Windows 10 has the Ubuntu-based "Linux Subsystem for Windows" (WSL) and the native bash shell which means you can run real Linux elf binaries on Windows natively without a Virtual Machine...so you should do your Windows-based Rails development in Bash on Windows.

Ruby on Rails development is great on Windows 10 because you've Windows 10 handling the "windows" UI part and bash and Ubuntu handling the shell.

After I set it up I want to git deploy my app to Azure, easily.

Developing on Ruby on Rails on Windows 10 using WSL

Rails and Ruby folks can apt-get update and apt-get install ruby, they can install rbenv or rvm as they like. These days rbenv is preferred.

Once you have Ubuntu on Windows 10 installed you can quickly install "rbenv" like this within Bash. Here I'm getting 2.3.0.

~$ git clone https://github.com/rbenv/rbenv.git ~/.rbenv

~$ echo 'export PATH="$HOME/.rbenv/bin:$PATH"' >> ~/.bashrc
~$ echo 'eval "$(rbenv init -)"' >> ~/.bashrc
~$ exec $SHELL
~$ git clone https://github.com/rbenv/ruby-build.git ~/.rbenv/plugins/ruby-build
~$ echo 'export PATH="$HOME/.rbenv/plugins/ruby-build/bin:$PATH"' >> ~/.bashrc
~$ exec $SHELL
~$ rbenv install 2.3.0
~$ rbenv global 2.3.0
~$ ruby -v
~$ gem install bundler
~$ rbenv reshash

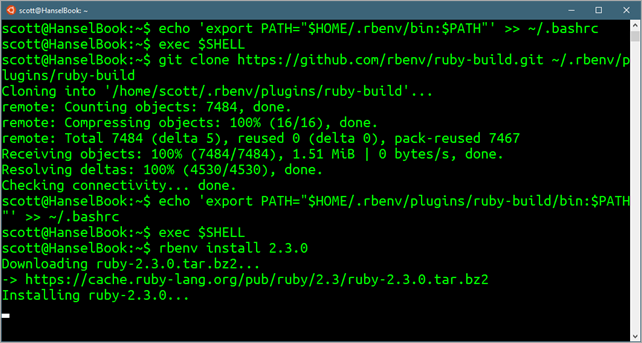
Here's a screenshot mid-process on my SurfaceBook. This build/install step takes a while and hits the disk a lot, FYI.

Installing rbenv on Windows under Ubuntu

At this point I've got Ruby, now I need Rails, as well as NodeJs for the Rails Asset Pipeline. You can change the versions as appropriate.

@ curl -sL https://deb.nodesource.com/setup_4.x | sudo -E bash -

$ sudo apt-get install -y nodejs
$ gem install rails -v 5.0.1

You will likely also want either PostgresSQL or MySQL or Mongo, or you can use a Cloud DB like Azure DocumentDB.

When you're developing on both Windows and Linux at the same time, you'll likely want to keep your code in one place or the other, not both. I use the automatic mount point that WSL creates at /mnt/c so for this sample I'm at /mnt/c/Users/scott/Desktop/RailsonAzure which maps to a folder on my Windows desktop. You can be anywhere, just be aware of your CR/LF settings and stay in one world.

I did a "rails new ." and got it running locally. Here you can se Visual Studio Code with Ruby Extensions and my project open next to Bash on Windows.

image

After I've got a Rails app running and I'm able to develop cleanly, jumping between Visual Studio Code on Windows and the Bash prompt within Ubuntu, I want to deploy the app to the web.

Since this is a simple "Hello World" default rails app I can't deploy it somewhere where the Rails Environment is Production. There's no Route in routes.rb (the Yay! You're on Rails message is development-time only) and there's no SECRET_KEY_BASE environment variable set which is used to verify signed cookies. I'll need to add those two things. I'll change routes.rb quickly to just use the default Welcome page for this demo, like this:

Rails.application.routes.draw do
  # For details on the DSL available within this file, see http://guides.rubyonrails.org/routing.html
    get '/' => "rails/welcome#index"
end

And I'll add the SECRET_KEY_BASE in as an App Setting/ENV var in the Azure portal when I make my backend, below.

Deploying Ruby on Rails App to Azure App Service on Linux

From the New menu in the Azure portal, choose to Web App on Linux (in preview as of the time I wrote this) from the Web + Mobile option. This will make an App Service Plan that has an App within it. There are a bunch of application stacks you can use here including node.js, PHP, .NE Core, and Ruby.

NOTE: A few glossary and definition points. Azure App Service is the Azure PaaS (Platform as a Service). You run Web Apps on Azure App Service. An Azure App Service Plan is the underlying Virtual Machine (sall, medium, large, etc.) that hosts n number of App Services/Web Sites. I have 20 App Services/Web Sites running under a App Service Plan with a Small VM. By default this is Windows by can run Php, Python, Node, .NET, etc. In this blog post I'm using an App Service Plan that runs Linux and hosts Docker containers. My Rails app will live inside that App Service and you can find the Dockerfiles and other info here https://github.com/Azure-App-Service/ruby or use your own Docker image.

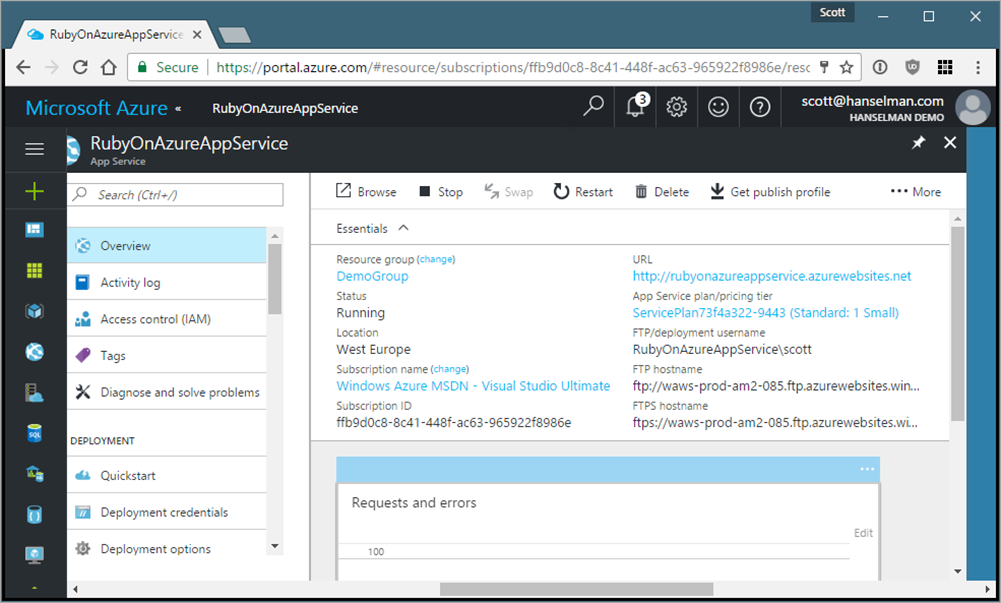
Here you can see my Azure App Service that I'll now deploy to using Git. I could also FTP.

Ruby on Rails on Azure

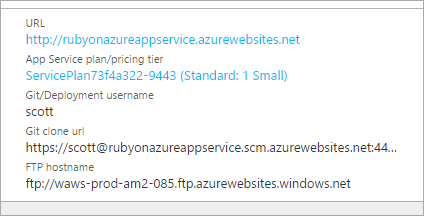
I went into Deployment OPtions and setup a local (to Azure) git repro. Now I can see that under Overview.

image

On my local bash I add azure as a remote. This can be set up however your workflow is setup. In this case, Git is FTP for code.

$ git add remote azure https://scott@rubyonazureappservice.scm.azurewebsites.net:443/RubyOnAzureAppService.git

$ git add .
$ git commit -m "initial"
$ git push azure master

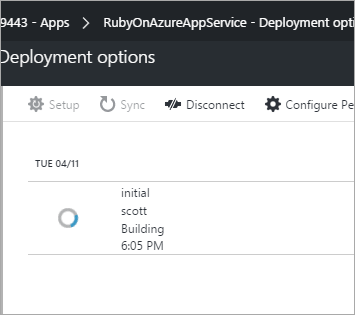
This starts the deployment as the code is pushed to Azure.

Azure deploying the Rails app

IMPORTANT: I will also add "RAILS_ENV= production" and a SECRET_KEY_BASE=to my Azure Application Settings. You can make a new secret with "rake secret."

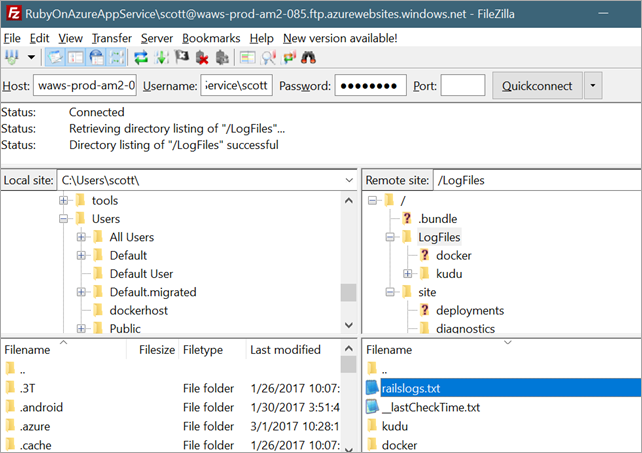
If I'm having trouble I can turn on Application Logging, Web Server Logging, and Detailed Error Messages under Diagnostic Logs then FTP into the App Service and look at the logs.

FTPing into Azure to look at logs

This is all in Preview so you'll likely run into issues. They are updating the underlying systems very often. Some gotchas I hit:

  • Deploying/redeploying requires an explicit site restart, today. I hear that'll be fixed soon.
  • I had to dig log files out via FTP. They are going to expose logs in the portal.
  • I used the Kudu "sidecar" site at mysite.scm.azurewebsite.net to get shell access to the Kudu container, but I'd like to be able to ssh into or get to access to the actual running container from the Azure Portal one day.

That said, if you'd like more internal details on how this works, you can watch a session from Connect() last year with developer Nazim Lala. Thanks to James Christianson for his debugging help!


Sponsor: Did you know VSTS can integrate closely with Octopus Deploy? Watch Damian Brady and Brian A. Randell as they show you how to automate deployments from VSTS to Octopus Deploy, and demo the new VSTS Octopus Deploy dashboard widget. Watch now


© 2017 Scott Hanselman. All rights reserved.
     

March 2017 Leaderboard of Database Systems contributors on MSDN

$
0
0

Many congratulations to the March 2017 Top-10 contributors!

Machine generated alternative text:
All database systems
March 2017
Cloud databases*
March 2017
I st
2nd
3 rd
4th
5th
6th
7th
8th
9th
10th
Hilary Cotter
Uri Dimant
Alberto Morillo
Olaf Helper
Jingyang Li
Shanky 621
philfactor
Erland Sommarskog
Tom Phillips
ArthurZ
1 st
2nd
3 rd
4th
5th
6th
7th
8th
9th
10th
Albem Morillo
Marcin Policht
SamCogan
Dan Guzman
davidbaxterbrowne
JRStern
Cloud Crusader
ErikEJ
RajkumarMS31SOSS
Kasun Rajapakse (MCSA)

Hilary Cotter and Alberto Morillo top the Overall and Cloud database lists this month as well. 7 of the Overall Top-10 featured in last month’s Overall Top-10 too.

This Leaderboard initiative was started in October 2016 to recognize the top Database Systems contributors on MSDN forums. The following continues to be the points hierarchy, in decreasing order of points:

Scoring methodology
Database Systems. MSDN Contributors
Answer
not accepted
Answer accepted
o

For questions related to this leaderboard, please write to leaderboard-sql@microsoft.com

Bing predicts the 2017 NBA Playoffs

$
0
0
With thirty teams, 1,230 regular season games, and one Russell Westbrook who just broke the season triple-double record behind us, the playoffs are sure to be a treat for hoops fans. One team will reign supreme; those who can’t wait until June to find out which one can take a sneak peek at the Bing Predicts NBA Playoffs bracket.

Golden State is predicted to meet Cleveland in the NBA Finals for the third straight year. They are predicted to avenge last year’s defeat to win the series 4-1 and regain the title. If you’re looking for a First Round series to follow, Bing predicts seed #5 Atlanta to upset #4 Washington and win 4-2; Atlanta will not carry the momentum to the Eastern Semifinals though, and lose to Boston in 7 games. In the West, Bing predicts Houston to prevail over Oklahoma City in another much-anticipated First Round series. Houston’s efficient offense, led by MVP-candidate James Harden, will need 7 games to beat Oklahoma and their own MVP-candidate (and Harden’s former OKC teammate) Russell Westbrook. The graphic below shows Bing’s full playoff predictions, including the predicted number of games per series.

Interested in how we do it? We generate our Bing sports predictions in two stages. We start with a traditional statistical model which incorporates win/loss, margins of victory, record at home and on the road, player composition, and many other factors to determine team strength.

Bing Predicts then adds web/social signals to capture the “wisdom of the crowd” to further improve predictive accuracy.

Let Bing power your playoffs experience starting this weekend, with information, team info, schedules, and more.


-The Bing Team


Announcing Azure CLI Shell (Preview); more Azure CLI 2.0 commands now generally Available

$
0
0

Following up on the generally available release of VM, ACS, Storage and Network commands in the new Azure CLI 2.0, we are today announcing a new Azure CLI interactive Shell preview mode release, in addition to the generally available release of following command modules: ACR, Batch, KeyVault, and SQL.

Interactive Shell

Azure CLI 2.0 provides an idiomatic command line interface that integrates natively with Bash and POSIX tools. It is easy to install, use and learn. You can use it to run one command at a time, as well as to run automation scripts composed of multiple commands, including other BASH commands. To support this, commands are not interactive and will error out when provided with incomplete or incorrect input.

However, there are circumstances when you might prefer an interactive experience, such as when learning the Azure CLI’s capabilities, command structures and output formats. Azure CLI Shell (az-shell) provides an interactive mode in which to run Azure CLI 2.0 commands. It provides autocomplete dropdowns, auto-cached suggestions combined with on the fly documentation, including examples of how each command is used. Azure CLI Shell provides an experience that makes it easier to learn and use Azure CLI commands.

Azure CLI Shell

We invite you to install and use the new interactive shell for Azure CLI 2.0. You can use it in a Docker image we created, or install it locally on your Mac or Windows machine. It works with your existing Azure CLI installations, and you can use the commands side-by-side in az-shell or another command shell of your choice (BASH on MAC/linux and cmd.exe on Windows).

New commands now generally available

Continuing with the momentum of our GA release of the first Azure CLI 2.0 command modules on Feb 27th, today we are also announcing that following command modules are now Generally Available: Azure Container Registry, Batch, KeyVault, and SQL. With this GA release, you can use these commands in production with full support from Microsoft through our Azure support channels or on GitHub. We don’t expect any breaking changes for these commands in future releases of Azure CLI 2.0.

Azure Container Registry enables developers to create and maintain Azure container registries to store and manage private Docker container images. Using the acr commands in Azure CLI 2.0, you can create and manage these registries right from the command line. After you create a registry, you can use other CLI commands to assign a service principal to it, manage admin credentials, and list the repositories within it.

Azure Batch service provides an environment developers can use to manage their compute resources, and to schedule jobs to run with specific resources and dependencies. Using the batch commands in Azure CLI 2.0, you can create Azure Batch accounts, applications, and application packages in that account. You can also create jobs, tasks and job schedules to run at specific times, and manage (create, update, delete) them directly from the command line.

Azure Key Vault helps safeguard cryptographic keys and secrets used by cloud applications and services. Developers and security administrators can generate keys, store and access them, set policies, and monitor their usage using this service. Using the keyvault commands in Azure CLI 2.0, you can create/delete a key vault, manage certificates, policies, import and create new keys, and set secrets to key vaults.

Azure SQL Database is a relational database-as-a-service using the Microsoft SQL Server engine. Using the SQL commands in Azure CLI 2.0, you can manage all aspects of this service from the command line: create/delete/update SQL server, create/delete/update databases and data warehouses and scale them individually by creating elastic pools and moving databases in and out of shared pools, etc.

In addition to the above commands being generally available, the new release also contains command modules for dev/test labs (lab) and monitoring (monitor) services that are now available in preview mode.

New features in Azure CLI 2.0

This release also contains some new features that will make working with the Azure CLI easier and more productive.

“Az find” is a new command for searching Azure CLI 2.0 commands based on simple text. As the number of commands and coverage of Azure services grows in Azure CLI 2.0, we recognize that it may become hard for developers to find the commands they need for specific tasks.

For example, the following command finds all Azure CLI 2.0 commands that contains the text “arm,” “template,” or “deploy.”

az find -q arm template deploy

`az monitor autoscale-settings get-parameters-template`
    Scaffold fully formed autoscale-settings' parameters as json
    template

`az group export`
    Captures a resource group as a template.

`az group`
    Manage resource groups and template deployments.

`az group deployment export`
    Export the template used for the specified deployment.

`az group deployment create`
    Start a deployment.

`az group deployment validate`
    Validate whether the specified template is syntactically correct
    and will be accepted by Azure Resource Manager.

`az vm capture`
    Captures the VM by copying virtual hard disks of the VM and
    outputs a template that can be used to create similar VMs.
    For an end-to-end tutorial, see https://docs.microsoft.com/azure
    /virtual-machines/virtual-machines-linux-capture-image.

`az keyvault certificate get-default-policy`
    Get a default policy for a self-signed certificate
    This default policy can be used in conjunction with `az keyvault
    create` to create a self-signed certificate. The default policy
    can also be used as a starting point to create derivative
    policies.   Also see: https://docs.microsoft.com/en-
    us/rest/api/keyvault/certificates-and-policies

`az keyvault certificate create`
    Creates a new certificate version. If this is the first version,
    the certificate resource is created.
    Create a Key Vault certificate. Certificates can also be used as a
    secrets in provisioned virtual machines.

`az vm format-secret`
    Format secrets to be used in `az vm create --secrets`
    Transform secrets into a form consumed by VMs and VMSS create via
    --secrets.

You can now set global defaults and scope for specific variables and resources that you need to use repeatedly within a command line session. You can set these defaults using the “az configure” command:

az configure --defaults group=MyResourceGroup

This sets the resource group to “MyResourceGroup” so that you don’t need to supply it as a parameter in subsequent commands that require this parameter. For example, you could then run the “vm show” command without explicitly specifying the resource group parameter:

az vm show -n MyLinuxVM

Name       ResourceGroup    Location
---------  ---------------  ----------
MyLinuxVM  MyResourceGroup  westus2

You can also specify multiple defaults by listing them in <resource name=value> pairs in the “az configure” command, and you can reset them by simply setting an empty value in the configure command.

Start using Azure CLI 2.0 today!

Whether you are an existing CLI user, or you are starting a new Azure project, it’s easy to get started with the CLI directly, or use the interactive mode to master the command line with our updated docs and samples.

Azure CLI 2.0 is open source and on GitHub.

In the next few months, we’ll provide more updates. As ever, we want your ongoing feedback! Customers using the commands, that are now in GA release, in production can contact Azure Support for any issues, reach out via StackOverflow using the azure-cli tag, or email us directly at azfeedback@microsoft.com. You can also use the "az feedback" command directly from within the CLI to send us your feedback.

The network is a living organism

$
0
0

Organism, from Greek word Organismos, depicts a complex structure of living elements. But, what does a network have in common with organisms?

At Microsoft, we build and manage a hyper-scale global network that’s constantly growing and evolving. Supporting workloads such as Microsoft Azure, Bing, Dynamics, Office 365, OneDrive, Skype, Xbox, and soon LinkedIn, has stringent needs of reliability, security, and performance. Such needs make it imperative to continually monitor the pulse of the network, to detect anomalies, faults, and drive recovery at the millisecond level, much akin to monitoring a living organism.

Monitoring a large network that connects 38 regions, as of April 2017, hundreds of datacenters, thousands of servers with several thousand devices, and millions of components requires constant innovation and invention.

Microsoft Global Network

Figure 1. Microsoft global network

WAN

Figure 2. Illustration of a physical network in a datacenter

Four core principles drive the design and innovation of our monitoring services:

  • Speed and accuracy: It’s imperative to detect failures at the sub-second level and drive recovery of the same.
  • Coverage: From bit errors to bytes, to packets, to protocols, to components, to devices that make up the end-to-end network, our monitoring services must cover them all.
  • Scale: The services must process petabytes of logs, millions of events, and thousands of correlations that are spread over several thousand miles of connectivity across the face of the planet.
  • Optimize based on real user metrics: Our monitoring services must use metrics from a network topology level—within a rack, to a cluster, to a datacenter, to a region, to the WAN and the edge—and they must have the capability to zoom in and out.

We built innovations to proactively detect and localize a network issue, including PingMesh and NetBouncer. These services are always on and monitor the pulse of our network for latency and packet drops.

PingMesh uses lightweight TCP probes (consuming negligible bandwidth) for probing thousands of peers for latency measurement (RTT, or round trip time) and detects whether the issue is related to the physical network. RTT measurement is a good tool for detecting network reachability and packet-level latency issues.

After a latency deviation or packet drop is discovered, Netbouncer’s machine learning algorithms are then used to filter out transient issues, such as top-of-rack reboots for an upgrade. After completing temporal analysis in which we look at historical data and performance, we can confidently classify the incident as a network issue and accurately localize the faulty component. After the issue is localized, we can auto-mitigate it by rerouting the impacted traffic, and then either rebooting or removing the faulty component. In the following figure, green, yellow, or red visualize network latency ranges at the 99th percentile between a source-destination rack-pair.

Network Latency

Figure 3. Examples of network latency patterns for known failure modes

In some customer incidents, the incident might need deeper investigation by an on-call engineer to localize and find the root cause. We needed a troubleshooting tool to efficiently capture and analyze the life of a packet through every network hop in its path. This is a difficult problem because of the necessary specificity and scale for packet-level analysis in our datacenters, where traffic can reach hundreds of terabits per second. This motivated us to develop a service called Everflow—it’s used to troubleshoot network faults using packet-level analysis. Everflow can inject traffic patterns, mirror specific packet headers, and mimic the customer’s network packet. Without Everflow, it would be hard to recreate the specific path taken by a customer’s packet; therefore, it would be difficult to accurately localize the problem. The following figure illustrates the high-level architecture of Everflow.

Everflow

Figure 4. Packet-level telemetry collection and analytics using Everflow

Everflow is one of the tools used to monitor every cable for frame check sequence (FCS) errors. The optical cables can get dirty from human errors like bending or bad placement, or simply aging of the cable. The following figure shows examples of cable bending and cable placed near fans that can cause an FCS error on this link.

Cable bending

Figure 5. Examples of cable bending, and cable placed near the fans that can cause an FCS error on this link

We currently monitor every cable and allow only one error for every billion packets sent, and we plan to further reduce this threshold to ensure link quality for loss-sensitive traffic across millions of physical cables in each datacenter. If the cable has a higher error rate, we automatically shut down any links with these errors. After the cable is cleaned or replaced, Everflow is used to send guided probes to ensure that the link quality is acceptable.

Beyond the datacenter, supporting critical customer scenarios on the most reliable cloud requires observing network performance end-to-end from Internet endpoints. The Azure WAN evolved to build a service called the Map of the Internet that monitors Internet performance and customer experience in real time. This system can disambiguate between expected client performance across wired and wireless connections, separates sustained issues from transient ones, and provides visibility into any customer perspective on demand. For example, it helps us to answer questions like, “Are customers in Los Angeles seeing high RTT on AT&T?”, “Is Taipei seeing increased packet loss through HiNet to Hong Kong?”, and “Is Bucharest seeing reliability issues to Amsterdam?” We use this service to proactively and reactively intervene on impact or risks to customer experiences and quickly correlate them to the scenario, network, and location at fault. This data also triggers automated response and traffic engineering to really minimize impact or mitigate ahead of time whenever possible.

Latency Degradation alert

Figure 6. Example of latency degradation alert with a peering partner

The innovation built to monitor our datacenters, and its connectivity is also leveraged to provide insights to our customers.

Typically, customers use our network services via software abstractions. Such abstractions, including virtual networks, virtual network interface cards, and network access control lists, hide the complexity and intricacies of the datacenter network. We recently launched Azure Network Watcher, a service to provide visibility and diagnostic capability of the virtual/logical network and related network resources.

Using Network Watcher, you can visualize the topology of your network, understand performance metrics of the resources deployed in the topology, create packet captures to diagnose connectivity issues, and validate the security perimeter of your network to detect vulnerabilities and for compliance/audit needs.

Topology view of a customer network

Figure 7. Topology view of a customer network

The following figure shows how a remote packet capture operation can be performed on a virtual machine.

Variable packet

Figure 8. Variable packet capture in a virtual machine

Building and operating the world’s most reliable and hyper-scale cloud is underpinned by the need to proactively monitor and detect network anomalies and take corrective action—much akin to monitoring a living organism. As the pace, scale, and complexity of the datacenters evolve, new challenges and opportunities emerge, paving the way for continuous innovation. We’ll continue to invest in networking monitoring and automatic recovery, while also sharing our innovations with customers to also help them manage their virtual networks.

References

PingMesh: Guo, Chuanxiong, Lihua Yuan, Dong Xiang, Yingnong Dang, Ray Huang, Dave Maltz, Zhaoyi Liu, et al. "Pingmesh: A large-scale system for data center network latency measurement and analysis." ACM SIGCOMM Computer Communication Review 45, no. 4 (2015): 139-152.

Everflow: Zhu, Yibo, Nanxi Kang, Jiaxin Cao, Albert Greenberg, Guohan Lu, Ratul Mahajan, Dave Maltz, et al. "Packet-level telemetry in large datacenter networks." In ACM SIGCOMM Computer Communication Review, vol. 45, no. 4, pp. 479-491. ACM, 2015.

Read more

To read more posts from this series please visit:

Building Your App in a CI Pipeline with Customized Build Servers (Private Agents)

$
0
0

With the expanding number of tools to help you become more productive or to improve the functionality of your app, you may have a requirement for a custom tool or specific version to be used during the build process in a Continuous Integration build. If using Visual Studio Team Services, there may be instances when the Hosted agent won’t work to build your app if you have such dependencies on tools or versions that don’t exist on the Hosted agent. Is it possible to build an app with customized build servers? Of course!

There are several benefits beyond simply the available versions of specific software to setting up your own build agents.

These include:

  1. Your server can cache dependencies such as NuGet or Maven packages.
  2. You can run incremental builds.
  3. You can have a faster machine.

Donovan Brown has an excellent article that has more detailed list on his blog.

How do I build my app in a Continuous Integration pipeline that requires custom dependencies?

In this case, you can easily install and configure a private agent that does have these dependencies installed on the machine to build your app through Visual Studio Team Services. The machine can be hosted in the cloud or on-premises as long as it can communicate back to Visual Studio Team Services. Any tool that you need installed for the build process to succeed can be installed on a machine that has a private agent on it. You just need to point the build definition to your agent pool with the private agent in it and you’re good to go.

With a private agent, there are no limits to the apps that you can build in Visual Studio Team Services. Your build definition can have any number of custom tasks and processes that you can point to the private agent. And you can use these same agents if you want to deploy to those machines as well!

How do I get started to build my app with a private agent?

If you want to host your agents on your own hardware or on VMs in the cloud, you can find detailed instructions on deploying the agent to each of our supported platforms.

We also publish container images to https://hub.docker.com/r/microsoft/vsts-agent/ and of course we open source the Docker files we use to create them.

While your agent can be deployed on any cloud or on-premises machine that can access VSTS, the Azure DevTest Labs service provides some great features to help you manage both your agents and the software installed on them. Using the artifacts and formulas you can rapidly deploy a pool of identical build and release agents, there is even a built-in artifact for adding the agent to your VM. In addition to the repeatable deployment of agents, DevTest Labs has a great set of policies that can help you control your costs by automatically turning some of your agents at certain times during the day when they may not be needed. You can find a more detailed walkthrough of this process in How to Create a Monster Build Agent in Azure for Cheap! By Peter Huage.

In any of the scenarios listed above you will need to start by creating a Personal Access Token (PAT). It is important to note that this PAT is only used for the agent registration process and is not persisted to the agent machine, so you don’t have to worry about the expiration. When you create the PAT you can limit the scope to Agent Pools (read, manage).

image

Then, download and install the private agent onto your machine. You can add the agent to the Default agent pool or a custom agent pool that you create in Visual Studio Team Services.

image

image

Follow these steps to create a build definition.

After you’ve added in the tasks to build (and test) your app into your build definition, ensure that the Continuous Integration trigger is set in the “Triggers” tab of the definition (the branch filter may look different if you’re using TFVC).

image

In the “General” tab of the build definition, set the default agent queue to be “Default” or the agent pool that you configured your private agent in.

image

When your build definition queues automatically after code has been checked in, you’ll be able to see that your build ran on the private agent you created:

image

How many builds and releases can I run in parallel?

VSTS allows you to register as many build and release agents as you want with the service. However, the number of builds and release you can run concurrently is controlled by the number of pipelines you have available in your account. By default, your account includes 2 pipelines and 240 minutes of compute in the Hosted pool. This means you can run 2 concurrent build and releases across all agents, hosted or private, in your account. For details on how pipelines are consumed and how you can purchase additional pipelines please see the documentation.

For further reading, see the documentation on Build and Release Agents.

We now have a Continuous Integration build pipeline that connects to a private agent that we’ve configured on our machine, a customized build server.

Visual Studio Team Services makes it easy to build any app, even if it requires custom tools or dependencies.

New features in the checkpoint package, version 0.4.0

$
0
0

by Andrie de Vries

In 2014 we introduced the checkpoint package for reproducible research. This package makes it easy to use R package versions that existed on CRAN at a given date in the past, and to use varying package versions with different projects. Previous blog posts include:

On April 12, 2017, we published version 0.4.0 of checkpoint to CRAN.

The checkpoint() function enables reproducible research by managing your R package versions. These packages are downloaded into a local .checkpoint folder. If you use checkpoint() for many projects, these local packages can consume some storage space, and this update introduces functions to manage your snapshots. In this post I review:

  • Managing local archives:
    • checkpointArchives(): list checkpoint archives on disk.
    • checkpointRemove(): remove checkpoint archive from disk.
    • getAccessDate(): returns the date the snapshot was last accessed.
  • Other:
    • unCheckpoint(): reset .libPaths to the user library to undo the effect of checkpoint().

Setting up an example project

For illustration, set up a script referencing a single package:

library(MASS)
hist(islands)
truehist(islands)

Next, create the checkpoint:

dir.create(file.path(tempdir(), ".checkpoint"), recursive = TRUE)
## Create a checkpoint by specifying a snapshot date
library(checkpoint)
checkpoint("2015-04-26", project = tempdir(), checkpointLocation = tempdir())

Working with checkpoint archive snapshots

You can query the available snapshots on disk using the checkpointArchives() function. This returns a vector of snapshot folders.

# List checkpoint archives on disk.
checkpointArchives(tempdir())
## [1] "2015-04-26"

You can get the full paths by including the argument full.names=TRUE:

checkpointArchives(tempdir(), full.names = TRUE)
## [1] "C:/Users/adevries/AppData/Local/Temp/RtmpcnciXd/.checkpoint/2015-04-26"

Working with access dates

Every time you use checkpoint() the function places a small marker in the snapshot archive with the access date. In this way you can track when was the last time you actually used the snapshot archive.

# Returns the date the snapshot was last accessed.
getAccessDate(tempdir())
## C:/Users/adevries/AppData/Local/Temp/RtmpcnciXd/.checkpoint/2015-04-26
##                                                           "2017-04-12"

Removing a snapshot from local disk

Since the date of last access is tracked, you can use this to manage your checkpoint archives. The function checkpointRemove() will delete archives from disk. You can use this function in multiple ways. For example, specify a specific archive to remove:

# Remove singe checkpoint archive from disk.
checkpointRemove("2015-04-26")

You can also remove a range of snapshot archives older (or more recent) than a snapshot date

# Remove range of checkpoint archives from disk.
checkpointRemove("2015-04-26", allSinceSnapshot = TRUE)
checkpointRemove("2015-04-26", allUntilSnapshot =  = TRUE)

Finally, you can remove all snapshot archives that have not been accessed since a given date:

# Remove snapshot archives that have not been used recently
checkpointRemove("2015-04-26", notUsedSince = TRUE)

Reading the checkpoint log file

One of the side effects of checkpoint() is to create a log file that contains information about packages that get downloaded, as well as the download size. This file is stored in the checkpoint root folder, and is a csv file with column names, so you can read this with your favourite R function or other tools.

dir(file.path(tempdir(), ".checkpoint"))
## [1] "2015-04-26"         "checkpoint_log.csv" "R-3.3.3"

Inspect the log file:

log_file 
##             timestamp snapshotDate  pkg   bytes
## 1 2017-04-12 15:05:12   2015-04-26 MASS 1084392

Resetting the checkpoint

In older versions of checkpoint() the only way to reset the effect of checkpoint() was to restart your R session. In v0.3.20 and above, you can use the function unCheckpoint(). This will reset your .libPaths to the user folder.

.libPaths()
## [1] "C:/Users/adevries/AppData/Local/Temp/RtmpcnciXd/.checkpoint/2015-04-26/lib/x86_64-w64-mingw32/3.3.3"
## [2] "C:/Users/adevries/AppData/Local/Temp/RtmpcnciXd/.checkpoint/R-3.3.3"
## [3] "C:/R/R-33~1.3/library"
Now use `unCheckpoint()` to reset your library paths
# Note this is still experimental
unCheckpoint()
.libPaths()
## [1] "C:\Users\adevries\Documents\R\win-library"
## [2] "C:/R/R-33~1.3/library"

How to obtain and use checkpoint

Version 0.4.0 of the checkpoint package is available on CRAN now, so you can install it with:

install.packages("checkpoint", repos="https://cloud.r-project.org")

The above command works both for CRAN R, and also for Microsoft R Open (which comes bundled with an older version of checkpoint). For more information on checkpoint, see the vignette Using checkpoint for reproducible research.

COM Server and OLE Document support for the Desktop Bridge

$
0
0

The Windows 10 Creators Update adds out-of-process (OOP) COM and OLE support for apps on the Desktop Bridge – a.k.a Packaged COM. Historically, Win32 apps would create COM extensions that other applications could use. For example, Microsoft Excel exposes its Excel.Application object so third-party applications can automate operations in Excel, leveraging its rich object model. But in the initial release of the Desktop Bridge with the Windows 10 Anniversary Update, an application cannot expose its COM extension points, as all registry entries are in its private hive and not exposed publicly to the system. Packaged COM provides a mechanism for COM and OLE entries to be declared in the manifest so they can be used by external applications. The underlying system handles the activation of the objects so they can be consumed by COM clients – all while still delivering on the Universal Windows Platform (UWP) promise of having a no-impact install and uninstall behavior.

How it works

Packaged COM entries are read from the manifest and stored in a new catalog that the UWP deployment system manages. This solves one of the main problems in COM in which any application or installer can write to the registry and corrupt the system, e.g. overwriting existing COM registrations or leaving behind registry entries upon uninstall.

At run-time when a COM call is made, i.e. calling CLSIDFromProgID() or CoCreateInstance(), the system first looks in the Packaged COM catalog and, if not found, falls back to the system registry. The COM server is then activated and runs OOP from the client application.

When to use Packaged COM

Packaged COM is very useful for apps that expose third-party extension points, but not all applications need it. If your application uses COM only for its own personal use, then you can rely on COM entries in the application’s private hive (Registry.dat) to support your app. All binaries in the same package have access to that registry, but any other apps on the system cannot see into your app’s private hive. Packaged COM allows you explicit control over which servers can be made public and used by third-parties.

Limitations

As the Packaged COM entries are stored in a separate catalog, applications that directly read the registry (e.g. calling RegOpenKeyEx() or RegEnumKeyEx()) will not see any entries and will fail. In these scenarios, applications providing extensions will need to work with their partners to go through COM API calls or provide another app-to-app communication mechanism.

Support is scoped to OOP servers, allowing two key requirements. First, OOP server supports means the Desktop Bridge can maintain its promise of serviceability. By running extensions OOP, the update manager can shut down the COM server and update all binaries because there are no dlls in use loaded by other processes. Second, OOP allows for a more robust extension mechanism. If an in-process COM server is hung, it will also hang the app; for OOP, the host app will still function and can decide how to handle the misbehaving OOP server.

We do not support every COM and OLE registration entry, for the full list of what we support please refer to the element hierarchy in the Windows 10 app package manifest on MSDN: https://docs.microsoft.com/uwp/schemas/appxpackage/uapmanifestschema/root-elements

Taking a closer look

The keys to enabling this functionality are the new manifest extension categories “windows.comServer” and “windows.comInterface.” The “windows.comServer” extension corresponds to the typical registration entries found under the CLSID (i.e.  HKEY_CLASSES_ROOTCLSID{MyClsId}) for an application supporting executable servers and their COM classes (including their OLE registration entries), surrogate servers, ProgIDs and TreatAs classes. The “windows.comInterface” extension corresponds to the typical registration entries under both the HKCR Interface{MyInterfaceID} and HKCRTypelib{MyTypelibID}, and supports Interfaces, ProxyStubs and Typelibs.

If you have registered COM classes before, these elements will look very familiar and straightforward to map from the existing registry keys into manifest entries. Here are a few examples.

Example #1: Registering an .exe COM server

In this first example, we will package ACDual for the Desktop Bridge. ACDual is an MFC OLE sample that shipped in earlier versions of Visual Studio. This app is an .exe COM server, ACDual.exe, with a Document CoClass that implements the IDualAClick interface. A client can then consume it. Below is a picture of the ACDual server and a simple WinForms client app that is using it:

Fig. 1 Client WinForms app automating AutoClick COM server

Store link: https://www.microsoft.com/store/apps/9nm1gvnkhjnf

GitHub link: https://github.com/Microsoft/DesktopBridgeToUWP-Samples/tree/master/Samples/PackagedComServer

Registry versus AppxManifest.xml

To understand how Packaged COM works, it helps to compare the typical entries in the registry with the Packaged COM entries in the manifest. For a minimal COM server, you typically need a CLSID with the LocalServer32 key, and an Interface pointing to the ProxyStub to handle cross-process marshaling. ProgIDs and TypeLibs make it easier to read and program against. Let’s take a look at each section and compare what the system registry looks like in comparison to Packaged COM snippets. First, let’s look at the following ProgID and CLSID entry that registers a server in the system registry:

; ProgID registration
[HKEY_CLASSES_ROOTACDual.Document]
@=”AClick Document”
[HKEY_CLASSES_ROOTACDual.DocumentCLSID]
@=”{4B115281-32F0-11CF-AC85-444553540000}”
[HKEY_CLASSES_ROOTACDual.DocumentDefaultIcon]
@=”F:\VCSamples\VC2010Samples\MFC\ole\acdual\Release\ACDual.exe,1″

; CLSID registration
[HKEY_CLASSES_ROOTCLSID{4B115281-32F0-11CF-AC85-444553540000}]
@=”AClick Document”
[HKEY_CLASSES_ROOTCLSID{4B115281-32F0-11CF-AC85-444553540000}InprocHandler32]
@=”ole32.dll”
[HKEY_CLASSES_ROOTCLSID{4B115281-32F0-11CF-AC85-444553540000}LocalServer32]
@=””C:\VCSamples\MFC\ole\acdual\Release\ACDual.exe””
[HKEY_CLASSES_ROOTCLSID{4B115281-32F0-11CF-AC85-444553540000}ProgID]
@=”ACDual.Document”

For comparison, the translation into the package manifest is straightforward. The ProgID and CLSID are supported through the windows.comServer extension, which must be under your app’s Application element along with all of your other extensions. Regarding ProgIDs, you can have multiple ProgID registrations for your server. Notice that there is no default value of the ProgID to provide a friendly name, as that information is stored with the CLSID registration and one of the goals of the manifest schema is to reduce duplication of information. The CLSID registration is enabled through the ExeServer element with an Executable attribute, which is a relative path to the .exe contained in the package. Package-relative paths solve one common problem with registering COM servers declaratively: in a .REG file, you don’t know where your executable is located. Often in a package, all the files are placed in the root of the package. The Class registration element is within the ExeServer element. You can specify one or more classes for an ExeServer.


<Applications>
    <Application Id="ACDual" Executable="ACDual.exe" EntryPoint="Windows.FullTrustApplication">
      <uap:VisualElements DisplayName="ACDual" .../>
    <Extensions>
      <com:Extension Category="windows.comServer">
        <com:ComServer>
          <!-- CLSID -->
          <com:ExeServer Executable="ACDual.exe" DisplayName="AutoClick">
            <com:Class Id ="4B115281-32F0-11cf-AC85-444553540000" DisplayName="AClick Document" ProgId="AutoClick.Document.1" VersionIndependentProgId="AutoClick.Document">
            </com:Class>
          </com:ExeServer>
          <!-- ProgId -->
          <com:ProgId Id="AutoClick.Document" CurrentVersion="AutoClick.Document.1" />
          <com:ProgId Id="AutoClick.Document.1" Clsid="4B115281-32F0-11cf-AC85-444553540000" />
        </com:ComServer>
      </com:Extension>

The next step is TypeLib and interface registration. In this example, the TypeLib is part of the main executable, and the interface uses the standard marshaler (oleaut32.dll) for its ProxyStub, so the registration is as follows:

[HKEY_CLASSES_ROOTInterface{0BDD0E81-0DD7-11CF-BBA8-444553540000}]
@=”IDualAClick”
[HKEY_CLASSES_ROOTInterface{0BDD0E81-0DD7-11CF-BBA8-444553540000}ProxyStubClsid32]
@=”{00020424-0000-0000-C000-000000000046}”
[HKEY_CLASSES_ROOTInterface{0BDD0E81-0DD7-11CF-BBA8-444553540000}TypeLib]
@=”{4B115284-32F0-11CF-AC85-444553540000}”
“Version”=”1.0″
 
;TypeLib registration
[HKEY_CLASSES_ROOTTypeLib{4B115284-32F0-11CF-AC85-444553540000}]
[HKEY_CLASSES_ROOTTypeLib{4B115284-32F0-11CF-AC85-444553540000}1.0]
@=”ACDual”
[HKEY_CLASSES_ROOTTypeLib{4B115284-32F0-11CF-AC85-444553540000}1.0]
[HKEY_CLASSES_ROOTTypeLib{4B115284-32F0-11CF-AC85-444553540000}1.0win32]
@=” C:\VCSamples\MFC\ole\acdual\Release\AutoClik.TLB”
[HKEY_CLASSES_ROOTTypeLib{4B115284-32F0-11CF-AC85-444553540000}1.0FLAGS]
@=”0″
[HKEY_CLASSES_ROOTTypeLib{4B115284-32F0-11CF-AC85-444553540000}1.0HELPDIR]
@=””

In translating this into the package manifest, the windows.comInterface extension supports one or more TypeLib, ProxyStub and interface registrations. Typically, it is placed under the Application element so it is easier to associate with the class registrations for readability, but it may also reside under the Package element. Also, note that we did not have to remember the CLSID of the universal marshaler (the key where ProxyStubClsid32 = {00020424-0000-0000-C000-000000000046}). This is simply a flag: UseUniversalMarshaler=”true”.


<com:Extension Category="windows.comInterface">
        <com:ComInterface>
          <!-- Interfaces -->
          <!-- IID_IDualAClick -->
          <com:Interface Id="0BDD0E81-0DD7-11cf-BBA8-444553540000" UseUniversalMarshaler="true">
            <com:TypeLib Id="4B115284-32F0-11cf-AC85-444553540000" VersionNumber="1.0" />
          </com:Interface>

          <!-- TypeLib -->
          <com:TypeLib Id="4B115284-32F0-11cf-AC85-444553540000">
            <com:Version DisplayName = "ACDual" VersionNumber="1.0" LocaleId="0" LibraryFlag="0">
              <com:Win32Path Path="AutoClik.tlb" />
            </com:Version>
          </com:TypeLib>
        </com:ComInterface>
      </com:Extension>
    </Extensions>
    </Application>
  </Applications>

Now you can initialize and use the server from any language that supports COM and dual interface OLE automation servers.

Example #2: OLE support

In this next example, we will package an existing OLE document server to demonstrate the capabilities of the Desktop Bridge and Packaged COM. The example we will use is the MFC Scribble sample app, which provides an insertable document type called Scribb Document. Scribble is a simple server that allows an OLE container, such as WordPad, to insert a Scribb Document.

Fig 2. WordPad hosting an embedded Scribb Document

Store Link: https://www.microsoft.com/store/apps/9n4xcm905zkj

GitHub Link: https://github.com/Microsoft/DesktopBridgeToUWP-Samples/tree/master/Samples/PackagedOleDocument

Registry versus AppxManifest.xml

There are many keys to specify various OLE attributes. Again, the magic here is that the platform has been updated to work with Packaged COM, and all you have to do is translate those keys into your manifest. In this example, the entries for Scribble include the ProgID, its file type associations and the CLSID with entries.

;SCRIBBLE.REG
;
;FileType Association using older DDEExec command to launch the app
[HKEY_CLASSES_ROOT.SCB]
@=”Scribble.Document”
[HKEY_CLASSES_ROOTScribble.Documentshellopencommand]
@=”SCRIBBLE.EXE %1”
 
;ProgId
[HKEY_CLASSES_ROOTScribble.Document]
@= Scribb Document
[HKEY_CLASSES_ROOTScribble.DocumentInsertable]
@=””
[HKEY_CLASSES_ROOTScribble.DocumentCLSID]
@= “{7559FD90-9B93-11CE-B0F0-00AA006C28B3}}”
 
;ClsId with OLE entries
[HKEY_CLASSES_ROOTCLSID{7559FD90-9B93-11CE-B0F0-00AA006C28B3}]
@=”Scribb Document”
[HKEY_CLASSES_ROOTCLSID{7559FD90-9B93-11CE-B0F0-00AA006C28B3}AuxUserType]
[HKEY_CLASSES_ROOTCLSID{7559FD90-9B93-11CE-B0F0-00AA006C28B3}AuxUserType2]
@=”Scribb”
[HKEY_CLASSES_ROOTCLSID{7559FD90-9B93-11CE-B0F0-00AA006C28B3}AuxUserType3]
@=”Scribble”
[HKEY_CLASSES_ROOTCLSID{7559FD90-9B93-11CE-B0F0-00AA006C28B3}DefaultIcon]
@=””C:\VC2015Samples\scribble\Release\Scribble.exe”,1″
[HKEY_CLASSES_ROOTCLSID{7559FD90-9B93-11CE-B0F0-00AA006C28B3}InprocHandler32]
@=”ole32.dll”
[HKEY_CLASSES_ROOTCLSID{7559FD90-9B93-11CE-B0F0-00AA006C28B3}Insertable]
@=””
[HKEY_CLASSES_ROOTCLSID{7559FD90-9B93-11CE-B0F0-00AA006C28B3}LocalServer32]
@=””C:\VC2015Samples\scribble\Release\Scribble.exe””
[HKEY_CLASSES_ROOTCLSID{7559FD90-9B93-11CE-B0F0-00AA006C28B3}MiscStatus]
@=”32″
[HKEY_CLASSES_ROOTCLSID{7559FD90-9B93-11CE-B0F0-00AA006C28B3}ProgID]
@=”Scribble.Document”
[HKEY_CLASSES_ROOTCLSID{7559FD90-9B93-11CE-B0F0-00AA006C28B3}Verb]
[HKEY_CLASSES_ROOTCLSID{7559FD90-9B93-11CE-B0F0-00AA006C28B3}Verb]
@=”&Edit,0,2″
[HKEY_CLASSES_ROOTCLSID{7559FD90-9B93-11CE-B0F0-00AA006C28B3}Verb1]
@=”&Open,0,2″

First, let’s discuss the file type association. This is an extension that was supported in the first release of the Desktop Bridge extensions. Note that specifying the file type association here automatically adds support for the shell open command.

Next, let’s take a closer look at the ProgID and CLSID entries. In this case, the simple example only has a ProgID and no VersionIndependentProgID.

Most of the excitement in this example is underneath the CLSID where all the OLE keys live. The registry keys typically map to attributes of the class, such as:

  • Insertable key under either the ProgID or CLSID, mapping to the InsertableObject=”true” attribute
  • If the InprocHandler32 key is Ole32.dll, use the EnableOleDefaultHandler=”true” attribute
  • AuxUserType2, mapping to ShortDisplayName
  • AuxUserType3, mapping to the Application DisplayName
  • In cases where there were multiple values in a key, such as the OLE verbs, we’ve split those out into separate attributes. Here’s what the full manifest looks like:

  <Applications>
    <Application Id="Scribble" Executable="Scribble.exe" EntryPoint="Windows.FullTrustApplication">
      <uap:VisualElements DisplayName="Scribble App" .../>
      <Extensions>
        <uap:Extension Category="windows.fileTypeAssociation">
          <uap3:FileTypeAssociation Name="scb" Parameters="%1">
            <uap:SupportedFileTypes>
              <uap:FileType>.scb</uap:FileType>
            </uap:SupportedFileTypes>
          </uap3:FileTypeAssociation>
        </uap:Extension>

        <com:Extension Category="windows.comServer">
          <com:ComServer>
            <com:ExeServer Executable="Scribble.exe" DisplayName="Scribble">
              <!-- ClsId Registration -->
              <com:Class Id="7559FD90-9B93-11CE-B0F0-00AA006C28B3" DisplayName="Scribb Document" ShortDisplayName="Scribb" ProgId="Scribble.Document.1" VersionIndependentProgId ="Scribble.Document" EnableOleDefaultHandler="true" InsertableObject="true">
                <com:DefaultIcon Path="Scribble.exe" ResourceIndex="1" />
                <com:MiscStatus OleMiscFlag="32"/>
                <com:Verbs>
                  <com:Verb Id="0" DisplayName="&amp;Edit" AppendMenuFlag="0" OleVerbFlag="2" />
                  <com:Verb Id="1" DisplayName="&amp;Open" AppendMenuFlag="0" OleVerbFlag="2" />
                </com:Verbs>
              </com:Class>
            </com:ExeServer>
            <!-- ProgId Registration -->
            <com:ProgId Id="Scribble.Document" CurrentVersion="Scribble.Document.1" />
            <com:ProgId Id="Scribble.Document.1" Clsid="7559FD90-9B93-11CE-B0F0-00AA006C28B3" />
          </com:ComServer>
        </com:Extension>
      </Extensions>
    </Application>
  </Applications>

Additional support

The two examples above covered the most common cases of a COM server and an OLE document support. Packaged COM also supports additional servers like Surrogates and TreatAs classes. For more information, please refer to the element hierarchy in the Windows 10 app package manifest on MSDN: https://docs.microsoft.com/uwp/schemas/appxpackage/uapmanifestschema/root-elements

Conclusion

With UWP and Windows 10, applications can take advantage of several exciting new features while leveraging existing code investments in areas such as COM. With the Desktop Bridge platform and tooling enhancements, existing PC software can now be part of the UWP ecosystem and take advantage of the same set of new platform features and operating system capabilities.

For more information on the Desktop Bridge, please visit the Windows Dev Center.

Ready to submit your app to the Windows Store? Let us know!

The post COM Server and OLE Document support for the Desktop Bridge appeared first on Building Apps for Windows.

Episode 126 on Outlook extensibility with Andrew Salamatov—Office 365 Developer Podcast

$
0
0

In Episode 126 of the Office 365 Developer Podcast, Richard diZerega and Andrew Coates catch up with Andrew Salamatov on Outlook extensibility.

Download the podcast.

Weekly updates

Show notes

Got questions or comments about the show? Join the O365 Dev Podcast on the Office 365 Technical Network. The podcast RSS is available on iTunes or search for it at “Office 365 Developer Podcast” or add directly with the RSS feeds.feedburner.com/Office365DeveloperPodcast.

About Andrew Salamatov

Andrew is a senior program manager at Microsoft, having worked there for six years. At Microsoft, Andrew worked on the Exchange team his entire career. Starting on Exchange Web Services, Andrew designed notifications protocol and throttling. Later, he moved on to working on mail apps.

About the hosts

Richard is a software engineer in Microsoft’s Developer Experience (DX) group, where he helps developers and software vendors maximize their use of Microsoft Cloud services in Office 365 and Azure. Richard has spent a good portion of the last decade architecting Office-centric solutions, many that span Microsoft’s diverse technology portfolio. He is a passionate technology evangelist and a frequent speaker at worldwide conferences, trainings and events. Richard is highly active in the Office 365 community, a popular blogger at aka.ms/richdizz and can be found on Twitter at @richdizz. Richard is born, raised and based in Dallas, Texas, but works on a worldwide team based in Redmond, Washington. Richard is an avid builder of things (BoT), musician and lightning-fast runner.

A Civil Engineer by training and a software developer by profession, Andrew Coates has been a Developer Evangelist at Microsoft since early 2004, teaching, learning and sharing coding techniques. During that time, he’s focused on .Net development on the desktop, in the cloud, on the web, on mobile devices and most recently for Office. Andrew has a number of apps in various stores and generally has far too much fun doing his job to honestly be able to call it work. Andrew lives in Sydney, Australia, with his wife and two almost-grown-up children.

Useful links

The post Episode 126 on Outlook extensibility with Andrew Salamatov—Office 365 Developer Podcast appeared first on Office Blogs.

Streamlined User Management

$
0
0

Effective user management helps administrators ensure they are paying for the right resources and enabling the right access in their projects. We’ve repeatedly heard in support calls and from our customers that they want capabilities to simplify this process in Visual Studio Team Services. I’m excited to announce that we have released a preview of our new account-level user hub experience, which begins to address these issues. If you are a Project Collection Administrator, you can now navigate to the new Users page by turning on “Streamlined User Management” under “Preview features”.

previewfeatures

Here are some of the changes that will light up when you turn on the feature.

Inviting people to the account in one easy step

Administrators can now add users to an account, with the proper extensions, access level, and group memberships at the same time, enabling their users to hit the ground running. You can also invite up to 50 users at once through the new invitation experience.

accountlvlinvite

User management with all the information where you need it

The Users page has been re-designed to show you more information to help you understand users in your account at a glance. The table of users also now includes a new column called “Extensions” that lists the extensions each user has access to.

acctlvluserhub

Detailed view of individual users

Additionally, you can view and change the access level, extensions, and group memberships that a specific user has access to through the context menu provided for each selected user – a one-stop shop to understand and adjust everything a user has access to.

detailsview

Feedback

Try it out on your account and tell us what you think by posting on Developer Community or sending us a smile. We look forward to hearing your feedback!

Thanks,

Ali Tai

VSTS & TFS Program Manager


Setting up a Shiny Development Environment within Linux on Windows 10

$
0
0

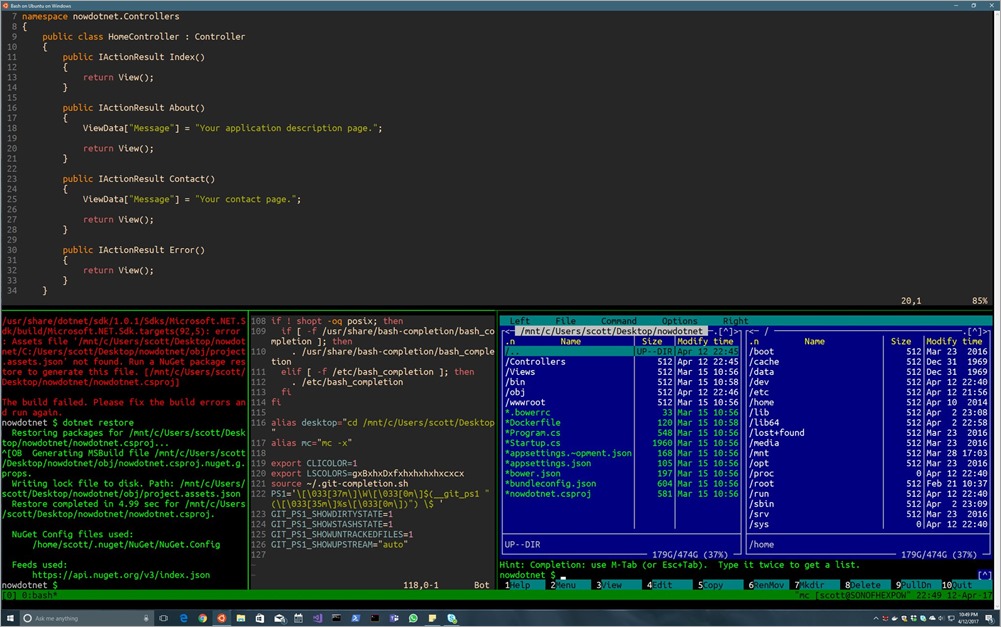
While I was getting Ruby on Rails to work nicely under Ubuntu on Windows 10 I took the opportunity to set up my *nix bash environment, which was largely using defaults. Yes, I know I can use zsh or fish or other shells. Yes, I know I can use emacs and screen, but I am using Vim and tmux. Fight me. Anyway, once my post was done, I starting messing around with open source .NET Core on Linux (it runs on Windows, Mac, and Linux, but here I'm running on Linux on Windows. #Inception) and tweeted a pic of my desktop.

By the way, I feel totally vindicated by all the interest in "text mode" given my 2004 blog post "Windows is completely missing the TextMode boat." ;)'

Also, for those of you who are DEEPLY NOT INTERESTED in the command line, that's cool. You can stop reading now. Totally OK. I also use Visual Studio AND Visual Studio Code. Sometimes I click and mouse and sometimes I tap and type. There is room for us all.

WHAT IS ALL THIS LINUX ON WINDOWS STUFF? Here's a FAQ on the Bash/Windows Subsystem for Linux/Ubuntu on Windows/Snowball in Hell and some detailed Release Notes. Yes, it's real, and it's spectacular. Can't read that much text? Here's a video I did on Ubuntu on Windows 10.

A number of people asked me how they could set up their WSL (Windows Subsystem for Linux) installs to be something like this, so here's what I did. Note that will I've been using *nix on and off for 20+ years, I am by no means an expert. I am, and have been, Permanently Intermediate in my skills. I do not dream in RegEx, and I am offended that others can bust out an awk script without googling.

C9RT5_bUwAALJ-H

So there's a few things going on in this screenshot.

  • Running .NET Core on Linux (on Windows 10)
  • Cool VIM theme with >256 colors
  • Norton Midnight Commander in the corner (thanks Miguel)
  • Desqview-esque tmux splitter (with mouse support)
  • Some hotkey remapping, git prompt, completion
  • Ubuntu Mono font
  • Nice directory colors (DIRCOLORS/LS_COLORS)

Let's break them down one at a time. And, again, your mileage may vary, no warranty express or implied, any of this may destroy your world, you read this on a blog. Linux is infinitely configurable and the only constant is that my configuration rocks and yours sucks. Until I see something in yours that I can steal.

Running .NET Core on Linux (on Windows 10)

Since Linux on Windows 10 is (today) Ubuntu, you can install .NET Core within it just like any Linux. Here's the Ubuntu instructions for .NET Core's SDK. You may have Ubuntu 14.04 or 16.04 (you can upgrade your Linux on Windows if you like). Make sure you know what you're running by doing a:

~ $ lsb_release -a

No LSB modules are available.
Distributor ID: Ubuntu
Description: Ubuntu 16.04.2 LTS
Release: 16.04
Codename: xenial
~ $

If you're not on 16.04 you can easily remove and reinstall the whole subsystem with these commands at cmd.exe (note the /full is serious and torches the Linux filesystem):

> lxrun /uninstall /full

> lxrun /install

Or if you want you can run this within bash (will take longer but maintain settings):

sudo do-release-upgrade

Know what Ubuntu your Windows 10 has when you install .NET Core within it. The other thing to remember is that now you have two .NET Cores, one Windows and one Ubuntu, on the same (kinda) machine. Since the file systems are separated it's not a big deal. I do my development work within Ubuntu on /mnt/d/github (which is a Windows drive). It's OK for the Linux subsystem to edit files in Linux or Windows, but don't "reach into" the Linux file system from Windows.

Cool Vim theme with >256 colors

That Vim theme is gruvbox and I installed it like this. Thanks to Rich Turner for turning me on to this theme.

$ cd ~/

$ mkdir .vim
$ cd .vim
$ mkdir colors
$ cd colors
$ curl -O https://raw.githubusercontent.com/morhetz/gruvbox/master/colors/gruvbox.vim
$ cd ~/
$ vim .vimrc

Paste the following (hit ‘i’ for insert and then right click/paste)

set number

syntax enable
set background=dark
colorscheme gruvbox
set mouse=a

if &term =~ '256color'
" disable Background Color Erase (BCE) so that color schemes
" render properly when inside 256-color tmux and GNU screen.
" see also http://snk.tuxfamily.org/log/vim-256color-bce.html
set t_ut=
endif

Then save and exit with Esc, :wq (write and quit). There's a ton of themes out there, so try some for yourself!

Norton Midnight Commander in the corner (thanks Miguel)

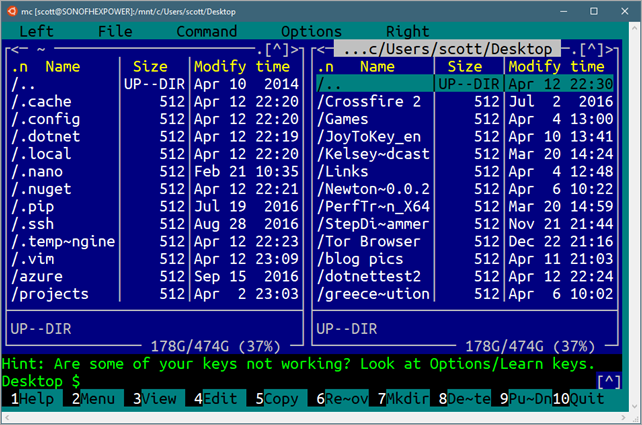
Midnight Commander is a wonderful Norton Commander clone that Miguel de Icaza started, that's licensed as part of GNU. I installed it via apt, as I would any Ubuntu software.

$ sudo apt-get install mc

There's mouse support within the Windows conhost (console host) that bash runs within, so you'll even get mouse support within Midnight Commander!

Midnight Commander

Great stuff.

Desqview-esque tmux splitter (with mouse support)

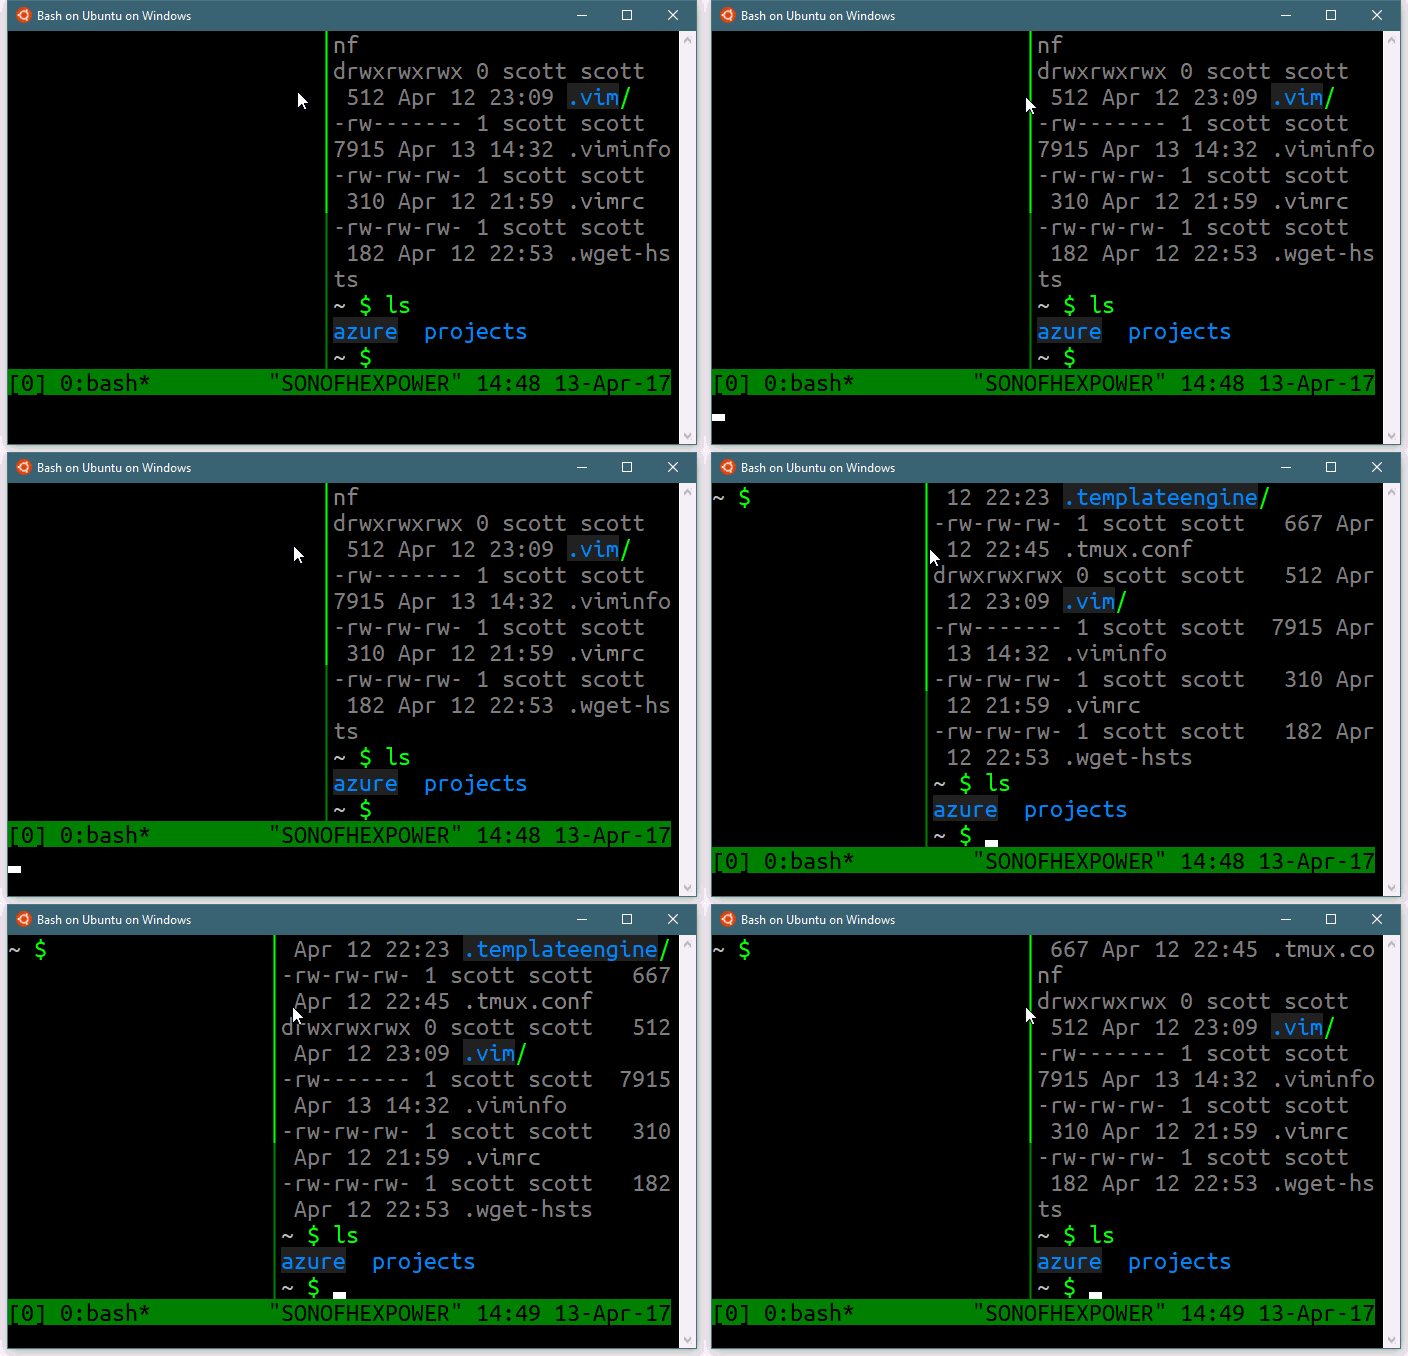
Tmux is a terminal multiplexer. It's a text-mode windowing environment within which you can run multiple programs. Even better, you can "detach" from a running session and reattached from elsewhere. Because of this, folks love using tmux on servers where they can ssh in, set up an environment, detach, and reattach from elsewhere.

NOTE: The Windows Subsystem for Linux shuts down all background processes when the last console exits. So you can detach and attach tmux sessions happily, but just make sure you don't close every console on your machine.

Here's a nice animated gif of me moving the splitter on tmux on Windows. YES I KNOW YOU CAN USE THE KEYBOARD BUT THIS GIF IS COOL.

Some hotkey remapping, git prompt, completion

I am still learning tmux but here's my .tmux.conf. I've made a few common changes to make the hotkey creation of windows easier.

#remap prefix from 'C-b' to 'C-a'

unbind C-b
set-option -g prefix C-a
bind-key C-a send-prefix

# split panes using | and -
bind | split-window -h
bind _ split-window -v
unbind '"'
unbind %
bind k confirm kill-window
bind K confirm kill-server
bind < resize-pane -L 1
bind > resize-pane -R 1
bind - resize-pane -D 1
bind + resize-pane -U 1
bind r source-file ~/.tmux.conf

# switch panes using Alt-arrow without prefix
bind -n M-Left select-pane -L
bind -n M-Right select-pane -R
bind -n M-Up select-pane -U
bind -n M-Down select-pane -D

# Enable mouse control (clickable windows, panes, resizable panes)
set -g mouse on
set -g default-terminal "screen-256color"

I'm using the default Ubuntu .bashrc that includes a check for dircolors (more on this below) but I added this for git-completion.sh and a git prompt, as well as these two alias. I like being able to type "desktop" to jump to my Windows Desktop. And the -x on Midnight Commander helps the mouse support.

alias desktop="cd /mnt/c/Users/scott/Desktop"

alias mc="mc -x"
export CLICOLOR=1
source ~/.git-completion.sh
PS1='[33[37m]W[33[0m]$(__git_ps1 " ([33[35m]%s[33[0m])") $ '
GIT_PS1_SHOWDIRTYSTATE=1
GIT_PS1_SHOWSTASHSTATE=1
GIT_PS1_SHOWUNTRACKEDFILES=1
GIT_PS1_SHOWUPSTREAM="auto"

Git Completion can be installed with:

sudo apt-get install git bash-completion

Ubuntu Mono font

I really like the Ubuntu Mono font, and I like the way it looks when running Ubuntu under Windows. You can download the Ubuntu Font Family free.

Ubuntu Mono

Nice directory colors (DIRCOLORS/LS_COLORS)'

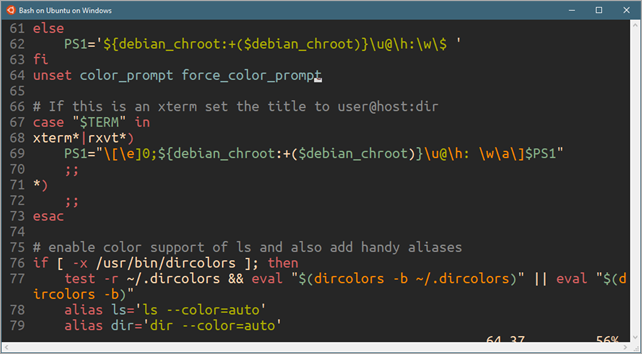
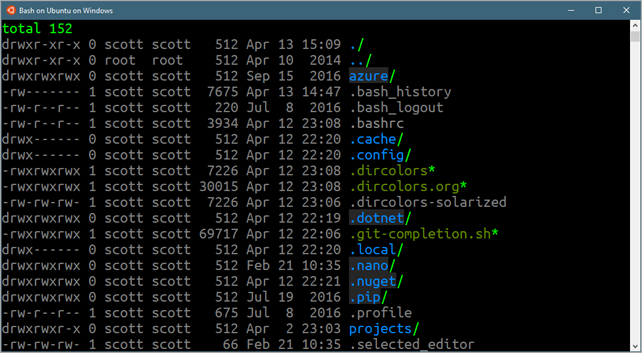
If you have a black command prompt background, then default colors for directories will be dark blue on black, which sucks. Fortunately you can get .dircolors files from all over the wep, or set the LS_COLORS (make sure to search for LS_COLORS for Linux, not the other, different LSCOLORS on Mac) environment variable.

I ended up with "dircolors-solarized" from here, downloaded it with wget or curl and put it in ~. Then confirm this is in your .bashrc (it likely is already)

# enable color support of ls and also add handy aliases

if [ -x /usr/bin/dircolors ]; then
test -r ~/.dircolors && eval "$(dircolors -b ~/.dircolors)" || eval "$(dircolors -b)"
alias ls='ls --color=auto'
alias dir='dir --color=auto'
#alias vdir='vdir --color=auto'

alias grep='grep --color=auto'
alias fgrep='fgrep --color=auto'
alias egrep='egrep --color=auto'
fi

Make a big difference for me, and as I mention, it's totally, gloriously, maddeningly configurable.

Nice dircolors

Leave YOUR Linux on Windows tips in the comments!


Sponsor: Did you know VSTS can integrate closely with Octopus Deploy? Watch Damian Brady and Brian A. Randell as they show you how to automate deployments from VSTS to Octopus Deploy, and demo the new VSTS Octopus Deploy dashboard widget. Watch now


© 2017 Scott Hanselman. All rights reserved.
     

Announcing SignalR 2.2.2 (Preview 1)

$
0
0

Today we are happy to announce the release of SignalR 2.2.2-preview1.

SignalR 2.2.2 is a servicing release, including some highly requested updates and bug fixes.

Here are the highlights of the release:

Here is a full list of issues fixed in this update.

This update also includes a new version of the SignalR C++ client (beta-2), which includes the following features:

Both SignalR 2.2.2 and the C++ client include community contributions – thanks!

Note: As mentioned, this is a servicing release for SignalR 2.2, not a new release for .NET Core. We’re hard at work on the SignalR port to .NET Core, with an expected release later this year.

Azure Functions Tools Roadmap

$
0
0

We’ve been humbled by the intense interest in Visual Studio tools for Azure Functions since we shipped our initial preview for Visual Studio 2015 last fall. Unfortunately, given other constraints, Visual Studio 2017 did not include Azure Functions when we shipped in March. So, we’d like to provide an update to our roadmap for Functions Tooling including Visual Studio 2017 support now.

Using the feedback we received from our first preview of the tools, we’ve decided that our next iteration of Azure Function tools will focus on creating precompiled Azure Function apps using .NET Standard 2.0 class libraries.

Why the pivot?

When we shipped the preview tools in Visual Studio 2015 last winter, two of the most common requests we received were for project to project references, and unit testing support (both locally and as part of a continuous integration pipeline). These feature requests along with many others made it clear that people desired a very standard Visual Studio experience for developing and working with Functions.

So rather than attempting to re-invent the wheel, we felt the right direction was to move to the standard C# artifact (class libraries) that has decades of investment and first class support for these capabilities. Additionally, as mentioned in the Publishing a .NET class library as a Function App blog post, precompiled functions also provide better cold start performance for Azure Functions.

What does this mean?

As with any change, there are both costs and benefits to the change. Overall we believe this will be a great thing for the future of Azure Functions for the following reasons:

  • These will be C# class libraries, which means that the full tooling power of the Visual Studio eco-system will be available including project to project references, test support, code analysis tools, code coverage, 3rd party extensions, etc.
  • NET Standard 2.0 is designed to work across the .NET Framework and .NET Core 2.0 (coming soon). This means .NET Standard 2.0 Azure Function projects will run with no code changes on both the current Azure Functions runtime, as well as on the planned .NET Core 2.0 Functions runtime. At that point, you can build .NET function apps on Windows, Mac, and Linux using the tools of your choice.

So, to ease the transition we recommend that you start new Azure Functions projects as C# class libraries, rather than using the 2015 preview tooling.

Conclusion

We hope that this helps to clarify what our current plans are, and why we think that it is the right thing to do for the long-term future of Azure Functions tooling. We’d also like to say that we’re working on on building this experience, and will have more details to share within the next month. As always, we would love your feedback, so let us know what comments and questions you have below, or via twitter at @AndrewBrianHall and @AzureFunctions.

R is for Archaeology: A report on the 2017 Society of American Archaeology meeting

$
0
0

by Ben Marwick, Associate Professor of Archaeology, University of Washington and Senior Research Scientist, University of Wollongong

The Society of American Archaeology (SAA) is one of the largest professional organisations for archaeologists in the world, and just concluded its annual meeting in Vancouver, BC at the end of March. The R language has been a part of this meeting for more than a decade, with occasional citations of R Core in the posters, and more recently, the distinctive ggplot2 graphics appearing infrequently on posters and slides. However, among the few archaeologists that have heard of R, it has a reputation for being difficult to learn and use, idiosyncratic, and only suitable for highly specialized analyses. Generally, archaeology students are raised on Excel and SPSS. This year, a few of us thought it was time to administer some first aid to R's reputation among archaeologists and generally broaden awareness of this wonderful tool. We developed a plan for this year's SAA meeting to show our colleagues that R is not too hard to learn, it is useful for almost anything that involves numbers, and it has lots of fun and cool people that use it to get their research done quicker and easier.

Our plan had three main elements. The first element was the début of two new SAA Interest Groups. The Open Science Interest Group (OSIG) was directly inspired by Andrew MacDonald's work founding the ESA Open Science section, with the OSIG being approved by the SAA Board this year. It aims to promote the use of preprints (e.g. SocArXiv), open data (e.g. tDAR, Open Context), and open methods (e.g. R and GitHub). The OSIG recently released a manifesto describing these aims in more detail. At this SAA meeting we also saw the first appearance of the Quantitative Archaeology Interest Group, which has a strong focus on supporting the use R for archaeological research. The appearance of these two groups shows the rest of the archaeological community that there is now a substantial group of R users among academic and professional archaeologists, and they are keen to get organised so they can more effectively help others who are learning R. Some of us in these interest groups were also participants in fora and discussants in sessions throughout the conference, and so had opportunities to tell our colleagues, for example, that it would be ideal if R scripts were available for for certain interesting new analytical methods, or that R code should be submitted when manuscripts are submitted for publication.

The second element of our plan was a normal conference session titled 'Archaeological Science Using R'. This was a two hour session of nine presentations by academic and professional archaeologists that were live code demonstrations of innovative uses of R to solve archaeological research problems. We collected R markdown files and data files from the presenters before the conference, and tested them extensively to ensure they'd work perfectly during the presentations. We also made a few editorial changes to speed things up a bit, for example using readr::read_csv instead of read.csv. We were told in advance by the conference organisers that we couldn't count on good internet access, so we also had to ensure that the code demos worked offline. On the day, the live-coding presentations went very well, with no-one crashing and burning, and some presenters even doing some off-script code improvisation to answer questions from the audience. At the start of the session we announced the release of our online book containing the full text of all contributions, including code, data and narrative text, which is online here. We could only do this thanks to the bookdown package, which allowed us to quickly combine the R markdown files into a single, easily readable website. I think this might be a new record for the time from an SAA conference session to a public release of an edited volume. The online book also uses Matthew Salganik's Open Review Toolkit to collect feedback while we're preparing this for publication as an edited volume by Springer (go ahead and leave us some feedback!). There was a lot of enthusiastic chatter later in the conference about a weird new kind of session where people were demoing R code instead of showing slides. We took this as an indicator of success, and received several requests for it to be a recurring event in future meetings.

The third element of our plan was a three hour training workshop during the conference to introduce archaeologists to R for data analysis and visualization. Using pedagogical techniques from Software Carpentry (i.e. sticky notes, live coding and lots of exercises), Matt Harris and I got people using RStudio (and discovering the miracle of tab-complete) and modern R packages such as readxl, dplyr, tidyr, ggplot2. At the end of three hours we found that our room wasn't booked for anything, so the students requested a further hour of Q&A, which lead to demonstrations of knitr, plotly, mapview, sf, some more advanced ggplot2, and a little git. Despite being located in the Vancouver Hilton, this was another low-bandwidth situation (which we were warned about in advance), so we loaded all the packages to the student's computers from USB sticks. In this case we downloaded package binaries for both Windows and OSX, put them on the USB sticks before the workshop, and had the students run a little bit of R code that used install.packages() to install the binaries to the .libpaths() location (for Windows) or untar'd the binaries to that location (for OSX). That worked perfectly, and seemed to be a very quick and lightweight method to get packages and their dependencies to all our students without using the internet. Getting the students started by running this bit of code was also a nice way to orient them to the RStudio layout, since they were seeing that for the first time.

This workshop was a first for the SAA, and was a huge success. Much of this is due to our sponsors who helped us pay for the venue hire (which was surprisingly expensive!). We got some major support from Microsoft Data Science User Group program (ed note: email msdsug@microsoft.com for info about the program) and Open Context, as well as cool stickers and swag for the students from RStudio, rOpenSci, and the Centre for Open Science. We used the stickers like tiny certificates of accomplishment, for example when our students produced their first plot, we handed out the ggplot2 stickers as a little reward.

Marwick-swag

Given the positive reception of our workshop, forum and interest groups, our feeling is that archaeologists are generally receptive to new tools for working with data, perhaps more so now than in the past (i.e. pre-tidyverse). Younger researchers seem especially motivated to learn R because they may have heard of it, but not had a chance to learn it because their degree program doesn't offer it. If you are a researcher in a field where R (or any programming language) is only rarely used by your colleagues, now might be a good time to organise a rehabilitation of R's reputation in your field. Our strategy of interest groups, code demos in a conference session, and a short training workshop during the meeting is one that we would recommend, and we imagine will transfer easily to many other disciplines. We're happy to share more details with anyone who wants to try!

Better battery life with Microsoft Edge

$
0
0

There’s a good chance you’ve noticed that Microsoft Edge and other popular browsers have recently been focused on improving battery life. We’ve been paying particular attention to this with Windows 10, and the response has been great. Windows users spend more than half their time on the web, so improvements here have a significant effect on your device’s battery life.

We’re committed to giving you the best, fastest, and most efficient browser possible. In this post, I’ll share some of the new energy efficiency improvements available with the Windows 10 Creators Update.

Comparing the latest versions of major browsers on Windows, the trends are similar to what we’ve seen with previous releases. According to our tests on the Windows 10 Creators Update – based on an open-source test which simulates typical browsing activities across multiple tabs – Microsoft Edge uses up to 31% less power than Google Chrome, and up to 44% less than Mozilla Firefox.

Bar chart measuring power consumed by Microsoft Edge and the latest versions of Chrome and Firefox. Microsoft Edge uses 31% less power than Chrome 57, and 44% less power than Firefox 52.

Direct measurements of average power consumption during typical browsing activities (source code).

Let’s dive in to some details of how we measure power consumption to optimize for battery life, and how we’re engineering Microsoft Edge to be the most efficient browser on Windows 10.

Our approach: open, transparent, and reproducible

Measuring and improving battery life are both complicated problems, and while we want to show off our leadership here, we also want to be a part of a constructive dialog that improves the entire web. That’s why we always share our measurements alongside filmed rundown tests, or through open source tests freely available on GitHub. These tests are repeatable by other browsers or curious users, backed by methodology documents and open source code.

One of the most important tools for our energy efficiency engineering is BrowserEfficiencyTest. It automates the most important tasks that people do with their browser, and runs through those tasks while measuring how much power a device is consuming, as well as how hard the CPU is working, how much traffic is being sent over the network, and more. It can be used to look at specific sites and patterns, or measure complex workloads composed of many different sites in multiple tabs. This test supports Microsoft Edge as well as Google Chrome and Mozilla Firefox, so we can compare results across browsers over time.

Surface Books instrumented for direct power measurement, running a looping browser test in a performance lab.

Surface Books instrumented for direct power measurement, running a looping browser test in a performance lab.

Using an open test has also enabled us to work closer with partners to deliver a better experience to you. As we built the Windows 10 Creators Update, we collaborated with hardware teams like Surface and Intel to understand what’s going on at the hardware level when you’re on the web. By designing the software and the hardware to work with each other, we can make your device run even faster and last even longer.

Battery life improvements in the Windows 10 Creators Update

Our improvements in EdgeHTML 15 are focused not only on improving the average power consumption in Microsoft Edge, but also making it more consistent. The below chart shows the 90th percentile power consumption during a multi-tab workload that went through email, social media, video, news, and more.

Bar chart comparing Edge power consumption in the Anniversary Update and in the Creators Update. In the Creators Update, Edge uses 17% less power at the 90th percentile.

As you can see, the 90th percentile has improved by 17% from the previous version of Microsoft Edge to the latest version. What does this mean for you? You can be more confident about getting consistent, all-day battery life with Microsoft Edge.

Let’s look at the specific things we’ve improved:

iframes are more efficient

Today, lots of web content is delivered using iframes, which allow web authors to embed documents (even from different origins) within their own webpages. This is a flexible, powerful, and secure tool used on many popular sites, often in the context of advertisements or embedded content. Iframes are essentially small webpages contained inside another web page.

Until now, these mini-webpages have been able to run JavaScript timers and code without restriction, even when you can’t see them. An iframe down at the bottom of an article could be running code, measuring if it’s visible, or performing animations while you’re still reading the headline at the top. With this release, we’ve made Microsoft Edge much more intelligent, throttling the JavaScript timers for iframes that aren’t visible, and stopping them from calculating animations that will never be seen. Users won’t notice any difference: the iframes still load and behave normally when you can see them. We’re simply reducing the resources they consume when they’re not visible.

Hit testing is more efficient

A common pattern we’ve found on sites is that pieces of a webpage want to know if they’re visible to the user or not, referred as hit testing. This is necessary for advertisers to judge the effectiveness of ads, as well as for creating infinite scrolling lists and other advanced layouts. In the past, this has been computationally expensive, especially since it’s done a lot. Sometimes, elements on a page will check to see if they’re visible on every frame, 60 times per second.

With the Creator’s Update, we’ve reworked what happens when the webpage needs to know if iframes or other elements are visible. We’ve added an additional layer of caching and optimizations to perform this common operation with less CPU and less power. Web developers don’t need to do anything different to take advantage of these improvements, and users won’t notice any difference, other than a faster experience and more battery life.

Intersection Observer

On top of these improvements, we’ve implemented a standards-based framework for webpages to accomplish the same thing without needing to constantly check for visibility themselves. This framework is called Intersection Observer; it’s supported by other major browsers and is documented with a working draft through the W3C.

When websites and ads take advantage of Intersection Observer, Microsoft Edge will do the work for them, calculating if they intersect with the main viewport or any other element. The page will be notified when any element’s intersection with the viewport changes, so constantly checking on every frame is no longer required. This is a much more efficient pattern, and will make the web better for everybody.

Encouraging HTML5 over Flash

In the Creator’s Update, we’re giving users even more control over their experience and helping transition the web to more secure, standards-based, and energy-efficient content by encouraging HTML5 over Flash and giving users control over where Flash is allowed to run. Not only is this good for battery life, but it will help improve security, speed, and stability.

Screen capture of a prompt in Microsoft Edge reading "Adobe Flash content was blocked."

Countless efficiency improvements based on telemetry

As with any release, we’re tweaking and improving what’s happening under the hood in Microsoft Edge. Recently, we’ve been using telemetry from real devices to measure how much time we’re spending responding to different APIs in JavaScript. This view tells us which functions we spend the most total time responding to across all devices, so we can improve those first and get the most bang for our buck.

Screen capture showing aggregated telemetry measuring how much time we’re spending responding to different APIs in JavaScript.

An interesting note: the top 10 functions account for about 50% of the total time that JavaScript spends waiting for Microsoft Edge to respond. Using this data, we’re improving not only battery life, but making webpages feel faster and snappier as well.

What’s next?

As always, this work is a step in our ongoing journey to improve your experience on the web and maximize what you can get out of your browser and your device. When it comes to making Microsoft Edge faster and more efficient, we’re never done! We look forward to continuing to push the limits of efficiency, speed, and battery life in upcoming releases.

– Brandon Heenan, Program Manager, Microsoft Edge

The post Better battery life with Microsoft Edge appeared first on Microsoft Edge Dev Blog.

Viewing all 10804 articles
Browse latest View live


<script src="https://jsc.adskeeper.com/r/s/rssing.com.1596347.js" async> </script>