Quantcast
Channel: Category Name
Viewing all 10804 articles
Browse latest View live

Easily Create IoT Edge custom modules with Visual Studio Code

$
0
0

At the recent Connect(); 2017 in November, we announced public preview of Azure IoT Edge. Now you can bring the intelligence of the Cloud right to the IoT Edge as well as easily create and manage business logic for your devices. The new Azure IoT Edge extension for Visual Studio Code along with the updated Azure IoT Toolkit extension will make your IoT Edge developments a real pleasure, providing a set of functionalities including:

  • Creating new IoT Edge projects
  • Building and publishing IoT Edge modules
  • Debugging IoT Edge modules locally
  • Managing IoT Edge devices in IoT Hub
  • Deploying IoT solutions to IoT Edge devices
  • Stopping and restarting IoT Edge

Azure IoT Edge Extension

Get Started with IoT Edge in Visual Studio Code

First things first, let’s start by answering the obvious question – What is IoT Edge? What can it do and how does it work? Azure IoT Edge moves cloud analytics and custom business logic to devices so that your organization can focus on business insights instead of data management. Enable your solution to truly scale by configuring your IoT software, deploying it to devices via standard containers, and monitoring it all from the cloud. Here is the Azure IoT Edge introduction page where you can find more in details.

Create a simulated Edge Device

Azure IoT Edge enables you to perform analytics and data processing on your devices, instead of having to push all the data to the cloud. To achieve this, you need a device having IoT Edge runtime installed to start with. Here are the tutorials about deploying Azure IoT Edge on a simulated device from end to end for both Windows and Linux operating environments.

Develop and deploy a C# IoT Edge module

Once you have the IoT Edge runtime deployed on your device (or simulator), you can then start working on modules. At the time we are writing this post, only C# is available for developing modules, but soon you will be able to develop them using C, Java, Node or Python as well. We have published a page talking about develop and deploy a C# IoT Edge module to your simulated device using Visual Studio Code, check it out first, then we’ll show you how to debug it in VS Code with the IoT Edge extension.

Debug your IoT Edge C# module

  1. To start debugging, you will need to use the dockerfile.debug to rebuild your docker image and deploy your Edge solution again. This is to add debugging support and rebuild the Docker image through dockerfile.debug configurations.
     
    In Visual Studio Code explorer, select Dockerfile.debug and right-click to select Build IoT Edge module Docker image. Then containerize and publish your module image as usual. It’s recommended you use a local registry to host your images for debugging purposes if you are working on a Linux container.
    Select Docker file debug
  1. You can reuse the deployment.json file (click here to know more about IoT Edge deployment) if you already have the desired modules and routes configured for your IoT Edge device. In command Palette (Ctrl+Shift+P), type and select Edge: Restart Edge to get your module started in debug version.
  2. Now you can setup the debug configuration. Visual Studio Code provides a configuration file launch.json that allows you to configure your own debugging environment (click here to read more). In this scenario, configure your launch.json file as follows:
    • If you don’t have a launch.json file yet, navigate to the VS Code debug window, press F5 and select IoT Edge (.Net Core). The launch.json file will be generated for you.
      Add new launch json file
    • If the launch.json file already exists, open it in VS Code, click Add Configuration…, and select Edge: Debug IoT Edge Module (.NET Core).
      Add configuration to existing json file
  3. In launch.json, navigate to the Debug IoT Edge Module (.NET Core) section and specify the <container_name>.
    Update configuration name
  4. Navigate to Program.cs. Add breakpoints and press F5 again. Then select the dotnet process to attach to.
    Start debugging
  5. In the Debug window, you can see the variables in the left panel.

Azure IoT Edge extension also supports developing, debugging and deploying Azure Function for IoT Edge. For more information, please visit here.

Try it out

Now that you have learnt the basics about debugging an IoT Edge module with Visual Studio Code, go download the Edge extension and create your first Module, then join Gitter to let us know what you think or if you need help.

Xinyi Zhang, Senior Engineering Manager, IoT Tools and Services

Xinyi is a engineering manager working on IoT tools and services, focusing on providing great dev experience on IoT related tools.


Build your ads free search engine with Bing Custom Search API

$
0
0

It’s a little over 6 weeks since we made the Bing Custom Search API generally available. We are excited to see the applications our partners are building and are overwhelmed with the response we are receiving. If you haven’t tried Bing Custom Search API yet, this blog post will help you to get started.

Bing Custom Search API – Salient Points

  • Ads free search experience for your website.
  • Complete control over which domains, subsites, or webpages to surface results from. This will enable you to build a tailored search experience for different topics for any industry type (e.g., health, entertainment, retail, finance etc.) that your application demands.
  • Free hosted UI for search experience.
  • Free access keys to explore, tweak, and configure your search instance followed by a pay-as-you-go subscription.
  • Ability to promote, demote, and pin search results.
  • Trusted indexing and relevance capabilities of Bing.

To learn more about Bing Custom Search API, check out the overview within our documentation. For getting started in C#, Java, Node.js, or Python languages, see our Quickstarts. For more detailed onboarding and hosted UI information, visit our tutorial section.

Also, please watch our short online demo about Bing Custom Search API here.

Getting Started

Below is the step-by-step process of how to sign up and create your new custom search instance:

  1. Get Access keys

    You can start your journey of building your customized search engine from here: https://azure.microsoft.com/en-us/services/cognitive-services/bing-custom-search/. For getting free access keys click on “Try Bing Custom Search”. Free access keys are good for exploring and tweaking the search instance you will create next. Alternately, you can buy paid subscription from the Azure portal.

    Try Bing Custom Search API

  2. Create Custom Search Instance

    Go to https://www.customsearch.ai/ and sign in using your outlook.com, live account etc. This is a home to your search instances (each search instance is your custom search engine) and you will come back here to modify the existing instances or create new instances in the future.

    Bing Custom Search API Sign In

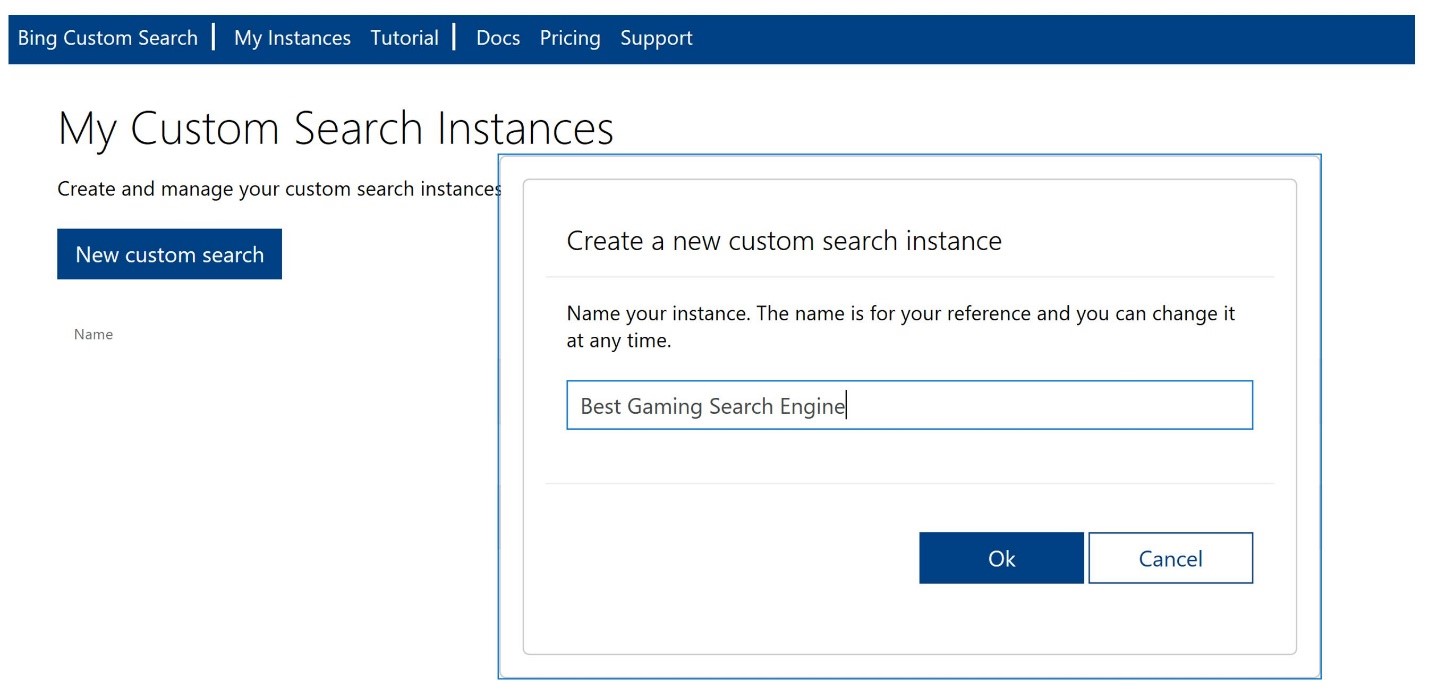
    Create a new search instance – you can alter the name of this instance any time in the future.

    My Custom Search Instances

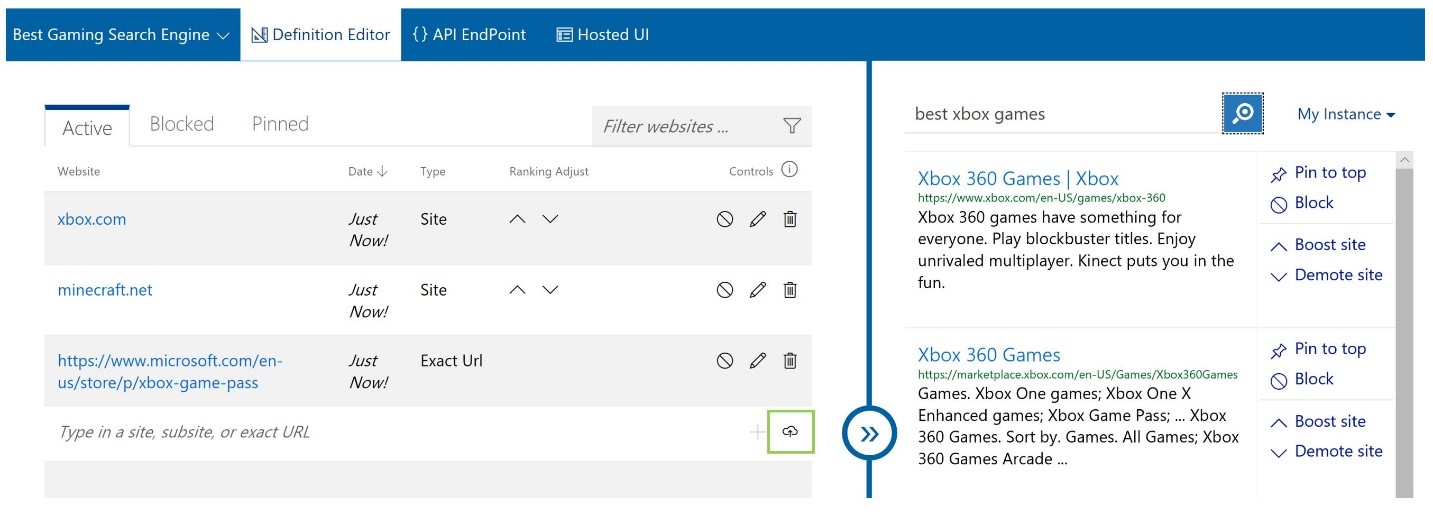
    After creating this instance, you can add sites, subsites, or exact URLs in the definition editor. Below is one such example. You can batch upload multiple websites by clicking on the cloud button highlighted in the below image. You can also add some more sources from “You might also want to add” section at the bottom of the page.

    Bing Custom Search Definition Editor

    While adding websites, you can check results on the right side of the frame by typing in your queries. Also, compare these results to Bing results by switching to “Bing” from “My Instance.”

  3. Using Custom Search Instance

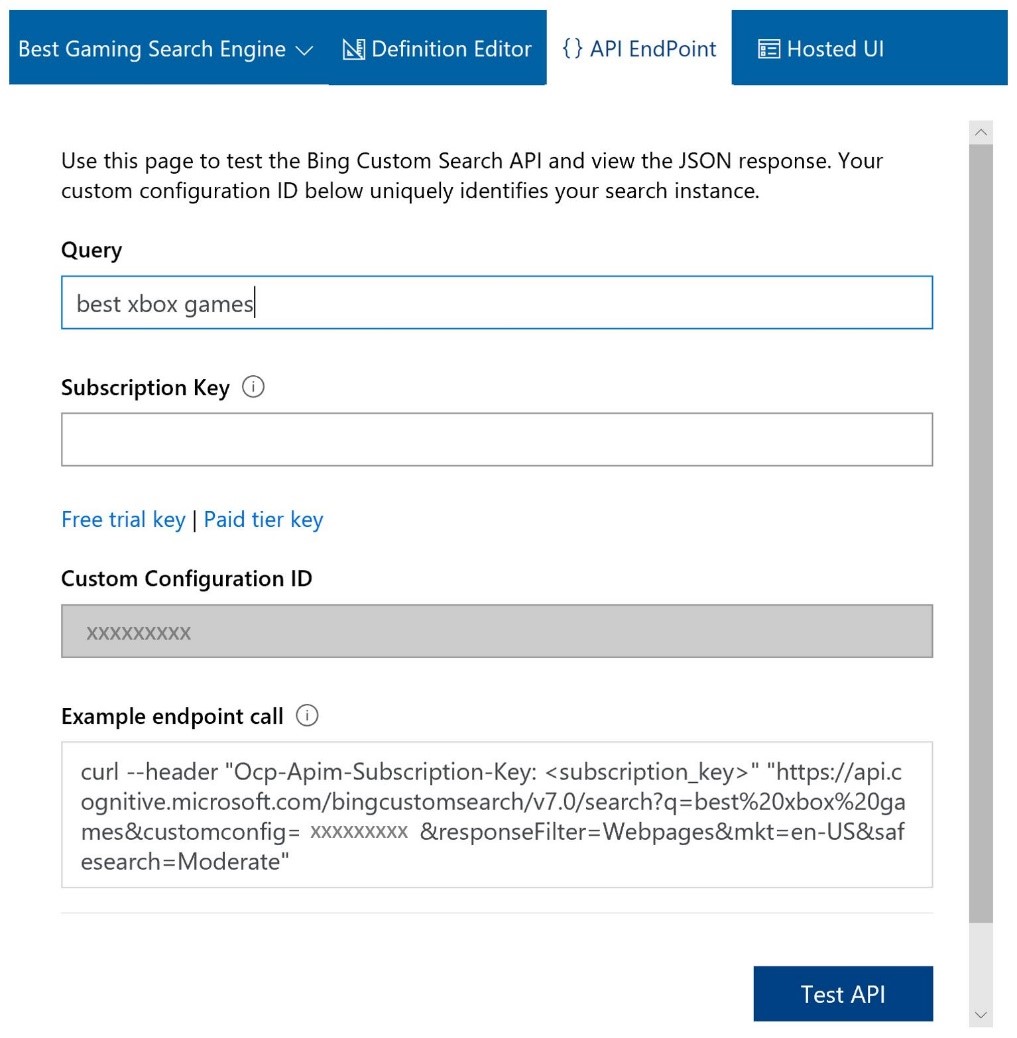
    Once your custom search instance is created, you can get your “Custom Configuration ID” and example endpoint from the “API Endpoint” tab. Insert your free or paid subscription key to see your custom search engine in action. Embed the “Example endpoint call” in your application to get JSON response for the user query.

    Bing Custom Search API EndPoint

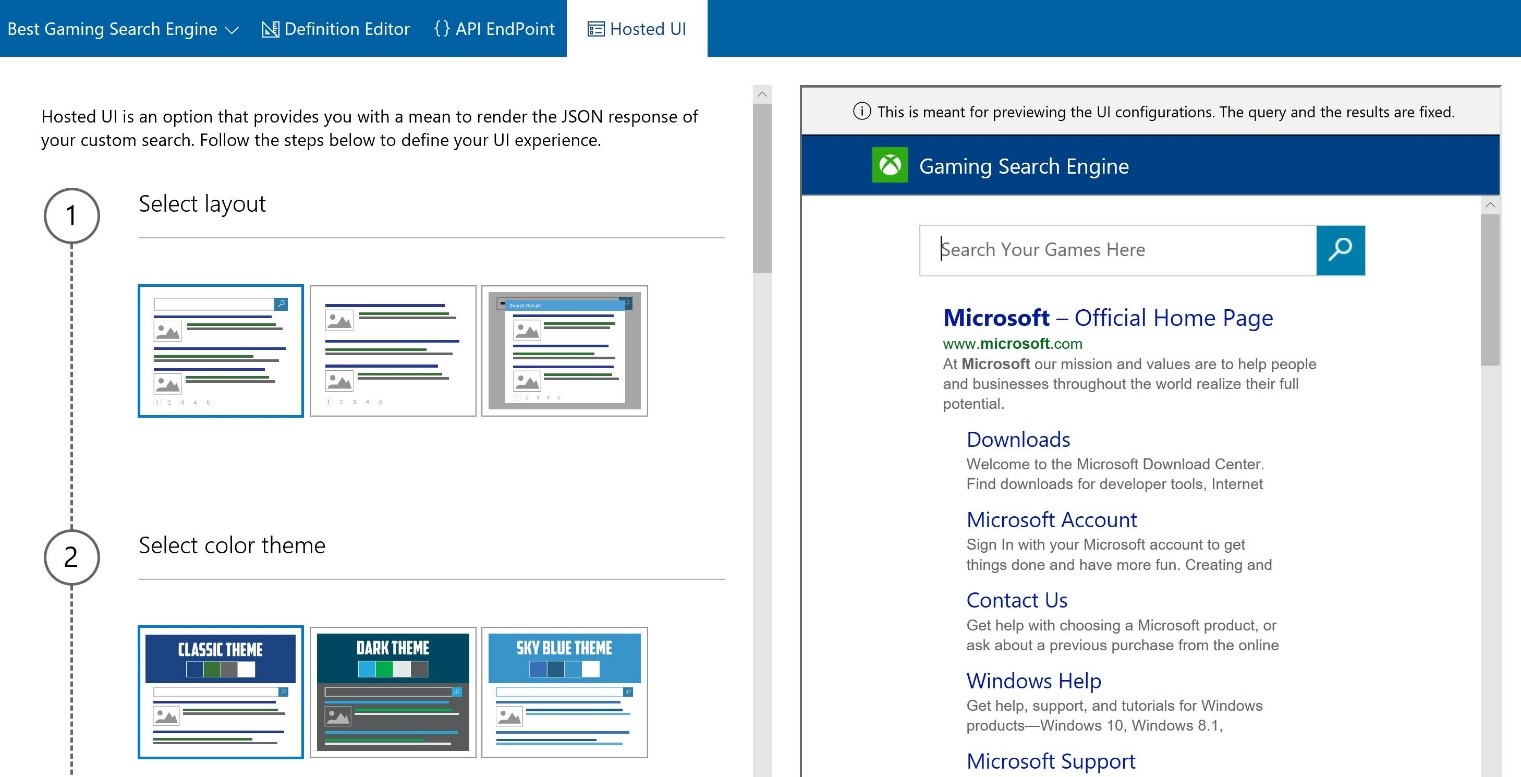
    You can also use Hosted UI for your search engine by providing layout, color theme, and additional configurations, such as number of results per page, search box text, page title, logo and favicon URLs among other things. Below is an example of what your search engine could look like using the hosted UI:

    Bing Custom Search Hosted UI

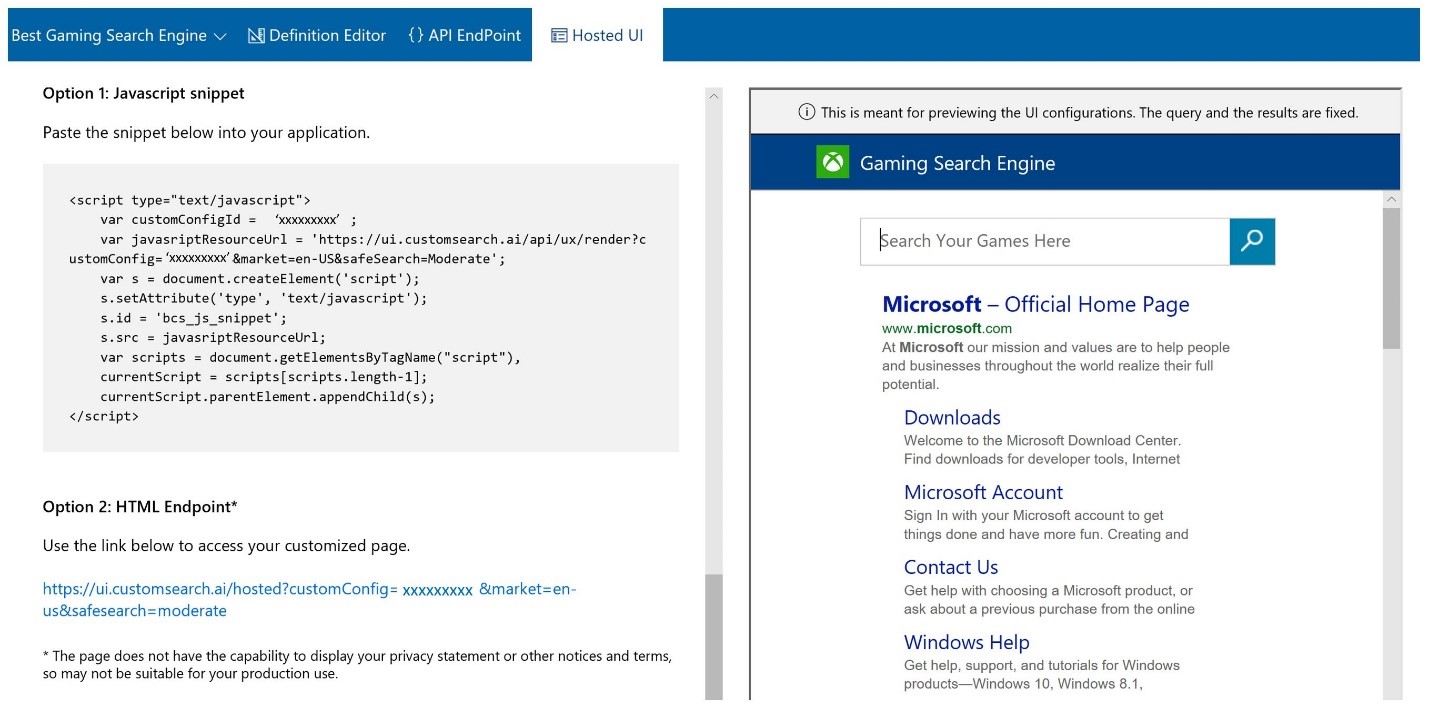
    You can embed Javascript snippet in your application or use the HTML endpoint to start utilizing the hosted UI you just designed. Below is the snapshot manifesting javascript and HTML snippets for the instance just created. More details for consuming hosted UI are available in a tutorial.

    Bing Custom Search Hosted UI Javascript Snippet

Let us know what think about Bing Custom Search API and what would you like to see in future versions at Stack Overflow and Azure Support. We’re eager to learn about your customized search engine.

- Bing Team

North Bay Python 2017 Recap

$
0
0

Bliss, the default background from Windows XP

Last week I had the privilege to attend the inaugural North Bay Python conference, held in Petaluma, California in the USA. Being part of any community-run conference is always enjoyable, and to help launch a new one was very exciting. In this post, I'm going to briefly tell you about the conference and help you find recordings of some of the best sessions (and also the session that I presented).

Petaluma is a small city in Sonoma County, about one hour north of San Francisco. Known for their food and wine, it was a surprising location to find a conference, including for many locals who got to attend their first Python event.

If the photo to the right looks familiar, you probably remember it as the default Windows XP background image. It was taken in the area, inspired the North Bay Python logo, and doesn't actually look all that different from the hills surrounding Petaluma today.

Nearly 250 attendees converged on a beautiful old theatre to hear from twenty-two speakers. Topics ranged from serious topics of web application accessibility, inclusiveness, through to lighthearted talks on machine learning and Django, and the absolutely hilarious process of implementing merge sort using the import statement. All the videos can be found on the North Bay Python YouTube channel.

George London (@rogueleaderr) presenting merge sort implemented using import

Recently I have been spending some of my time working on a proposal to add security enhancements to Python, similar to those already in Powershell. While Microsoft is known for being highly invested in security, not everyone shares the paranoia. I used my twenty-five minute session to raise awareness of how modern malware attacks play out, and to show how PEP 551 can enable security teams to better defend their networks.

Steve Dower (@zooba) presenting on PEP 551

(Image credit: VM Brasseur, CC-BY 2.0)

While I have a general policy of not uploading my presentation (slides are for speaking, not reading), here are the important links and content that you may be interested in:

Overall, the conference was a fantastic success. Many thanks to the organizing committee, Software Freedom Conservancy, and the sponsors who made it possible, and I am looking forward to attending in 2018.

The North Bay Python committee on stage at the end of the conference

Until the next North Bay Python though, we would love to have a chance to meet you at the events that you are at. Let us know in the comments what your favorite Python events are and the ones you would most like to have people from our Python team come and speak at.

A chart of Bechdel Test scores

$
0
0

A movie is said to satisfy the Bechdel Test if it satisfies the following three criteria:

  1. The movie has at least two named female characters
  2. ... who have a conversation with each other
  3. ... about something other than a man

The website BechdelTest.com scores movies accordingly, granting one point for each of the criteria above for a maximum of three points. The recent Wonder Woman movie scores the full three points (Diana and her mother discuss war, for example), while Dunkirk, which features no named female characters, gets zero. (It was still a great film, however.)

The website also offers an API, which enabled data and analytics director Austin Wehrwein to create this time series chart of Bechdel scores for movies listed on BechdelTest.com:

Bechdel2-1

This chart only includes ratings for that subset of movies listed on Bechdeltest.com, so it's not clear whether this is representative of movies as a whole. Austin suggests combining these data with the broader data from IDMB, so maybe someone wants to give that a try. Austin's R code for generating the above chart and several others is available at the link below, so click through for the full analysis.

Austin Wehrwein: A quick look at Bechdel test data (& an awtools update) (via Mara Averick)

Cloud storage now more affordable: Announcing general availability of Azure Archive Storage

$
0
0

Today we’re excited to announce the general availability of Archive Blob Storage starting at an industry leading price of $0.002 per gigabyte per month! Last year, we launched Cool Blob Storage to help customers reduce storage costs by tiering their infrequently accessed data to the Cool tier. Organizations can now reduce their storage costs even further by storing their rarely accessed data in the Archive tier. Furthermore, we’re also excited to announce the general availability of Blob-Level Tiering, which enables customers to optimize storage costs by easily managing the lifecycle of their data across these tiers at the object level.

From startups to large organizations, our customers in every industry have experienced exponential growth of their data. A significant amount of this data is rarely accessed but must be stored for a long period of time to meet either business continuity or compliance requirements; think employee data, medical records, customer information, financial records, backups, etc. Additionally, recent and coming advances in artificial intelligence and data analytics are unlocking value from data that might have previously been discarded. Customers in many industries want to keep more of these data sets for a longer period but need a scalable and cost-effective solution to do so.

“We have been working with the Azure team to preview Archive Blob Storage for our cloud archiving service for several months now.  I love how easy it is to change the storage tier on an existing object via a single API. This allows us to build Information Lifecycle Management into our application logic directly and use Archive Blob Storage to significantly decrease our total Azure Storage costs.”

-Tom Inglis, Director of Enabling Solutions at BP BPP_Rlbg

Azure Archive Blob Storage

Azure Archive Blob storage is designed to provide organizations with a low cost means of delivering durable, highly available, secure cloud storage for rarely accessed data with flexible latency requirements (on the order of hours). See Azure Blob Storage: Hot, cool, and archive tiers to learn more.

Archive Storage characteristics include:

  • Cost-effectiveness: Archive access tier is our lowest priced storage offering for long-term storage which is rarely accessed. Preview pricing will continue through January 2018. For new pricing effective February 1, 2018, see Archive Storage General Availability Pricing.
  • Seamless Integration: Customers use the same familiar operations on objects in the Archive tier as on objects in the Hot and Cool access tiers. This will enable customers to easily integrate the new access tier into their applications.
  • Durability: All access tiers including Archive are designed to offer the same high durability that customers have come to expect from Azure Storage with the same data replication options available today.
  • Security: All data in the Archive access tier is automatically encrypted at rest using 256-bit AES encryption, one of the strongest block ciphers available.
  • Global Reach: Archive Storage is available today in 14 regions – North Central US, South Central US, East US, West US, East US 2, Central US, West US 2, West Central US, North Europe, West Europe, Korea Central, Korea South, Central India, and South India.

Blob-Level Tiering: easily optimize storage costs without moving data

To simplify data lifecycle management, we now allow customers to tier their data at the object level. Customers can easily change the access tier of a single object among the Hot, Cool, or Archive tiers as usage patterns change, without having to move data between accounts. Blobs in all three access tiers can co-exist within the same account.

Flexible management

Archive Storage and Blob-Level Tiering are available on both new and existing Blob Storage and General Purpose v2 (GPv2) accounts. GPv2 accounts are a new account type that support all our latest features, while offering support for Block Blobs, Page Blobs, Files, Queues, and Tables. Customers with General Purpose v1 (GPv1) accounts can easily convert their accounts to a General Purpose v2 account through a simple 1-click step (Blob Storage account conversion support coming soon). GPv2 accounts have a different pricing model than GPv1 accounts, and customers should review it prior to using GPv2 as it may change their bill. See Azure Storage Options to learn more about GPv2, including how and when to use it. 

A user may access Archive and Blob-Level Tiering via the Azure portal (Figure 1), PowerShell, and CLI tools and REST APIs, .NET (Figure 2), Java, Python, or Node.js client libraries.

image
Figure 1: Set blob access tier in portal


CloudBlockBlob blob = (CloudBlockBlob)items;
blob.SetStandardBlobTier(StandardBlobTier.Archive);

Figure 2: Set blob access tier using .NET client library

Partner Integration

We integrate with a broad ecosystem of partners to jointly deliver solutions to our customers. The following partners support Archive Storage:

imageCommvault’s Windows/Azure Centric software solution enables a single solution for storage-agnostic, heterogeneous enterprise data management. Commvault's native support for Azure, including being one of the first Windows/ISV to be "Azure Certified" has been a key benefit for customers considering a Digital Transformation to Azure. Commvault remains committed to continuing our integration and compatibility efforts with Microsoft, befitting a close relationship between the companies that has existed for over 17 years. This includes quick, cost effective and efficient movement of data to Azure while enabling indexing such that our customers can proactively use the data we send to Azure, including "Azure Archive". With this new Archive Storage offering, Microsoft again makes significant enhancements to their Azure offering and we expect that this service will be an important driver of new and expanding opportunities for both Commvault and Microsoft.

imageNetApp® AltaVaultTM cloud-integrated storage enables customers to tap into cloud economics and securely backup data to Microsoft Azure cloud storage at up to 90% lower cost compared with on-premises solutions. AltaVault’s modern storage architecture optimizes data using class-leading deduplication, compression, and encryption. Optimized data is written to Azure blob storage, reducing WAN bandwidth requirements and ensuring maximum data security. By adding Day 1 support for Azure Archive storage, AltaVault provides organizations access to the most cost-effective Azure blob storage tier, significantly driving down costs for rarely accessed long term backup and archive datasets. Try AltaVault’s free 90-day trial and see how easy it is to leverage Microsoft Azure Archive cloud storage today.

imageHubStor is a cloud archiving platform that converges long-term retention and data protection for on-premises file servers, Office 365, email, and other sources of unstructured data content. Delivered as Software-as-a-Service (SaaS) exclusively on the Azure cloud platform, IT teams are adopting HubStor to understand, secure, and manage large volumes of data in Azure with policies for classification, indexing, WORM retention, deletion, and tiering. As detailed in this post, customers can now apply HubStor’s built-in file analytics and storage tiering policies with the new Azure Archive Blob Storage tier to place the right data on the optimal tier at the best time in the information lifecycle. Enterprise Strategy Group recently completed a lab validation report on HubStor which you can download here.

imageThe purpose of CloudBerry Backup for Microsoft Azure is automating data upload to Microsoft Azure cloud storage. It is able to compress and encrypt the data with a user-defined password prior to the upload. It then securely transfers it to the cloud either on schedule or in real time. CloudBerry Backup also comes with file-system and image-based backup, SQL Server and MS Exchange support, as well as flexible retention policies and incremental backup. CloudBerry Backup now supports Microsoft Azure Archive Blob Storage for storing backup and archival data.

imageArchive2Azure, the intelligent data management and compliance archiving solution, provides customers a native Azure archiving application. Archive2Azure enables companies to provide automated retention, indexing on demand, encryption, search, review, and production for long term archiving of their compliance, active, low-touch, and inactive data from within their own Azure tenancy. This pairing of the Azure Cloud with Archive2Azure's archiving and data management capabilities provides companies with the cloud-based security and information management they have long sought. With the general availability of Azure's much anticipated Archive Storage offering, the needed security and lower cost to archive and manage data for extended periods is now possible. With the availability of the new Archive Storage offering, Archive2Azure can now offer Azure’s full range of storage tiers providing users a wide choice of storage performance and cost.

image[Archive support coming soon] Cohesity delivers the world’s first hyper-converged storage system for enterprise data. Cohesity consolidates fragmented, inefficient islands of secondary storage into an infinitely expandable and limitless storage platform that can run both on-premises and in the public cloud. Designed with the latest web-scale distributed systems technology, Cohesity radically simplifies existing backup, file shares, object, and dev/test storage silos by creating a unified, instantly-accessible storage pool. The Cohesity platform will support Azure Archive Storage for the following customer use cases: (i) long-term data retention for infrequently accessed data that require cost effective lowest priced blob storage, (ii) blob-level tiering functionality among Hot, Cool and Archive tiers, and (iii) ease of recovery of data from cloud back to on-premise independent of which Azure blob tier the data is in. Note that Azure Blob storage can be easily registered and assigned via Cohesity’s policy-based administration portal to any data protection workload running on the Cohesity platform.

imageIgneous Systems delivers the industry’s first secondary storage system built to handle massive file systems. Offered as-a-Service and built using a cloud-native architecture, Igneous Hybrid Storage Cloud provides a modern, scalable approach to management of unstructured file data across datacenters and public cloud, without the need to manage infrastructure. Igneous supports backup and long-term archiving of unstructured file data to Azure Archive Blob Storage, enabling organizations to replace legacy backup software and targets with a hybrid cloud approach.

image[Archive support coming soon] Rubrik orchestrates all critical data management services – data protection, search, development, and analytics – on one platform across all your Microsoft applications. By adding integration with Microsoft Azure Archive Storage Tier, Rubrik will complete support for all storage classes of Azure. With Rubrik, enterprises can now automate SLA compliance to any class in Azure with one policy engine and manage all archival locations in a single consumer-grade interface to meet regulatory and legal requirements. Leverage a rich suite of API services to create custom lifecycle management workflows across on-prem to Azure. Rubrik Cloud Data Management was architected from the beginning to deliver cloud archival services with policy-driven intelligence. Rubrik has achieved Gold Cloud Platform competency and offers end-to-end coverage of Microsoft technologies and services (physical or virtualized Windows, SQL, Hyper-V, Azure Stack, and Azure).

General availability of Azure Site Recovery Deployment Planner for VMware and Hyper-V

$
0
0

I am excited to announce the general availability (GA) of the Azure Site Recovery Deployment Planner for VMware and Hyper-V. This tool helps VMware and Hyper-V enterprise customers to understand their on-premises networking requirements, Microsoft Azure compute and storage requirements for successful Azure Site Recovery replication, and test failover or failover of their applications.

Apart from understanding infrastructure requirements, our customers also needed a way to estimate the total disaster recovery (DR) cost to Azure. In this GA release, we have added detailed estimated DR cost to Azure for your environment. You can generate a report with the latest Azure prices based on your subscription, the offer that is associated with your subscription, and the target Azure region for the specified currency. The Deployment Planner report gives you cost for compute, storage, network, and Azure Site Recovery licenses.

Key features of the tool

  • The Deployment Planner can be run without having to install any Azure Site Recovery components to your on-premises environment.
  • The tool does not impact the performance of production servers, as no direct connection is made to them. All performance data is collected from the Hyper-V server or VMware vCenter Server/VMware vSphere ESXi Server, which hosts the production virtual machines.

What aspects does the Azure Site Recovery Deployment Planner cover?

As you move from a proof of concept to a production rollout of Azure Site Recovery, we strongly recommend running the Deployment Planner. The tool provides following details:

Compatibility assessment

  • A VM eligibility assessment to protect to Azure with Site Recovery

Network bandwidth need vs. RPO assessment

  • The estimated network bandwidth that's required for delta replication
  • The throughput that Site Recovery can get from on-premises to Azure
  • RPO that can be achieved for a given bandwidth
  • Impact on the desired RPO if lower bandwidth is provisioned

Microsoft Azure infrastructure requirements

  • The storage type (standard or premium storage account) requirement for each virtual machine
  • The total number of standard and premium storage accounts to be set up for replication
  • The storage-account placement for all virtual machines
  • The number of Azure cores to be set up before test failover or failover on the subscription
  • The Azure VM-recommended size for each on-premises VM

    On-premises infrastructure requirements

    • The required free storage on each of volume of Hyper-V storage for successful initial replication and delta replication
    • Maximum copy frequency to be set for Hyper-V replication
    • The required number of Configuration Servers and Process Servers to be deployed on-premises for VMware to Azure scenario

    Initial replication batching guidance

    • Number of virtual machines that can be replicated to Azure in parallel to complete initial replication

    Estimated DR cost to Azure

    • Estimated total DR cost to Azure: compute, storage, network, and Azure Site Recovery license cost
    • Detail cost analysis per virtual machine
    • Specifies replication cost and the DR-Drill cost

    Factoring future growth

    • All the above factors are impacted after considering possible future growth of the on-premises workloads with increased usage

    How does the Deployment Planner work?

    The Deployment Planner has three main modes of operation:

    • Profiling
    • Report generation
    • Throughput calculation

    Profiling

    In this mode, you profile all the on-premises servers that you want to protect over a few days, e.g. 30 days. The tool stores various performance counters like R/W IOPS, Write IOPS, and data churn, as well as other virtual machine characteristics like number of cores, number/size of disks, number of NICs, ect., by connecting to the Hyper-V server or the VMware vCenter Server/VMware vSphere ESXi Server where the virtual machines are hosted.

    Report generation

    In this mode, the tool uses the profiled data to generate a deployment planning report in Microsoft Excel format. The report has six to eight sheets based on the virtualization type:

    • On-premises summary
    • Recommendations
    • Virtual machine to storage placement
    • Compatible VMs
    • Incompatible VMs
    • On-premises storage requirement (only for Hyper-V)
    • Initial replication batching (only for Hyper-V)
    • Cost estimation

    By default, the tool takes the 95th percentile of all profiled performance metrics and includes a growth factor of 30%. Both these parameters, percentile calculation and growth factor, are configurable.

    Throughput calculation

    In this mode, the tool finds the network throughput that can be achieved from your on-premises environment to Microsoft Azure for replication. This will help you determine what additional bandwidth you need to provision for replication.

    With Azure Site Recovery’s promise of full application recovery on Microsoft Azure, through deployment planning is critical for disaster recovery. With the Deployment Planner, we will ensure that both brand new deployments and existing deployments get the best replication experience and application performance when running on Microsoft Azure.

    Learn more about Hyper-V to Azure Deployment Planner and VMware to Azure Deployment Planner.

    New Azure management and cost savings capabilities

    $
    0
    0

    Enterprise customers choose Azure because of the unique value it provides as a productive, hybrid, intelligent and trusted cloud. Today I’m excited to announce four new management and cost savings capabilities. Azure Policy, now in public preview, provides control and governance at scale for your Azure resources. Azure Cost Management is rolling out the support for Azure Virtual Machine Reserved Instances management later this week to help you maximize savings over time.. To continue our commitment to making Azure cost-effective, we are reducing the prices of up to 4% on our Dv3 Series in several regions in the coming days, and making our lowest priced Storage tier Azure Archive Storage generally available today.

    Simple ways to ensure a secure and well-managed cloud infrastructure

    Azure is committed to providing a secure cloud foundation, while making available a comprehensive set of services to ensure that your cloud resources are secure and well-managed. Cloud security and management is a joint responsibility between Microsoft and the customer. We recommend that customers follow secure and well-managed cloud best practices for every production virtual machine. To help you achieve this goal, Azure has built-in services that can be configured quickly, are always up to date and are tightly integrated into the Azure experience. Take advantage of Azure Security Center for security management and threat protection, back up data to protect against ransomware and human errors with Azure Backup, and keep your applications running with Azure Monitor and Log Analytics. Check out the new poster that describes the Azure security and operations management services.

    Enterprise customers have asked for better ways to help them manage and secure cloud resources at scale to accelerate cloud adoption. Azure Policy allows you to turn on built-in policies or build your own custom policies to enable company-wide governance. For example, you can set your security policy for your production subscription once and apply that policies to multiple subscriptions. I am happy to announce that Azure Policy is now in public preview.

    Most value for every cloud dollar spent

    With Azure Cost Management, Azure is the only platform that offers an end-to-end cloud cost management and optimization solution to help customers make the most of cloud investment across multiple clouds. Cost Management is free to all customers to manage their Azure spend. We are continuing to invest in bringing new capabilities to Cost Management. I am excited to announce that Cost Management supports Azure Reserved Virtual Machine Instances management starting December 15th.

    In Azure, we have a long standing promise of making our prices comparable with AWS on commodity services such as compute, storage, and bandwidth. In keeping with this commitment, we are happy to announce price reductions of up to 4% on our latest general-purpose virtual machines, Dv3 Series in US West 2, US East and Europe North. These prices will take effect on January 5th.

    We often hear customers are looking to the cloud for cost-effective ways to manage and store their infrequently accessed data for use cases like backup and archiving. Today, we’re announcing general availability of Azure Archive Storage, our lowest priced Storage tier yet. You can learn more details here.

    Azure is the most cost-effective cloud for Windows Server workloads. If you are a Windows Server customer with Software Assurance, you can combine Azure Reserved Instances (RIs) with Azure Hybrid Benefits and save up to 82% compared to pay-as-you-go prices, and up to 67% compared to AWS RIs for Windows VMs. In addition, with Azure Hybrid Benefit for SQL Server, customers with Software Assurance will be able to save even more.

    There are many other ways to save money with Azure. To learn more, check out the new Azure Cost Savings infographic below.

    AzureCostSavings_InfographicStoryboard_v9_JJ

    Azure provides the broadest set of security and management capabilities built into a public cloud platform. With these capabilities, customers can more easily secure and manage hybrid infrastructure resources while achieving significant cost savings. Activate Security Center, Backup, Log Analytics and Cost Management today to ensure a secure and well-managed cloud infrastructure with optimized efficiency.

    Azure ARM API for consumption usage details

    $
    0
    0

    As an update to the Reporting APIs for Enterprise customers we are releasing an updated usage details API. This is a first step in the consolidation of Azure cost and usage based APIs in the ARM (Azure Resource Manager) model. The updated usage details API will support:

    • Migrating from a key based authorization model to ARM based authentication. The benefits of this authorization mode are an improved security posture and the ability to utilize ARM RBAC for authorization.
    • Adding support for Web Direct subscriptions, with a few exceptions documented below.
    • The ability to use filters and expand usage details.
    • Call the API for either a subscription scope, or a subscription and billing period scope. All calls for a subscription will return data for the current billing period.
    • Filter criteria will support dates, resource groups, resources, and instances. Additional details on the filters are available in the Swagger.

    For Enterprise customers, reporting at a grain higher than the subscription is a work in progress and until released, you will need to continue to use the existing API. The consumption ARM API is the area we continue to invest in for cost related APIs with the goals of normalizing our APIs across the different purchase channels, starting with Enterprise customers and Web Direct. The APIs will continue to evolve as we invest in extending the APIs to include features such as budgets, and support for other subscription types and channels in upcoming releases.

    Usage details API

    Usage details list

    The usage details API returns usage and cost information for the provided subscription. In addition, the API also supports a few options for scope, filter, and details. For an example and detailed documentation, please visit the documentation page.

    At minimum you will need to have Billing Reader privileges on the subscription to call the API. Also, view charges will need to be enabled on the EA portal for EA customers.

    Usage details options

    Scope

    The scope is the context of the subscription or the billing period that your are calling the API under. Scope can be just the subscription or a specific billing period for a subscription, as shown below.

    • Subscription only: subscriptions/{subscriptionId}
    • Billing period for a subscription: /subscriptions/{subscriptionId}/providers/Microsoft.Billing/billingPeriods/{billingPeriodName}

    Expand

    By default, the API only returns summarized usage information with a meter ID. If you want additional information on the meter, or additional information about the resource, you will need to add the expand parameter with the appropriate value:

    • Expanded meter information: properties/meterDetails
    • Expanded properties bag: properties/additionalProperties

    Filters

    Filters can be used to limit data to specific criteria. Filters are supported on only a few columns, including the date range filter, with a few limitations described in the documentation.

    Limitations on subscriptions

    The following subscription types are currently not supported with this API:

    • MS-AZR-0145P
    • MS-AZR-0 146P
    • MS-AZR-159P
    • MS-AZR-0036P
    • MS-AZR-0143P
    • MS-AZR-0015P
    • MS-AZR-0144P

    Additional resources


    Announcing the General Availability of Azure Bot Service and Language Understanding, enabling developers to build better conversational bots

    $
    0
    0

    Conversational AI, or making human and computer interactions more natural, has been a goal since technology became ubiquitous in our society. Our mission is to bring conversational AI tools and capabilities to every developer and every organization on the planet, and help businesses augment human ingenuity in unique and differentiated ways.

    Today, I’m excited to announce Microsoft Azure Bot Service and Microsoft Cognitive Services Language Understanding (LUIS) are both generally available.

    Azure Bot Service enables developers to create conversational interfaces on multiple channels while Language Understanding (LUIS) helps developers create customized natural interactions on any platform for any type of application, including bots. Making these two services generally available on Azure simultaneously extends the capabilities of developers to build custom models that can naturally interpret the intentions of people conversing with bots.

    This announcement delivers on our AI Platform approach, providing developers and data scientists with all the tools they need to create AI applications in the cloud and on mobile devices. In November, at Connect(); 2017, we released tools to infuse AI into new and existing applications quickly and easily with updates to Azure Machine Learning (AML) including Azure IoT Edge integration, as well as new Visual Studio Tools for AI. In September, at Microsoft Ignite 2017, we announced tools for the AI-driven Digital Transformation and described how the Microsoft AI platform enables a rich variety of application scenarios.

    New capabilities of Azure Bot Service and Language Understanding

    With the general availability of Azure Bot Service and Language Understanding, we're also introducing new capabilities to help developers achieve more. Azure Bot Service is now available in more regions and offers premium channels to communicate better with users and provide advanced customization capabilities.

    ABS_Templates_Csharp

    Azure Bot Service allows you to select various templates from simple form, questions and answers, in either C# or node.js

    Language Understanding (LUIS) now has an updated user interface and is available in more regions. It is also expanded up to 500 intents and 100 entities, so developers can create more conversational experiences for their apps. For example, a travel app with LUIS would extract from the sentence “Book me a ticket to Paris” an intent named BookFlight and entity Location as “Paris” to process the order.

    LUIS portal

    Language Understanding new portal, listing for one intent, the potential sentences created

    Language Understanding is part of Microsoft Cognitive Services, a collection of intelligent APIs that enables systems to see, hear, speak, understand and interpret our needs using natural methods of communication. We’ve been making several of these Cognitive Services more customizable, allowing developers to use their own data with algorithms for specific needs. For example, with Custom Speech Service, the research division of an enterprise could create a bot able to understand the specific vernacular of chemical compounds. Or, a fast food restaurant could create an application for taking orders in a noisy drive-through environment.

    Feel free to deep dive into the detailed information about the new features of Language Understanding and Azure Bot Service here.

    Customer adoption

    Today, more than 760,000 developers from 60 countries are using Cognitive Services to add intelligent capabilities to their applications. Additionally, over 240,000 developers have signed up to use the Azure Bot Service which provides developers with everything they need to build and connect intelligent bots. And thousands of customers are already developing intelligent applications with Azure Bot Service and/or LUIS, such as Dixons Carphone, Equadex, Human Interact, Molson Coors, Sabre, UPS, and many more.

    Equadex is one customer using Language Understanding for smart applications. Some children with Autism Spectrum Disorder can experience barriers that can make it difficult to communicate and verbalize their thoughts in order to successfully navigate their world. Equadex worked to provide a tool to alleviate communication difficulty with an easy-to-use mobile app that provides a visual representation of language. With the Microsoft Cognitive Services REST APIs and Microsoft Azure tools, Equadex was easily able to incorporate powerful machine learning and artificial intelligence into its Helpicto app. Equadex hopes that Helpicto will eventually help all people with language difficulties communicate more easily.

    “We wanted to deliver to the market an innovative technology that could translate natural language into a universal form that someone who is nonverbal could use and understand,” explains Anthony Allebée, Chief Technology Officer at Equadex. “With features like LUIS and the Computer Vision API, Cognitive Services helped us quickly turn our dream of an enhanced communication tool into a reality,” says Allebée.

    With a story that starts in 1774, Molson Coors has spent centuries defining brewing greatness. As one of the largest global brewers, Molson Coors works to deliver extraordinary brands that delight the world’s beer drinkers. In order to help its employees better access knowledge in the organization and collaborate across time zones and geographies, Molson Coors is exploring the use of knowledge bots for specific IT and Procurement topics, leveraging Microsoft Cognitive Services QnA Maker, Azure Bot Service, Microsoft Teams, and the Calendar.Help service powered by Cortana.

    To improve customer service with intelligent applications as well as increase the efficiency of IT staff, UPS recently improved service levels via a chatbot, the UPS Bot. This sophisticated agent runs on the Microsoft bot technology on Azure. Customers can engage with the UPS Bot in text-based and voice-based conversations to get the information they need about shipments, rates, and UPS locations.

    “Within five weeks, we had developed a chatbot prototype with the Microsoft bot technology. Our Chief Information and Engineering Officer loved it and asked that we get a version into production in just two months…and that’s just what we did,” said Kumar Athreya, Senior Applications Development Manager of Shipping Systems, UPS.

    Microsoft AI platform

    We are making AI approachable and productive for all developers and data scientists with our flexible AI platform, combining the latest advances in technologies like machine learning and deep learning, with our comprehensive data, Azure cloud and productivity platform.

    Powered by Azure, our AI platform integrates:

    • High-level services to accelerate the development of AI solutions. This includes conversational AI with Azure Bot Service, trained models such as Cognitive Services (pre-built APIs and custom AI services), allowing developers to use their own data with algorithms trained for their specific needs, and full custom AI services such as Azure Machine Learning.
    • An underlying AI infrastructure with virtually infinite scale
    • Tools to increase productivity for developers and data scientists, bringing AI to every developer and every scenario.

    Microsoft AI platform

    The Microsoft AI platform, provides a comprehensive cloud powered AI for every developer.

    I invite you to visit www.azure.com/ai to learn more about how AI can augment and empower digital transformation efforts. We’ve also launched the AI School to help developers get up to speed with all of these AI technologies.

    Dive in and learn how to infuse conversational AI into your applications today.

    Lili Cheng
    @lilich

    Conversational Bots Deep Dive – What’s new with the General Availability of Azure Bot Service and Language Understanding

    $
    0
    0

    This post was authored by the Azure Bot Service and Language Understanding Team.

    Microsoft brings the latest advanced chatbot capabilities to developers' fingertips, allowing them to create apps that see, hear, speak, understand, and interpret users’ needs -- using natural communication styles and methods.

    Today, we’re excited to announce we’re making generally available Microsoft Cognitive Services Language Understanding service (LUIS) and Azure Bot Service, two top notch AI services to create digital agents that interact in natural ways and make sense of the surrounding environment.

    Think about the possibilities: all developers regardless of expertise in data science able to build conversational AI that can enrich and expand the reach of applications to audiences across a myriad of conversational channels. The app will be able to understand natural language, reason about content and take intelligent actions. Bringing intelligent agents to developers and organizations that do not have expertise in data science is disruptive to the way humans interact with computers in their daily life and the way enterprises run their businesses with their customers and employees.

    Through our preview journey in the past two years, we have learned a lot from interacting with thousands of customers undergoing digital transformation. We highlighted some of our customer stories (such as UPS, Equadex, and more) in our general availability announcement. This post covers conversational AI in a nutshell using Azure Bot Service and LUIS, what we’ve learned so far, and dive into the new capabilities. We will also show how easy it is to get started in building a conversational bot with natural language.

    Conversational AI with Azure Bot Service and LUIS

    Azure Bot Service provides a scalable, integrated bot development and hosting environment for conversational bots that can reach customers across multiple channels on any device. Bots provide the conversational interface that accepts user input in different modalities including text, speech, cards, or images. The Azure Bot Service offers a set of fourteen channels to interact with users including Cortana, Facebook Messenger, Skype, etc. Intelligence is enabled in the Azure Bot Service through the cloud AI services forming the bot brain that understands and reasons about the user input. Based on understanding the input, the bot can help the user complete some tasks, answer questions, or even chit chat through action handlers. The following diagram summarizes how conversational AI applications are enabled through the Azure Bot Service and the Cloud AI services including language understanding, speech recognition, Q&A Maker, etc.

    Image 2

    Language Understanding (LUIS) is the key part of the bot brain that allows the bot to understand natural language input and reason about it to take the appropriate action. As customization is critical for every business scenario, Language Understanding helps build custom models for your business vertical with little effort and without prior expertise in data science. Designed to identify valuable information in conversations, it interprets user goals (intents) and distills valuable information from sentences (entities), for a high quality, nuanced language model.

    With the General Availability of Language Understanding and Azure Bot Service, we're also introducing new capabilities to help you achieve more and delight your users

    Language Understanding:

    • With an updated user interface, we’re providing Language Understanding service (LUIS) users more intents and entities than ever: expanding up to 500 intents (task or action identified in the sentence) and 100 entities (relevant information extracted, from the sentence, to complete the task or action associated to the intent) per application.
    • Language Understanding is now available in 7 new regions (South Central US, East US, West US 2, East Asia, North Europe, Brazil South, Australia East) on top of the 5 existing regions (West Europe, West US, East US2, West central US, South east Asia). This will help customers to improve network latency and bandwidth.
    • The Language Understanding service is also supporting more languages for its various features, in addition to English.
      • The prebuilt entities (representing common concepts like numbers, date, time) previously available in English are now available in French and Spanish.
      • Prebuilt domains (off-the-shelf collections of intents and entities grouped by domain that you can directly add and use in your application) are now also available in Chinese.
      • Phrase suggestions that help the developer customize your LUIS domain vocabulary are available in 7 new languages Chinese, Spanish, Japanese, French, Portuguese, German, and Italian.

    Azure Bot Service:

    • Speed bot development by providing an integrated environment with the Microsoft Bot Framework channels, development tools and hosting solutions.
    • Connect with your audience with no code modifications via our supported channels on the Bot Service; Office 365 Email, GroupMe, Facebook Messenger, Kik, Skype, Slack, Microsoft Teams, Telegram, text/SMS, Twilio, Cortana, Skype for Business – or provide a custom experience in your app or website.
    • Bot Service is now integrated into the Azure portal; easy access to 24x7 support, monitoring capabilities, integrated billing and more in the trusted Azure ecosystem.
    • Now generally available in 9 different regions namely West US, East US, West Europe, and Southeast Asia including new deployments in North Europe, Australia Southeast, Australia East, Brazil South, and East Asia regions.
    • We are also announcing Premium Channels including webchat and directline.  Premium channels offer unique capabilities over the standard channels:
      • Communicate with your users on your website or in your application instead of sharing that data with public chat services.
      • Open Source webchat and directline clients enabling advanced customization opportunities.
      • 99.9% availability guarantees for premium channels

    Developers can connect to other Azure services to enrich their bots as well as add Cognitive Services to enable your bots to see, hear, interpret, and interact in more human ways. For example, on top of language, the Computer Vision and Face APIs can enable bots to understand images and faces passed to the bot.

    Learning through our customer’s experiences

    For several years now, Microsoft has been leading the charge into the application of AI to build new intelligent conversational experiences…everything from proprietary solutions built to target a specific audience on a specific chat service to general purpose API’s that expect the developer to create the rest of the custom solution themselves.  We are still at the beginning of this evolution of the conversational application model; but already we have takeaways that are guiding how we think about the future.

    Bots are changing how we do business. We are constantly having great discussions with customers who see bots as a key part of their digital transformation as a business. They see the opportunity to enhance their customer support experiences, provide easy access to information, or even expose their business to an audience that might not otherwise visit their website.

    Developers need to have choice in technologies. With the growth in popularity of open source technologies, developers want choice of the technology components they use to build solutions.

    Great conversational applications are multi-modal. Our customers are building conversational experiences which accomplish multiple tasks. For example, a customer support bot may have a Q&A search function, a support ticket entry function, a guided dialog to diagnose a problem, and an appointment scheduling function that hands off to a human for final confirmation.

    AI platforms must scale to the needs of business. Often as not, business scenarios are based on sets of concepts that are being codified into the bot. Developers require the technologies they depend on to scale to the complexity of their business without arbitrary limits getting in the way.

    Conversational app platforms need to be reliable and compliant. In the same way that mobile app platforms have needed to provide robust and secure platforms to enable great productivity scenarios, so too will conversational application platforms; they must be certifiably secure, reliable, compliant and privacy aware. In addition, the platform should to make it easy for developers building to it to build compliant solutions as well.

    Businesses are global and multi-lingual. Businesses need to talk to customers world-wide 24/7 in their language of choice.

    There is art in building a great conversational application. Much in the same way the 80’s and 90’s cemented what we now think of as common controls for native apps, and the 2000’s for web and mobile, the industry is still defining what it means to be a great conversational application.

    Key design considerations

    Given the learnings we’ve had, we’ve anchored our design on the following six points to shape the Azure Bot Service and Language Understanding (LUIS) capabilities:

    Code-first approach: Azure Bot Service is built on top of the BotBuilder SDK V3 (in Node and Java) that takes a code-first approach to enable developers to have full control over their bots’ conversational capabilities. Available for both Node.JS and C#, the open source SDK’s provides multiple dialog types and conversational orchestration tools to help the developer with various tasks like slot filling, dialog management and card representation.

    Different dialog management flavors: developers build bots that range from simple question answer bots to multi-turn solutions that span ten or fifteen turns to complete a task. We provide a rich set of dialog management flavors to cover the different task types a bot developer might wish to expose. You can create bots that utilize a mix of prompts, form filling, natural language, and your own dialog management system with the ability to reuse some of the components like prompts.

    Open bot platform: Building on Azure's commitment to open source technologies, applications using our SDK and LUIS can be deployed on any connected infrastructure and consumed from any device anywhere targeting your audience on multiple chat channels. This open design allows the offering to be integrated with different deployment platforms including public cloud or on-premise infrastructure.

    Global and multi-lingual: We have put considerable effort into making our services highly available and as close to customers as possible as part of the Azure cloud.  Azure Bot Service and Language Understanding support a growing list of languages for understanding conversations.

    Getting started quickly: While bots can be deployed anywhere, with Azure we provide rich connected cloud services for hosting your bot and AI applications with a single click.  The Azure Bot Service and LUIS get you a running bot that can converse with users in a natural way in minutes. Azure Bot Service takes care of provisioning all of the Azure resources you need so that developers can focus on their business logic. LUIS provides customizable pre-built apps and entity dictionaries, such as Calendar, Music, and Devices, so you can build and deploy a solution more quickly. Dictionaries are mined from the collective knowledge of the web and supply billions of entries, helping your model to correctly identify valuable information from user conversations.

    Custom models with little effort: as customization is critical for every business scenario, LUIS capitalizes on the philosophy of machine teaching to help non-expert machine learning developers build effective custom language understanding models. While machine learning focuses on creating new algorithms and improving the accuracy of “learners”, the machine teaching discipline focuses on the efficacy of the “teachers”. Machine teaching as a discipline is a paradigm shift that follows and extends principles of software engineering and programming languages. It provides the developer with a set of tools to build machine learning models by transferring the developer domain knowledge to the machine learning algorithms. This contrasts with Machine Learning which is about creating useful models from this knowledge. Developer knowledge is expressed in LUIS through schema (what intents and entities are in the LUIS application) and labeled examples.  It supports a wide variety of techniques for reliably recognizing entities with normalization to allow them to be easily consumed in a program.

    Always monitor, learn and improve: Azure Bot Service and LUIS use Azure monitoring tools to help developers monitor the performance of their bots including the quality of the language understanding models and the bot usage. Once the model starts processing input, LUIS begins active learning, allowing you to constantly update and improve the model. It helps you pick the most informative utterances from your real bot traffic to add to your model and continuously improve. This intelligent selection of examples to add to the training data of the LUIS model helps developers build cost effective models that don’t require a lot of data and yet perform with high accuracy.

    Getting started with the Bot Service and Language Understanding

    In this section, we’ll create a bot using the Azure Bot Service that uses Language Understanding (LUIS) to understand the user. When creating a bot using natural language, the bot determines what a user wants to do by identifying their intent. This intent is determined from spoken or textual input, or utterances, which in turn can be mapped to actions that Bot developers has coded. For example, a note-taking bot recognizes a Notes. Create intent to invoke the functionality for creating a note. A bot may also need to extract entities, which are important words in utterances. In the example of a note-taking bot, the Notes. Title entity identifies the title of each note.

    Create a Language Understanding bot with Bot Service

    To create your bot; log in the Azure portal, select Create new resource in the menu blade and select AI + Cognitive Services.

    AI   Cognitive Services

    You can browse through the suggestions, or search for Web App Bot.

    Web App Bot

    Once selected, the Bot Service blade should appear; which will be familiar to users of Azure services. For those that aren’t, here you can specify information about your service for the Bot Service to use in creating your bot such as where it will live, what subscription in and so forth. In the Bot Service blade, provide the required information, and click Create. This creates and deploys the bot service and LUIS app to Azure. Some interesting fields:

    • Set App name to your bot’s name. The name is used as the subdomain when your bot is deployed to the cloud (for example, mynotesbot.azurewebsites.net). This name is also used as the name of the LUIS app associated with your bot. Copy it to use later, to find the LUIS app associated with the bot.
    • Select the subscription, resource group, hosting plan, and location.
    • For pricing, you can choose the free pricing tier. You can go back and change that at any time if you need more.
    • For this sample, select the Language understanding (C#) template for the Bot template field.
    • For the final required field, choose the Azure Storage where you wish to store your bot’s conversation state. Think of this as where the bot keeps track of where each user is in the conversation.

    Bot Service

    Now that you’re complete, you can click Create. Azure will set about creating your bot including the resources it needs to operate your bot and a LUIS account to host your natural language model. Once complete, you’ll receive a notification via the bell in the top right corner of the Azure portal.
    Next up, lets confirm that the bot service has been deployed.

    • Click Notifications (the bell icon that is located along the top edge of the Azure portal). The notification will change from Deployment started to Deployment succeeded.
    • After the notification changes to Deployment succeeded, click Go to resource on that notification.

    Try the bot

    So now you should have a working bot. Let’s try it out.

    Once the bot is registered, click Test in Web Chat to open the Web Chat pane. Type "hello" in Web Chat.

    NotesBot - Test in Web Chat

    The bot responds by saying "You have reached Greeting. You said: hello". This confirms that the bot has received your message and passed it to a default LUIS app that it created. This default LUIS app detected a Greeting intent.

    Note: Occasionally, the first message or two after startup may need to be retried before the bot will answer.

    Viola! You have a working bot! The default bot only knows a few things; it recognizes some greetings, as well as help and cancel. In the next section we’ll modify the LUIS app for our bot to add some new intents for our Note taking bot.

    Modify the LUIS app

    Log in to www.luis.ai using the same account you use to log in to Azure. Click on My apps. If all has gone well, in the list of apps, you’ll find the app with the same name as the App name from the Bot Service blade when you created the Bot Service.

    After opening the app, you should see it has four intents: Cancel, Greeting, Help, and None. The first three we already mentioned. None is a special intent in LUIS that captures “everything else”.

    For our sample, we’re going to add three intents for the user: Note.Create and Note.ReadAloud. Conveniently, one of the great features about LUIS are the pre-built domains that can be used to bootstrap your application, of which Note is one.

    • Click on Pre-built Domains in the lower left of the page. Find the Note domain and click Add domain.
    • This tutorial doesn't use all the intents included in the Note prebuilt domain. In the Intents page, click on each of the following intent names and then click the Delete Intent button to remove them from your app.
      • Note.ShowNext
      • Note.DeleteNoteItem
      • Note.Confirm
      • Note.Clear
      • Note.CheckOffItem
      • Note.AddToNote
      • Note.Delete
    • IMPORTANT: The only intents that should remain in the LUIS app are the Note.ReadAloud, Note.Create, None, Help, Greeting, and Cancel intents.  If they’re still there, your app will still work, but may more often behave inconsistently.

    As mentioned earlier, the Intents that we’ve now added represent the types of things we expect the user to want the bot to do.  Since these are pre-defined, we don’t have to do any further tuning to the model, so let’s jump right to training and publishing your model.

    • Click the Train button in the upper right to train your app.  Training takes everything you’ve entered into the model by creating intents and entities, entering utterances and labeling them and generates a machine learned model, all with one click.  You can test your app here in the LUIS portal, or move on to publishing so that it’s available to your bot.
    • Click PUBLISH in the top navigation bar to open the Publish page. Click the Publish to production slot button. After successful publish, copy the URL displayed in the Endpoint column the Publish App page, in the row that starts with the Resource Name Starter_Key. Save this URL to use later in your bot’s code. The URL has a format similar to this example: https://westus.api.cognitive.microsoft.com/luis/v2.0/apps/xxxxxxxxxxxxxxxxx?subscription-key=xxxxxxxxxxxxxx3&timezoneOffset=0&verbose=true&q=

    Your Language Understanding Application is now ready for your Bot. If the user asks to create, delete, or read back a note, Language Understanding will identify that and return the correct intent to the Bot to be acted on. In the next section we’ll add logic to the bot to handle these Intents.

    Modify the bot code

    The Bot Service is set up to work in a traditional development environment; sync your source code with GIT and work in your favorite dev environment. That said, Azure Bot Service also offers the ability to edit right in the portal; which is great for our experiment. Click Build and then click Open online code editor.

    Modify the bot code

    First, some preamble. In the code editor, open BasicLuisDialog.cs. It contains the code for handling Cancel, Greeting, Help, and None intents from the LUIS app.

    Add the following statement:

    using System.Collections.Generic;

    Create a class for storing notes

    Add the following after the BasicLuisDialog constructor:

    private readonly Dictionary<string, Note> noteByTitle = new Dictionary<string, Note>();
    
    private Note noteToCreate;
    
    private string currentTitle;
    
    // CONSTANTS
    
    // Name of note title entity
    
    public const string Entity_Note_Title = "Note.Title";
    
    // Default note title
    
    public const string DefaultNoteTitle = "default";
    
    [Serializable]
    
    public sealed class Note : IEquatable<Note>
    
    {
    
    public string Title { get; set; }
    
    public string Text { get; set; }
    
    public override string ToString()
    
    {
    
    return $"[{this.Title} : {this.Text}]";
    
    }
    
    public bool Equals(Note other)
    
    {
    
    return other != null
    
    && this.Text == other.Text
    
    && this.Title == other.Title;
    
    }
    
    public override bool Equals(object other)
    
    {
    
    return Equals(other as Note);
    
    }
    
    public override int GetHashCode()
    
    {
    
    return this.Title.GetHashCode();
    
    }
    
    }

    Handle the Note.Create intent

    Note.Create intent, add the following code to the BasicLuisDialog class.

    [LuisIntent("Note.Create")]
    
    public Task NoteCreateIntent(IDialogContext context, LuisResult result)
    
    {
    
    EntityRecommendation title;
    
    if (!result.TryFindEntity(Entity_Note_Title, out title))
    
    {
    
    // Prompt the user for a note title
    
    PromptDialog.Text(context, After_TitlePrompt, "What is the title of the note you want to create?");
    
    }
    
    else
    
    {
    
    var note = new Note() { Title = title.Entity };
    
    noteToCreate = this.noteByTitle[note.Title] = note;
    
    // Prompt the user for what they want to say in the note
    
    PromptDialog.Text(context, After_TextPrompt, "What do you want to say in your note?");
    
    }
    
    return Task.CompletedTask;
    
    }
    
    private async Task After_TitlePrompt(IDialogContext context, IAwaitable<string> result)
    
    {
    
    EntityRecommendation title;
    
    // Set the title (used for creation, deletion, and reading)
    
    currentTitle = await result;
    
    if (currentTitle != null)
    
    {
    
    title = new EntityRecommendation(type: Entity_Note_Title) { Entity = currentTitle };
    
    }
    
    else
    
    {
    
    // Use the default note title
    
    title = new EntityRecommendation(type: Entity_Note_Title) { Entity = DefaultNoteTitle };
    
    }
    
    // Create a new note object
    
    var note = new Note() { Title = title.Entity };
    
    // Add the new note to the list of notes and also save it in order to add text to it later
    
    noteToCreate = this.noteByTitle[note.Title] = note;
    
    // Prompt the user for what they want to say in the note
    
    PromptDialog.Text(context, After_TextPrompt, "What do you want to say in your note?");
    
    }
    
    private async Task After_TextPrompt(IDialogContext context, IAwaitable<string> result)
    
    {
    
    // Set the text of the note
    
    noteToCreate.Text = await result;
    
    await context.PostAsync($"Created note **{this.noteToCreate.Title}** that says "{this.noteToCreate.Text}".");
    
    context.Wait(MessageReceived);
    
    }
    

    Handle the Note.ReadAloud Intent

    The bot can use the Note.ReadAloud intent to show the contents of a note, or of all the notes if the note title isn't detected. Paste the following code into the BasicLuisDialog class.

    [LuisIntent("Note.ReadAloud")]
    
    public async Task NoteReadAloudIntent(IDialogContext context, LuisResult result)
    
    {
    
    Note note;
    
    if (TryFindNote(result, out note))
    
    {
    
    await context.PostAsync($"**{note.Title}**: {note.Text}.");
    
    }
    
    else
    
    {
    
    // Print out all the notes if no specific note name was detected
    
    string NoteList = "Here's the list of all notes: nn";
    
    foreach (KeyValuePair<string, Note> entry in noteByTitle)
    
    {
    
    Note noteInList = entry.Value;
    
    NoteList += $"**{noteInList.Title}**: {noteInList.Text}.nn";
    
    }
    
    await context.PostAsync(NoteList);
    
    }
    
    context.Wait(MessageReceived);
    
    }
    
    public bool TryFindNote(string noteTitle, out Note note)
    
    {
    
    // TryGetValue returns false if no match is found.
    
    bool foundNote = this.noteByTitle.TryGetValue(noteTitle, out note);
    
    return foundNote;
    
    }
    
    public bool TryFindNote(LuisResult result, out Note note)
    
    {
    
    note = null;
    
    string titleToFind;
    
    EntityRecommendation title;
    
    if (result.TryFindEntity(Entity_Note_Title, out title))
    
    {
    
    titleToFind = title.Entity;
    
    }
    
    else
    
    {
    
    titleToFind = DefaultNoteTitle;
    
    }
    
    // TryGetValue returns false if no match is found.
    
    return this.noteByTitle.TryGetValue(titleToFind, out note);
    
    }

    Build the bot

    Now that the cut and paste part is done, you can right-click on build.cmd in the code editor and choose Run from Console. Your bot will be built and deployed from within the online code editor environment.

    Test the bot

    In the Azure Portal, click on Test in Web Chat to test the bot. Try type messages like "Create a note", "read my notes", and "delete notes".  Because you’re using natural language you have more flexibility on how you state your request, and in turn, Language Understanding’s Active Learning feature can be used such that you can open your Language Understanding application and it can make suggestions about things you said which it didn’t understand and might make your app more effective.

    Test in Web Chat

    Tip: If you find that your bot doesn't always recognize the correct intent or entities, improve your Language Understanding app's performance by giving it more example utterances to train it. You can retrain your Language Understanding app without any modification to your bot's code.

    That's It (For Now)

    From here you’re just getting started.  You can go back to the bot service and connect your bot to various conversation channels.  You can remove the pre-built intents and start creating your own custom intents for your application.

    There’s a world to discover in creating conversational applications and it’s easy to get started.  We look forward to seeing what you create and your feedback. For more information, please visit the following sites:

    Happy coding!

    The Azure Bot Service and Language Understanding Team

    Connect(); 2017: SmartHotel360 Demo Apps and Architecture

    $
    0
    0

    Last month we hosted Microsoft Connect(); in New York City. Connect(); is a three-day, in-person and online developer event. If you missed it, no worries! You can watch our keynotes, sessions, and on-demand videos on Channel 9.

    For the past five months our keynote demo team worked on a new set of reference apps. We used most of these apps and Azure backend for our keynote demos. As every year, today we are delighted to share the availability of our newest reference sample apps and Azure backend: SmartHotel360 in GitHub.

    SmartHotel360Logo

    SmartHotel360 is a fictitious smart hospitality company showcasing the future of connected travel.

    Their vision is to provide:

    • Intelligent, conversational, and personalized apps and experiences to guests
    • Modern workplace experiences and smart conference rooms for business travelers
    • Real-time customer and business insights for hotel managers & investors
    • Unified analytics and package deal recommendations for campaign managers.

    There’s never been a better time to be a developer. Our intent with these set of reference apps and Azure backend is to show developers how to get started building the apps of the future, today!

    The heart of this application is the cloud – best-in-class tools, data platform, and AI – and the code is built using a microservice oriented architecture orchestrated with multiple Docker containers. There are various services developed in different languages: .NET Core 2.0, Java and Node.js. These services use different data stores like SQL Server, Azure SQL DB, Azure CosmosDB, and Postgres.

    In production, all these microservices run in a Kubernetes cluster, powered by Azure Container Service (ACS) as shown in the accompanying architecture diagram.

    Architecture diagram

    You can find everything you need to run the backend services locally and/or deploy them in a Azure environment at our SmartHotel360 Backend repository in GitHub.

    Websites

    SmartHotel360Website SmartHotel360 has multiple apps that share a common Azure backend, including a public website where hotel guests can book a room, smart conference rooms, and even include their accompanying family travelers and their pets! The site was built using ASP.NET Core 2.0. We published the SmartHotel360 Public Website code in GitHub and a few simplified versions on our demo scripts as well.
    SentimentApp For hotel managers, we built a simple Node.js website to analyze customer sentiment from Twitter by using Text Analysis Cognitive Services APIs. This website was built with Visual Studio Code and we used multiple of our newest extensions for Cosmos DB, App Service, Azure Functions, and Docker for Visual Studio Code and Azure to build this app. You can find this app at our Sentiment Analysis GitHub repo.

    Mobile and Desktop Apps

    For hotel managers and maintenance crew, we built a maintenance iOS app and used Xamarin Forms embedded. This is a great way to showcase how companies can modernize existing line-of-business apps with Xamarin. In this app, hotel managers and maintenance crew can get notifications of issues and resolve those directly from their mobile app.

    SmartHotel360GuestApp Travelers are always on the go, so SmartHotel360 offers a beautiful fully-native cross-device mobile app for guests and business travelers built with Xamarin. In this app guests and business travelers can book rooms and smart conference rooms as well as customize room temperature and lighting settings. The mobile app is available in iOS, Android, and Windows.
    SmartHotel360DesktopApp We also built a desktop app. This is a version of the SmartHotel360 Xamarin app. With this app, travelers can adjust the temperature and lighting settings of their rooms and find nearby recommended places to go, like coffee shops. All based on deeply personalized preferences.
    SmartHotel360SmartDoorNFCApp Travelers need quick access to their rooms. What if we can provide an automated way to have them go straight to their room when they get to the hotel? We used the power of mobile development with Android and NFC to provide this experience. We included NFC access from the SmartHotel360 traveler application and we also created a digital door application to check-in and open your room. All you need is to tap your phone on the digital door. No need to get a key from the lobby.
    SmartHotel360MaintenanceApp For hotel managers and maintenance crew, we built a maintenance iOS app and used Xamarin Forms embedded. This is a great way to showcase how companies can modernize existing line-of-business apps with Xamarin. In this app, hotel managers and maintenance crew can get notifications of issues and resolve those directly from their mobile app.

    Given the interest, we published all the SmartHotel360 mobile and desktop apps code in GitHub and we are very excited to share those with you as well.

    Watch demos in action and download the code!

    We used most of the SmartHotel360 reference apps and our Azure backend in multiple Connect(); 2017 keynote demos. If you missed it, you can watch Scott Guthrie’s Keynote: Journey to the Intelligent Cloud in Channel 9 or you can watch individual demo videos at our Microsoft Visual Studio YouTube Channel as well.

    You can also grab all the presentations, links to workshops and demos, and creative assets to host your own Re-Connect(); events, also available in our Connect-Event-in-a-Box repo on GitHub.

    Our Microsoft Application Platform gives developers the power or Azure, our best-in-class tools, our data platform, artificial intelligence, and cross-device apps to start building the apps of the future. We hope you can use SmartHotel360 as a great learning resource to start building what you need today with any apps, any tools, and any platform.

    Enjoy SmartHotel360 from our demo team: Brady Gaster, Beth Massi, PJ Meyer, Bowden Kelly, David Ortinau, Rajen Kishna, Thomas Dohmke, Maria Naggaga, Steve Lasker, Stephen Provine, Tara Shankar Jana, Anitah Cantele, Sachin Hridayraj, Paul Stubbs, Giampaolo Battaglia, and Nishant Thacker.

    Erika Ehrli, Director of Product Marketing, Cloud Apps Dev, Data + AI
    @erikaehrli1

    Erika has been at Microsoft for 14 years. In her current role she manages a creative and energetic team of technical product managers for Developer Tools and DevOps building tier 1 event keynote and general session demos, reference content apps, and technical content to showcase App Innovation.

    Announcing Babylon.js v3.1

    $
    0
    0

    Babylon.js is an open source framework that allows you to easily create stunning 3D experiences in your browser or your web apps.

    Built with simplicity and performance in mind, it is the engine that fuels the Remix3D site, Xbox Design Lab or 3D objects preview in Teams or OneDrive on the web.

    Earlier this year we announce the third version of the engine. Today I’m glad to announce its first update: Babylon.js v3.1.

    The main goal of this version was to provide helpers to achieve high end tasks. Let’s see some of them:

    Improving VR experiences with the VRExperienceHelper

    Babylon.js v3.0 introduced support for WebVR and VR controllers (including Windows Mixed Reality, Oculus and HTC Vive). With 3.1 release, we wanted to make the process to add VR experience in your code dead simple.

    Therefore, we introduced the VRExperienceHelper which will take care of the following for you:

    • Create the HTML button to enter VR mode
    • Create a WebVRCamera (if supported) and a DeviceOrientationCamera as a fallback (this camera will allow you to use device orientation events to control your scene. This is useful on mobiles for instance)
    • Add support for teleportation and rotation in the same way you can experience it in the Windows Mixed Reality cliff house
    • Add support for controllers picking (you can use your controllers to interact with the scene) and gaze picking (you can use your gaze to interact)

    All of this will be available with literally 3 lines of code:

    
    var VRHelper = scene.createDefaultVRExperience();
    VRHelper.enableTeleportation({floorMeshName: "Sponza Floor"});


    You can try it here: https://www.babylonjs-playground.com/frame.html#JA1ND3#15

    We also added more WebVR demos on our homepage for you to try:

    Building a 3D experience with 2 lines of HTML with Babylon.js Viewer

    Babylon.js viewer is a new tool to allow you to integrate 3D into your web sites or web apps in a couple of seconds. Everything can be done directly from your web page:

    
        <body>
            <babylon model.title="Damaged Helmet"
                     model.subtitle="BabylonJS"
                     model.thumbnail="https://www.babylonjs.com/img/favicon/apple-icon-144x144.png"
    model.url="https://www.babylonjs.com/Assets/DamagedHelmet/glTF/DamagedHelmet.gltf">
      </babylon>
            <script src="//viewer.babylonjs.com/viewer.js "></script>
        </body>


    With these two lines of HTML you can create a complete touch aware 3D viewer anywhere in your page.


    http://viewer.babylonjs.com/basicexample

    The viewer can be configured in all possible way either with HTML attributes, JavaScript code or even with DOM elements:

    
      <babylon extends="minimal" scene.default-camera="false">
                <model url="https://playground.babylonjs.com/scenes/BoomBox.glb" title="GLB Model" subtitle="BabylonJS">
                </model>
                <camera>
                    <behaviors>
                        <auto-rotate type="0"></auto-rotate>
                    </behaviors>
                </camera>
                <lights>
                    <light1 type="1" shadow-enabled="true" position.y="0.5" direction.y="-1" intensity="4.5">
                        <shadow-config use-blur-exponential-shadow-map="true" use-kernel-blur="true" blur-kernel="64" blur-scale="4">
                        </shadow-config>
                    </light1>
                </lights>
            </babylon>


    All the user interface can be updated to reflect your brand and the configuration model can also be extended.

    Please follow this link to our documentation to learn mode about the Babylon.js viewer: http://doc.babylonjs.com/extensions/the_babylon_viewer

    Create your demo setup with a few lines of code thanks to the EnvironmentHelper

    For non-3D experts, setting up a 3D environment (lights, skyboxes, etc.) could be tricky. Therefore, we added a tool named EnvironmentHelper and directly available on the scene to help you with this task.

    Using it is straightforward:

    
    var helper = scene.createDefaultEnvironment();
    helper.setMainColor(BABYLON.Color3.Teal());


    And you can then get a good-looking setup (skybox + ground) adapted to your scene:

    The helper offers a lot of options like enabling reflections or shadows:

    
    var helper = scene.createDefaultEnvironment({
        enableGroundMirror: true,
        groundShadowLevel: 0.6,
    });


    See a live version here: https://www.babylonjs-playground.com/#4AM01A

    Helping the community with our glTF exporter for Autodesk 3dsmax

    We introduced support for glTF 2.0 in Babylon.js 3.0 and we wanted to help our community to produce assets in this open standard format. This is the reason why we worked on adding support for glTF export in our Autodesk 3dsmax exporter.

    You can now create your scene in 3dsmax and directly export it to glTF in one click:

    More info here: http://doc.babylonjs.com/resources/3dsmax_to_gltf

    From the client to the server: Introducing the NullEngine

    Starting with Babylon.js v3.1, we introduced the NullEngine which is a version of the main Babylon.js engine but we no need for a WebGL capable device.

    The NullEngine will obviously not produce any rendering and thus can be used in a node.js / server-side environment.

    It can be used to:

    • Run tests
    • Run a server-side version of your application / game
    • Use specific Babylon.js services (like glTF loaders for instance)

    More details can be found here: http://doc.babylonjs.com/features/nullengine

    Improving the codebase

    Babylon.js is entirely written in TypeScript. In order to improve the quality of the code we decided to turn on all strict type checking offered by the latest version of TypeScript (like the strict null check introduced by TypeScript 2.0 or the strict function types added by TypeScript 2.6).

    With stricter type checking we can capture errors and bugs at compilation time and thus provide more reliable code for the community.

    Improving documentation

    Writing good documentation is a complex task. With this release we added more content for beginners. We now have complete course starting from scratch and going through all important aspects of the engine.

    We also added several multi-steps guide so you can read and learn at your own pace.

    If you want to know more or just want to experiment with our latest demo, please visit http://www.babylonjs.com/.

    And if you want to join the community and contribute, please join us on GitHub!

    The post Announcing Babylon.js v3.1 appeared first on Building Apps for Windows.

    Placeholder Post

    $
    0
    0
    We shipped a lot of cool features.

    Android NDK R15C support goes in-box in Visual Studio 2017 Version 15.6 Preview

    $
    0
    0

    Visual Studio has provided in-box support for building C++ Android and iOS apps or libraries since VS 2015, enabling cross-platform C++ mobile development with full editing and debugging capabilities all in one single IDE.

    Just recently, we updated the tools to make it easier for you to work with newer versions of the Android platform. This includes built-in support for Android SDK API level 25 that was shipped in VS 2017 Version 15.5 and support for Android NDK R15C that just went out last week in the first preview of VS 2017 Version 15.6. You can either download the Preview, or, if you already have it installed, click on the notification you’ll receive in the product informing you that the update is available.

    In the VS Installer, you will find “Android NDK (R15C)” and “Android SDK setup (API level 25)” as recommended components that are included in the “Mobile development with C++” workload.

    Tell us what you’d like to see next in the VS C++ Android tools

    We are continuing to work on supporting the latest Android platform. If there’s something that you’d like to see us working on next in the VS C++ Android tools, feel free to leave comments below. You can also find us on Twitter (@VisualC). We look forward to hearing from you!

    Bing launches new intelligent search features, powered by AI

    $
    0
    0
    Today we announced new Intelligent Search features for Bing, powered by AI, to give you answers faster, give you more comprehensive and complete information, and enable you to interact more naturally with your search engine.


    Intelligent answers:


    One of the Intelligent Search features announced today are Intelligent Answers. These answers leverage the latest state of the art in machine reading comprehension, backed by Project Brainwave running on Intel’s FPGAs, to read and analyze billions of documents to understand the web and help you more quickly and confidently get the answers you need.
     
    Bing now uses deep neural networks to validate answers by aggregating across multiple reputable sources, rather than just one, so you can feel more confident about the answer you’re getting. 


    Many times, you have to click into multiple sources to get a comprehensive answer for your question. Bing now saves you time by bringing together content from across multiple sources. 


    Of course, not every question has just one answer. Sometimes you might be looking for expert opinions, different perspectives or collective knowledge. If there are different authoritative perspectives on a topic, such as benefits vs drawbacks, Bing will aggregate the two viewpoints from reputable sources and intelligently surface them to you on the top of the page to save you time.  


    If there are multiple ways to answer a question, you’ll get a carousel of intelligent answers, saving you time searching from one blue link to another. 


    We’re also expanding our comparison answers beyond just products, so you can get a snapshot of the key differences between two items or topics in an easy-to-read table. Bing’s comparison answers understand entities, their aspects, and using machine reading comprehension, reads the web to save you time combing through numerous dense documents to find what you are looking for. 


    Bing also leverages technology built in Microsoft’s research labs to help make sense of numbers we increasingly encounter in the digital world. Bing translates this data into simple concepts so it’s easier to understand what data like the population of another country means.

    Many of these answers are available today and others will be rolling out to users over the next week in the US with expansion to other markets over time.


    Reddit on Bing:

     
    A key element of Intelligent Search is bringing together different sources of knowledge, like the wisdom of the crowd, to help people make decisions. Today, we’re launching a new partnership with Reddit, an online community of 330M monthly active users, to bring information from the Reddit community, which generates 2.8M comments daily, to Bing. We are launching with three initial experiences, which we’ll continue to develop and expand as we get feedback from users: 
    • While already in Bing, when you search for a specific Reddit topic or subreddit, like “Reddit Aww”, Bing will surface a sneak peak of the topic with the top conversations for the day from Reddit.  
    • When searching for a general topic that is best answered with relevant Reddit conversations, Bing will surface a snippet of those conversations at the top of the page so you can easily get perspectives from the millions of Reddit users. 
    • Bing will be the place to go to search for Reddit AMAs, Q&As with celebrities and every day heroes hosted by the Reddit community. On Bing you can discover AMA schedules and see snapshots of AMAs that have already been completed. Simply search a person’s name to see their AMA snapshot or search for “Reddit AMAs” to see a carousel of popular AMAs.  


    More conversational search:


    We often hear that search would be easier if only Bing could complete your sentences. Half the battle of searching is knowing the right words to query. Combining our expertise in web scale mining of billions of documents and with Conversational AI, we're creating a new way to search that is interactive and can build on your previous searches to get you the best answer. Now if you need help figuring out the right question to ask, Bing will help you with clarifying questions based on your query to better refine your search and get you the best answer the first time around. You’ll start to see this experience in health, tech and sports queries, and we will be adding more topic areas over time. And because we’ve built it with large-scale machine learning, the experience will get better over time as more users engage with it.   


    Intelligent image search:


    Today, we also shared more detail on Bing’s advanced image search features. Bing Image Search leverages computer vision and object recognition to give you more ways to find what you’re looking for. Search any image or within images to shop for fashion or home furniture.  Bing detects and highlights different products within images or you can click the magnifying glass icon on the top right of any image to search within an image and find related images or products. We also previewed a new feature that helps you better explore the world around you. If you find a landmark on Bing image search or use a photo from your camera roll, Bing will identify it and share interesting information about that landmark, such as the origins of the landmark and other relevant trivia. For instance, if you are looking at the India Gate, Bing can tell you why it was created and even what kind of stone it was made from. More to come on this feature in the future.


    We’re excited for you to try out all of Bing’s new Intelligent Search features and are committed to delivering even more features that will help to save you time and money in the future. To learn more about Intelligent Search visit our site here.

    -The Bing Team

    R in the Windows Subsystem for Linux

    $
    0
    0

    R has been available for Windows since the very beginning, but if you have a Windows machine and want to use R within a Linux ecosystem, that's easy to do with the new Fall Creator's Update (version 1709). If you need access to the gcc toolchain for building R packages, or simply prefer the bash environment, it's easy to get things up and running.

    Once you have things set up, you can launch a bash shell and run R at the terminal like you would in any Linux system. And that's because this is a Linux system: the Windows Subsystem for Linux is a complete Linux distribution running within Windows. This page provides the details on installing Linux on Windows, but here are the basic steps you need and how to get the latest version of R up and running within it.

    First, Enable the Windows Subsystem for Linux option. Go to Control Panel > Programs > Turn Windows Features on or off (or just type "Windows Features" into the search box), and select the "Windows Subsystem for Linux" option. You'll need to reboot, just this once. 

    Wsl2

    Next, you'll need to install your preferred distribution of Linux from the Microsoft Store. If you search for "Linux" in the store, you'll find an entry "Run Linux on Windows" which will provide you with the available distributions. I'm using "Ubuntu", which as of this writing is Ubuntu 16.04 (Xenial Xerus).

    Linuxdists

    Once that's installed you can launch Ubuntu from the Start menu (just like any other app) to open a new bash shell window. The first time you launch, it will take a few minutes to install various components, and you'll also need to create a username and password. This is your Linux username, different from your Windows username. You'll automatically log in when you launch new Ubuntu sessions, but make sure you remember the password — you'll need it later.

    From here you can go ahead and install R, but if you use the default Ubuntu repository you'll get an old version of R (R 3.2.3, from 2015). You probably want the latest version of R, so add CRAN as a new package repository for Ubuntu. You'll need to run these three commands as root, so enter the password you created above here if requested:

    sudo echo "deb http://cloud.r-project.org/bin/linux/ubuntu xenial/" | sudo tee -a /etc/apt/sources.list

    sudo apt-key adv --keyserver keyserver.ubuntu.com --recv-keys E084DAB9

    sudo apt-get update

    (Don't be surprised by the message key E084DAB9: public key "Michael Rutter <marutter@gmail.com>" imported. That's how Ubuntu signs the R packages.)

    Now you're all set to install the latest version of R, which can be done with:

    sudo apt-get install r-base

    And that's it! (Once all the dependencies install, anyway, which can take a while the first time.) Now you're all ready to run R from the Linux command line:

    Rterminal

    Note that you can access files on your Windows system from R — you'll find them at /mnt/c/Users/<your-Windows-username>. This FAQ on the WSL provides other useful tips, and for complete details refer to the Windows for Linux Subsystem Documentation.

    Broken Warnings Theory

    $
    0
    0

    The “broken warnings theory” is a fictional theory of the norm-setting and signaling effect of coding practices and bug-checking techniques in 3rd party libraries on new bugs and design anti-patterns. The theory states that maintaining and monitoring warning levels to prevent small problems such as “signed/unsigned mismatch”, “no effect before comma”, and “non-standard extension used” helps to create an atmosphere of order and lawfulness, thereby preventing more serious bugs, like buffer overruns, from happening.

    Problem Description

    Jokes aside though, not all warnings have been made equal:

    • Some are precise
    • Some are useful
    • Some are actionable
    • Some are fast to detect
    • Some have little effect on existing code bases

    Virtually none have all 5 of these nice-to-have characteristics, so a particular warning would usually fall somewhere on the spectrum of these traits creating endless discussions on which should or should not be reported. Naturally, different teams would settle on different criteria as to what set of warnings should be emitted, while compiler developers would try to put them into some overapproximated taxonomy trying to satisfy those numerous criteria. Clang and GCC try to be more fine-grained by using warning families, Visual C++ is more coarse-grained with its use of warning levels.

    In our Diagnostics Improvements Survey, 15% of 270 respondents indicated they build their code with /Wall /WX indicating they have a zero tolerance for any warnings. Another 12% indicated they build with /Wall, which implies /W4 with all off-by-default warnings enabled. Another 30% build with /W4. These were disjoint groups that altogether make 57% of users that have stricter requirements to code than the default of Visual C++ IDE – /W3 or the compiler by itself – /W1. These levels are somewhat arbitrary and in no way represent our own practices. Visual C++ libraries team, for example, strives hard to have all our libraries be /W4 clean.

    While everyone disagrees on which subset of the warnings should be reported, most agree there should be 0 warnings from the agreed upon set admitted in a project: all should be fixed or suppressed. On one hand, 0 makes any new warning a JND of the infamous Weber-Fechner law, but on another it is often a necessity in cross-platform code, where it’s been repeatedly reported that warnings on one platform/compiler can often manifest themselves as errors or worse – bugs on another. This zero-tolerance to warnings can be easily enforced for internal code, yet virtually unenforceable for external code of 3rd-party libraries, whose authors may have settled on a different set of [in]tolerable warnings. Requiring all libraries to be clean with regard to all known warnings is both impractical (due to false positives and absence of standard notation to suppress them) and impossible to achieve (as the set of all warnings is an ever-growing target). The latter one is a result of compilers and libraries ecosystems coevolution where improvements in one require improvements, and thus keeping up in the race, in the other. Because of this coevolution, a developer will often be dealing with compilers that haven’t caught up with their libraries or libraries that haven’t caught up with their compilers and neither of those would be under the developer’s control. The developers under such circumstances, which we’d argue are all the developers using an alive and vibrant language like C++, effectively want to have control over emission of warnings in the code they don’t have control over.

    Proposed Solution

    We offer a new compiler switch group: /external:* dealing with “external” headers. We chose the notion of “external header” over “system header” that other compilers use as it better represents the variety of 3rd party libraries in existence. Besides, the standard already refers to external headers in [lex.header], so it was only natural. We define a group instead of just new switches to ease discoverability by users, which would be able to guess the full syntax of the switch based on the switches they already know. For now, this group consists of 5 switches split into 2 categories (each described in its own section below):

    Switches defining the set of external headers

    • /external:I <path>
    • /external:anglebrackets
    • /external:env:<var>

    Switches defining diagnostics behavior on external headers

    • /external:W<n>
    • /external:templates-

    The 2nd group may later be extended to /external:w, /external:Wall, /external:Wv:<version>, /external:WX[-], /external:w<n><warning>, /external:wd<warning>, /external:we<warning>, /external:wo<warning> etc. which would constitute an equivalent of the corresponding warning switch when applied to an external (as opposed to user) header or any other switch when it would make sense to specialize it for external headers. Please note that since this is an experimental feature, you will have to additionally use /experimental:external switch to enable the feature until we finalize its functionality. Let’s see what those switches do.

    External Headers

    We currently offer 4 ways for users and library writers to define what constitutes an external header, which differ in the level of ease of adding to build scripts, intrusiveness and control.

    • /external:I <path> – a moral equivalent of -isystem, or just -i (lowercase) from GCC, Clang and EDG that defines which directories contain external headers. All recursive sub-directories of that path are considered external as well, but only the path itself is added to the list of directories searched for includes.
    • /external:env:<var> – specifies the name of an environment variable that holds a semicolon-separated list of directories with external headers. This is useful for build systems that rely on environment variables like INCLUDE and CAExcludePath to specify the list of external includes and those that shouldn’t be analyzed by /analyze respectively. The user can simply use /external:env:INCLUDE and /external:env:CAExcludePath instead of a long list of directories passed via /external:I switch.
    • /external:anglebrackets – a switch that allows a user to treat all headers included via #include <> (as opposed to #include "") as external headers
    • #pragma system_header – an intrusive header marker that allows library writers to mark certain headers as external.

    Warning Level for External Headers

    The basic idea of /external:W<n> switch is to define the default warning level for external headers. We wrap those inclusions with a moral equivalent of:

            #pragma warning (push, n)
            // the global warning level is now n here
            #pragma warning (pop)
    

    Combined with your preferred way to define the set of external headers, /external:W0 is everything you need to do to entirely shut off any warnings emanating from those external headers.

    Example:

    External Header: some_lib_dir/some_hdr.hpp

    template <typename T>
    struct some_struct
    {
        static const T value = -7; // W4: warning C4245: 'initializing': conversion from 'int' to 'unsigned int', signed/unsigned mismatch
    };
    

    User code: my_prog.cpp

    #include "some_hdr.hpp"
    
    int main()
    {
        return some_struct<unsigned int>().value;
    }
    

    Compiling this code as:

    cl.exe /I some_lib_dir /W4 my_prog.cpp

    will emit a level-4 C4245 warning inside the header, mentioned in the comment. Running it with:

    cl.exe /experimental:external /external:W0 /I some_lib_dir /W4 my_prog.cpp

    has no effect as we haven’t specified what external headers are. Likewise, running it as:

    cl.exe /experimental:external /external:I some_lib_dir /W4 my_prog.cpp

    has no effect either as we haven’t specified what the warning level in external headers should be and by default it is the same as the level specified in /W switch, which is 4 in our case. To suppress the warning in external headers, we need to both specify which headers are external and what the warning level in those headers should be:

    cl.exe /experimental:external /external:I some_lib_dir /external:W0 /W4 my_prog.cpp

    This would effectively get rid of any warning inside some_hdr.hpp while preserving warnings inside my_prog.cpp.

    Warnings Crossing an Internal/External Boundary

    Simple setting of warning level for external headers would have been good enough if doing so wouldn’t hide some user-actionable warnings. The problem with doing just pragma push/pop around include directives is that it effectively shuts off all the warnings that would have been emitted on template instantiations originating from the user code, many of which could have been actionable. Such warnings might still indicate a problem in user’s code that only happens in instantiations with particular types (e.g. the user forgot to apply a type trait removing const or &) and the user should be aware of them. Before this update, the determination of warning level effective at warning’s program point was entirely lexical, while reasons that caused that warning could have originated from other scopes. With templates, it seems reasonable that warning levels in place at instantiation points should play a role in what warnings are and what aren’t permitted for emission.

    In order to avoid silencing the warnings inside the templates whose definitions happen to be in external headers, we allow the user to exclude templates from the simplified logic for determining warning levels at a given program point by passing /external:templates- along with /external:W<n>. In this case, we look not only at the effective warning level at the program point where template is defined and warning occurred, but also at warning levels in place at every program point across template instantiation chain. Our warning levels form a lattice with respect to the set of messages emitted at each level (well not a perfect one, since we sometimes emit warnings at multiple levels). One over-approximation of what warnings should be allowed at a given program point with respect to this lattice would be to take the union of messages allowed at each program point across instantiation chain, which is exactly what passing /external:template- does. With this flag, you will be able to see warnings from external headers as long as they are emitted from inside a template and the template is instantiated from within user (non-external) code.

    cl.exe /experimental:external /external:I some_lib_dir /external:W0 /external:templates- /W4 my_prog.cpp

    This makes the warning inside the external header reappear, even though the warning is inside an external header with warning level set to 0.

    Suppressing and Enforcing Warnings

    The above mechanism does not by itself enable or disable any warnings, it only sets the default warning level for a set of files, and thus all the existing mechanisms for enabling, disabling and suppressing the warnings still work:

    • /wdNNNN, /w1NNNN, /weNNNN, /Wv:XX.YY.ZZZZ etc.
    • #pragma warning( disable : 4507 34; once : 4385; error : 4164 )
    • #pragma warning( push[ ,n ] ) / #pragma warning( pop )

    In addition to these, when /external:templates- is used, we allow a warning to be suppressed at the point of instantiation. In the above example, the user can explicitly suppress the warning that reappeared due to use of /external:templates- as following:

    int main()
    {
    #pragma warning( suppress : 4245)
        return some_struct<unsigned int>().value;
    }
    

    On the other side of developers continuum, the library writers can use the exact same mechanisms to enforce certain warnings or all the warnings at certain level if they feel those should never be silenced with /external:W<n>.

    Example:

    External Header: some_lib_dir/some_hdr.hpp

    #pragma warning( push, 4 )
    #pragma warning( error : 4245 )
    template <typename T>
    struct some_struct
    {
        static const T value = -7; // W4: warning C4245: 'initializing': conversion from 'int'
                                   //                    to 'unsigned int', signed/unsigned mismatch
    };
    #pragma warning( pop )
    

    With the above change to the library header the owner of the library now ensures that the global warning level in his header is going to be 4 no matter what the user specified in /external:W<n> and thus all level 4 and above warnings will be emitted. Moreover, like in the above example she can enforce that a certain warning will be always treated as error, disabled, suppressed or emitted once in her header, and, again, the user will not be able to override that deliberate choice.

    Limitations

    In the current implementation you will still occasionally get a warning through from an external header when that warning was emitted by the compiler’s back-end (as opposed to front-end). These warnings usually start with C47XX, though not all C47XX warnings are back-end warnings. A good rule of thumb is that if detection of a given warning may require data or control-flow analysis, then it is likely done by the back-end in our implementation and such a warning won’t be suppressed by the current mechanism. This is a known problem and the proper fix may not arrive until the next major release of Visual Studio as it requires breaking changes to our intermediate representation. You can still disable these warnings the traditional way with /wd47XX.

    Besides, this experimental feature hasn’t been integrated yet with /analyze warnings as we try to gather some feedback from the users first. /analyze warnings do not have warning levels, so we are also investigating the best approach to integrate them with the current logic.

    We currently don’t have a guidance on the use of this feature for SDL compliance, but we will be in contact with the SDL team to provide such guidance.

    Conclusion

    Coming back to the analogy with the Broken Windows Theory, we had mixed feelings about the net effect of this feature on the broader libraries ecosystem. On one hand it does a disservice to library writers by putting their users into “not my problem” mode and making them less likely to report or fix problems upstream. On the other hand, it gives them more control over their own code as they can now enforce stricter requirements over it by subduing rogue libraries that prevented such enforcement in the past.

    While we agree that the secondary effect of this feature might limit contributions back to the library, fixing issues upstream is usually not a user’s top priority given the code she is working on, but fixing issues in her own code is her topmost priority and warnings from other libraries obstruct detection of warnings in it because she cannot enforce /WX on her code only. More importantly, we believe this will have a tertiary effect that would balance the net loss of the secondary effect.

    By enabling a developer to abstract from 3rd party library warnings we encourage her to concentrate on her own code – make it cleaner, possibly even warning free on as large level as she possibly can. 3rd party library developers are also developers in this chain, so by allowing them to abstract from their 3rd party dependencies, we encourage them to clean up their code and make it compile with as large warning level as they possibly can, etc. etc. Why is this important? In essence, in the current world the warnings avalanche across the entire chain of library dependencies and the further you are on this chain, the more difficult it becomes to do something about them – the developer feels overwhelmed and gives up on any attempt to do so. On the other hand, in the world where we can distinguish our own code from 3rd party code, each developer in the chain has means to stop (block the effects of) the avalanche and is encouraged to minimize its impact, resulting in minimizing the overall impact to the entire chain. This is a speculation of course, but we think it is as plausible as the secondary effect we were concerned about.

    In closing, we would like to invite you to try the feature out for yourself and let us know what you think. Please do tell us both what you like and what you don’t like about it as otherwise the vocal minority might decide for you. The feature is available as of Visual Studio 15.6 Preview 1. As always, we can be reached via the comments below, via email (visualcpp@microsoft.com) and you can provide feedback via Help -> Report A Problem in the product, or via Developer Community. You can also find us on Twitter (@VisualC) and Facebook (msftvisualcpp).

    P.S. Kudos to Robert Schumacher for pointing to the analogy with the Broken Windows Theory!

    Setting up a managed container cluster with AKS and Kubernetes in the Azure Cloud running .NET Core in minutes

    $
    0
    0

    After building a Raspberry Pi Kubernetes Cluster, I wanted to see how quickly I could get up to speed on Kubernetes in Azure.

    • I installed the Azure CLI (Command Line Interface) in a few minutes - works on Windows, Mac or Linux.
      • I also remembered that I don't really need to install anything locally. I could just use the Azure Cloud Shell directly from within VS Code. I'd get a bash shell, Azure CLI, and automatically logged in without doing anything manual.
      • Anyway, while needlessly installing the Azure CLI locally, I read up on the Azure Container Service (AKS) here. There's walkthrough for creating an AKS Cluster here. You can actually run through the whole tutorial in the browser with an in-browser shell.
    • After logging in with "az login" I made a new resource group to hold everything with "az group create -l centralus -n aks-hanselman." It's in the centralus and it's named aks-hanselman.
    • Then I created a managed container service like this:
      C:UsersscottSource>az aks create -g aks-hanselman -n hanselkube --generate-ssh-keys
      / Running ...
    • This runs for a few minutes while creating, then when it's done, I can get ahold of the credentials I need with
      C:UsersscottSource>az aks get-credentials --resource-group aks-hanselman --name hanselkube
      Merged "hanselkube" as current context in C:Usersscott.kubeconfig
    • I can install Kubenetes CLI "kubectl" easily with "az aks install-cli"
      Then list out the nodes that are ready to go!
      C:UsersscottSource>kubectl get nodes
      NAME                       STATUS    ROLES     AGE       VERSION
      aks-nodepool1-13823488-0   Ready     agent     1m        v1.7.7
      aks-nodepool1-13823488-1   Ready     agent     1m        v1.7.7
      aks-nodepool1-13823488-2   Ready     agent     1m        v1.7.7

    A year ago, Glenn Condron and I made a silly web app while recording a Microsoft Virtual Academy. We use it for demos and to show how even old (now over a year) containers can still be easily and reliably deployed. It's up at https://hub.docker.com/r/glennc/fancypants/.

    I'll deploy it to my new Kubernetes Cluster up in Azure by making this yaml file:

    apiVersion: apps/v1beta1
    
    kind: Deployment
    metadata:
    name: fancypants
    spec:
    replicas: 1
    template:
    metadata:
    labels:
    app: fancypants
    spec:
    containers:
    - name: fancypants
    image: glennc/fancypants:latest
    ports:
    - containerPort: 80
    ---
    apiVersion: v1
    kind: Service
    metadata:
    name: fancypants
    spec:
    type: LoadBalancer
    ports:
    - port: 80
    selector:
    app: fancypants

    I saved it as fancypants.yml, then run kubectl create -f fancypants.yml.

    I can run kubectl proxy and then hit http://localhost:8001/api/v1/namespaces/kube-system/services/http:kubernetes-dashboard:/proxy/#!/overview?namespace=default to look at the Kubernetes Dashboard, proxyed locally, but all running in Azure.

    image

    When fancypants is created and deployed, then I can find out its external IP with:

    C:UsersscottSources>kubectl get service
    
    NAME TYPE CLUSTER-IP EXTERNAL-IP PORT(S) AGE
    fancypants LoadBalancer 10.0.116.145 52.165.232.77 80:31040/TCP 7m
    kubernetes ClusterIP 10.0.0.1 <none> 443/TCP 18m

    There's my IP, I hit it and boom, I've got fancypants in the managed cloud. I only have to pay for the VMs I'm using, and not for the VM that manages Kubernetes. That means the "kube-system" namespace is free, I pay for other namespaces like my "default" one.

    image

    Best part? When I'm done, I can just delete the resource group and take it all away. Per minute billing.

    C:UsersscottSources>az group delete -n aks-hanselman --yes

    Super fun and just took about 30 min to install, read about, try it out, write this blog post, then delete. Try it yourself!


    Sponsor: Check out JetBrains Rider: a new cross-platform .NET IDE. Edit, refactor, test and debug ASP.NET, .NET Framework, .NET Core, Xamarin or Unity applications. Learn more and download a 30-day trial!


    © 2017 Scott Hanselman. All rights reserved.
         

    An introduction to seplyr

    $
    0
    0

    by John Mount, Win-Vector LLC

    seplyr is an R package that supplies improved standard evaluation interfaces for many common data wrangling tasks.

    The core of seplyr is a re-skinning of dplyr's functionality to seplyr conventions (similar to how stringr re-skins the implementing package stringi).

    Standard Evaluation and Non-Standard Evaluation

    "Standard evaluation" is the name we are using for the value oriented calling convention found in many programming languages. The idea is: functions are only allowed to look at the values of their arguments and not how those values arise (i.e., they can not look at source code or variable names). This evaluation principle allows one to transform, optimize, and reason about code.

    It is what lets us say the following two snippets of code are equivalent.

    • x <- 4; sqrt(x)
    • x <- 4; sqrt(4)

    The mantra is:

    "variables can be replaced with their values."

    Which is called referential transparency.

    "Non-standard evaluation" is the name used for code that more aggressively inspects its environment. It is often used for harmless tasks such as conveniently setting axis labels on plots. For example, notice the following two plots have different y-axis labels (despite plotting identical values).

    plot(x = 1:3)
    

    Plot1

    plot(x = c(1,2,3))
    

    Plot2

    dplyr and seplyr

    The dplyr authors appear to strongly prefer a non-standard evaluation interface. Many in the dplyr community have come to think a package such as dplyr requires a non-standard interface. seplyr started as an experiment to show this is not actually the case.

    Syntactically the packages are deliberately similar.

    We can take a dplyr pipeline:

    suppressPackageStartupMessages(library("dplyr"))
    
    starwars %>%
      select(name, height, mass) %>%
      arrange(desc(height)) %>%
      head()
    
    ## # A tibble: 6 x 3
    ##           name height  mass
    ##          <chr>  <int> <dbl>
    ## 1  Yarael Poof    264    NA
    ## 2      Tarfful    234   136
    ## 3      Lama Su    229    88
    ## 4    Chewbacca    228   112
    ## 5 Roos Tarpals    224    82
    ## 6     Grievous    216   159
    

    And re-write it in seplyr notation:

    library("seplyr")
    
    starwars %.>%
      select_se(., c("name", "height", "mass")) %.>%
      arrange_se(., "desc(height)") %.>%
      head(.)
    
    ## # A tibble: 6 x 3
    ##           name height  mass
    ##          <chr>  <int> <dbl>
    ## 1  Yarael Poof    264    NA
    ## 2      Tarfful    234   136
    ## 3      Lama Su    229    88
    ## 4    Chewbacca    228   112
    ## 5 Roos Tarpals    224    82
    ## 6     Grievous    216   159
    

    For the common dplyr-verbs (excluding mutate(), which we will discuss next) all the non-standard evaluation is saving us is a few quote marks and array designations (and we have ways of getting rid of the need for quote marks). In exchange for this small benefit the non-standard evaluation is needlessly hard to program over. For instance in the seplyr pipeline it is easy to accept the list of columns from an outside source as a simple array of names.

    Until you introduce a substitution system such as rlang or wrapr::let() (which we recommend over rlang and publicly pre-dates the public release of rlang) you have some difficulty writing re-usable programs that use the dplyr verbs over "to be specified later" column names.

    We are presumably not the only ones who considered this a limitation:

    Github

    seplyr is an attempt to make programming a primary concern by making the value-oriented (standard) interfaces the primary interfaces.

    mutate()

    The earlier "standard evaluation costs just a few quotes" becomes a bit strained when we talk about the dplyr::mutate() operator. It doesn't seem worth the effort unless you get something more in return. In seplyr 0.5.0 we introduced "the something more": planning over and optimizing dplyr::mutate() sequences.

    A seplyr mutate looks like the following:

      select_se(., c("name", "height", "mass")) %.>%
      mutate_se(., c(
        "height" := "height + 1",
        "mass" := "mass + 1",
        "height" := "height + 2",
        "mass" := "mass + 2",
        "height" := "height + 3",
        "mass" := "mass + 3"
      )) %.>%
      arrange_se(., "name") %.>%
      head(.)
    
    ## # A tibble: 6 x 3
    ##                  name height  mass
    ##                 <chr>  <dbl> <dbl>
    ## 1              Ackbar    186    89
    ## 2          Adi Gallia    190    56
    ## 3    Anakin Skywalker    194    90
    ## 4        Arvel Crynyd     NA    NA
    ## 5         Ayla Secura    184    61
    ## 6 Bail Prestor Organa    197    NA
    

    seplyr::mutate_se() always uses ":=" to denote assignment (dplyr::mutate() prefers "=" for assignment, except in cases where ":=" is required).

    The advantage is: once we are go to the trouble to capture the mutate expressions we can treat them as data and apply procedures to them. For example we can re-group and optimize the mutate assignments.

    plan <- partition_mutate_se(
      c("name" := "tolower(name)",
        "height" := "height + 0.5",
        "height" := "floor(height)",
        "mass" := "mass + 0.5",
        "mass" := "floor(mass)"))
    print(plan)
    
    ## $group00001
    ##            name          height            mass
    ## "tolower(name)"  "height + 0.5"    "mass + 0.5"
    ##
    ## $group00002
    ##          height            mass
    ## "floor(height)"   "floor(mass)"
    

    Notice seplyr::partition_mutate_se() re-ordered and re-grouped the assignments so that:

    • In each group each value used is independent of values produced in other assignments.
    • All dependencies between assignments are respected by the group order.

    The "safe block" assignments can then be used in a pipeline:

    starwars %.>%
      select_se(., c("name", "height", "mass")) %.>%
      mutate_seb(., plan) %.>%
      arrange_se(., "name") %.>%
      head(.)
    
    ## # A tibble: 6 x 3
    ##                  name height  mass
    ##                 <chr>  <dbl> <dbl>
    ## 1              ackbar    180    83
    ## 2          adi gallia    184    50
    ## 3    anakin skywalker    188    84
    ## 4        arvel crynyd     NA    NA
    ## 5         ayla secura    178    55
    ## 6 bail prestor organa    191    NA
    

    This may not seem like much. However, when using dplyr with a SQL database (such as PostgreSQL or even Sparklyr) keeping the number of dependencies in a block low is critical for correct calculation (which is why I recommend keeping dependencies low). Furthermore, on Sparklyr sequences of mutates are simulated by nesting of SQL statements, so you must also keep the number of mutates at a moderate level (i.e., you want a minimal number of blocks or groups).

    Machine Generated Code

    Because we are representing mutate assignments as user manipulable data we can also enjoy the benefit of machine generated code. seplyr 0.5.* uses this opportunity to introduce a simple function named if_else_device(). This device uses R's ifelse() statement (which conditionally chooses values in a vectorized form) to implement a more powerful block-if/else statement (which conditionally simultaneously controls blocks of values and assignments; SAS has such a feature).

    For example: suppose we want to NA-out one of height or mass for each row of the starwars data uniformly at random. This can be written naturally using the if_else_device.

    if_else_device(
      testexpr = "runif(n())>=0.5",
      thenexprs = "height" := "NA",
      elseexprs = "mass" := "NA")
    
    ##                           ifebtest_30etsitqqutk
    ##                               "runif(n())>=0.5"
    ##                                          height
    ##    "ifelse( ifebtest_30etsitqqutk, NA, height)"
    ##                                            mass
    ## "ifelse( !( ifebtest_30etsitqqutk ), NA, mass)"
    

    Notice the if_else_device translates the user code into a sequence of dplyr::mutate() expressions (using only the weaker operator ifelse()). Obviously the user could perform this translation, but if_else_device automates the record keeping and can even be nested. Also many such steps can be chained together and broken into a minimal sequence of blocks by partition_mutate_se() (not forcing a new dplyr::mutate() step for each if-block encountered).

    When we combine the device with the partitioned we get performant database-safe code where the number of blocks is only the level of variable dependence (and not the possibly much larger number of initial value uses that a straightforward non-reordering split would give; note: seplyr::mutate_se() 0.5.1 and later incorporate the partition_mutate_se() in mutate_se()).

    starwars %.>%
      select_se(., c("name", "height", "mass")) %.>%
      mutate_se(., if_else_device(
        testexpr = "runif(n())>=0.5",
        thenexprs = "height" := "NA",
        elseexprs = "mass" := "NA")) %.>%
      arrange_se(., "name") %.>%
      head(.)
    
    ## # A tibble: 6 x 4
    ##                  name height  mass ifebtest_wwr9k0bq4v04
    ##                 <chr>  <int> <dbl>                 <lgl>
    ## 1              Ackbar     NA    83                  TRUE
    ## 2          Adi Gallia    184    NA                 FALSE
    ## 3    Anakin Skywalker     NA    84                  TRUE
    ## 4        Arvel Crynyd     NA    NA                  TRUE
    ## 5         Ayla Secura    178    NA                 FALSE
    ## 6 Bail Prestor Organa    191    NA                 FALSE
    

    Conclusion

    The value oriented notation is a bit clunkier, but this is offset by it's greater flexibility in terms of composition and working parametrically.

    Our group has been using seplyr::if_else_device() and seplyr::partition_mutate_se() to greatly simplify porting powerful SAS procedures to R/Sparklyr/Apache Spark clusters.

    This is new code, but we are striving to supply sufficient initial documentation and examples.

    Visual Studio Updates for Office 365 APIs Tools

    $
    0
    0

    As we recently detailed on the Office Developer blog, we are making it simpler and easier for developers to connect to Office 365 through the Microsoft Graph. For Visual Studio developers currently using the Office 365 API Tools to create applications, you should plan to transition your apps to use Microsoft Graph to access Office 365 data directly.

    Call to Action

    You can use the Microsoft Graph Quick Start Guide to learn the quickest way to get started with Microsoft Graph for the platform of your choice. Or, you can use Office 365 Connected Services docs for Microsoft Graph if you have Visual Studio 2017 (version 15.3 or later) installed. If your app requires SharePoint APIs that are not yet available in Microsoft Graph, update your code to use Microsoft Graph to discover your service endpoints.

    As a reminder, starting January 10th, 2018, new apps will not be able to use on Office 365 Discovery Service. Existing apps can continue to use the service until November 1st, 2019. From November 1st, 2019 onward, the Office 365 discovery service will be fully decommissioned, and no apps will be able to use the service anymore. For Outlook v1.0 endpoint, on November 1st, 2019, we will decommission the Outlook REST API v1.0 in order to transition to Microsoft Graph and Outlook REST API v2.0.

    We are here to help. If you have questions, please let us know via Stack Overflow with the [MicrosoftGraph] tag.

    Keyur Patel, Senior Program Manager, Office Platform team.

    Keyur is focused on building great experiences for developers across Office and the Microsoft Graph.

    Viewing all 10804 articles
    Browse latest View live


    <script src="https://jsc.adskeeper.com/r/s/rssing.com.1596347.js" async> </script>