Quantcast
Channel: Category Name
Viewing all 10804 articles
Browse latest View live

Bing Entity Search API Now Generally Available

$
0
0

We are pleased to announce the general availability of Bing Entity Search API, which is now available in the United States and the following other markets: Australia, Brazil, Canada, France, Germany, India, Italy, Mexico, Spain and the United Kingdom.

Bing Entity Search API brings rich contextual information about people, places, things, and local businesses to any application, blog, or website for a more engaging user experience. With Bing Entity Search, you can identify the most relevant entity results based on the search term and provide users with primary details about those entities. With our latest coverage improvements, we now support multiple international markets and many more entity types such as famous people, places, movies, TV shows, video games, and books. With this new API, developers can enhance their apps by exposing rich data from the Bing Knowledge Graph directly in their apps.

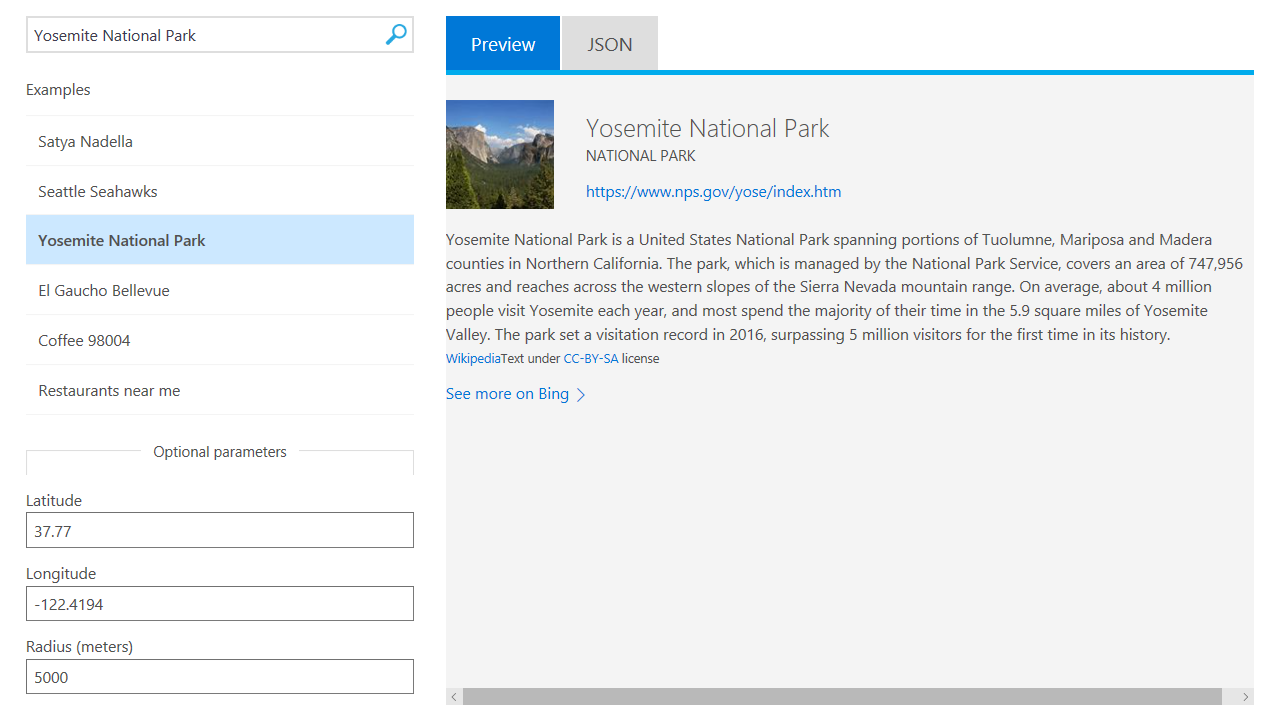
Bing Entity Search API Demo Screenshot

Developers can now innovate using Bing Entity Search to fulfill their users’ information needs and help users perform searches in context, instead of forcing users to switching apps to perform web searches. Millions of Bing users around the globe use rich information from the Bing Knowledge Graph every day, on Bing.com, Cortana, Xbox, Office, Skype and more. Our API partners, like Jibo, use the Bing knowledge graph to add smarts to their products to understand and respond to human queries.

So are you now thinking, “How do I use this technology in my application?”. Below is a short list of ideas to help you explore possibilities:

  • Messaging app that could provide an entity snapshot of a restaurant, making it easier for a group to plan an evening.
  • Social media app that could augment users’ photos with information about the locations of each photo. A news app could provide entity snapshots for entities in the article.
  • Music app that could augment content with snapshots of artists and songs.
  • Camera app that could use Computer Vision API to detect entities in an image and then use Entity Search API to provide more context about those entity inline, and so on.

The possibilities are endless.  We are excited to see how you will incorporate Bing Entity Search API into your applications.


@CurrentIteration, Team Parameter, Offset

$
0
0
With our Sprint 131 update (rolling out over the next few weeks), there are some major changes coming to the @CurrentIteration macro used for work item queries. We are introducing the concept of a macro parameter, as well as allowing an offset to @CurrentIteration. These updates are mainly motivated by: A desire for queries to... Read More

ASP.NET Core 2.1.0-preview1: Razor UI in class libraries

$
0
0

One frequently requested scenario that ASP.NET Core 2.1 improves is building UI in reusable class libraries. With ASP.NET Core 2.1 you can package your Razor views and pages (.cshtml files) along with your controllers, page models, and data models in reusable class libraries that can be packaged and shared. Apps can then include pre-built UI components by referencing these packages and customize the UI by overriding specific views and pages.

To try out building Razor UI in a class library first install the .NET Core SDK for 2.1.0-preview1.

Create an ASP.NET Core Web Application by running dotnet new razor or selecting the corresponding template in Visual Studio. The default template has fivestandard pages: Home, About, Contact, Error, and Privacy. Let’s move the Contact page into a class library. Add a .NET Standard class library to the solution and reference it from the ASP.NET Core Web Application.

We need to make some modifications to the class library .csproj file to enable Razor compilation. We need to set the RazorCompileOnBuild, IncludeContentInPack, and ResolvedRazorCompileToolset MSBuild properties as well as add the .cshtml files as content and also a package reference to Microsoft.AspNetCore.Mvc. Your class library project file should look like this:

ClassLibrary1.csproj

<Project Sdk="Microsoft.NET.Sdk">

  <PropertyGroup>
    <TargetFramework>netstandard2.0</TargetFramework>
    <ResolvedRazorCompileToolset>RazorSdk</ResolvedRazorCompileToolset>
    <RazorCompileOnBuild>true</RazorCompileOnBuild>
    <IncludeContentInPack>false</IncludeContentInPack>
  </PropertyGroup>

  <ItemGroup>
    <Content Include="Pages***.cshtml" />
  </ItemGroup>

  <ItemGroup>
    <PackageReference Include="Microsoft.AspNetCore.Mvc" Version="2.1.0-preview1-final" />
  </ItemGroup>

</Project>

For Preview1 making these project file modifications is a manual step, but in future previews we will provide a Razor MSBuild SDK (Microsoft.NET.Sdk.Razor) as well as project templates to handle these details for you.

Now we can add some Razor files to our class library. Add a Pages directory to the class library project and move over the Contact page along with its page model (Contact.cshtml, Contact.cshtml.cs) from the web app project. You’ll also need to move over _ViewImports.cshtml to get the necessary using statements.

Class library with Razor

Add some content to the Contact.cshtml file so you can tell it’s being used.

@page
@model ContactModel
@{
    ViewData["Title"] = "Contact";
}
<h2>@ViewData["Title"]</h2>
<h3>@Model.Message</h3>

<h2>BTW, this is from a Class Library!</h2>

Run the app and browse to the Contact page.

Contact page from a class library

You can override views and pages from a class library in your app by putting the page or view at the same path in your app. For example, let’s add a _Message.cshtml partial view that gets called from the contact page.

In the class library project add a Shared folder under the Pages folder and add the following partial view:

_Message.cshtml

<h2>You can override me!</h2>

Then call the _Message partial from the contact page using the new partial tag helper.

Contact.cshtml

@page
@model ContactModel
@{
    ViewData["Title"] = "Contact";
}
<h2>@ViewData["Title"]</h2>
<h3>@Model.Message</h3>

<h2>BTW, this is from a Class Library!</h2>

<partial name="_Message" />

Run the app to see that the partial is now rendered.

Contact page with partial

Now override the partial by adding a _Message.cshtml file to the web app under the /Pages/Shared folder.

_Message.cshtml

<h2>Overridden!</h2>

Rebuild and run the app to see the update.

Overridden partial

Summary

By compiling Razor views and pages into shareable libraries you can reuse existing UI with minimal effort. Please give this feature a try and let us know what you think on GitHub. Thanks!

Reducing the latency of permissions inherited through AAD Group memberships

$
0
0
Ever since we introduced the support for Azure AD groups in VSTS, the usage of Azure AD groups for managing permissions by our customers have grown significantly. The growth in usage also highlighted a gap we had where VSTS took anywhere between 24-48 hours to catch up with any membership changes that happened in upstream... Read More

Free Azure credits for students

$
0
0

For students looking to try out cloud computing, but who don't have access to a credit card, there's a new way to get access to Azure. Microsoft now offers a free Azure account to students in 140 countries, with free access to dozens of services — plus $100 in Azure credits for everything else. This gives students direct access to a powerful platform for statistical computing and AI application development in the cloud, including:

This is similar to the Free Azure account available to everyone, except that the free Azure credits can be used over 12 months (instead of 30 days) and, again, no credit card is required.

This is just a summary, and you can find the complete details here: Free Azure for Students.


Running ASP.NET Core on GoDaddy’s cheapest shared Linux Hosting – Don’t Try This At Home

$
0
0

First, a disclaimer. Don't do this. I did this to test a theory and to prove a point. ASP.NET Core and the .NET Core that it runs on are open source and run pretty much anywhere. I wanted to see if I could run an ASP.NET Core site on GoDaddy's cheapest hosting ($3, although it scales to $8) that basically supports only PHP. It's not a full Linux VM. It's locked-down and limited. You don't have root. You are missing most tools you'd expect you'd have.

BUT.

I wanted to see if I could get ASP.NET Core running on it anyway. Maybe if I do, they (and other inexpensive hosts) will talk to the .NET team, learn that ASP.NET Core is open source and could easily run on their existing infrastructure.

AGAIN: Don't do this. It's hacky. It's silly. But it's hella cool. IMHO. Also, big thanks to Tomas Weinfurt for his help!

First, I went to GoDaddy and signed up for their cheap hosting. Again, not a VM, but their shared one. I also registered supercheapaspnetsite.com as well. They use a cPanel-based web management system that doesn't really let you do anything. You can turn on SSH, do some PHP stuff, and generally poke around, but it's not exactly low-level.

First I ssh (shoosh!) in and see what I'm working with. I'm shooshing with Ubuntu on Windows 10 feature, that every developer should turn on. It's makes it really easy to work with Linux hosts if you're starting from Linux on Windows 10.

secretname@theirvmname [/proc]$ cat version
Linux version 2.6.32-773.26.1.lve1.4.46.el6.x86_64 (mockbuild@build.cloudlinux.com) (gcc version 4.4.7 20120313 (Red Hat 4.4.7-18) (GCC) ) #1 SMP Tue Dec 5 18:55:41 EST 2017
secretname@theirvmname [/proc]$

OK, looks like Red Hat, so CentOS 6 should be compatible.

I'm going to use .NET Core 2.1 (which is in preview now!) and get the SDK at https://www.microsoft.com/net/download/all and install it on my Windows machine where I will develop and build the app. I don't NEED to use Windows to do this, but it's the laptop I have and it's also nice to know I can build on Windows but target CentOS/RHEL6.

Next I'll make a new ASP.NET site with

dotnet new razor

and then I'll publish a self-contained version like this:

dotnet publish -r rhel.6-x64

And those files will end up in a folder like supercheapaspnetsitebinDebugnetcoreapp2.1rhel.6-x64publish

NOTE: You may need to add the NuGet feed for the dailies for this .NET Core preview in order to get the RHEL6 runtime downloaded during this local publish.

Then I used WinSCP (or whatever FTP/SCP client you like, rsync, etc) to get the files over to the ~/www folder on your GoDaddy shared site. Then I

chmod +x ./supercheapasnetsite

to make it executable. Now, from my ssh session at GoDaddy, let's try to run my app!

secretname@theirvmname [~/www]$ ./supercheapaspnetsite
Failed to load hb, error: libunwind.so.8: cannot open shared object file: No such file or directory
Failed to bind to CoreCLR at '/home/secretname/public_html/libcoreclr.so'

Of course it couldn't be that easy, right? .NET Core wants the unwind library (shared object) and it doesn't exist on this locked down system.

AND I don't have yum/apt/rpm or a way to install it right?

I could go looking for tar.gz file somewhere like this http://download.savannah.nongnu.org/releases/libunwind/ but I need to think about versions and make sure things line up. Given that I'm targeting CentOS6, I should start here https://centos.pkgs.org/6/epel-x86_64/libunwind-1.1-3.el6.x86_64.rpm.html and download libunwind-1.1-3.el6.x86_64.rpm.

I need to crack open that rpm file and get the library. RPM packages are just headers on top of a CPIO archive, so I can apt-get install rpm2cpio from my local Ubuntu instances (on Windows 10). Then from /mnt/c/users/scott/Downloads (where I downloaded the file) I will extract it.

rpm2cpio ./libunwind-1.1-3.el6.x86_64.rpm | cpio -idmv

There they are.

image

This part is cool. Even though I have these files, I don't have root or any way to "install" them. However I could either export/use the LD_LIBRARY_PATH environment variable to control how libraries get loaded OR I could put these files in $ORIGIN/netcoredeps. You can read more about Self Contained Linux Applications on .NET Core here.

The main executable of published .NET Core applications (which is the .NET Core host) has an RPATH property set to $ORIGIN/netcoredeps. That means that when Linux shared library loader is looking for shared libraries, it looks to this location before looking to default shared library locations. It is worth noting that the paths specified by the LD_LIBRARY_PATHenvironment variable or libraries specified by the LD_PRELOAD environment variable are still used before the RPATH property. So, in order to use local copies of the third-party libraries, developers need to create a directory named netcoredeps next to the main application executable and copy all the necessary dependencies into it.

At this point I've added a "netcoredeps" folder to my public folder, and then copied it (scp) over to GoDaddy. Let's run it again.

secretname@theirvmname [~/www]$ ./supercheapaspnetsite
FailFast: Couldn't find a valid ICU package installed on the system. Set the configuration flag System.Globalization.Invariant to true if you want to run with no globalization support.
   at System.Environment.FailFast(System.String)
   at System.Globalization.GlobalizationMode.GetGlobalizationInvariantMode()
   at System.Globalization.GlobalizationMode..cctor()
   at System.Globalization.CultureData.CreateCultureWithInvariantData()
   at System.Globalization.CultureData.get_Invariant()
   at System.Globalization.CultureInfo..cctor()
   at System.StringComparer..cctor()
   at System.AppDomain.InitializeCompatibilityFlags()
   at System.AppDomain.Setup(System.Object)
Aborted

Ok, now it's complaining about ICU packages. These are for globalization. That is also mentioned in the self-contained-linux apps docs and there's a precompiled binary I could download. But there's options.

If your app doesn't explicitly opt out of using globalization, you also need to add libicuuc.so.{version}, libicui18n.so.{version}, and libicudata.so.{version}

I like "opt-out" so I don't have to go dig these ups (although I could) so I can either set the CORECLR_GLOBAL_INVARIANT env var to 1, or I can add System.Globalization.Invariant = true to supercheapaspnetsite.runtimeconfig.json, which I'll do with just to be obnoxious. ;)

When I run it again I get another complained about libuv. Yet another shared library that isn't installed on this instance. I could  go get it and put it in netcoredeps OR since I'm using the .NET Core 2.1, I could try something new. There were some improvements made in .NET Core 2.1 around sockets and http performance. On the client side, these new managed libraries are written from the ground up in managed code using the new high-performance Span<T> and on the server-side I could use Kestrel's (Kestrel is the .NET Core webserver) experimental UseSockets() as they are starting to move that over.

In other words, I can bypass libuv usage entirely by changing my Program.cs to use the use UseSockets() like this.

public static IWebHostBuilder CreateWebHostBuilder(string[] args) =>
     WebHost.CreateDefaultBuilder(args)
     .UseSockets()
     .UseStartup<Startup>();

Let's run it again. I'll add the ASPNETCORE_URLS environment variable and set it to a high port like 8080. Remember, I'm not admin so I can't use any port under 1024.

secretname@theirvmname [~/www]$ export ASPNETCORE_URLS="http://*:8080"
secretname@theirvmname [~/www]$ ./supercheapaspnetsite
Hosting environment: Production
Content root path: /home/secretname/public_html
Now listening on: http://0.0.0.0:8080
Application started. Press Ctrl+C to shut down.

Holy crap it actually started.

Ok, but I can't access it from supercheapaspnetsite.com:8080 because this is GoDaddy's locked down managed shared hosting. I can't just open a port or forward a port in their control panel.

But. They use Apache, and that has the .htaccess file!

Could I use mod_proxy and try this?

ProxyPassReverse / http://127.0.0.1:8080/

Looks like no, they haven't turned this on. Likely they don't want to proxy off to external domains, but it'd be nice if they allowed localhost. Bummer. So close.

Fine, I'll proxy the traffic myself. (Not perfect, but this is all a spike)

RewriteRule ^(.*)$  "show.php" [L]

Cool, now a cheesy proxy goes in show.php.

<?php
$site = 'http://127.0.0.1:8080';
$request = $_SERVER['REQUEST_URI'];
$ch = curl_init();
curl_setopt($ch, CURLOPT_URL, $site . $request);
curl_setopt($ch, CURLOPT_HEADER, TRUE);
$f = fopen("headers.txt", "a");
    curl_setopt($ch, CURLOPT_VERBOSE, 0);
    curl_setopt($ch, CURLOPT_STDERR, $f);
    #don't output curl response, I need to strip the headers.
    #yes I know I can just CURLOPT_HEADER, false and all this 
    # goes away, but for testing we log headers
    curl_setopt($ch, CURLOPT_RETURNTRANSFER, 1); 
    curl_setopt($ch, CURLOPT_FOLLOWLOCATION, true);
$hold = curl_exec($ch);
#strip headers
$header_size = curl_getinfo($ch, CURLINFO_HEADER_SIZE);
$headers = substr($hold, 0, $header_size);
$response = substr($hold, $header_size);
$headerArray = explode(PHP_EOL, $headers);
echo $response; #echo ourselves. Yes I know curl can do this for us.
?>

Cheesy, yes. Works for GET? Also, yes. This really is Apache's job, not ours, but kudos to Tomas for this evil idea.

An ASP.NET Core app at a host that doesn't support it

Boom. How about another page at /about? Yes.

Another page with ASP.NET Core at a host that doesn't support it

Lovely. But I had to run the app myself. I have no supervisor or process manager (again this is already handled by GoDaddy for PHP but I'm in unprivileged world.) Shooshing in and running it is a bad idea and not sustainable. (Well, this whole thing is not sustainable, but still.)

We could copy "screen" over and start it up and detach like use screen ./supercheapaspnet app, but again, if it crashes, no one will start it. We do have crontab, so for now, we'll launch the app on a schedule occasionally to do a health check and if needed, keep it running. Also added a few debugging tools in ~/bin:

secretname@theirvmname [~/bin]$ ll
total 304
drwxrwxr-x  2    4096 Feb 28 20:13 ./
drwx--x--x 20    4096 Mar  1 01:32 ../
-rwxr-xr-x  1  150776 Feb 28 20:10 lsof*
-rwxr-xr-x  1   21816 Feb 28 20:13 nc*
-rwxr-xr-x  1  123360 Feb 28 20:07 netstat*

All in all, not that hard. ASP.NET Core and .NET Core underneath it can run pretty much anywhere, just like PHP, Python, whatever.

If you're a host and you want to talk to someone at Microsoft about setting up ASP.NET Core shared hosting, email Sourabh.Shirhatti@microsoft.com and talk to them! If you are GoDaddy, I apologize, and you should also email. ;)


Sponsor: Get the latest JetBrains Rider for debugging third-party .NET code, Smart Step Into, more debugger improvements, C# Interactive, new project wizard, and formatting code in columns.


© 2017 Scott Hanselman. All rights reserved.
     

ASP.NET Core 2.1.0-preview1: Introducing Identity UI as a library

$
0
0

ASP.NET Core has historically provided project templates with code for setting up ASP.NET Core Identity, which enables support for identity related features like user registration, login, account management, etc. While ASP.NET Core Identity handles the hard work of dealing with passwords, two-factor authentication, account confirmation, and other hairy security concerns, the amount of code required to setup a functional identity UI is still pretty daunting. The most recent version of the ASP.NET Core Web Application template with Individual User Accounts setup has over 50 files and a couple of thousand lines of code dedicated to setting up the identity UI!

Identity files

Having all this identity code in your app gives you a lot of flexibility to update and change it as you please, but also imposes a lot of responsibility. It's a lot of security sensitive code to understand and maintain. Also if there is an issue with the code, it can't be easily patched.

The good news is that in ASP.NET Core 2.1 we can now ship Razor UI in reusable class libraries. We are using this feature to provide the entire identity UI as a prebuilt package (Microsoft.AspNetCore.Identity.UI) that you can simply reference from an application. The project templates in 2.1 have been updated to use the prebuilt UI, which dramatically reduces the amount of code you have to deal with. The one identity specific .cshtml file in the template is there solely to override the layout used by the identity UI to be the layout for the application.

Identity UI files

_ViewStart.cshtml

@{
    Layout = "/Pages/_Layout.cshtml";
}

The identity UI is enabled by both referencing the package and calling AddDefaultUI when setting up identity in the ConfigureServices method.

services.AddIdentity<IdentityUser, IdentityRole>(options => options.Stores.MaxLengthForKeys = 128)
    .AddEntityFrameworkStores<ApplicationDbContext>()
    .AddDefaultUI()
    .AddDefaultTokenProviders();

If you want the flexibility of having the identity code in your app, you can use the new identity scaffolder to add it back.

Currently you have to invoke the identity scaffolder from the command-line. In a future preview you will be able to invoke the identity scaffolder from within Visual Studio.

From the project directory run the identity scaffolder with the -dc option to reuse the existing ApplicationDbContext.

dotnet aspnet-codegenerator identity -dc WebApplication1.Data.ApplicationDbContext

The identity scaffolder will generate all of the identity related code in a new area under /Areas/Identity/Pages.

In the ConfigureServices method in Startup.cs you can now remove the call to AddDefaultUI.

services.AddIdentity<IdentityUser, IdentityRole>(options => options.Stores.MaxLengthForKeys = 128)
    .AddEntityFrameworkStores<ApplicationDbContext>()
    // .AddDefaultUI()
    .AddDefaultTokenProviders();

Note that the ScaffoldingReadme.txt says to remove the entire call to AddIdentity, but this is a typo that will be corrected in a future release.

To also have the scaffolded identity code pick up the layout from the application, remove _Layout.cshtml from the identity area and update _ViewStart.cshtml in the identity area to point to the layout for the application (typically /Pages/_Layout.cshtml or /Views/Shared/_Layout.cshtml).

/Areas/Identity/Pages/_ViewStart.cshtml

@{
    Layout = "/Pages/_Layout.cshtml";
}

You should now be able to run the app with the scaffolded identity UI and log in with an existing user.

You can also use the code from the identity scaffolder to customize different pages of the default identity UI. For example, you can override just the register and account management pages to add some additional user profile data.

Let's extend identity to keep track of the name and age of our users.

Add an ApplicationUser class in the Data folder that derives from IdentityUser and adds Name and Age properties.

public class ApplicationUser : IdentityUser
{
    public string Name { get; set; }
    public int Age { get; set; }
}

Update the ApplicationDbContext to derive from IdentityContext<ApplicationUser>.

    public class ApplicationDbContext : IdentityDbContext<ApplicationUser>
    {
        public ApplicationDbContext(DbContextOptions<ApplicationDbContext> options)
            : base(options)
        {
        }
    }

In the Startupclass update the call to AddIdentity to use the new ApplicationUser and add back the call to AddDefaultUI if you removed it previously.

services.AddIdentity<ApplicationUser, IdentityRole>(options => options.Stores.MaxLengthForKeys = 128)
    .AddEntityFrameworkStores<ApplicationDbContext>()
    .AddDefaultUI()
    .AddDefaultTokenProviders();

Now let's update the register and account management pages to add UI for the two additional user properties.

In a future release we plan to update the identity scaffolder to support scaffolding only specific pages and provide a UI for selecting which pages you want, but for now the identity scaffolder is all or nothing and you have to remove the pages you don't want.

Remove all of the scaffolded files under /Areas/Identity except for:

  • /Areas/Identity/Pages/Account/Manage/Index.*
  • /Areas/Identity/Pages/Account/Register.*
  • /Areas/Identity/Pages/_ViewImports.cshtml
  • /Areas/Identity/Pages/_ViewStart.cshtml

Let's start with updating the register page. In /Areas/Identity/Pages/Account/Register.cshtml.cs make the following changes:

  • Replace IdentityUser with ApplicationUser
  • Replace ILogger<LoginModel> with ILogger<RegisterModel> (known bug that will get fixed in a future release)
  • Update the InputModel to add Name and Age properties:

      public class InputModel
      {
          [Required]
          [DataType(DataType.Text)]
          [Display(Name = "Full name")]
          public string Name { get; set; }
    
          [Required]
          [Range(0, 199, ErrorMessage = "Age must be between 0 and 199 years")]
          [Display(Name = "Age")]
          public string Age { get; set; }
    
          [Required]
          [EmailAddress]
          [Display(Name = "Email")]
          public string Email { get; set; }
    
          [Required]
          [StringLength(100, ErrorMessage = "The {0} must be at least {2} and at max {1} characters long.", MinimumLength = 6)]
          [DataType(DataType.Password)]
          [Display(Name = "Password")]
          public string Password { get; set; }
    
          [DataType(DataType.Password)]
          [Display(Name = "Confirm password")]
          [Compare("Password", ErrorMessage = "The password and confirmation password do not match.")]
          public string ConfirmPassword { get; set; }
      }
    
  • Update the OnPostAsync method to bind the new input values to the created ApplicationUser

      var user = new ApplicationUser()
      {
          Name = Input.Name,
          Age = Input.Age,
          UserName = Input.Email,
          Email = Input.Email
      };
    

Now we can update /Areas/Identity/Pages/Account/Register.cshtml to add the new fields to the register form.

<div class="row">
    <div class="col-md-4">
        <form asp-route-returnUrl="@Model.ReturnUrl" method="post">
            <h4>Create a new account.</h4>
            <hr />
            <div asp-validation-summary="All" class="text-danger"></div>
            <div class="form-group">
                <label asp-for="Input.Name"></label>
                <input asp-for="Input.Name" class="form-control" />
                <span asp-validation-for="Input.Name" class="text-danger"></span>
            </div>
            <div class="form-group">
                <label asp-for="Input.Age"></label>
                <input asp-for="Input.Age" class="form-control" />
                <span asp-validation-for="Input.Age" class="text-danger"></span>
            </div>
            <div class="form-group">
                <label asp-for="Input.Email"></label>
                <input asp-for="Input.Email" class="form-control" />
                <span asp-validation-for="Input.Email" class="text-danger"></span>
            </div>
            <div class="form-group">
                <label asp-for="Input.Password"></label>
                <input asp-for="Input.Password" class="form-control" />
                <span asp-validation-for="Input.Password" class="text-danger"></span>
            </div>
            <div class="form-group">
                <label asp-for="Input.ConfirmPassword"></label>
                <input asp-for="Input.ConfirmPassword" class="form-control" />
                <span asp-validation-for="Input.ConfirmPassword" class="text-danger"></span>
            </div>
            <button type="submit" class="btn btn-default">Register</button>
        </form>
    </div>
</div>

Run the app and click on Register to see the updates:

Register updated

Now let's update the account management page. In /Areas/Identity/Pages/Account/Manage/Index.cshtml.cs make the following changes:

  • Replace IdentityUser with ApplicationUser
  • Update the InputModel to add Name and Age properties:

      public class InputModel
      {
          [Required]
          [DataType(DataType.Text)]
          [Display(Name = "Full name")]
          public string Name { get; set; }
    
          [Required]
          [Range(0, 199, ErrorMessage = "Age must be between 0 and 199 years")]
          [Display(Name = "Age")]
          public int Age { get; set; }
    
          [Required]
          [EmailAddress]
          public string Email { get; set; }
    
          [Phone]
          [Display(Name = "Phone number")]
          public string PhoneNumber { get; set; }
      }
    
  • Update the OnGetAsync method to initialize the Name and Age properties on the InputModel:

      Input = new InputModel
      {
          Name = user.Name,
          Age = user.Age,
          Email = user.Email,
          PhoneNumber = user.PhoneNumber
      };
    
  • Update the OnPostAsync method to update the name and age for the user:

      if (Input.Name != user.Name)
      {
          user.Name = Input.Name;
      }
    
      if (Input.Age != user.Age)
      {
          user.Age = Input.Age;
      }
    
      var updateProfileResult = await _userManager.UpdateAsync(user);
      if (!updateProfileResult.Succeeded)
      {
          throw new InvalidOperationException($"Unexpected error ocurred updating the profile for user with ID '{user.Id}'");
      }
    

Now update /Areas/Identity/Pages/Account/Manage/Index.cshtml to add the additional form fields:

<div class="row">
    <div class="col-md-6">
        <form method="post">
            <div asp-validation-summary="All" class="text-danger"></div>
            <div class="form-group">
                <label asp-for="Username"></label>
                <input asp-for="Username" class="form-control" disabled />
            </div>
            <div class="form-group">
                <label asp-for="Input.Email"></label>
                @if (Model.IsEmailConfirmed)
                {
                    <div class="input-group">
                        <input asp-for="Input.Email" class="form-control" />
                        <span class="input-group-addon" aria-hidden="true"><span class="glyphicon glyphicon-ok text-success"></span></span>
                    </div>
                }
                else
                {
                    <input asp-for="Input.Email" class="form-control" />
                    <button asp-page-handler="SendVerificationEmail" class="btn btn-link">Send verification email</button>
                }
                <span asp-validation-for="Input.Email" class="text-danger"></span>
            </div>
            <div class="form-group">
                <label asp-for="Input.Name"></label>
                <input asp-for="Input.Name" class="form-control" />
            </div>
            <div class="form-group">
                <label asp-for="Input.Age"></label>
                <input asp-for="Input.Age" class="form-control" />
            </div>
            <div class="form-group">
                <label asp-for="Input.PhoneNumber"></label>
                <input asp-for="Input.PhoneNumber" class="form-control" />
                <span asp-validation-for="Input.PhoneNumber" class="text-danger"></span>
            </div>
            <button type="submit" class="btn btn-default">Save</button>
        </form>
    </div>
</div>

Run the app and you should now see the updated account management page.

Manage account updated

You can find a complete version of this sample app on GitHub.

Summary

Having the identity UI as a library makes it much easier to get up and running with ASP.NET Core Identity, while still preserving the ability to customize the identity functionality. For complete flexibility you can also use the new identity scaffolder to get full access to the code. We hope you enjoy these new features! Please give them a try and let us know what you think about them on GitHub.

//ceptor5.rssing.com/chan-4009396/article6908-live.html

$
0
0

On Wednesday, we released a roll up of fixes for security vulnerabilities for several versions of Team Foundation Server. There are no new features in this update. Most of the vulnerabilities are related to cross site scripting (XSS), some of which were customer reported. The others include an improperly encoded API, a service endpoint editing experience which exposes a previously configured password, and a regex denial of service vulnerability in our web portal. We recommend customers install these updates. These fixes are included in the recently released Team Foundation Server 2018 Update 1.  The release on Wednesday was for older versions and for customers who are not yet ready to update to the TFS 2018.

Team Foundation Server 2015 Update 4.1:

Team Foundation Server 2017.0.1:

Team Foundation Server 2017 Update 3.1:

We take all security vulnerabilities very seriously and go to great lengths to protect our customers.  The worst kind of security vulnerabilities you can have are those that allow an external, unauthenticated attacker access to or control over a system.  Fortunately, none of these are of that nature.  All of them require an authenticated user who has been granted permissions to your TFS server.  They all would require a hostile or unlikely accidental action by someone on your team.  However, out of an abundance of caution, we are releasing fixes and we encourage you to install the update.  All of these fixes have, of course, already been applied to our cloud hosted offering – VSTS.

As I mentioned above, some of the vulnerabilities were customer reported.  Although we do extensive security testing ourselves, like all bugs, it’s possible for us to miss something.  From time to time, some of our customers (particularly larger enterprises) do their own security testing of both TFS and VSTS and report their findings.  In most cases they don’t find anything.  However, recently, one of our customers did some very detailed testing and they found a few XSS issues.  We’re grateful to our customers who invest the effort to ensure our product is as secure as possible and we’re committed to fixing any significant issues they find.

Going forward, to avoid future XSS vulnerabilities slipping through our testing, we are adopting Content Security Policy to broadly mitigate XSS issues

Thank you,

Brian


A good incident postmortem

$
0
0

I wanted to call your attention to a good incident postmortem done by Taylor Lafrinere this week.  Taylor sits in my team room and, for a week, I saw him bent over his keyboard, often with two or three people staring over his shoulders trying to figure out what had caused this incident and what we needed to do to prevent it in the future.  This is the kind of tenacity you have to have to, in the long term, run a highly available service.  Only if you really understand the root cause and build mitigations and resiliency will you get there.

It’s a bit long and detailed but it’s a good read.

This is also a good opportunity for me to comment on our reliability of late.  In many, important, ways we are in much better shape than we have ever been in.  We have more reliability and isolation infrastructure in place than ever before.  We very rarely have incidents that affect a large percentage of customers any more.  Our practices help us isolate the effects of incidents so most people are completely unaware we are having issues.

However, in the past few months, we’ve had too many of those “smaller” incidents and, unfortunately, a very disproportionate # of them have been on our European instances so the availability of our European instances has looked much worse than the overall service availability.  There’s no one reason Europe has been hit hardest – it’s many reasons and we are taking steps to address them.

Many of the issues have been self-inflicted – by that I mean code defects that got checked in, deployed and not caught until they caused issues for customers.  In part that’s because we are making some pretty large systemic/structural changes to the service right now (you’ll hear more about the resulting new capabilities in the next few months) and the level of rigor we typically apply just has been up to the magnitude of the churn that’s happening.  We are working to improve that level of rigor while we simultaneously continue to improve isolation and resiliency.  The RCA above is a great example of the ongoing effort and learnings that go into every incident we experience.

At the same time, I recognize all that matters is that the service is good and healthy and doing what you need it to do.  It hasn’t been as healthy as it should have been lately.  For that I want to apologize.  We are working hard to address the underlying issues and this dip in health will get fixed and we’ll come out of it stronger and more resilient than ever.

Thank you,

Brian

Top stories from the VSTS community–2018.03.02

$
0
0
Here are top stories we found in our streams this week related to DevOps, VSTS, TFS and other interesting topics. TOP STORIES Make a Group Team Administrator in VSTS/TFS – Jesse HouwingIn the past, I’ve contributed to the TFS Team Tools from the ALM Rangers. That project had since been deprecated, though it still has... Read More

Security updates for TFS 2015 Update 4, TFS 2017, and TFS 2017 Update 3

$
0
0
We released updates to Team Foundation Server 2015 Update 4, Team Foundation Server 2017, and Team Foundation Server 2017 Update 3 to fix security vulnerabilities. You can read the details in Brian’s blog post. We recommend customers install these updates. All of these fixes are also in Team Foundation Server 2018 Update 1, and we... Read More

Updates to Azure Database for MySQL and Azure Database for PostgreSQL

$
0
0

Azure database services for MySQL and PostgreSQL are fully managed, enterprise-ready services built using community version of MySQL and PostgreSQL database engines respectively. These services come with built-in high availability and ability to elastically scale compute and storage independently in seconds, helping you to easily adjust resources and respond faster to market and customer demands. Additionally, you benefit from unparalleled security and compliance, Azure IP advantage, as well as Azure’s industry leading global reach.

Since we announced these services in preview last year, users have been providing feedback helping drive product improvements and new features. As part of executing on customer feedback, I am really excited to announce the changes to the pricing model that will provide customers with more flexibility and help optimize costs.

Pricing tiers

Since the preview launch, we have been offering the Basic and Standard pricing tiers. We are continuing with the Basic tier, re-naming Standard to General Purpose and introducing a new premium tier called Memory Optimized to cater to workloads requiring faster in-memory performance. For more information about the General Purpose and Memory Optimized tiers, and when to use them, visit MySQL and PostgreSQL documentation.

Changing from “compute units” to vCores

Beginning today you will be provisioning compute in vCores instead of “compute units”. vCores represent the logical CPU of the underlying hardware. Currently, two compute generations, Gen 4 and Gen 5, are offered for you to choose from (may vary based on the deployment region you choose). Gen 4 logical CPUs are based on Intel E5-2673 v3 (Haswell) 2.4 GHz processors. Gen 5 logical CPUs are based on Intel E5-2673 v4 (Broadwell) 2.3 GHz processors. The General Purpose tier now supports up to 32 vCores, using either Gen 4 or Gen 5. The Memory Optimized tier is only offered on Gen 5 and supports up to 32 vCores.

Flexibly configure and scale storage

Now users can provision a server with as little as 5 GB of storage. You can also increase storage on existing or new MySQL and PostgreSQL servers in 1 GB increments without any downtime to your application.

Additional options for backup and geo-restore

Backup retention period can now be configured between 7 and 35 days across all pricing tiers. In addition, for General Purpose and Memory Optimized tiers, you can opt for geo-redundant storage for backups. Geo-redundant storage allows you to use the backups to restore your server to any Azure region in the event of a disaster. For more information, visit MySQL and PostgreSQL documentation.

What does it mean for you?

Existing MySQL and PostgreSQL servers will transparently move to the new vCore and storage model. The mapping from old compute units to the new vCores is as follows:

Basic (compute units) Basic (vCores)
50 1
100 2
Standard (compute units) General Purpose (vCores)
100 2
200 4
400 8
800 16

The backup retention period for all existing MySQL and PostgreSQL Standard servers will be set to 35 days by default using geo-redundant backup storage. Existing Basic MySQL and PostgreSQL servers will be set to 7 days by default using locally redundant backup storage. You can configure the backup retention period to any value between 7 and 35 days.

Resources

Get started and create your MySQL and PostgreSQL servers today!

Learn more about Azure Database for MySQL on the overview and pricing pages.

Learn more about Azure Database for PostgreSQL on the overview and pricing pages.


Sunil Kamath

Twitter: @kamathsun

ASP.NET Core 2.1.0-preview1: Introducing Identity UI as a library

$
0
0

ASP.NET Core has historically provided project templates with code for setting up ASP.NET Core Identity, which enables support for identity related features like user registration, login, account management, etc. While ASP.NET Core Identity handles the hard work of dealing with passwords, two-factor authentication, account confirmation, and other hairy security concerns, the amount of code required to setup a functional identity UI is still pretty daunting. The most recent version of the ASP.NET Core Web Application template with Individual User Accounts setup has over 50 files and a couple of thousand lines of code dedicated to setting up the identity UI!

Identity files

Having all this identity code in your app gives you a lot of flexibility to update and change it as you please, but also imposes a lot of responsibility. It's a lot of security sensitive code to understand and maintain. Also if there is an issue with the code, it can't be easily patched.

The good news is that in ASP.NET Core 2.1 we can now ship Razor UI in reusable class libraries. We are using this feature to provide the entire identity UI as a prebuilt package (Microsoft.AspNetCore.Identity.UI) that you can simply reference from an application. The project templates in 2.1 have been updated to use the prebuilt UI, which dramatically reduces the amount of code you have to deal with. The one identity specific .cshtml file in the template is there solely to override the layout used by the identity UI to be the layout for the application.

Identity UI files

_ViewStart.cshtml

@{
    Layout = "/Pages/_Layout.cshtml";
}

The identity UI is enabled by both referencing the package and calling AddDefaultUI when setting up identity in the ConfigureServices method.

services.AddIdentity<IdentityUser, IdentityRole>(options => options.Stores.MaxLengthForKeys = 128)
    .AddEntityFrameworkStores<ApplicationDbContext>()
    .AddDefaultUI()
    .AddDefaultTokenProviders();

If you want the flexibility of having the identity code in your app, you can use the new identity scaffolder to add it back.

Currently you have to invoke the identity scaffolder from the command-line. In a future preview you will be able to invoke the identity scaffolder from within Visual Studio.

From the project directory run the identity scaffolder with the -dc option to reuse the existing ApplicationDbContext.

dotnet aspnet-codegenerator identity -dc WebApplication1.Data.ApplicationDbContext

The identity scaffolder will generate all of the identity related code in a new area under /Areas/Identity/Pages.

In the ConfigureServices method in Startup.cs you can now remove the call to AddDefaultUI.

services.AddIdentity<IdentityUser, IdentityRole>(options => options.Stores.MaxLengthForKeys = 128)
    .AddEntityFrameworkStores<ApplicationDbContext>()
    // .AddDefaultUI()
    .AddDefaultTokenProviders();

Note that the ScaffoldingReadme.txt says to remove the entire call to AddIdentity, but this is a typo that will be corrected in a future release.

To also have the scaffolded identity code pick up the layout from the application, remove _Layout.cshtml from the identity area and update _ViewStart.cshtml in the identity area to point to the layout for the application (typically /Pages/_Layout.cshtml or /Views/Shared/_Layout.cshtml).

/Areas/Identity/Pages/_ViewStart.cshtml

@{
    Layout = "/Pages/_Layout.cshtml";
}

You should now be able to run the app with the scaffolded identity UI and log in with an existing user.

You can also use the code from the identity scaffolder to customize different pages of the default identity UI. For example, you can override just the register and account management pages to add some additional user profile data.

Let's extend identity to keep track of the name and age of our users.

Add an ApplicationUser class in the Data folder that derives from IdentityUser and adds Name and Age properties.

public class ApplicationUser : IdentityUser
{
    public string Name { get; set; }
    public int Age { get; set; }
}

Update the ApplicationDbContext to derive from IdentityContext<ApplicationUser>.

    public class ApplicationDbContext : IdentityDbContext<ApplicationUser>
    {
        public ApplicationDbContext(DbContextOptions<ApplicationDbContext> options)
            : base(options)
        {
        }
    }

In the Startupclass update the call to AddIdentity to use the new ApplicationUser and add back the call to AddDefaultUI if you removed it previously.

services.AddIdentity<ApplicationUser, IdentityRole>(options => options.Stores.MaxLengthForKeys = 128)
    .AddEntityFrameworkStores<ApplicationDbContext>()
    .AddDefaultUI()
    .AddDefaultTokenProviders();

Now let's update the register and account management pages to add UI for the two additional user properties.

In a future release we plan to update the identity scaffolder to support scaffolding only specific pages and provide a UI for selecting which pages you want, but for now the identity scaffolder is all or nothing and you have to remove the pages you don't want.

Remove all of the scaffolded files under /Areas/Identity except for:

  • /Areas/Identity/Pages/Account/Manage/Index.*
  • /Areas/Identity/Pages/Account/Register.*
  • /Areas/Identity/Pages/_ViewImports.cshtml
  • /Areas/Identity/Pages/_ViewStart.cshtml

Let's start with updating the register page. In /Areas/Identity/Pages/Account/Register.cshtml.cs make the following changes:

  • Replace IdentityUser with ApplicationUser
  • Replace ILogger<LoginModel> with ILogger<RegisterModel> (known bug that will get fixed in a future release)
  • Update the InputModel to add Name and Age properties:

      public class InputModel
      {
          [Required]
          [DataType(DataType.Text)]
          [Display(Name = "Full name")]
          public string Name { get; set; }
    
          [Required]
          [Range(0, 199, ErrorMessage = "Age must be between 0 and 199 years")]
          [Display(Name = "Age")]
          public string Age { get; set; }
    
          [Required]
          [EmailAddress]
          [Display(Name = "Email")]
          public string Email { get; set; }
    
          [Required]
          [StringLength(100, ErrorMessage = "The {0} must be at least {2} and at max {1} characters long.", MinimumLength = 6)]
          [DataType(DataType.Password)]
          [Display(Name = "Password")]
          public string Password { get; set; }
    
          [DataType(DataType.Password)]
          [Display(Name = "Confirm password")]
          [Compare("Password", ErrorMessage = "The password and confirmation password do not match.")]
          public string ConfirmPassword { get; set; }
      }
    
  • Update the OnPostAsync method to bind the new input values to the created ApplicationUser

      var user = new ApplicationUser()
      {
          Name = Input.Name,
          Age = Input.Age,
          UserName = Input.Email,
          Email = Input.Email
      };
    

Now we can update /Areas/Identity/Pages/Account/Register.cshtml to add the new fields to the register form.

<div class="row">
    <div class="col-md-4">
        <form asp-route-returnUrl="@Model.ReturnUrl" method="post">
            <h4>Create a new account.</h4>
            <hr />
            <div asp-validation-summary="All" class="text-danger"></div>
            <div class="form-group">
                <label asp-for="Input.Name"></label>
                <input asp-for="Input.Name" class="form-control" />
                <span asp-validation-for="Input.Name" class="text-danger"></span>
            </div>
            <div class="form-group">
                <label asp-for="Input.Age"></label>
                <input asp-for="Input.Age" class="form-control" />
                <span asp-validation-for="Input.Age" class="text-danger"></span>
            </div>
            <div class="form-group">
                <label asp-for="Input.Email"></label>
                <input asp-for="Input.Email" class="form-control" />
                <span asp-validation-for="Input.Email" class="text-danger"></span>
            </div>
            <div class="form-group">
                <label asp-for="Input.Password"></label>
                <input asp-for="Input.Password" class="form-control" />
                <span asp-validation-for="Input.Password" class="text-danger"></span>
            </div>
            <div class="form-group">
                <label asp-for="Input.ConfirmPassword"></label>
                <input asp-for="Input.ConfirmPassword" class="form-control" />
                <span asp-validation-for="Input.ConfirmPassword" class="text-danger"></span>
            </div>
            <button type="submit" class="btn btn-default">Register</button>
        </form>
    </div>
</div>

Run the app and click on Register to see the updates:

Register updated

Now let's update the account management page. In /Areas/Identity/Pages/Account/Manage/Index.cshtml.cs make the following changes:

  • Replace IdentityUser with ApplicationUser
  • Update the InputModel to add Name and Age properties:

      public class InputModel
      {
          [Required]
          [DataType(DataType.Text)]
          [Display(Name = "Full name")]
          public string Name { get; set; }
    
          [Required]
          [Range(0, 199, ErrorMessage = "Age must be between 0 and 199 years")]
          [Display(Name = "Age")]
          public int Age { get; set; }
    
          [Required]
          [EmailAddress]
          public string Email { get; set; }
    
          [Phone]
          [Display(Name = "Phone number")]
          public string PhoneNumber { get; set; }
      }
    
  • Update the OnGetAsync method to initialize the Name and Age properties on the InputModel:

      Input = new InputModel
      {
          Name = user.Name,
          Age = user.Age,
          Email = user.Email,
          PhoneNumber = user.PhoneNumber
      };
    
  • Update the OnPostAsync method to update the name and age for the user:

      if (Input.Name != user.Name)
      {
          user.Name = Input.Name;
      }
    
      if (Input.Age != user.Age)
      {
          user.Age = Input.Age;
      }
    
      var updateProfileResult = await _userManager.UpdateAsync(user);
      if (!updateProfileResult.Succeeded)
      {
          throw new InvalidOperationException($"Unexpected error ocurred updating the profile for user with ID '{user.Id}'");
      }
    

Now update /Areas/Identity/Pages/Account/Manage/Index.cshtml to add the additional form fields:

<div class="row">
    <div class="col-md-6">
        <form method="post">
            <div asp-validation-summary="All" class="text-danger"></div>
            <div class="form-group">
                <label asp-for="Username"></label>
                <input asp-for="Username" class="form-control" disabled />
            </div>
            <div class="form-group">
                <label asp-for="Input.Email"></label>
                @if (Model.IsEmailConfirmed)
                {
                    <div class="input-group">
                        <input asp-for="Input.Email" class="form-control" />
                        <span class="input-group-addon" aria-hidden="true"><span class="glyphicon glyphicon-ok text-success"></span></span>
                    </div>
                }
                else
                {
                    <input asp-for="Input.Email" class="form-control" />
                    <button asp-page-handler="SendVerificationEmail" class="btn btn-link">Send verification email</button>
                }
                <span asp-validation-for="Input.Email" class="text-danger"></span>
            </div>
            <div class="form-group">
                <label asp-for="Input.Name"></label>
                <input asp-for="Input.Name" class="form-control" />
            </div>
            <div class="form-group">
                <label asp-for="Input.Age"></label>
                <input asp-for="Input.Age" class="form-control" />
            </div>
            <div class="form-group">
                <label asp-for="Input.PhoneNumber"></label>
                <input asp-for="Input.PhoneNumber" class="form-control" />
                <span asp-validation-for="Input.PhoneNumber" class="text-danger"></span>
            </div>
            <button type="submit" class="btn btn-default">Save</button>
        </form>
    </div>
</div>

Run the app and you should now see the updated account management page.

Manage account updated

You can find a complete version of this sample app on GitHub.

Summary

Having the identity UI as a library makes it much easier to get up and running with ASP.NET Core Identity, while still preserving the ability to customize the identity functionality. For complete flexibility you can also use the new identity scaffolder to get full access to the code. We hope you enjoy these new features! Please give them a try and let us know what you think about them on GitHub.

Because it’s Friday: Meet the Neighbors

$
0
0

Bringing over a cake is so passé. If you want to meet the neighbours, just invite them over to dance (via TH).

That's all from the blog for this week. We'll be back next week: have a great weekend (ideally with dancing!).

ASP.NET Core 2.1.0-preview1: GDPR enhancements

$
0
0

2018 sees the introduction of the General Data Protection Regulation, an EU framework to allow EU citizens to control, correct and delete their data, no matter where in the word it is held. In ASP.NET Core 2.1 Preview 1 we’ve added some features to the ASP.NET Core templates to allow you to meet some of your GDPR obligations, as well as a cookie “consent” features to allow you to annotate your cookies and control whether they are sent to the user based on their consent to have such cookies delivered.

HTTPS

In order to help keep users’ personal data private, ASP.NET Core configures new projects to be served over HTTPS by default. You can read more about this feature in Improvements to using HTTPS.

Cookie Consent

When you create an ASP.NET Core application targeting version 2.1 and run it you will see a new banner on your home page,

Cookie Consent Bar

Cookie Consent Bar

This is the consent feature in action. This feature allows you to prompt a user to consent to your application creating “non-essential” cookies. Your application should have a privacy policy and an explanation of what the user is consenting to that conforms to your GDPR requirements. By default, clicking “Learn more” will navigate the user to /Privacy where you could publish the details about your app.
The banner itself is contained in the _CookieConsentPartial.cshtml shared view. If you open this file you can see some code showing how the user’s consent value is retrieved and how it can be updated. The current consent status is exposed as an HttpFeature, ITrackingConsentFeature. If a user consents to allowing the use of cookies a new cookie will be created by calling CreateConsentCookie() on the feature. The status of the user’s consent can be examined by the CanTrack property on the feature, however you don’t need to do this manually, instead you can use the IsEssential property on cookie options. For example

context.Response.Cookies.Append("Test", "Value", new CookieOptions { IsEssential = false });

would append a non-essential cookie to the response. If a user has not indicated their consent this cookie will not be appended to the response but will be silently dropped. Conversely marking a cookie as essential,

context.Response.Cookies.Append("Test", "Value", new CookieOptions { IsEssential = true });

will always create the cookie in the response, no matter the user’s consent status.

You can provide feedback on the cookie consent tracking feature at https://github.com/aspnet/Security/issues.

Data Control

The GDPR gives users the right to examine the data your application holds on it, edit the data and delete the data entirely from your application. Obviously, we cannot know what data you have, where it lives or how its all linked together but what we do know is what personal data a default ASP.NET Core Identity application holds and how to delete Identity users, so we can give you a starting point. When you create an ASP.NET Core application with Individual Authentication and the data stored in-app you might notice two new options in the user profile page, Download and Delete.

Default Data Control actions

Default Data Control actions

Download takes its data from ASP.NET Core Identity and creates a JSON file for download, delete does as you’d expect, it deletes the user. You will probably have extended the identity models or added new tables to your database which uses a user’s identity as a foreign key, so you will need to customize both these functions to match your own data structure and your own GDPR requirements, to do this you’ll need to override the view for each of these functions.

If you look at the code created in your application you will see that a lot of the old template code has vanished, this is because of the new “Identity UI as a library” feature. To override the functionality, you need to manually create the view as it would appear if ASP.NET Identity’s UI were not bundled into a library. For now, until tooling arrives, this is a manual process. The Download capability is contained in DownloadPersonalData.cshtml.cs and the Delete capability is in DeletePersonalData.cshtml.cs. You can see each of these files in the Identity UI GitHub repository. For example, to override the data in the download page you must create an Account Folder under AreasIdentityPages, then a Manage folder under the account folder and finally a DownloadPersonalData.cshtml and associated DownloadPersonalData.cshtml.cs.

For the cshtml file you can take the source from GitHub as a starting point, then add your own namespace, a using statement for Microsoft.AspNetCore.Identity.UI.Pages.Account.Manage.Internal and the instruction to wire up MVC Core Tag Helpers, for example if application namespace is WebApplication21Auth the .cshtml file would look like this:

Then for the corresponding .cs file you can take the default implementation from the source as a starting point for the OnPost implementation so your version might look like the following:

You can give feedback on the data control features of Identity at https://github.com/aspnet/Identity/issues.

Conclusion

These features should put you in a good starting position for the GDPR but remember the GDPR places a lot more requirements on your company and application than just the features we provide, including protection of data at rest, risk assessments and management, data breach reporting and so on. You should consult with a GDPR specialist to see what implications the regulation has for your company.


A multi-player server-side GameBoy Emulator written in .NET Core and Angular

$
0
0

Server-side GameBoyOne of the great joys of sharing and discovering code online is when you stumble upon something so truly epic, so amazing, that you have to dig in. Head over to https://github.com/axle-h/Retro.Net and ask yourself why this GitHub project has only 20 stars?

Alex Haslehurst has created some retro hardware libraries in open source .NET Core with an Angular Front End!

Translation?

A multiplayer server-side Game Boy emulator. Epic.

You can run it in minutes with

docker run -p 2500:2500 alexhaslehurst/server-side-gameboy

Then just browse to http://localhost:2500 and play Tetris on the original GameBoy!

I love this for a number of reasons.

First, I love his perspective:

Please check out my GameBoy emulator written in .NET Core; Retro.Net. Yes, a GameBoy emulator written in .NET Core. Why? Why not. I plan to do a few write-ups about my experience with this project. Firstly: why it was a bad idea.

  1. Emulation on .NET
  2. Emulating the GameBoy CPU on .NET

The biggest issue one has trying to emulate a CPU with a platform like .NET is the lack of reliable high-precision timing. However, he manages a nice from-scratch emulation of the Z80 processor, modeling low level things like registers in very high level C#. I love that public class GameBoyFlagsRegister is a thing. ;) I did similar things when I ported a 15 year old "Tiny CPU" to .NET Core/C#.

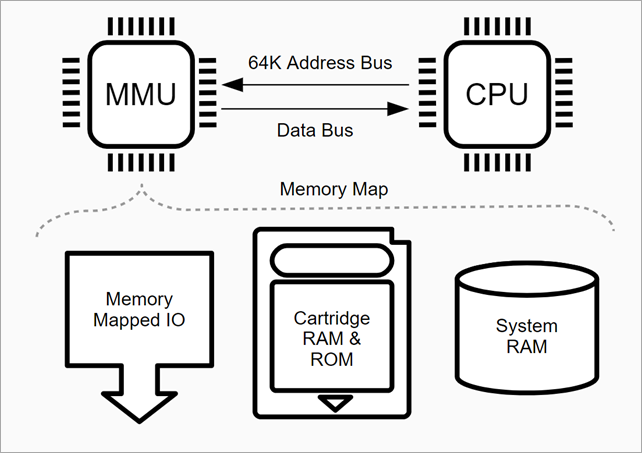
Address space diagram from https://ax-h.com/software/development/emulation/2017/12/03/emulating-the-gameboy-cpu-on-dot-net.html

Be sure to check out Alex's extremely detailed explanation on how he modeled the Z80 microprocessor.

Luckily the GameBoy CPU, a Sharp LR35902, is derived from the popular and very well documented Zilog Z80 - A microprocessor that is unbelievably still in production today, over 40 years after it’s introduction.

The Z80 is an 8-bit microprocessor, meaning that each operation is natively performed on a single byte. The instruction set does have some 16-bit operations but these are just executed as multiple cycles of 8-bit logic. The Z80 has a 16-bit wide address bus, which logically represents a 64K memory map. Data is transferred to the CPU over an 8-bit wide data bus but this is irrelevant to simulating the system at state machine level. The Z80 and the Intel 8080 that it derives from have 256 I/O ports for accessing external peripherals but the GameBoy CPU has none - favouring memory mapped I/O instead

He didn't just create an emulator - there's lots of those - but uniquely he runs it on the server-side while allowing shared controls in a browser. "In between each unique frame, all connected clients can vote on what the next control input should be. The server will choose the one with the most votes… most of the time." Massively multi-player online GameBoy! Then he streams out the next frame! "GPU rendering is completed on the server once per unique frame, compressed with LZ4 and streamed out to all connected clients over websockets."

This is a great learning repository because:

  • it has complex business logic on the server-side but the front end uses Angular and web-sockets and open web technologies.
  • It's also nice that he has a complete multi-stage Dockerfile that is itself a great example of how to build both .NET Core and Angular apps in Docker.
  • Extensive (thousands) of Unit Tests with the Shouldly Assertion Framework and Moq Mocking Framework.
  • Great example usages of Reactive Programming
  • Unit Testing on both server AND client, using Karma Unit Testing for Angular

Here's a few favorite elegant code snippets in this huge repository.

The Reactive Button Presses:

_joyPadSubscription = _joyPadSubject
    .Buffer(FrameLength)
    .Where(x => x.Any())
    .Subscribe(presses =>
                {
                    var (button, name) = presses
                        .Where(x => !string.IsNullOrEmpty(x.name))
                        .GroupBy(x => x.button)
                        .OrderByDescending(grp => grp.Count())
                        .Select(grp => (button: grp.Key, name: grp.Select(x => x.name).First()))
                        .FirstOrDefault();
                    joyPad.PressOne(button);
                    Publish(name, $"Pressed {button}");
                    Thread.Sleep(ButtonPressLength);
                    joyPad.ReleaseAll();
                });

The GPU Renderer:

private void Paint()
{
    var renderSettings = new RenderSettings(_gpuRegisters);
    var backgroundTileMap = _tileRam.ReadBytes(renderSettings.BackgroundTileMapAddress, 0x400);
    var tileSet = _tileRam.ReadBytes(renderSettings.TileSetAddress, 0x1000);
    var windowTileMap = renderSettings.WindowEnabled ? _tileRam.ReadBytes(renderSettings.WindowTileMapAddress, 0x400) : new byte[0];
    byte[] spriteOam, spriteTileSet;
    if (renderSettings.SpritesEnabled) {
        // If the background tiles are read from the sprite pattern table then we can reuse the bytes.
        spriteTileSet = renderSettings.SpriteAndBackgroundTileSetShared ? tileSet : _tileRam.ReadBytes(0x0, 0x1000);
        spriteOam = _spriteRam.ReadBytes(0x0, 0xa0);
    }
    else {
        spriteOam = spriteTileSet = new byte[0];
    }
    var renderState = new RenderState(renderSettings, tileSet, backgroundTileMap, windowTileMap, spriteOam, spriteTileSet);
    var renderStateChange = renderState.GetRenderStateChange(_lastRenderState);
    if (renderStateChange == RenderStateChange.None) {
        // No need to render the same frame twice.
        _frameSkip = 0;
        _framesRendered++;
        return;
    }
    _lastRenderState = renderState;
    _tileMapPointer = _tileMapPointer == null ? new TileMapPointer(renderState) : _tileMapPointer.Reset(renderState, renderStateChange);
    var bitmapPalette = _gpuRegisters.LcdMonochromePaletteRegister.Pallette;
    for (var y = 0; y < LcdHeight; y++) {
        for (var x = 0; x < LcdWidth; x++) {
            _lcdBuffer.SetPixel(x, y, (byte) bitmapPalette[_tileMapPointer.Pixel]);
            if (x + 1 < LcdWidth) {
                _tileMapPointer.NextColumn();
            }
        }
        if (y + 1 < LcdHeight){
            _tileMapPointer.NextRow();
        }
    }
    
    _renderer.Paint(_lcdBuffer);
    _frameSkip = 0;
    _framesRendered++;
}

The GameBoy Frames are composed on the server side then compressed and sent to the client over WebSockets. He's got backgrounds and sprites working, and there's still work to be done.

The Raw LCD is an HTML5 canvas:

<canvas #rawLcd [width]="lcdWidth" [height]="lcdHeight" class="d-none"></canvas>
<canvas #lcd
        [style.max-width]="maxWidth + 'px'"
        [style.max-height]="maxHeight + 'px'"
        [style.min-width]="minWidth + 'px'"
        [style.min-height]="minHeight + 'px'"
        class="lcd"></canvas>

I love this whole project because it has everything. TypeScript, 2D JavaScript Canvas, retro-gaming, and so much more!

const raw: HTMLCanvasElement = this.rawLcdCanvas.nativeElement;
const rawContext: CanvasRenderingContext2D = raw.getContext("2d");
const img = rawContext.createImageData(this.lcdWidth, this.lcdHeight);
for (let y = 0; y < this.lcdHeight; y++) {
  for (let x = 0; x < this.lcdWidth; x++) {
    const index = y * this.lcdWidth + x;
    const imgIndex = index * 4;
    const colourIndex = this.service.frame[index];
    if (colourIndex < 0 || colourIndex >= colours.length) {
      throw new Error("Unknown colour: " + colourIndex);
    }
    const colour = colours[colourIndex];
    img.data[imgIndex] = colour.red;
    img.data[imgIndex + 1] = colour.green;
    img.data[imgIndex + 2] = colour.blue;
    img.data[imgIndex + 3] = 255;
  }
}
rawContext.putImageData(img, 0, 0);
context.drawImage(raw, lcdX, lcdY, lcdW, lcdH);

I would encourage you to go STAR and CLONE https://github.com/axle-h/Retro.Net and give it a run with Docker! You can then use Visual Studio Code and .NET Core to compile and run it locally. He's looking for help with GameBoy sound and a Debugger.


Sponsor: Get the latest JetBrains Rider for debugging third-party .NET code, Smart Step Into, more debugger improvements, C# Interactive, new project wizard, and formatting code in columns.


© 2017 Scott Hanselman. All rights reserved.
     

Gartner reaffirms Microsoft as a leader in Data Management Solutions for Analytics

$
0
0

We are excited to announce that Microsoft has once again been positioned as a leader in Gartner's 2018 Magic Quadrant for Data Management Solutions for Analytics (DMSA). Gartner has also positioned Microsoft as a leader in the Magic Quadrant for Analytics and Business Intelligence Platforms, and in the Magic Quadrant for Operational Database Management Systems. This is an exciting milestone, and it is Microsoft’s perspective that this underscores our global leadership and its relentless commitment to innovation across the data estate.

Gartner defines DMSA as a complete software system that supports and manages data in one or more file management systems (usually databases). DMSA includes specific optimizations to support analytical processing. This includes, but is not limited to, support for relational processing, nonrelational processing (such as graph processing), and machine learning and programming languages such as Python and R.

image

Source: Gartner (February, 2018)*

At Microsoft, we've championed a data platform evolution to make big data processing and analytics simpler and more accessible, helping you transform data into intelligent action. We do this through SQL Server 2017 and key Azures services: Azure SQL Data Warehouse (a fully managed, MPP architecture cloud data warehouse), Azure Databricks (an Apache Spark-based analytics platform) and Azure HDInsight (a fully managed open source analytics platform).

We believe that customer choose Microsoft as their platform of choice to build powerful big data and data warehousing solutions for the following reasons:

Productive: with best in class support for SQL, Spark and Hadoop and fully managed cloud services that allows you to provision your data warehouse & spark environment in minutes with a single click. Customers can also accelerate data integration with consistent 30+ native data connectors and empower your data scientists, data engineers and business analysts to use the tools and languages of their choice. Read how Rockwell cut development time by 80 percent for shorter time-to-market, reduced costs, and improved customer responsiveness.

Hybrid: Only Microsoft allows customers to leverage the SQL Server’s proven performance and security consistently, in private cloud or as a managed service in Azure. Customers also reduce cost & complexity of managing existing data transformations by consistently running SQL Server Integration Service packages in Azure. Finally, we also enable consistent user experience with common identity across on-premises and Azure. Learn how Carnival built a hybrid solution predicts onboard water usage, saving $200k/ship/year.

Intelligent: Customer have the flexibility to build & deploy machine learning models on premises, in the cloud or on the edge. They can also leverage the data science tool of choice with support for the best of Microsoft and open source innovation.  And easily distribute insights across your organization through rich integration with Power BI and other leading BI tools. Find out how ASOS.com delivers 13 million personalized experiences with 33 orders per second.

Trusted: Built-in advanced security features including Encryption, Audit, Threat Detection, Azure Active Directory and VNET. Azure service also offers 50+ industry and geographical compliances and are globally available across 42 regions to keep your data where your users are. Finally Microsoft offers financially backed SLAs ton ensure peace of mind. Read why GE Healthcare delivers their core solutions using Azure data services.

Finally, Azure SQL Data Warehouse significantly improves your analytics while managing costs. We commissioned Forrester Consulting to conduct a Total Economic Impact (TEI) study to detail what happened after the companies moved their data to the cloud. You can also get the Gartner’s 2018 Magic Quadrant for Data Management Solutions for Analytics report to learn more about Microsoft’s leadership in the industry.


*This graphic was published by Gartner, Inc. as part of a larger research document and should be evaluated in the context of the entire document. The Gartner document is available upon request from Microsoft. Gartner does not endorse any vendor, product or service depicted in its research publications, and does not advise technology users to select only those vendors with the highest ratings or other designation. Gartner research publications consist of the opinions of Gartner’s research organization and should not be construed as statements of fact. Gartner disclaims all warranties, expressed or implied, with respect to this research, including any warranties of merchantability or fitness for a particular purpose.

Azure Government – technology innovation shaping the future

$
0
0

From the state and local level to the largest federal agencies, U.S. Government customers are using Azure to transform how they meet the needs of citizens. We’re seeing strong growth on Microsoft Azure Government, the mission-critical cloud, delivering the latest innovation to over 7,000 U.S. Government customers and their partners. We remain highly focused on meeting the accelerating demand for cloud services that support the most stringent security and compliance requirements of our government customers.

Our customers serve in every federal cabinet agency and across the Army, Navy, Air Force and Marine Corps. We have supported over 500 million government authentications and every eight minutes we add a new 1 TB drive. Our growing ecosystem includes more than 500 offerings and 350+ partners in the marketplace, recently reaching 2.5M compute usage hours per month.

We are seeing continued momentum in utilizing the cloud for sensitive workloads with recent ATOs issued for the U.S. Air Force and Immigration and Customs Enforcement (ICE). The Air Force is rapidly transforming systems with a PaaS-first environment to deliver modern apps and exploit cloud scale and agility to reduce capital expenditures and more effectively focus resources on their mission. The FedRAMP High ATO for ICE brings critical cloud services such as identity, access, and deep learning to support their mission.

As we move forward, we are continuing to add new features and services to Azure Government. At the Microsoft Government Tech Summit in Washington D.C. today, we announced Azure Government Secret regions for classified data, new and unique hybrid approaches to IT modernization with Azure Stack, and growing connectivity options with new ExpressRoute locations. We’re also releasing new capabilities to accelerate developer and IT productivity and efficiency with DevTest Labs, Logic Apps and Power BI embedded. Here’s more:

Expanding the mission-critical cloud with two new Azure Government Secret regions coming soon, enabled for data classified Secret. This announcement brings the number of dedicated government regions to a total of eight and expands Azure Government’s support across a broad spectrum of data classifications. With these new regions we’ll continue to deliver commercial-grade hyperscale cloud services with the highest availability, deepest compliance, and fastest innovation to advance the most critical of U.S. Government missions.

dataclass_final

Microsoft Azure Stack, a game-changing hybrid solution coming soon to Azure Government, delivers consistency across on-premises environments and Azure. Agencies can continue to leverage their existing infrastructure and share data seamlessly across platforms, easily integrating with next-generation services and innovating rapidly.

For federal customers, Azure Stack provides a foundation for the intelligent edge and enables advanced services that can power the DoD’s tactical missions.

Azure Stack will integrate with Azure Government, enabling consistent connections to Azure Government across identity, subscription, billing, backup and disaster recovery, and the Azure Marketplace. Azure Stack will also enable government customers to seamlessly use and move amongst public, government-only, and on-premises cloud environments to rapidly respond to geopolitical developments and cybersecurity threats. Learn more about the Azure Stack integration in this blog.

Accelerating cloud capabilities for highly sensitive workloads with three new PaaS services, Azure Site Recovery, Backup and Azure App Service added to our DoD Impact Level 5 Provisional Authorization. Azure Government remains the only provider to deliver a hyperscale cloud that is authorized for DoD Impact Level 5 data for infrastructure, platform, and productivity services. Azure Government is serving every branch of the military and many of the combatant commands and defense agencies. We’ve also expanded FedRAMP authorized service coverage to include eight new services, including Azure App Service, Azure Functions and SQL Server Stretch DB. Government customers now have more options for building new applications, moving data from on-premises datacenters to the cloud, and scaling virtual machines while maintaining the highest compliance standards. Azure continues to offer the broadest compliance portfolio of any major cloud provider, with 72 certifications supported.

Two new ExpressRoute locations coming soon, will bring fast, reliable, private connectivity to government customers in San Antonio and Phoenix for a new total of 8 ExpressRoute locations that offer choice, security, reliability, high connection speeds, and low latency access to cloud resources. Customers can now use ExpressRoute Microsoft Peering to leverage Azure VPN for data exchange with confidence and integrity, and the ability to access Office 365 and all Azure PaaS services through Microsoft Peering. We have added key networking services such as VNet service endpoints for storage and SQL and Network Watcher for more secure building of applications and monitoring.

Faster, more efficient cloud development and IT management with new services coming soon, including Logic Apps and DevTest Labs to support rapid building and delivery of innovation, as well as agile development and DevOps with minimal organizational structure changes. DevTest Labs provides a self-service sandbox environment in Azure to quickly create environments while minimizing waste. This enables IT and empowers software teams to address modernization challenges and improve resource use. Logic Apps enhance productivity with rapid innovation and business processes automation, with common out-of-the-box connectors for Azure services, Office 365 and more.

Power BI Embedded is now available in Azure Government, offering built-in interactive visual analytics for your applications. New DV3 and EV3 VM sizes help you leverage more power from underlying hardware and harness greater performance, efficiency, and cost savings.

You can read more on these announcements on the Azure Government blog. Learn more about the Azure Stack integration in this blog. We welcome your feedback and look forward to hearing from you.

To get started with Azure Government get your trial today!

What’s brewing in Visual Studio Team Services: March 2018 Digest

$
0
0

This post series provides the latest updates and news for Visual Studio Team Services and is a great way for Azure users to keep up-to-date with new features being released every three weeks. Visual Studio Team Services offers the best DevOps tooling to create an efficient continuous integration and release pipeline to Azure. With the rapidly expanding list of features in Team Services, teams can start to leverage it more efficiently for all areas of their Azure workflow, for apps written in any language and deployed to any OS.

Azure Red Shirt Dev Tour: Our VSTS account

Scott Guthrie has been traveling the world on a tour he’s called the Azure Red Shirt Dev Tour. As part of that, he shows the account our team uses to build VSTS. That’s right – we use VSTS to plan, build, test, and release VSTS. See what VSTS looks like for a large team in Scott’s demo of VSTS using our account (mseng.visualstudio.com) – showing ongoing work on VSTS live on stage – from the New York City stop on the tour. If you want to go deep on how our team works, check out DevOps at Microsoft.

VSTS account demo

Roadmap Update

We periodically update our roadmap of new features we have planned for VSTS. We just published our latest update, and it’s our largest yet.

Generate YAML templates from existing build definitions

Last year we announced the public preview of YAML builds that enable you to configure your build process as a YAML file checked in with your code rather than with the graphical build definition editor. We’ve now made it simpler for you to convert your build definitions in the web UI into a YAML file. In the build definition editor for your build, you can select the Process tab on the left and then click the View YAML link in the pane on the right. Copy the text to the clipboard and check in a file with the contents into your repo. Then configure a new build YAML based build definition that references the checked in file.

This can also be used as a good way to learn YAML quickly. You can create a new build definition using the appropriate template for your app and examine the YAML to understand the mapping between what you’re used to and the new YAML constructs. Here are a couple more resources to get you started with YAML builds (later this year we will also have YAML for Release Management).

Enhancements to multi-phase builds

NOTE: To use this capability, you must have the Build with multiple queues preview feature enabled on your account.

We recently added phases to build definitions. You’ve been able to use phases to organize your build steps and to target different agents using different demands for each phase. Now we’ve added several capabilities to build phases so that you can now do the following.

  • Specify a different agent queue for each phase. This means you can, for example:

    • Run one phase of a build on a macOS agent and another phase on a Windows agent. To see a cool example of how useful this can be, see this Connect(); 2017 video: CI/CD DevOps Pipeline for mobile apps and services.
    • Run build steps on a build agent pool and test steps on a test agent pool.
  • Run tests faster by running them in parallel. Any phase that has parallelism configured as “Multi-agent” and contains a “VSTest” task will now automatically parallelize test execution across the configured agent count.

  • Permit or deny scripts to access the OAuth token each phase. This means, for example, you can now allow scripts running in your build phase to communicate with VSTS over REST APIs, and in the same build definition block the scripts running in your test phase.

  • Run a phase only under specific conditions. For example, you can configure a phase to run only when previous phases succeed, or only when you are building code in the master branch.

To learn more, see Phases in Build and Release Management.

Run UI tests and install software on Hosted VS2017 agents

We’ve had a lot of customers ask us for the ability to install software on the hosted build agents because there’s something their builds need but isn’t available in the image. Now you can do that. If you’re using the Hosted VS2017 queue, your build and release tasks now run as administrator, in interactive mode. This means you can now use this hosted pool to run UI tests and install whatever software you need. Because we re-image the build agents after every build, each build starts with a clean environment.

Release triggers branch enhancements

You can now configure a release trigger filter based on the default branch speciffied in the build definition. This is particularly helpful if your default build branch changes every sprint and the release trigger filters needs to be updated across all the release definitions. Now you just need to change the default branch in build definition and all the release definitions automatically use this branch. For example, if your team is creating release branches for each sprint release payload, you update it in the build definition to point to a new sprint release branch and release will pick this up automatically.

Release triggers

Identify flaky tests

One of the core tenets of DevOps is to have reliable and fast automated tests. Sometimes tests are flaky where they fail on one run and pass on another without any changes (of course, it could be the product code and not the tests that are flaky). Flaky tests are frustrating and undermine the team’s confidence in the tests. Left unchecked, the team will ignore flaky tests as noise, resulting in bugs slipping through to production. We’ve now deployed the first piece of a solution to help tackle the problem of flaky tests. You can now configure the Visual Studio Test task to re-run failed tests. The test results then indicate which tests initially failed and then passed on re-run. That’s a key step in identifying flaky tests that need to be investigated and fixed. Support for re-run of data driven and ordered tests will be coming later.

The Visual Studio Test task can be configured to control the maximum number of attempts to re-run failed tests and a threshold percentage for failures (e.g. only re-run tests if less than 20% of all tests failed) to avoid re-running tests in event of wide spread failures.

Re-run failed test section

In the Tests tab under Build and Release, you can filter the test results with the Outcome “Passed on rerun” to identify the tests that were flaky during the run. This will currently show the last attempt for each test that passed on re-run. The Summary view shows “Passed on rerun (n/m)” under Total tests, where n is the count of tests passed on re-run and m is total passed tests. A hierarchical view of all attempts is coming in next few sprints.

Re-run failed test results

Build with the appropriate agent by default

When you use one of our templates to create a new build definition, we now select a hosted agent queue for you by default. For example, the Ant and Maven templates default to the Hosted Linux queue. Xcode and Xamarin.iOS templates default to Hosted macOS Preview. The ASP.NET Core template defaults to Hosted VS2017. Of course, you can still change the queue to your preference, but this default saves some time when defining a new build process and otherwise avoids having to re-set the appropriate agent queue.

Default hosted agent option in Build

Use VSTS as a symbol server

VSTS is a symbol server, which enables you to host and share symbols with your organization. The symbol server functionality is now generally available. Symbols provide additional information that makes it easier to debug executables. See the publishing symbols for debugging for more information.

This feature was prioritized based on a top suggestion.

Blame now has history

The Blame view is great for identifying the last person to change a line of code. However, sometimes you need to know who made the previous change to a line of code. The newest improvement in blame can help - View blame prior to this commit. As the name suggests, this feature allows you to jump back in time to the version of the file prior to the version which changed a particular line, and view the blame info for that version. You can continue to drill back in time looking at each version of the file that changed the selected line of code.

Blame history

View pull request merge commit

Pull request diff views are great at highlighting the changes introduced in the source branch. However, changes to the target branch may cause the diff view to look different than expected. A new command is now available to view the diff of the “preview” merge commit for the pull request - View merge commit. This merge commit is created to check for merge conflicts and to use with a pull request build, and it reflects what the merge commit will look like when the pull request is eventually completed. When the target branch has changes not reflected in the diff, the merge commit diff can be useful for seeing the latest changes in both the source and target branches.

View pull request merge commit

Another command that’s useful in conjunction with the View merge commit command is Restart merge (available on the same command menu). If the target branch has changed since the pull request was initially created, running this command will create a new preview merge commit, updating the merge commit diff view.

Integrate using the pull request status API and branch policy

Branch policies enable teams to maintain high quality branches and follow best practices during the pull request workflow. Now, you can use the pull request status API and branch policy to integrate custom tooling into pull request workflows. Whether it’s integrating with a 3rd party CI/CD solution, or enforcing your own internal process requirements, the status API can help. We’re using this extensively in our own PR processes for building and testing code prior to completing each pull request. Check out our code, samples, and documentation for more information.

View Analytics Widgets as a Stakeholder

Installing the Analytics extension adds 6 powerful widgets to your widget catalog: Cumulative Flow Diagram, Lead Time, Cycle Time, Velocity, Burndown, and Burnup. Now, those with the free Stakeholder license can view all the Analytics widgets too!

To use the Analytics OData endpoint or Power BI to connect to Analytics, a Basic license is still required.

Integrate Power BI with VSTS Analytics using new views

The default views in the VSTS Power BI Desktop Connector help you get started on working with VSTS data right away. We’ve added additional views with common historical definitions to allow you to more easily perform trending and bug analysis. Refer to our guidance on connecting to VSTS with Power BI Data Connector for more information.

PowerBI view

In the upcoming February release of Power BI Desktop, we will introduce the ability to create your own views, which will make working with the specific data you need in Power BI even easier.

Discuss work items in Microsoft Teams using the VSTS messaging extension

Microsoft Teams has become the hub for teamwork within many engineering teams. We have expanded our Microsoft Teams integration with the new VSTS messaging extension to enable you to find and discuss specific work items alongside your other content and tools. See the Microsoft Teams Integration extension in the Marketplace for more information.

VSTS messaging extension in Microsoft Teams

Move work using suggested Areas and Iterations

It can be common to work in the same area or iteration and repeatedly browse through the hierarchies when moving work items around. The Area and Iteration path controls now include a list of recently used values as Suggestions, giving you quick access to set and move on.

Area drop down list

In addition, Iteration dates are included to the right of the name so that you can quickly judge when a work item should be delivered.

Iteration drop down list

Wiki Search now Generally Available

After a public preview of Wiki search in December, we are now making it generally available. You can search for your favorite wiki pages by title or content right alongside code and work items.

Manage access and extensions for large numbers of users using groups

We’ve made it easy for administrators to manage large groups of users by enabling you to assign access levels and extensions to AAD or VSTS groups. After setting up the appropriate rules, adding someone to the group will automatically grant them the correct access levels and extensions when they access the VSTS account. As a result, access levels and extensions will no longer have to be managed on an individual basis.

Group licensing

See the large account user management roadmap post on the Microsoft DevOps Blog from last year for more information.

Cloud Solution Provider purchasing now generally available

Purchasing from Visual Studio Marketplace via the Cloud Solution Provider (CSP) program is available for all offers/markets where CSP is supported today. CSP partners across those markets can now purchase Visual Studio subscriptions, Visual Studio Team Services Users, 1st party extensions (e.g. Test Manager, Hosted Pipelines, Package Management) from Visual Studio Marketplace for their customers. Visual Studio Marketplace will now recognize and accept Azure CSP subscriptions for all 1st party purchases now. In addition, CSPs can also manage Visual Studio subscriptions they purchased for their customers through our subscription management portal, setup VSTS accounts from Azure portal, and link existing VSTS accounts to Azure CSP subscriptions to take over the billing from their customers.

Extension of the month: Pull Request Conflict Resolution in the Browser

Last year we moved the entire Windows code base into a single Git repo using something we created called Git Virtual File System. Once the entire Windows team was using Git, they needed a more convenient way to resolve conflicts for some of their workflows. The Windows team built a new extension to VSTS that allows you to resolve pull request conflicts directly in the browser, and I’m excited that it’s now available to everyone as an extension in the VSTS Marketplace.

Before a Git pull request can complete, any conflicts with the target branch must be resolved. With this extension, you can resolve these conflicts on the web, as part of the pull request merge, instead of performing the merge and resolving conflicts in a local clone.
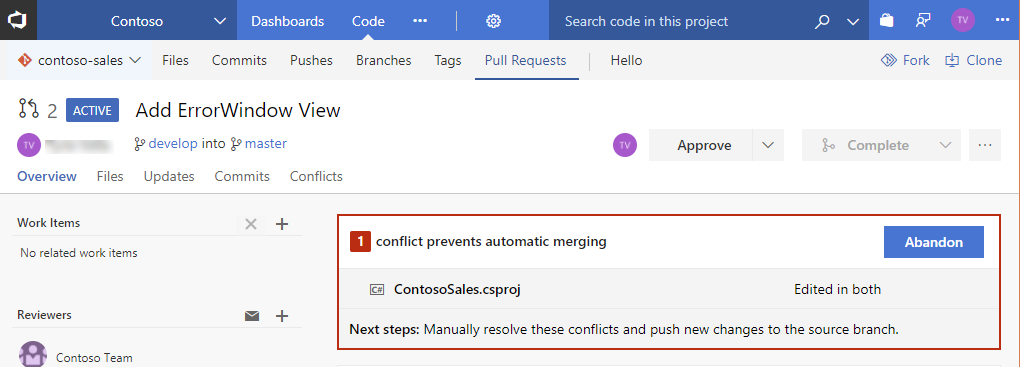
Here’s what the experience looks like when you have a conflict after you’ve installed the extension.

Conflicts Tab

Clicking on the file listed, you’ll be presented with a view to see the previous version and the new version so you can choose which content to keep.

Example resolution

You also choose to edit the combined file manually.

Conflict markers

Wrapping Up

As always, you can find the full list of features in our release notes. Be sure to subscribe to the DevOps blog to keep up with the latest plans and developments for VSTS.

Happy coding!

@tfsbuck

New app usage monitoring capabilities in Application Insights

$
0
0

Our goal with Azure Monitoring tools is to provide full-stack monitoring for your applications. The top of this “stack” isn’t the client-side of your app, it’s your users themselves. Understanding user behavior is critical for making the right changes to your apps to drive the metrics your business cares about.

Recent improvements to the usage analytics tools in Application Insights can help your team better understand overall usage, dive deep into the impact of performance on customer experience, and give more visibility into user flows.

A faster, more insightful experience for Users, Sessions, and Events

users

Understanding application usage is critical to making smart investments with your development team. An application can be fast, reliable, and highly available, but if it doesn’t have many users, it’s not contributing value to your business.

The Users, Sessions, and Events tools in Application Insights make it easy to answer the most basic usage analytics question, “How much does my application and each of its features get used?”

We've re-built the Users, Sessions, and Events tools to make them even more responsive. A new sidebar of daily and monthly usage metrics help you spot growth and retention trends. Clicking on each metric gives you more detail, like a custom workbook for analyzing monthly active users (MAU). Also, the new “Meet your users” cards put you in the shoes of some of your customers, letting you follow their journeys step-by-step in a timeline.

Learn more about Users, Sessions, and Events.

Introducing the Impact tool

impact

Are slow page loads the cause of user engagement problems in your app?

The new Impact tool in Application Insights makes it easy to find out. Just by choosing a page in your app and a user action on that page, the Impact tool graphs conversion rates by page load time. This makes it easy to spot if performance really does cause your users to churn.

The Impact tool can analyze more than just performance impact. It can look for correlations between any property or measurement in your telemetry and conversion rates. So you can see how conversion varies by country, device type, and more.

On our team, the Impact tool has uncovered several places where slow page load time was strongly correlated with decreased conversion rates. Better yet, the Impact tool quantified the page load time we should aim for, the slowest page load time that still had high conversion rates.

Learn more about the Impact tool.

More capabilities for User Flows

userflows

Now the User Flows tool can analyze what users did before they visited some page or custom event in your site, in addition to what they did afterward. New “Session Started” nodes show you where a node was the first in a user session so you can spot how users are entering your site.

A new Split By option allows you to create more detailed User Flows visualizations by segmenting nodes by property values. For example, let’s say your team is collecting a custom event name with an overly generic name like “Button Clicked”. You can better understand user behavior by separating out which button was clicked by splitting by a “Button Name” custom dimension. Then in the visualization, you’ll see nodes to the effect of “Button Clicked where Button Name = Save,” “Button Clicked where Button Name = Edit,” and so on.

We’ve made a few smaller improvements to User Flows, too. The visualization now better adapts to smaller screen sizes. A “Tour” button gives you a step-by-step look at how to get more out of the User Flows tool. Also, on-node hide and reveal controls make it easier to control the density of information on the visualization.

Learn more about User Flows.

Viewing all 10804 articles
Browse latest View live


<script src="https://jsc.adskeeper.com/r/s/rssing.com.1596347.js" async> </script>