Quantcast
Channel: Category Name
Viewing all 10804 articles
Browse latest View live

Announcing Babylon.js v3.2

$
0
0

Babylon.js is an open source framework designed from ground up to help create easy and powerful 3D experiences in your browser or your web apps.

Today I’m excited to announce the availability of Babylon v3.2.

Babylon.JS logo

As usual, our wonderful community helped build a massive list of features and fixes for this release. I highly encourage you to read through it as it is full of cool demos that highlight new capabilities available for you right out of the box.

I would also like to take some time here to detail some of the new features that best characterize this release:

Rendering improvements

One of the goals of v3.2 was to make sure that the engine runs very well on all kinds of browsers and devices. When running 3D experiences on browsers, you must make sure that time spent executing JavaScript is reduced to a bare minimum to really leverage the raw power of GPUs. Therefore, we introduced multiple new cache layers all over the engine to keep track of the states of all objects. We also moved to a push approach where the engine is told by entities that something changed, and the cache must be updated.

The engine was previously in a pull mode where it would ask the state of the entities when needed.

These changes can improve rendering speed on large scenes by a significant amount.

While optimizing the engine itself, we also wanted to leverage more WebGL 2.0 features. You can find on this page the list of WebGL 2.0 features we are currently supporting (including a description of the potential fallbacks when WebGL 2.0 is not supported by your browser). One feature I’d like to mention is support for improved shadows with techniques like PCF (Percentage Closer Filtering) and contact hardening shadows. These two features provide even more realistic real time shadows like in this demo (you can notice that shadows are more dense when close to the emitters):

Mask Model of real-time shadow.

(Please note that this demo will fall back to another rendering technique if your browser does not support WebGL2)

Alongside with shadows, this version also improves the anti-aliasing algorithm with a new option named specular anti-aliasing. This will help reducing visual artifacts on shiny objects. You can play with this new option in this interactive demo:

Shark interactive demo.

Embracing modern JavaScript

Babylon.js is developed using TypeScript. This gives us a powerful tool to embrace new JavaScript features as we can decide which flavor of JavaScript we can generate from TypeScript.

With v3.2 we decided to support Promises (and for the sake of cross compatibility we also added a custom polyfill). We also introduced async functions which returns Promises like this one: http://doc.babylonjs.com/api/interfaces/babylon.isceneloaderpluginasync#loadassetcontainerasync

When a function returns a promise, modern browsers let us use the new await keyword. This new keyword (which will be familiar for C# developer) let you create asynchronous code like it would be synchronous:


// load the assets
var rootURL = 'https://models.babylonjs.com';
var filename = 'ufo.glb';
var container = await BABYLON.SceneLoader.LoadAssetContainerAsync(rootURl, filename, scene);
container.addAllToScene();

scene.createDefaultEnvrionment();

You can see a live example here.

Animation support improvements

Babylon.js already had rich support for multiple types of animation, and with 3.2 we wanted to provide more tools, so developers could build even better animated content.  To do this, we added support for animation blending and animation weights.

Animation blending is an automatic system that allows developers to seamlessly transition from one animation to another. In the following demo, you can select individual animations with provided buttons and you will see that Babylon.js will automatically blend them to provide a natural transition:

Example of individual animations.

Animation weights is a technique that allows developers to mix multiple animations by specifying weights for each of them. On the following demo, you can play with the sliders to change the weights or directly start an animation:

Example of playing with the sliders to change the weights or directly start an animation.

More special effects

We completely rewrote the default rendering pipeline for Babylon.js v3.2. The goal was to provide a one stop shop for a large list of special effects that developers could easily add to their scenes. In the following demo, you can play with:

  • Multisample anti-aliasing (MSAA)
  • Fast approximate anti-aliasing (FXAA)
  • Tone mapping
  • Contrast
  • Exposure
  • Color curves
  • Bloom
  • Depth of field
  • Chromatic aberration
  • Sharpen
  • Vignette effect
  • Grain

Example of glow layer.

We also added support for a long-requested feature: The glow layer. This effect will make emissive part of your object appear glowing (really useful to simulate source of lights) as you can see on the following demo:

Example of glow layer.

As part of our commitment to WebGL 2.0 we also added support for GPU particles. Previously, particles were animated by the CPU and rendered by the GPU. Now with GPU particles, we can animate and render them using only the GPU which lets us handle far more particles with much better performance. Feel free to play with them with this interactive demo:

Example of added support for GPU particles.

GPU particles are entirely compatible with CPU particles, so you can always fallback to CPU particles if WebGL 2.0 is not supported.

Documentation

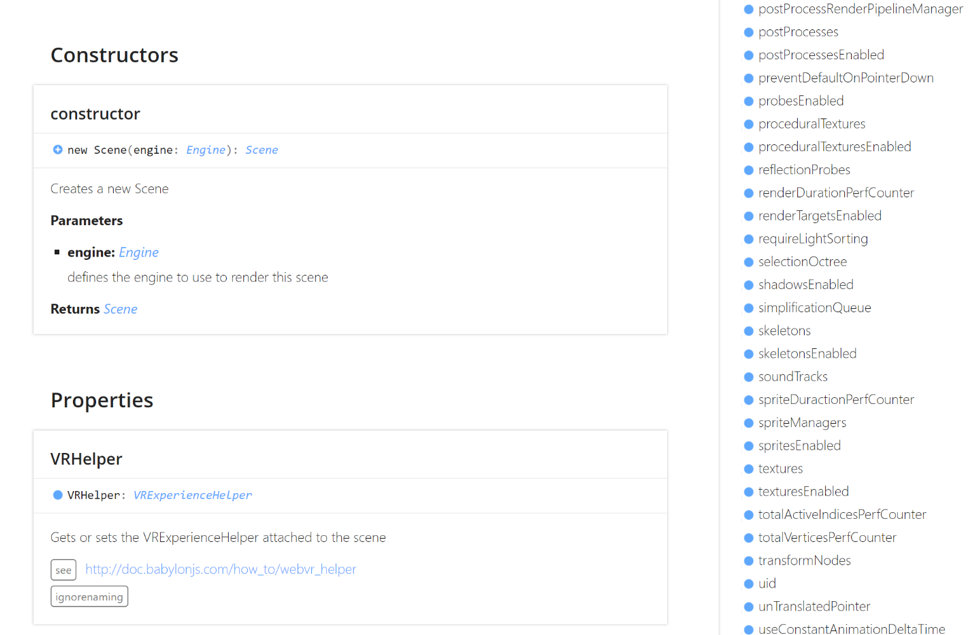
After 6 years, we all considered it would be the right time to improve our API documentation. We happily switched all of it to TypeDoc which produces neat documentation pages:

Babylon.JS upgrade to TypeDoc documentation.

I would also like to give a special shout out to the whole Babylon.js community which was helpful to write and complete our documentation and code comments.

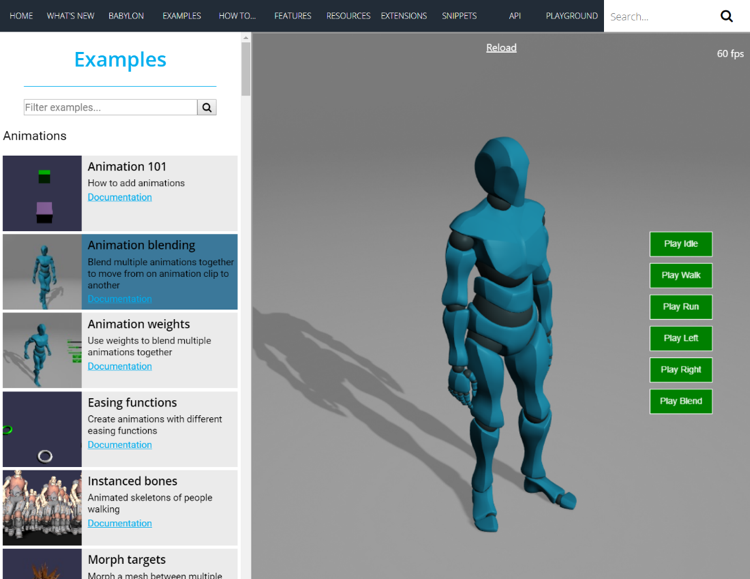
We also added a new section named “Examples” where you can browse live examples for specific Babylon.js features. Every example comes with a link to the associated documentation to understand how to use the demonstrated feature:

Browse live examples and demos.

This list will quickly grow with more examples.

glTF

We want Babylon.js to be the best engine to load, edit and view glTF models.  With this release, we continued our investment in the format with several new features and improvements including:

Alongside Babylon.js v3.2, we are also shipping new features for our exporters:

We also released a new API within Babylon.js to generate glTF files from any Babylon.js scene. For instance, you can see in this demo that you can build a new object by doing boolean operations. And then thanks to our glTF exporter, you are one line of code away from getting a glTF file of your creation.


var gltf = BABYLON.GLTF2Export.GLB(scene, "bowl.glb");
gltf.downloadFiles();

Furthermore, the Sandbox (the tool where you can drag and drop your meshes to visualize them) was improved to let you test glTF / glb animations as well:

The Sandbox (the tool where you can drag and drop your meshes to visualize them) was improved to let you test glTF / glb animations as well:

There still are more features to discover in this release, so if you want to know more or just want to experiment with our latest demos, please visit http://www.babylonjs.com/.

And if you want to join the community and contribute, please join us on GitHub!

The post Announcing Babylon.js v3.2 appeared first on Windows Developer Blog.

Build-A-Bear turns to Microsoft 365 to empower employees and drive competitive advantage

$
0
0

Today’s post was written by Mike Early, senior managing director and head of information technology at Build-A-Bear Workshop.

Profile picture of Mike Early of Build-A-Bear Workshop.Build-A-Bear Workshop has brought joy to families and kids since 1997. And with more than 170 million furry friends made over the last 20 years, we are experts at creating memorable experiences for our guests. That emphasis on the guest experience is at the core of our DNA. As we enter our next 20 years, we are excited about what our future has in store. With the now-iconic, multigenerational status of Build-A-Bear, we have a fresh opportunity to imagine new ways for kids and kids at heart to experience our unique world of wonder and stories by creating Build-A-Bearinspired toys, fashions, entertainment, music, and games. Even as we evolve, the Build-A-Bear team will continue to focus on putting our hearts into everything we do, recognizing that a hug is understood in every language.

While the IT team doesn’t interact with our guests on a daily basis, doing everything we can to improve the guest and associate experience is a top priority. That’s why we are investing in cloud technologies like Microsoft 365, a complete, intelligent solution that empowers our associates and Firstline employees to work more efficiently and spend more time providing great service to our guests. After our positive experience moving to the cloud with Office 365, we also deployed Microsoft Dynamics 365 for Finance and Operations. As a global brand, we were looking for a solution that covers our complex business requirements, without adding significant overhead to the technology team. Dynamics 365 was the best option for us to replace our aging, on-premises ERP solution.

In addition to supporting our business requirements and reducing IT overhead, Microsoft 365 supports a digital workplace in a familiar environment that’s simple for us to maintain and allows our associates to work from anywhere. This frees everyone to be more productive wherever they may be.

Associates at our headquarters are enjoying collaboration tools such as Microsoft Teams, which provides a hub for creative teamwork in Office 365. Associates in marketing used to collaborate on global marketing plans using Google Docs, but now they use Teams to share and collaborate on these key documents. It’s more convenient and efficient for the team to refine their plans because they can simply open the file and work concurrently on edits within the Teams environment. They can also use the Teams app and Excel Online to collaborate using other devices when away from their desks.

From a technology management perspective, we are happy about the improved security control we gain over our corporate content, compared to storing files using other cloud solutions. That’s because we use Azure Active Directory (Azure AD) to manage employees’ access to Teams. Implementing Azure AD was an early priority for us, so we enlisted the aid of Microsoft FastTrack. We had a great experience working with the FastTrack Team to expedite our migration to this cloud-based identity and access management solution.

In addition to Azure AD, we are looking to deploy other components of Enterprise Mobility + Security. Having the heft of Microsoft behind what we do is appealing from a security standpoint. We’re currently deploying Windows 10, and we are excited about the time savings we’ll enjoy with regular updates in the Windows as a Service model.

As we build business efficiencies and enhance customer experiences, Build-A-Bear is well-positioned to continue bringing smiles to the faces of kids and the young at heart.

Mike Early

The post Build-A-Bear turns to Microsoft 365 to empower employees and drive competitive advantage appeared first on Microsoft 365 Blog.

Supporting Jetty for Java in Visual Studio Code

$
0
0

Eclipse Jetty is a popular web server and servlet container in Java community. We’ve released a new Jetty extension for Visual Studio Code that makes it easy to run and deploy WAR packages (Web Application aRchive), operate your Jetty servers, and interact with your application from within the editor. Today this extension includes the following features:

  • Add Jetty Server from download directory
  • Start/Restart/Stop/Delete Jetty Server
  • Run/Debug/Delete WAR packages
  • Open WAR package directories in File Explorer / Finder
  • Open Server homepage
  • Open WAR package homepage

Jetty for Java in Visual Studio Code

Other Updates

There are many additional new features added to our Java extension lineup for VS Code.

Debugger for Java

  1. Support restart frame. It allows you to restart at the beginning of a method or any method on the stack. This is useful when using DCEVM or jrebel to inject code changes and rerun them.
  2. Support auto-complete for debug console. It works the same as in the editor.

Java Test Runner

  1. Support for test configurations. You can now configure your test setting through command java.test.configure. It supports following configurations:
    • projectName
    • workingDirectory
    • args
    • margs
    • preLaunchTask
  2. And you can run/debug with config through CodeLens or test explorer context menu.

Tomcat

  1. Support automatically run operations against the server when there is only one Tomcat Server in workspace
  2. Enable “Open in Browser” command for idle server too
  3. Support right click on server to select a war package to debug

Maven

  1. Added support for setting JAVA_HOME and other environment variables through configuration settings.
  2. Supported to put popular archetypes ahead when generating projects.
  3. Supported to append default options for mvn commands.

Provide feedback

Your feedback and suggestions are especially important to us and will help shape our products in the future. Please help us by taking this survey to share your thoughts!

Join us at //Build

If you’re attending Microsoft //Build, please join us for a workshop session on Monday, May 7, in which we will walk you through the experience to create and “dockerize” a java Spring Boot app and then deploy it to the cloud. You can also find our team at the “Tools” area in the expo if you’d like to talk to the team behind the Java support for Visual Studio Code.

Try it out

Please don’t hesitate to try using VS Code for your Java development and let us know how you like it! VS code is a lightweight and performant code editor and our goal is to make it great for Java developers!

Xiaokai He, Program Manager
@XiaokaiHe

Xiaokai is a program manager working on Java tools and services. He’s currently focusing on making Visual Studio Code great for Java developers, as well as supporting Java in various of Azure services.

The 3 improvements to Dev Center you should know about

$
0
0

We’ve been working hard on Windows Dev Center and wanted to share some of the improvements we’ve made for you, our developers.

You can now submit PWAs to the Microsoft Store

First, we’re excited to announce that you can submit your Progressive Web App (PWA) to the Microsoft Store through Windows Dev Center. PWAs are web apps, progressively enhanced with modern web technologies to provide a more app-like experience. Publishing a PWA to the Microsoft Store give you full access to everything Windows Dev Center has to offer including control over how your app appears in the Microsoft Store, the ability to view and respond to feedback (reviews and comments), insights into telemetry (installs, crashes, shares, etc.), and the ability to monetize your app.

Submitting a PWA to the Microsoft Store requires generating an app package upload file containing your PWA first, which can be done via the free PWA Builder tool. To learn more about PWAs and some of the steps required to publish to Microsoft Store, check out this blog.

Health report enhancements

We’ve added new charts to the Health report. You can use this additional info to help you make informed decisions on improvements you can make to your application to keep your customers happy.

Crash-free sessions and devices (Health report):  Shows the percent of devices or user sessions that did not experience a crash.

This allows you to understand how the number of crashes you are seeing affect your users. For example, an app could have 10,000 crashes in one day. If 90% of your devices are affected, then you would probably classify that as critical and act to fix it right away. However, if that only represents 5% of devices using your app, the priority might be lower.

This chart has two tabs:

  • Crash free devices: the % of unique devices that did not experience a failure
  • Crash free sessions: the % of unique user sessions that did not experience a failure

Chart depicting crash free devices and crash free sessions.

Stack prevalence (Failure details page): Shows the top stacks that contributed to the failure, ordered by percentage.

The stack prevalence table displays the most common failure paths, ordered by percentage of all stacks. This lets you quickly see which are the most common call stacks/paths to a point of failure, so you can best apply your time to implement fixes with the greatest impact. In addition, the frame where the failure occurred is bolded in the call stack.

Stack prevalence (Failure details page) shows the top stacks that contributed to the failure, ordered by percentage.

Also, we have made failure downloads [CABs] more discoverable on the failure details page by adding a filter so you can easily find all “Failures with downloads” – instead of having to search through the report.

Improvements to the Store listing page

We have made changes to the Store listing page, where you provide the text and images that your customers will see when viewing your app’s listing in the Microsoft Store. With these changes you will see additional text to the right of sections within the Store listing page that help provide clarity on what you should enter in each field.  Some sections even have direct links to documentation.

Provide the text and images that your customers will see when viewing your app’s listing in the Microsoft Store.

Two major sections we’ve redesigned based on your feedback are the “Store logos” and “Additional art assets” sections. We now provide additional guidance to help you understand how each of these assets are used.

The “Store logos” and “Additional art assets” sections provide additional guidance to help you understand how each of these assets are used.

You’ll find additional info throughout the Store listing page to help you use fields effectively.

As always, we encourage you to use the Feedback link in the upper right corner of the Windows Dev Center dashboard to share your thoughts and suggestions. Your feedback helps us build the best capabilities and experiences possible. You can also use the Windows Developer Feedback User Voice site to share platform capability requests and ideas around improving the Windows developer platform.

The post The 3 improvements to Dev Center you should know about appeared first on Windows Developer Blog.

Microsoft Build: Come for the tech, stay for the party

$
0
0

Bulild%20image

Looking forward to Microsoft Build? Now you’ve got one more reason. After three days of can’t-miss tech sessions and skill-sharpening workshops, we’re throwing an awesome party for attendees at Seattle Center.

We’ll celebrate with an evening of music, games, exhibits, and more at these world-famous Seattle sites, open exclusively to Microsoft Build attendees on the evening of May 9, 2018, starting at 7:30 PM:

  • Drop by MoPOP, designed by internationally acclaimed architect Frank O. Gehry, and lose yourself in the latest exhibition dedicated to your favorite comic books, Marvel: Universe of Super Heroes. Discover everything you ever wanted to know about the greatest guitarists of all time, grunge rock legend Kurt Cobain and Nirvana, the iconic Captain Kirk and the rest of the Star Trek crew, classic horror movies, sci-fi masterpieces, and more. The museum has tons of unique exhibits and hands-on experiences to check out. And you won’t want to miss the famous Sky Church with state-of-the-art acoustics and a soaring 65-foot ceiling — the perfect setting for the evening’s live music entertainment.
  • Get your silent groove on at Next 50 Plaza, just outside MoPOP. Grab a headset, pick your DJ, and dance to your favorite beat in this beautiful downtown Seattle setting. Or enjoy a little open-air gaming at the Pavilion nearby.

Build_Chihuly

  • Cross the street to Chihuly Garden and Glass, and immerse yourself in a wonderland of Dale Chihuly’s beautiful artwork. Journey through the Galleries and Gardens, ending in the stunning Glasshouse, where a 100-foot-long sculpture hangs overhead. Dueling pianos will provide animated ambiance and you can swing by the live glass-blowing demonstration to see how it’s all done.

Haven’t registered yet for Microsoft’s most important developer event of the year? It’s not too late to secure your spot at Microsoft Build, May 7–9 in Seattle, Washington. Come boost your skills, discover the latest IT trends, interact with experts, and imagine the future of tech with your peers. And you can party with us, too! Register now to attend in person and start designing your Microsoft Build experience today.

If you can’t make it to Seattle this year, there’s more than one way to be at Microsoft Build. Why not register for the livestream to catch the action as it happens online?

Azure Marketplace new offers: April 1–15

$
0
0

We continue to expand the Azure Marketplace ecosystem. From April 1st to 15th, 20 new offers successfully met the onboarding criteria and went live. See details of the new offers below:

(Basic) Apache NiFi 1.4 on Centos 7.4

(Basic) Apache NiFi 1.4 on Centos 7.4: A CentOS 7.4 VM running a basic install of Apache NiFi 1.4 using default configurations. Once the virtual machine is deployed and running, Apache NiFi can be accessed via web browser.

Ethereum developer kit (techlatest.net)

Ethereum developer kit (techlatest.net): If you are looking to get started with Ethereum development and want an out-of-the-box environment to get up and running in minutes, this VM is for you. It includes the Truffle Ethereum framework, a world-class development environment.

xID

xID: eXtensible IDentity (xID) is an open (standards based), modular (componentized architecture), secure (security built-in), and pluggable (adaptor-based integration approach) product built specially for delivering your organization’s identity management needs.

Qualys Virtual Scanner Appliance

Qualys Virtual Scanner Appliance: Qualys Virtual Scanner Appliance helps you get a continuous view of security and compliance, putting a spotlight on your Microsoft Azure cloud infrastructure. It’s a stateless resource that acts as an extension to the Qualys Cloud Platform.

FileCloud on Ubuntu Linux

FileCloud on Ubuntu Linux: FileCloud allows businesses to host their own branded file sharing, sync, and mobile access solution for employees, partners, and customers on Azure infrastructure. FileCloud provides secure, high-performance backup across all platforms and devices.

FileCatalyst Direct Server Per Hour Billing

FileCatalyst Direct Server Per Hour Billing: FileCatalyst Direct is a software-only file transfer solution that provides accelerated, secure, reliable delivery and file transfer tracking and management. FileCatalyst results in file transfers that are 100 times faster (or more) than FTP, HTTP or CIFS.

Centos 7 Minimal

Centos 7 Minimal: Contains minimal installation of Centos 7. Version includes the minimum of packages required for functional installation while retaining the same level of security and network usability. Packages can be added or removed after installation.

TensorFlow Serving Certified by Bitnami

TensorFlow Serving Certified by Bitnami: TensorFlow Serving is a system for serving machine learning models. This secure, up-to-date stack from Bitnami comes with Inception v3 with trained data for image recognition, but it can be extended to serve other models.

WordPress with NGINX and SSL Certified by Bitnami

WordPress with NGINX and SSL Certified by Bitnami: WordPress with NGINX and SSL combines the most popular blogging application with the power of the NGINX web server. This solution also includes PHP, MySQL, and phpMyAdmin to manage your databases.

mPLAT Suite - Multi-Cloud Conductor

mPLAT Suite - Multi-Cloud Conductor: To resolve the issue of IT silos in the cloud era, mPLAT Suite can manage multi-cloud platforms and public clouds. Streamline repetitive manual operations and workflows through runbook automation and IT service management.

ME PasswordManagerPro 10 admins-25 keys

ME PasswordManagerPro 10 admins,25 keys: This privileged identity management solution lets you manage privileged identities, passwords, SSH keys, and SSL certificates as well as control and monitor privileged access to critical information systems from one platform.

Gallery Server on Windows Server 2016

Gallery Server on Windows Server 2016: Gallery Server is a powerful and easy-to-use Digital Asset Management (DAM) application and web gallery for sharing and managing photos, video, audio, and other files. It is open source software released under GPL v3.

NCache Opensource 4.9

NCache Opensource 4.9: NCache is a high-performance object caching solution for mission critical .NET applications that accounts for real-time data access needs. Cache once and read multiple times. Reference or update data as frequently as you are reading it (transnational).

WebtoB 5 Standard Edition

WebtoB 5 Standard Edition: WebtoB effectively addresses problems on a web system such as slow processing speed and server down. In addition to basic functions as a web server, it provides powerful performance for security, fault handling, and large capacity processing.

GigaSECURE Cloud 5.3.01

GigaSECURE Cloud 5.3.01: GigaSECURE Cloud delivers intelligent network traffic visibility for workloads running in Azure and enables increased security, operational efficiency, and scale across virtual networks. Optimize costs with up to 100 percent visibility for security.

Umbraco CMS on Windows Server 2016

Umbraco CMS on Windows Server 2016: Umbraco Cloud is an open-source content management system for publishing on the web and intranets. Get stunningly simple editing, Word 2007 integration, version control, content scheduling, workflow and event tracking, and more.

F5 BIG-IP Virtual Edition - BEST

F5 BIG-IP Virtual Edition – BEST: Advanced load balancing, GSLB, network firewall, DNS, WAF, and app access. From traffic management and service offloading to app access, acceleration, and security, the BIG-IP VE ensures your applications are fast, available, and secure.

Machine Learning Server Operationalization

Machine Learning Server Operationalization: Operationalization refers to deploying R and Python models and code to Machine Learning Server in the form of web services and the subsequent consumption of these services within client applications to affect business results.


Microsoft Azure Applications

Striim for Real-time Data Integration to HDInsight

Striim for Real-time Data Integration to HDInsight: Striim (pronounced "stream") is an end-to-end streaming data integration and analytics platform, enabling continuous ingestion, processing, correlation, and analytics of disparate data streams, non-intrusively.

Minio - Amazon S3 API for Azure Blob

Minio (Amazon S3 API for Azure Blob): Minio provides Amazon S3-compatible API data access for Azure Blob storage. Objects stored using Minio are accessible both via Native Azure Blob APIs and AWS S3 APIs. Minio also enables data access for other Azure services.

Towards More Intelligent Search: Deep Learning for Query Semantics

$
0
0

Deep learning is helping to make Bing’s search results more intelligent. Here’s a peek behind the curtain of how we’re applying some of these techniques.

Last week, I noticed there were dates printed on my soda cans and I wanted to know what they referred to - sell by dates, best by dates or expiration dates? Searching online wasn’t so easy, I didn’t know how to phrase my search query. For instance, searching for {how long does canned soda last} may miss other relevant results including those that use synonyms for soda like 'pop' or 'soft drink'. This is just one example where we struggle to pick the right terms to get the search results we want. Consequently, we must search multiple times to get the best results! But, with deep learning we can help solve this problem.

Different Queries, Similar Meaning: Understanding Query Semantics

Traditionally, to satisfy the search intent of a user, search engines find and return web pages matching query terms (also known as keyword matching). This approach has helped a lot throughout the history of search engines. However, as users start “speaking their queries” to intelligent speakers, to their phones and become more comfortable expressing their search needs in natural language, search engines need to become more intelligent and understand the true meaning behind a query – its semantics. This lets you see results from other queries with similar meaning even if they are expressed using different terms and phrases

From Bing’s search results, while my original query uses the terms {canned soda}, I realize that it can also refer to {canned diet soda} , {soft drinks}, {unopened room temperature pop} or {carbonated drinks}. I can find a comprehensive list of web pages and answers in a single search without issuing multiple variants of the original query – saving me time from the detective work of figuring out the soda industry!

Why is a deeper understanding of query meaning interesting?

Bing can show results from similar queries with the same meaning by building upon recent foundational work where each word is represented as a numerical quantity known as vector. This has been the subject of previous work such as word2vec or GloVe. Each vector captures information about what a word means – its semantics. Words with similar meanings get similar vectors and can be projected onto a 2-dimensional graph for easy visualization. These vectors are trained by ensuring words with similar meanings are physically near each other. We trained a GloVe model over Bing’s query logs and generated 300-dimensional vector to represent each word.

You can see some interesting clusters of words circled in green above. Words like lobster, meat, crab, steak are all clustered together. Similarly, Starbucks is close to donuts, breakfast, coffee, tea, etc. Vectors provide natural compute-friendly representation of information where distances matter: closer is good, farther is bad, etc. You can zoom in, shift and click on the + icons in the interactive view below to explore other interesting word clusters.

Once we were able to represent single words as vectors, we extended this capability to represent collections of words e.g. queries. Such representations have an intrinsic property where physical proximity corresponds to the similarity between queries. We represent queries as vectors and can now search for nearest neighbor queries based on the original query.  For example, for the query {how to stop animals from destroying my garden}, the nearest neighbor search leads to the following results:

As can be seen, the query {how to stop animals from destroying my garden} is close to {how can I stop cats fouling in my garden}. One could argue that this type of “nearby” queries could be realized by traditional query rewriting methods. However, replacing “animals” with “cats”, and “destroying” with “fouling” in all cases would be a very strong rewrite which would either not be done by traditional systems or, if triggered, would likely produce a lot of bad, aggressive rewrites. Only when we capture the entire semantics of the sentence can we safely say that the two queries are similar in meaning.

Since web search involves retrieving the most relevant web pages for a query, this vector representation can be extended beyond just queries to the title and URL of webpages. Webpages with titles and URLs that are semantically similar to the query become relevant results for the search. This semantic understanding of queries and webpages using vector representations is enabled by deep learning and improves upon traditional keyword matching approaches.

How is deeper search query understanding achieved in Bing?

Traditionally, for identifying best results, web search relies on characteristics of web pages (features) such as number of keyword matches between the query and the web page’s title, URL, body text etc. defined by engineers. (This is just an illustration. Commercial search engines typically use thousands of features based on text, links, statistical machine translation etc.). During run time, these features are fed into classical machine learning models like gradient boosted trees to rank web pages. Each query-web page pair becomes the fundamental unit of ranking

Deep learning improves this process by allowing us to automatically generate additional features that more comprehensively capture the intent of the query and the characteristics of a webpage.

Specifically, unlike human-defined and term-based matching features, these new features learned by deep learning models can better capture the meaning of phrases missed by traditional keyword matching. This improved understanding of natural language (i.e. semantic understanding) is inferred from end user clicks on webpages for a search query. The deep learning features represent each text-based query and webpage as a string of numbers known as the query vector and document vector respectively.

To further amplify the impact of deep learning features, we replaced the classical machine learned model with a deep learning model to do the ranking itself as well. This model runs on 100% of our queries meaningfully affecting over 40% of the results, and it achieves a runtime performance of a few milliseconds through custom, hardware specific model optimizations.

Deep neural network technique in Bing search

Looking closer at the Deep Neural Network Model and Encoder in the context of our first example query reveals that each character from the input text query is represented as a string of numbers (“character vector”). In addition, each word in the query is also separately trained to represent word vector. Eventually, the character vectors are joined with the word vectors to represent the query.

In the same way we can represent each web page’s title, URL, and text as character and word vectors.

The query and webpage vectors are then fed into a deep model known as convolutional neural network (CNN). This model improves semantic understanding and generalization between query and webpages and calculates the Output Score for ranking. It is achieved by measuring the similarity between a query and a webpage’s title, URL etc. using a distance metric, for example, cosine similarity.

Conclusion

Thanks to the new technologies enabled with deep learning, we can now go way beyond simple keyword matches in finding relevant information for user queries.

As with our initial example of {how long does a canned soda last}, you can find out that soda is also called 'pop' in the United States, or 'fizzy drink' in England while scientifically, it's referred to as a carbonated drink. From the soft drink industry perspective, it’s also useful to note the difference between diet and non-diet sodas. Most diet sodas start to lose quality about 3 months after the date stamped, while non-diet soda will last about 9 months after the date – a deeper industry level insight which may not be common knowledge for the average person! By applying deep learning for better semantic understanding of your search queries, you can now gain comprehensive, fast insights from diverse perspectives beyond your individual human experiences. Take it for a spin and let us know what you think using Bing Feedback!

Chun Ming Chin
On behalf of the Search and AI team

The Programmer’s Hindsight – Caching with HttpClientFactory and Polly Part 2

$
0
0

Hindsight - by Nate Steiner - Public DomainIn my last blog post Adding Cross-Cutting Memory Caching to an HttpClientFactory in ASP.NET Core with Polly I actually failed to complete my mission. I talked to a few people (thanks Dylan and Damian and friends) and I think my initial goal may have been wrong.

I thought I wanted "magic add this policy and get free caching" for HttpClients that come out of the new .NET Core 2.1 HttpClientFactory, but first, nothing is free, and second, everything (in computer science) is layered. Am I caching the right thing at the right layer?

The good thing that come out of explorations and discussions like this is Better Software. Given that I'm running Previews/Daily Builds of both .NET Core 2.1 (in preview as of the time of this writing) and Polly (always under active development) I realize I'm on some kind of cutting edge. The bad news (and it's not really bad) is that everything I want to do is possible it's just not always easy. For example, a lot of "hooking up" happens when one make a C# Extension Method and adds in into the ASP.NET Middleware Pipeline with "services.AddSomeStuffThatIsTediousButUseful()."

Polly and ASP.NET Core are insanely configurable, but I'm personally interested in the 80% or even the 90% case. The 10% will definitely require you/me to learn more about the internals of the system, while the 90% will ideally be abstracted away from the average developer (me).

I've had a Skype with Dylan from Polly and he's been updating the excellent Polly docs as we walk around how caching should work in an HttpClientFactory world. Fantastic stuff, go read it. I'll steal some here:

ASPNET Core 2.1 - What is HttpClient factory?

From ASPNET Core 2.1, Polly integrates with IHttpClientFactory. HttpClient factory is a factory that simplifies the management and usage of HttpClient in four ways. It:

  • allows you to name and configure logical HttpClients. For instance, you may configure a client that is pre-configured to access the github API;

  • manages the lifetime of HttpClientMessageHandlers to avoid some of the pitfalls associated with managing HttpClient yourself (the dont-dispose-it-too-often but also dont-use-only-a-singleton aspects);

  • provides configurable logging (via ILogger) for all requests and responses performed by clients created with the factory;

  • provides a simple API for adding middleware to outgoing calls, be that for logging, authorisation, service discovery, or resilience with Polly.

The Microsoft early announcement speaks more to these topics, and Steve Gordon's pair of blog posts (1; 2) are also an excellent read for deeper background and some great worked examples.

Polly and Polly policies work great with ASP.NET Core 2.1 and integrated nicely. I'm sure it will integrate even more conveniently with a few smart Extension Methods to abstract away the hard parts so we can fall into the "pit of success."

Caching with Polly and HttpClient

Here's where it gets interesting. To me. Or, you, I suppose, Dear Reader, if you made it this far into a blog post (and sentence) with too many commas.

This is a salient and important point:

Polly is generic (not tied to Http requests)

Now, this is where I got in trouble:

Caching with Polly CachePolicy in a DelegatingHandler caches at the HttpResponseMessage level

I ended up caching an HttpResponseMessage...but it has a "stream" inside it at HttpResponseMessage.Content. It's meant to be read once. Not cached. I wasn't caching a string, or some JSON, or some deserialized JSON objects, I ended up caching what's (effectively) an ephemeral one-time object and then de-serializing it every time. I mean, it's cached, but why am I paying the deserialization cost on every Page View?

The Programmer's Hindsight: This is such a classic programming/coding experience. Yesterday this was opaque and confusing. I didn't understand what was happening or why it was happening. Today - with The Programmer's Hindsight - I know exactly where I went wrong and why. Like, how did I ever think this was gonna work? ;)

As Dylan from Polly so wisely points out:

It may be more appropriate to cache at a level higher-up. For example, cache the results of stream-reading and deserializing to the local type your app uses. Which, ironically, I was already doing in my original code. It just felt heavy. Too much caching and too little business. I am trying to refactor it away and make it more generic!

This is my "ShowDatabase" (just a JSON file) that wraps my httpClient

public class ShowDatabase : IShowDatabase
{
    private readonly IMemoryCache _cache;
    private readonly ILogger _logger;
    private SimpleCastClient _client;
 
    public ShowDatabase(IMemoryCache memoryCache,
            ILogger<ShowDatabase> logger,
            SimpleCastClient client)
    {
        _client = client;
        _logger = logger;
        _cache = memoryCache;
    }
 
    static SemaphoreSlim semaphoreSlim = new SemaphoreSlim(1);
  
    public async Task<List<Show>> GetShows()
    {
        Func<Show, bool> whereClause = c => c.PublishedAt < DateTime.UtcNow;
 
        var cacheKey = "showsList";
        List<Show> shows = null;
 
        //CHECK and BAIL - optimistic
        if (_cache.TryGetValue(cacheKey, out shows))
        {
            _logger.LogDebug($"Cache HIT: Found {cacheKey}");
            return shows.Where(whereClause).ToList();
        }
 
        await semaphoreSlim.WaitAsync();
        try
        {
            //RARE BUT NEEDED DOUBLE PARANOID CHECK - pessimistic
            if (_cache.TryGetValue(cacheKey, out shows))
            {
                _logger.LogDebug($"Amazing Speed Cache HIT: Found {cacheKey}");
                return shows.Where(whereClause).ToList();
            }
 
            _logger.LogWarning($"Cache MISS: Loading new shows");
            shows = await _client.GetShows();
            _logger.LogWarning($"Cache MISS: Loaded {shows.Count} shows");
            _logger.LogWarning($"Cache MISS: Loaded {shows.Where(whereClause).ToList().Count} PUBLISHED shows");
 
            var cacheExpirationOptions = new MemoryCacheEntryOptions();
            cacheExpirationOptions.AbsoluteExpiration = DateTime.Now.AddHours(4);
            cacheExpirationOptions.Priority = CacheItemPriority.Normal;
 
            _cache.Set(cacheKey, shows, cacheExpirationOptions);
            return shows.Where(whereClause).ToList(); ;
        }
        catch (Exception e)
        {
            _logger.LogCritical("Error getting episodes!");
            _logger.LogCritical(e.ToString());
            _logger.LogCritical(e?.InnerException?.ToString());
            throw;
        }
        finally
        {
            semaphoreSlim.Release();
        }
    }
}
 
public interface IShowDatabase
{
    Task<List<Show>> GetShows();
}

I'll move a bunch of this into some generic helpers for myself, or I'll use Akavache, or I'll try another Polly Cache Policy implemented farther up the call stack! Thanks for reading my ramblings!


Sponsor: SparkPost’s cloud email APIs and C# library make it easy for you to add email messaging to your .NET applications and help ensure your messages reach your user’s inbox on time. Get a free developer account and a head start on your integration today!


© 2018 Scott Hanselman. All rights reserved.
     

Bring the power of serverless to your IoT application and compete for cash prizes

$
0
0

It is hard these days to not walk past something which is connected to the Internet in some way. These things are everywhere - desks, pockets, wrists, walls, kitchens, vehicles, factories, traffic stops, grocery shops… the list goes on and on. These things perform useful operations, gather data, and most importantly have built-in connectivity. There are endless possibilities to what can be achieved when the data from these things is securely captured, processed, and analyzed using the processing power, availability, and intelligence of the cloud. We want to explore these possibilities, with YOU!

Which is why we are inviting you to participate in the Azure IoT on Serverless hackathon for your chance to win* a piece of the $20,000 prize pool.

Azure IoT on Serverless Hackathon

This online competition will run over the next few months, is open to anyone who wants to participate. In addition to winning cash prizes, this competition gives you an opportunity to be featured on the Azure blog.

All ideas are welcome, whether you want to work on that sensors-driven smart-home project you have been putting off, build a remote monitoring solution for a healthcare facility, create an intelligent system to streamline the manufacturing process of your production plant, or even create a self-healing robot wearing cool sunglasses. This challenge is for you!

What about this serverless thing?

Using a serverless architecture is a great fit for Internet of Things projects, as it lets you focus on processing the data – no matter how variable the traffic – and generating insights from it, instead of the undifferentiated heavy lifting that usually comes with infrastructure management for IoT backends. Add to this the integrations that Azure Functions or Logic Apps offers with other cloud services, and you have the quickest and cheapest way for building cloud-powered IoT applications.

Come and surprise us with your jaw dropping solution and explore the possibilities of going serverless on an IoT project while building it!

“Okay, I’m in…how do I join?”

You can go ahead and register for the online hackathon at http://azurehacks.devpost.com. Sign up for a free Azure account if you don’t already have a subscription, and start building your solution using IoT Hub and Azure Functions, as well as any other service, device or technology you might want to include.

New to Azure? New to serverless? Worry not! Check out this quick sample on how to capture data from your devices or sensors, perform aggregation, filtering or some other custom processing on this data, and store it on a database. In this sample you will set up the integration between IoT Hub and Azure Functions, learn a bit about triggers and bindings for Azure Functions, and understand how to drop your processed data on Cosmos DB.

Show me the money!

Besides providing a great hands-on learning opportunity for working with these services together, this hackathon offers great prizes for the top projects:

  • $10,000 cash prize for the solution ranked 1st
  • $6,000 cash prize for the solution ranked 2nd
  • $3,000 cash prize for the solution ranked 3rd
  • $1,000 cash prize for the popular choice solution, chosen via public voting

A panel of judges will review and evaluate all submissions and will select the winning solutions. This panel will consist of Microsoft experts in IoT, cloud computing, and serverless. The criteria will consist of the quality of the idea, its implementation, and the potential value for a production use. You can find all relevant details on the Hackathon website.

If the above is not enough motivation, we will also highlight the winning projects and developers on the Azure blog, so you have an opportunity to let the world know the cool things you are building.

Next steps

Keep an eye on the announcements we will have at the Microsoft Build conference next week, and start working on your solution right away!

Let the hack games begin!


*No purchase necessary. Open only to new and existing Devpost users who are the age of majority in their country. Game ends August 2, 2018 at 5:00 PM Eastern Time. For details, see Official Rules.

Microsoft extends AI support to PyTorch 1.0 deep learning framework

$
0
0

Today Microsoft is announcing the support for PyTorch 1.0 in Azure Machine Learning Services and Data Science Virtual Machine.

PyTorch 1.0 takes the modular, production-oriented capabilities from Caffe2 and ONNX and combines them with PyTorch's existing flexible, research-focused design to provide a fast, seamless path from research prototyping to production deployment for a broad range of AI projects. With PyTorch 1.0, AI developers can both experiment rapidly and optimize performance through a hybrid front end that seamlessly transitions between imperative and declarative execution modes. Data Scientists can develop models in PyTorch 1.0, which are saved in ONNX as the native format and directly use them in applications built on Windows ML and other platforms that support ONNX.

At Microsoft we believe bringing AI advances to all developers, on any platform, using any language, in an open and interoperable AI ecosystem, will help ensure AI is more accessible and valuable to all. Microsoft’s support for ONNX is an example of this – ONNX allows developers to choose the right framework for their task, framework authors can focus on innovative enhancements, and hardware vendors can streamline optimizations.

Azure Machine Learning Services provides support for a variety of frameworks including TensorFlow, Microsoft Cognitive Toolkit, and soon PyTorch 1.0 is another example. Azure infrastructure services, of course, lets you use any framework, even beyond this list because it is an open compute fabric with cutting edge hardware like the latest GPUs. Microsoft is also deeply engaged in the AI Open Source community with Visual Studio Code Tools for AI,  Microsoft Cognitive Toolkit and ONNX to provide transparency, faster innovation and interoperability.

To learn more about Microsoft’s Azure AI Platform visit http://azure.com/ai.

The Azure Cloud Collaboration Center: A First-of-Its Kind Facility

$
0
0

As businesses around the world continue to adopt Azure, it's our mission to ensure our customers can trust our cloud. Today in Redmond, we invited the world to see how our teams are innovating in the Azure Cloud Collaboration Center, a first-of-its-kind facility that combines innovation and scale to address operational issues and unexpected events in order to drive new levels of customer responsiveness, security and efficiency.

The Azure Cloud Collaboration Center A First-of-Its Kind Facility


Microsoft unveils Azure Cloud Collaboration Center

We’re using the Cloud Collaboration Center to take a proactive approach to delivering responsiveness for our customers, who count on our cloud services in 140 countries and on all inhabited continents. To meet the mission-critical requirements businesses trust, we need to be always looking ahead. Delivering innovation in Azure services means identifying new efficiencies and finding new ways to streamline connections with the intelligence we have at every level of the cloud.

The Cloud Collaboration Center space gives customers a snapshot of what is happening with their data 24/7 and enables real-time troubleshooting of any issue by multiple teams simultaneously from across the organization. It is a space that’s purpose-built for collaborative work, with a 1,600 square foot video wall that enables a comprehensive view of Azure, from internal processes to the customer experience. Anything on the board can be pulled up on an individual workstation: it’s designed for viewing at a distance and for correlation of information. But just as important as the video wall is the array of spaces where engineering teams, large and small, can come together to utilize the data to increase efficiency, anticipate issues, and deliver on customer needs.

The Azure Cloud Collaboration Center figure 2

The Cloud Collaboration Center also uses industry-leading technology to bring together the many engineering teams from across Azure to optimize the quality of our cloud services and accelerate the resolution of any incidents. Dozens of regional teams are collaboratively problem-solving, whether through weeklong Hackathons with multiple teams, or by leveraging its cutting-edge visualization and Skype technology to ensure global experts are receiving critical information updates in real time so they can contribute their expertise just as quickly.

To learn more about why more than 90 percent of Fortune 500 enterprises trust the Microsoft Cloud, read about our global infrastructure.

Azure Storage Explorer Generally Available

$
0
0

We are pleased to announce the general availability of Microsoft Azure Storage Explorer. Storage Explorer provides easy management of Azure Storage accounts and contents, including Blobs, Files, Queues, and Table entities. For example, you can easily manage your Azure Virtual Machines disks as Blobs. Azure Cosmos DB and Azure Data Lake are also supported as preview features.

General Availability Highlights

  • Improved sign-in experience. Based on your feedback, we’ve updated sign-in once to quickly and reliably connect to your Azure subscriptions from your developer tools on the same device. If you experience any issues, please open an issue on GitHub.
  • Open feedback platform on GitHub: Microsoft/AzureStorageExplorer. Instead of filling out a survey to offer a suggestion, you can now open Storage Explorer issues on GitHub. You can search existing issues, add comments to issues you fell are more important, share workarounds with other users, and receive updates when issues are resolved.
  • Accessibility support. We believe technology should empower every individual to work with efficiency and high productivity. As part of this release, we are proud to deliver features including better keyboard navigation, such as quickly jumping between panels, improved screen reader support, such as adding aria-live tags to activities, and tons of little fixes to our high contrast themes. We’ll actively look for your feedback on GitHub.

Looking Ahead

We’re working on a variety of features, including:

Next steps

Download latest Storage Explorer today from Storage Explorer landing page.
For any feedback, please report to GitHub: Microsoft/AzureStorageExplorer.

Catherine Wang, Program Manager, Azure Developer Experience Team
@cawa_cathy

Catherine is a Program Manager for Azure Developer Experience team in Microsoft. I worked on Azure security tooling, Azure diagnostics, Storage Explorer, Service Fabric and Docker tools. Interested in making development experience simple, smooth and productive.

Announcing a new name for the UWP Community Toolkit: Windows Community Toolkit

$
0
0

I’m really excited to announce, starting with the next major release, the UWP Community Toolkit will have a new name – the Windows Community Toolkit. This is a huge milestone for the toolkit and the community that has made this project possible.

The toolkit was first released over a year and a half ago with 26 different features. Since then, we’ve added five new packages over nine new releases, each one adding new controls, helpers, services, extensions, object models and more – most coming from the community directly. Today, there are over 100 distinct features. Just compare the number of controls (and categories) in the sample app from the initial release:

UWP Community Toolkit Sample App (v1.0)

UWP Community Toolkit Sample App (v1.0)

UWP Community Toolkit Sample App (v2.2)

UWP Community Toolkit Sample App (v2.2)

When we initially released the UWP Community Toolkit, we received feedback that developers want to share toolkit components with other frameworks such as WPF, WinForms, Xamarin, .NET Core, and more. In v2.0, with the help of the community, we identified components that could be factored out in .NET Standard libraries and created new .NET Standard packages so more developers could take advantage of the community work – and many did. Many of the services, helpers, and parsers are cross platform today and can be used anywhere – and we are working to enable even more.

Enabling more developers is what the toolkit is all about, so starting with the next Windows Community Toolkit release, we are setting a goal to enable more Windows developers working on Windows 10 experiences to take advantage of toolkit components where possible. Therefore, the new name is reflective of this increased focus and more inclusive of all Windows developers.

The community is working enthusiastically towards the next major toolkit update, currently scheduled for late May. All the work is done in the open and we invite any developer to participate and contribute. To get started with the latest and greatest today, visit the GitHub repository and dive into the code. Or if you rather use NuGet packages, preview packages will be published on NuGet right on time for the Microsoft Build conference. We will update the documentation and the sample app at the same time but keep in mind these are pre-release packages and they might change for the final release.

To join the conversation on Twitter, use the #windowstoolkit hashtag. And if you are attending Microsoft Build 2018, just stop by our booth to say hi!

Happy coding!

The post Announcing a new name for the UWP Community Toolkit: Windows Community Toolkit appeared first on Windows Developer Blog.

Bringing Screen Capture to Microsoft Edge with the Media Capture API

$
0
0

Beginning with the EdgeHTML 17, Microsoft Edge is the first browser to support Screen Capture via the Screen Capture API. Web developers can start building on this feature today by upgrading to the Windows 10 April 2018 Update, or using one of our free virtual machines.

Screen Capture uses the new getDisplayMedia API specified by the W3C Web Real-Time Communications Working Group The feature lets web pages capture output of a user’s display device, commonly used to broadcast a desktop for plugin-free virtual meetings or presentations. Using Media Capture, Microsoft Edge can capture all Windows applications–including including Win32 and Universal Windows Platform applications (UWP apps).

In this post, we’ll walk through how Screen Capture is implemented in Microsoft Edge, and what’s on our roadmap for future releases, as well as some best practices for developers looking to get started with this API today.

Getting started with the Screen Capture API

The getDisplayMedia() method is the heart of the Screen Capture API. The getDisplayMedia() call takes MediaStreamConstraints as an optional input argument.  Once the user grants permission, the getDisplayMedia() call will return a promise with a MediaStream object representing the user-selected capture device.

The MediaStream object will only have a MediaStreamTrack for the captured video stream; there is no MediaStreamTrack corresponding to a captured audio stream. The MediaStream object can be rendered on multiple rendering targets, for example, by setting it on the srcObject attribute of MediaElement (e.g. video tags).

While the operation of the getDisplayMedia API is superficially very similar to getUserMedia, there are some important differences. To ensure users are in control of any sensitive information which may be captured, getDisplayMedia does not allow the MediaStreamConstraints argument to influence the selection of sources. This is different from getUserMedia, which enables picking a specific capture device.

Our implementation of Screen Capture currently does not support the use of MediaStreamConstraints to influence MediaStreamTrack characteristics (such as framerate or resolution). The getSettings() method can’t be used to obtain the type of display surface that was captured, although information such as the width, height, aspect ratio and framerate of the capture can be obtained. Within the W3C Web Real-Time Communications Working Group there is ongoing discussion of how MediaStreamConstraints influences properties of the captured screen device, such as resolution and framerate, but consensus has not yet been reached.

User permissions

While screen capture functionality can enable a lot of exciting user and business scenarios, removing the need for additional third-party software, plugins, or manual user steps for scenarios such as conference calls and desktop screenshots, it also introduces security and privacy concerns. Explicit, opt-in user consent is a critical part of the feature.

While the W3C specification recommends some best practices, it also leaves each browser some flexibility in implementation. To balance security and privacy concerns and user experiences, our implementation requires the following:

  • An HTTPS origin is required for getDisplayMedia() to be called.
  • The user is prompted to allow or deny permission to allow screen capture when getDisplayMedia() is called.
  • While the user’s chosen permissions persist, the capture picker UI will come up for each getDisplayMedia() call. Permissions can be managed via the site permissions UI in Microsoft Edge (in Settings or via the site info panel in the URL bar).
  • If a webpage calls getDisplayMedia() from an iframe, we will manage the screen capture device permission separately based on its own URL. This provides protection to the user in cases where the iframe is from a different domain than its parent webpage.
  • As noted above, we do not permit MediaStreamConstraints to influence the selection of getDisplayMedia screen capture sources.

Sample scenarios using screen capture

Screen capture is an essential step in many scenarios, including real-time audio and video communications. Below we walk through a simple scenario introducing you to how to use the Screen Capture functionality.

Capture photo from a screen capture device

Let’s assume we have a video tag on the page and it is set to autoplay.  Prior to calling navigator.getDisplayMedia, we set up constraints and create a handleSuccess function to wire the screen capture stream to the video tag as well as a handleError function to log an error to the console if one occurs.

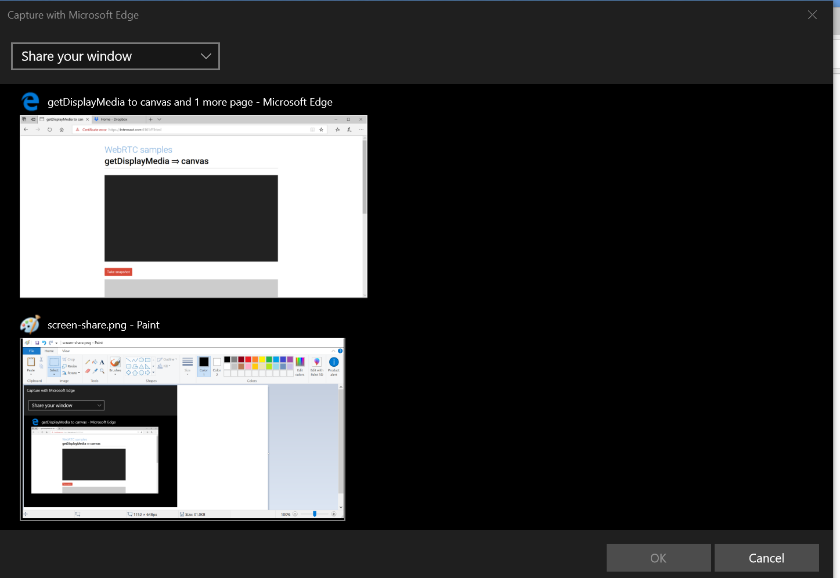
When navigator.getDisplayMedia is called, the picker UI comes up and the user can select whether to share a window or a display.

Image showing the picker UI for Screen Capture in Microsoft Edge

The Picker UI allows the user to select whether to share the entire display, or a particular window.

While being captured, the chosen application or display will have a yellow border draw around it which is not included in the capture frame. Application windows being captured will return black frames while minimized (though they will still be enumerated in the picker); if the window is restored, rendering will resume.

If an application window includes a privacy flag (setDisplayAffinity or isScreenCaptureEnabled) the application is not enumerated in the picker. Application windows being captured will not include overlapping content, which is an improvement on snapshotting the entire display and cropping to window location.

What’s next for Screen Capture

Currently the MediaStream produced by getDisplayMedia can be consumed by the ORTC API in Microsoft Edge.  To optimize encoding in screen capture scenarios, the  degradationPreference encoding parameter is used.  For applications where video motion is limited (e.g. a slideshow presentation), degradationPreference should be set to “maintain-resolution” for best results. To limit the maximum framerate that can be sent over the wire, the maxFramerate encoding parameter can be used.

To use the MediaStream with the WebRTC 1.0 API in Microsoft Edge, we recommend the adapter.js library, as we work towards support for getDisplayMedia along with the WebRTC 1.0 object model in a future release.

You can get started with the Screen Capture API in Microsoft Edge today on EdgeHTML 17.17134 or higher, available in the Windows 10 April 2018 Update or through the free virtual machines on the Microsoft Edge Developer Site. Try it out and let us know what you think by reaching out to @MSEdgeDev on Twitter or submitting feedback at https://issues.microsoftedge.com!

– Angelina Gambo, Senior Program Manager, Microsoft Edge
– Bernard Aboba, Principal Architect, Skype

The post Bringing Screen Capture to Microsoft Edge with the Media Capture API appeared first on Microsoft Edge Dev Blog.

Python at Microsoft: Meet us at Build and PyCon US!

$
0
0

Next week are the Microsoft Build conference in Seattle, WA on May 7-9, and the PyCon conference in Cleveland, OH on May 9-17, and we (the Microsoft Python team) will be at both conferences looking forward to meeting you! If you are going to either of these conferences, come by our booth and check out our sessions. If you can’t make it, don’t worry, we will be sharing the content from the conferences on our blog after the events are over, so stay tuned by using the RSS feed or following us on Twitter.

Microsoft has had a long history of working with Python, from support for Python in Visual Studio and Visual Studio Code (our free, open source editor for macOS, Linux and Windows) to contributing to open source projects such as IronPython and CPython. In fact, Microsoft employs five active Python contributors, more than any other company! We are excited to have the team at Build and PyCon to show and talk about the work we are doing with Python at Microsoft.

Build

Check out our breakout session Get Productive with Python Developer Tools on Wednesday May 9th, 8:30 AM in WSSC Room 608 for an in-depth tour of using Python in Visual Studio, Visual Studio Code, and Azure.

Also check out our From Zero to Azure with Python and VS Code session on Tuesday May 8th at 2:30PM at the Expo Hall Theater 2 for a quick walkthrough of deploying a Python web app to Azure.

Stop by our Python booth in the expo hall to chat with us about anything we are doing, we want to hear from you!

PyCon

Microsoft is a keystone-level sponsor of PyCon this year, and we will have a booth at the expo hall as well as two sponsor workshops on Thursday May 10. Be sure to stop by the booth, talk to the team and check out some of the fun demos we’ll be showing. Above all tell us what we should be doing more of or less of, what you’d like to see next, and how can we improve!

Attend our first workshop Standardized Data Science: The Team Data Science Data Process on Thursday May 10th at 9AM in room 25C to learn about a standardized approach to doing Data Science as a team.

Then, check out our second workshop Python with Visual Studio and Visual Studio Code on Thursday May 10th at 11AM in room 25C, an in-depth tour of our Python developer tools.

Also, join our teams at the developer sprints where we will be working on various projects and are available to help anyone who is interested in contributing to the Microsoft Python extension for Visual Studio Code.


Towards More Intelligent Search: Deep Learning for Query Semantics

$
0
0

Deep learning is helping to make Bing’s search results more intelligent. Here’s a peek behind the curtain of how we’re applying some of these techniques.Last week, I noticed there were dates printed on my soda cans and I wanted to know what they referred to - sell by dates, best by dates or expiration dates? But searching online wasn’t so easy, I didn’t know how to phrase my search query. For instance, searching for {how long does canned soda last} may miss other relevant results including those that use synonyms for soda like 'pop' or 'soft drink'. This is just one example where we struggle to pick the right terms to get the search results we want. Consequently, we must search multiple times to get the best results! But, with deep learning we can help solve this problem.

Different Queries, Similar Meaning: Understanding Query Semantics

Traditionally, to satisfy the search intent of a user, search engines find and return web pages matching query terms (also known as keyword matching). This approach has helped a lot throughout the history of search engines. However, as users start “speaking their queries” to intelligent speakers, to their phones and become more comfortable expressing their search needs in natural language, search engines need to become more intelligent and understand the true meaning behind a query – its semantics. This lets you see results from other queries with similar meaning even if they are expressed using different terms and phrases

From Bing’s search results, while my original query uses the terms {canned soda}, I realize that it can also refer to {canned diet soda} , {soft drinks}, {unopened room temperature pop} or {carbonated drinks}. I can find a comprehensive list of web pages and answers in a single search without issuing multiple variants of the original query – saving me time from the detective work of figuring out the soda industry!
Why is a deeper understanding of query meaning interesting?
Bing can show results from similar queries with the same meaning by building upon recent foundational work where each word is represented as a numerical quantity known as vector. This has been the subject of previous work such as word2vec or GloVe. Each vector captures information about what a word means – its semantics. Words with similar meanings get similar vectors and can be projected onto a 2-dimensional graph for easy visualization. These vectors are trained by ensuring words with similar meanings are physically near each other. We trained a GloVe model over Bing’s query logs and generated 300-dimensional vector to represent each word.
You can see some interesting clusters of words circled in green above. Words like lobster, meat, crab, steak are all clustered together. Similarly, Starbucks is close to donuts, breakfast, coffee, tea, etc. Vectors provide natural compute-friendly representation of information where distances matter: closer is good, farther is bad, etc. You can zoom in, shift and click on the + icons in the interactive view below to explore other interesting word clusters.
Once we were able to represent single words as vectors, we extended this capability to represent collections of words e.g. queries. Such representations have an intrinsic property where physical proximity corresponds to the similarity between queries. We represent queries as vectors and can now search for nearest neighbor queries based on the original query.  For example, for the query {how to stop animals from destroying my garden}, the nearest neighbor search leads to the following results:
¬As can be seen, the query {how to stop animals from destroying my garden} is close to {how can I stop cats fouling in my garden}. One could argue that this type of “nearby” queries could be realized by traditional query rewriting methods. However, replacing “animals” with “cats”, and “destroying” with “fouling” in all cases would be a very strong rewrite which would either not be done by traditional systems or, if triggered, would likely produce a lot of bad, aggressive rewrites. Only when we capture the entire semantics of the sentence can we safely say that the two queries are similar in meaning.
Since web search involves retrieving the most relevant web pages for a query, this vector representation can be extended beyond just queries to the title and URL of webpages. Webpages with titles and URLs that are semantically similar to the query become relevant results for the search. This semantic understanding of queries and webpages using vector representations is enabled by deep learning and improves upon traditional keyword matching approaches.
How is deeper search query understanding achieved in Bing?
Traditionally, for identifying best results, web search relies on characteristics of web pages (features) such as number of keyword matches between the query and the web page’s title, URL, body text etc. defined by engineers. (This is just an illustration. Commercial search engines typically use thousands of features based on text, links, statistical machine translation etc.). During run time, these features are fed into classical machine learning models like gradient boosted trees to rank web pages. Each query-web page pair becomes the fundamental unit of ranking.
Deep learning improves this process by allowing us to automatically generate additional features that more comprehensively capture the intent of the query and the characteristics of a webpage.
Specifically, unlike human-defined and term-based matching features, these new features learned by deep learning models can better capture the meaning of phrases missed by traditional keyword matching. This improved understanding of natural language (i.e. semantic understanding) is inferred from end user clicks on webpages for a search query. The deep learning features represent each text-based query and webpage as a string of numbers known as the query vector and document vector respectively.
To further amplify the impact of deep learning features, we replaced the classical machine learned model with a deep learning model to do the ranking itself as well. This model runs on 100% of our queries meaningfully affecting over 40% of the results, and it achieves a runtime performance of a few milliseconds through custom, hardware specific model optimizations.
Deep neural network technique in Bing search
Looking closer at the Deep Neural Network Model and Encoder in the context of our first example query reveals that each character from the input text query is represented as a string of numbers (“character vector”). In addition, each word in the query is also separately trained to represent word vector. Eventually, the character vectors are joined with the word vectors to represent the query.
In the same way we can represent each web page’s title, URL, and text as character and word vectors.
The query and webpage vectors are then fed into a deep model known as convolutional neural network (CNN). This model improves semantic understanding and generalization between query and webpages and calculates the Output Score for ranking. It is achieved by measuring the similarity between a query and a webpage’s title, URL etc. using a distance metric, for example, cosine similarity.
Conclusion
Thanks to the new technologies enabled with deep learning, we can now go way beyond simple keyword matches in finding relevant information for user queries.
As with our initial example of {how long does a canned soda last}, you can find out that soda is also called 'pop' in the United States, or 'fizzy drink' in England while scientifically, it's referred to as a carbonated drink. From the soft drink industry perspective, it’s also useful to note the difference between diet and non-diet sodas. Most diet sodas start to lose quality about 3 months after the date stamped, while non-diet soda will last about 9 months after the date – a deeper industry level insight which may not be common knowledge for the average person! By applying deep learning for better semantic understanding of your search queries, you can now gain comprehensive, fast insights from diverse perspectives beyond your individual human experiences. Take it for a spin and let us know what you think using Bing Feedback!
Chun Ming Chin
On behalf of the Search and AI team

Blazor 0.3.0 experimental release now available

$
0
0

Blazor 0.3.0 is now available! This release includes important bug fixes and many new feature enhancements.

New features in this release (details below):

  • Project templates updated to use Bootstrap 4
  • Async event handlers
  • New component lifecycle events: OnAfterRender / OnAfterRenderAsync
  • Component and element refs
  • Better encapsulation of component parameters
  • Simplified layouts

A full list of the changes in this release can be found in the Blazor 0.3.0 release notes.

Get Blazor 0.3.0

To get setup with Blazor 0.3.0:

  1. Install the .NET Core 2.1 SDK (2.1.300-preview2-008533 or later).
  2. Install Visual Studio 2017 (15.7 Preview 5 or later) with the ASP.NET and web development workload selected.
  3. Install the latest Blazor Language Services extension from the Visual Studio Marketplace.

To install the Blazor templates on the command-line:

dotnet new -i Microsoft.AspNetCore.Blazor.Templates

You can find getting started instructions, docs, and tutorials for Blazor at https://blazor.net.

Upgrade an existing project to Blazor 0.3.0

To upgrade an existing Blazor project from 0.2.0 to 0.3.0:

  • Install all of the required bits listed above
  • Update your Blazor package and .NET CLI tool references to 0.3.0
  • Remove any package reference to Microsoft.AspNetCore.Razor.Design as it is now a transitive dependency
  • Update the C# language version to be 7.3
  • Update component parameters to not be public and to add the [Parameter] attribute
  • Update layouts to inherit from BlazorLayoutComponent and remove the implementation of @ILayout including the Body property

Your upgraded Blazor project file should look like this:

<Project Sdk="Microsoft.NET.Sdk.Web">

  <PropertyGroup>
    <TargetFramework>netstandard2.0</TargetFramework>
    <RunCommand>dotnet</RunCommand>
    <RunArguments>blazor serve</RunArguments>
    <LangVersion>7.3</LangVersion>
  </PropertyGroup>

  <ItemGroup>
    <PackageReference Include="Microsoft.AspNetCore.Blazor.Browser" Version="0.3.0" />
    <PackageReference Include="Microsoft.AspNetCore.Blazor.Build" Version="0.3.0" />
    <DotNetCliToolReference Include="Microsoft.AspNetCore.Blazor.Cli" Version="0.3.0" />
  </ItemGroup>

</Project>

Project templates updated to use Bootstrap 4

The Blazor project templates have been updated to use Bootstrap 4. Bootstrap 4 includes lots of new features including an improved grid system based on flexbox, an improved reset file, new components, better tooltip support, better forms styling, built-in spacing utilities, and much more.

The new Bootstrap 4 styles also give the Blazor templates a fresh look:

Blazor Boostrap 4 template

Async event handlers

Event handlers can now be asynchronous and return a Task that gets managed by the runtime. Once the task is completed the component is rendered without the need to manually invoke StateHasChanged. Any exceptions that occur during the asynchronous execution of the event handler will be correctly handled and reported.

For example, we can update the FetchData.cshtml page to have an Update button that when selected asynchronously updates the weather forecast data by making HttpClient calls to the backend web API:

<button class="btn btn-primary" onclick="@UpdateForecasts">Update</button>

...

@functions {
    WeatherForecast[] forecasts;

    protected override Task OnInitAsync()
    {
        return UpdateForecasts();
    }

    async Task UpdateForecasts()
    {
        forecasts = await Http.GetJsonAsync<WeatherForecast[]>("/api/SampleData/WeatherForecasts");
    }
}

More strongly-typed events

This release adds strongly typed events for the most of the commonly used browser events, including mouse and focus events. You can now handle most events from your components.

You can see a full list of the events now supported in here.

<h1 class="display-1" onmouseover="@OnMouseOver" onmouseout="@OnMouseOut">@inOrOut</h1>

@functions {
    string inOrOut = "OUT";

    void OnMouseOver()
    {
        inOrOut = "IN!";
    }

    void OnMouseOut()
    {
        inOrOut = "OUT";
    }
}

Mouse events tooling screen shot

Most of the event arguments don't yet capture and surface the data from the events. That's something that we expect to handle in a future release. We welcome community contributions to help out with this effort.

Capturing references to DOM elements

Blazor components typically interact with the DOM through their rendering logic in markup. There are cases, however, when a parent component needs to modify or interact with DOM elements directly. Example scenarios including setting element focus or integrating with existing UI libraries that require references to elements for initialization. This release adds support for capturing DOM elements from components and using them when interacting with JavaScript.

To capture an element reference from a component attribute the element markup with a ref attribute that points to a component field of type ElementRef.

<input ref="username" />

@functions {
    ElementRef username;
}

ElementRef is an opaque handle. The only thing you can do with it is pass it through to JavaScript code, which receives the element as an HTMLElement that can be used with normal DOM APIs.

Note that the ElementRef field (username in the previous example) will uninitialized until after the component has been rendered. If you pass an uninitialized ElementRef to JavaScript code, the JavaScript code will receive null.

Let's create a API that lets us set the focus on an element. We could define this API in our app, but to make it reusable let's put it in a library.

  1. Create a new Blazor class library

     dotnet new blazorlib -o BlazorFocus
    
  2. Update content/exampleJsInterop.js to register a JavaScript method that sets the focus on a specified element.

     Blazor.registerFunction('BlazorFocus.FocusElement', function (element) {
         element.focus();
     });
    
  3. Add a ElementRefExtensions class to the library that defines a Focus extension method for ElementRef.

     using System;
     using Microsoft.AspNetCore.Blazor;
     using Microsoft.AspNetCore.Blazor.Browser.Interop;
    
     namespace BlazorFocus
     {
         public static class ElementRefExtensions
         {
             public static void Focus(this ElementRef elementRef)
             {
                 RegisteredFunction.Invoke<object>("BlazorFocus.FocusElement", elementRef);
             }
         }
     }
    
  4. Create a new Blazor app and reference the BlazorFocus library

     dotnet new blazor -o BlazorApp1
     dotnet add BlazorApp1 reference BlazorFocus
    
  5. Update Pages/Index.cshtml to add a button and a text input. Capture a reference to the text input by adding a ref attribute that points to a field of type ElementRef with the same name. Add an onclick handler to the first button that sets the focus on the second button using the captured reference and the Focus extension method we defined previously.

     @using BlazorFocus
    
     ...
    
     <button onclick="@SetFocus">Set focus</button>
     <input ref="input1" />
    
     @functions {
         ElementRef input1;
    
         void SetFocus()
         {
             input1.Focus();
         }
     }
    
  6. Run the app and try out behavior

     dotnet run BlazorApp1
    

    Set focus

Capturing reference to components

You can also capture references to other components. This is useful when you want a parent component to be able to issue commands to child components such as Show or Reset.

To capture a component reference attribute the component with a ref attributes that points to a field of the matching component type.

<MyLoginDialog ref="loginDialog"/>

@functions {
    MyLoginDialog loginDialog;

    void OnSomething()
    {
        loginDialog.Show();
    }
}

Note that component references should not be used as a way of mutating the state of child components. Instead, always use normal declarative parameters to pass data to child components. This will allow child components to re-render at the correct times automatically.

OnAfterRender / OnAfterRenderAsync

To capture element and component references the component must already be rendered. Components now have a new life-cycle event that fires after the component has finished rendering: OnAfterRender / OnAfterRenderAsync. When this event fires element and component references have already been populated. This makes it possible to perform additional initialization steps using the rendered content, such as activating third-party JavaScript libraries that operate on the rendered DOM elements.

For example, we can use OnAfterRender to set the focus on a specific element when a component first renders.

The example below shows how you can receive the OnAfterRender event in your component.

<input ref="input1" placeholder="Focus on me first!" />
<button>Click me</button>

@functions {
    ElementRef input1;
    bool isFirstRender = true;

    protected override void OnAfterRender()
    {
        if (isFirstRender)
        {
            isFirstRender = false;
            input1.Focus();
        }
    }
}

Note that OnAfterRender / OnAfterRenderAsync is called after each render, not just the initial one, so the component has to keep try of whether this is the first render or not.

Better encapsulation of component parameters

In this release we've made some changes to the programming model for component parameters. These changes are intended to improve the encapsulation of the parameter values and discourage improper mutation of component state (e.g. using component references).

Component parameters are now defined by properties on the component type that have been attributed with [Parameter]. Parameters that are set by the Blazor runtime (e.g. ChildContent properties, route parameters) must be similarly attributed. Properties that define parameters should not be public.

A Counter component with an IncrementAmount parameter now looks like this:

@page "/counter"

<h1>Counter</h1>

<p>Current count: @currentCount</p>

<button class="btn btn-primary" onclick="@IncrementCount">Click me</button>

@functions {
    int currentCount = 0;

    [Parameter]
    private int IncrementAmount { get; set; } = 1;

    void IncrementCount()
    {
        currentCount += IncrementAmount;
    }
}

Simplified layouts

Layouts now inherit from BlazorLayoutComponent instead of implementing ILayout. The BlazorLayoutComponent defines a Body parameter that can be used for specifying where content should be rendered. Layouts no longer need to define their own Body property.

An example layout with these changes is shown below:

@inherits BlazorLayoutComponent

<div class="sidebar">
    <NavMenu />
</div>

<div class="main">
    <div class="top-row px-4">
        <a href="http://blazor.net" target="_blank" class="ml-md-auto">About</a>
    </div>

    <div class="content px-4">
        @Body
    </div>
</div>

Summary

We hope you enjoy this latest preview of Blazor. Your feedback is especially important to us during this experimental phase for Blazor. If you run into issues or have questions while trying out Blazor please file issues on GitHub. You can also chat with us and the Blazor community on Gitter if you get stuck or to share how Blazor is working for you. After you've tried out Blazor for a while please also let us know what you think by taking our in-product survey. Just click the survey link shown on the app home page when running one of the Blazor project templates:

Blazor survey

Thanks for trying out Blazor!

Python in Visual Studio Code – April 2018 Release

$
0
0

We are pleased to announce that the April 2018 release of the Python Extension for Visual Studio Code is now available from the marketplace and the gallery. You can download the Python extension from the marketplace, or install it directly from the extension gallery in Visual Studio Code. You can learn more about Python support in Visual Studio Code in the VS Code documentation.

In this release we have closed a total of 110 issues including remote debugging support in the Preview debugger, and enhancements to running Python code in the terminal.

Improvements to Running Python Code in the Terminal

We’ve made various improvements that make it easier to run Python code in the terminal.

A Ctrl+Enter keyboard shortcut has been added for the “Python: Run Line/Selection in terminal” command. The command was also enhanced so that it adds and removes blank lines in indented code blocks so that they will run correctly in the terminal.

Take the following code example:

Previously this code would not have run properly in the terminal because the blank line in between the two print statements would cause an indentation error when running the second print function, and a blank line is needed to finish the indentation block before running the third print function.

Now the blank line is removed in between the two print function calls, a blank line is added before the third print function call, and the code is successfully run in the terminal when pressing Ctrl-Enter:

When using the "Python: Create Terminal" command, the focus is put into the terminal so you no longer need to use the mouse to click into the window before you start typing. The "Run Python File in Terminal" command (available on the context menu in the file explorer, or in the command palette) now saves the file before running it, avoiding confusion from running code that doesn’t match what is shown in the editor.

Remote Debugging Support in Preview Debugger

We are continuing to add features to our Preview debugger, in this release we added remote debugging capabilities. The Preview debugger was first added in the February release of the extension, and will provide significantly better debugging performance and reliability when it becomes stable.

To use remote debugging, you first need to start the debug server in one of two ways. You can start the debugging server by using the following command to start a python file:

python -m ptvsd --server --port 9091 --file module.py

Or you can import ptvsd into your app and install

import ptvsd
ptvsd.enable_attach(('0.0.0.0', 5678))

Then you can add a remote attach configuration from the debugging configuration drop-down and enter the port and IP address to use:

One improvement of remote debugging that you get with the Preview debugger is that you don’t need to use the exact same ptvsd library version on the server that is used in VS Code going forward with ptvsd 4.

To try out the preview version of the debugger, select Python Experimental debugger type when you start debugging, or when adding debug configurations.

Various Fixes and Enhancements

We have also fixed several small enhancements and fixed issues requested by users that should improve your experience working with Python in Visual Studio Code. The full list of improvements is listed in our changelog, some notable issues are:

  • Fix "Go to definition" functionality across files. (#1033)
  • IntelliSense improvements from upgrading to Jedi version 0.12.0 and various fixes for completions and go to definition (#1072, #178, #142, #344, #338)
  • Improvements to formatting as you type when editor.formatOnType is on (#726, #1257, #1257, #1364)
  • Improvements to interpreter selection/display (#1015, #1192, #1254, #1305)
  • Add support for logpoints in the preview debugger. (#1306)
  • Enable debugging of Jinja templates (outside of Flask apps) in the preview debugger. (#1492)
  • Add support for hit count breakpoints in the preview debugger. (#1409)

Be sure to download the Python extension for VS Code now to try out the above improvements. If you run into any issues be sure to file an issue on the Python VS Code GitHub page.


Announcing ASP.NET MVC 5.2.5, Web API 5.2.5, and Web Pages 3.2.5

$
0
0

Today we released ASP.NET MVC 5.2.5, Web API 5.2.5, and Web Pages 3.2.5 on NuGet. This is a patch release that contains only bug fixes. You can find the full list of bug fixes for this release in the release notes.

To update an existing project to use this preview release run the following commands from the NuGet Package Manager Console for each of the packages you wish to update:

Install-Package Microsoft.AspNet.Mvc -Version 5.2.5
Install-Package Microsoft.AspNet.WebApi -Version 5.2.5
Install-Package Microsoft.AspNet.WebPages -Version 3.2.5

If you have any questions or feedback on this release please let us know on GitHub.

Thanks!

CMake Support in Visual Studio – Code Analysis and CMake 3.11

$
0
0

Visual Studio 2017 15.7 Preview 4 is now available and we have added a few more CMake features in addition to the Targets View and single file compilation added in Preview 3.  We keep the version of CMake that ships with Visual Studio as fresh as possible, so we have updated it to version 3.11.  We are also excited to announce that CMake projects now support the IDE’s code analysis features that previously required a VCXProj to take advantage of.

Please download the preview and check out the latest CMake features such as the Targets View, single file compilation, and more control over when projects are configured.  As always, we would love to hear your feedback too.

If you are new to CMake in Visual Studio, check out how to get started.

Code Analysis for CMake Projects

In the latest preview, you can now run Visual Studio’s comprehensive code analysis tools on CMake projects.  Currently, you can run code analysis at the target level.  Options to run code analysis for single files or your entire project are coming soon.

To run code analysis on a CMake target you can select “Run Code Analysis” from the CMake menu:

CMake Menu Code Analysis

Or, if you are using the Targets View you can simply right click on any target and select “Run Code Analysis:”

Targets View Code Analysis

Any analysis errors or warnings that are detected will appear in the Output Window:

Code Analysis Output Window

By default CMake projects use the “Microsoft Native Recommended Rules” rule set, but you can change this by modifying your CMakeSettings.json file.  Just add the “codeAnalysisRuleset” tag to your configuration with the name or path to a rule set file.

CMake 3.11

To ensure that your projects can take advantage of the latest and greatest CMake features we have upgraded the version of CMake that ships with Visual Studio from 3.10 to 3.11.  You can find the full lists of enhancements to CMake 3.11 in the CMake 3.11 release notes.

Send Us Feedback

Your feedback is a critical part of ensuring that we can deliver the best CMake experience.  We would love to know how Visual Studio 2017 Preview is working for you.  If you have any feedback specific to CMake Tools, please reach out to cmake@microsoft.com.  For general issues please Report a Problem.

Viewing all 10804 articles
Browse latest View live


<script src="https://jsc.adskeeper.com/r/s/rssing.com.1596347.js" async> </script>