Quantcast
Channel: Category Name
Viewing all 10804 articles
Browse latest View live

Installing the .NET Core 2.x SDK on a Raspberry Pi and Blinking an LED with System.Device.Gpio

$
0
0

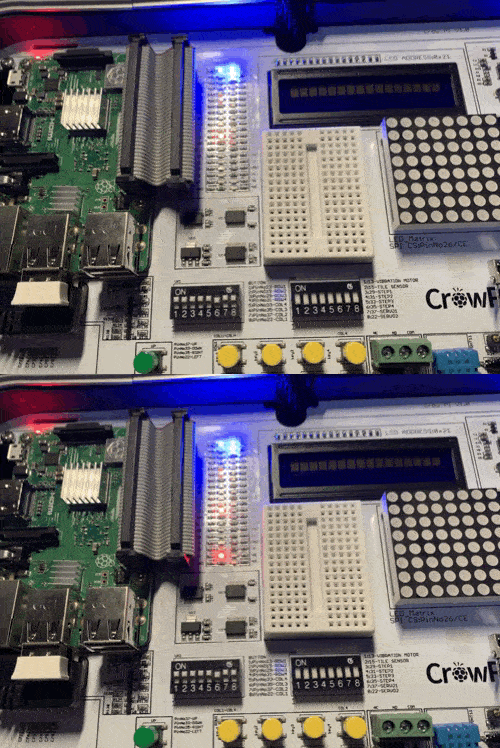
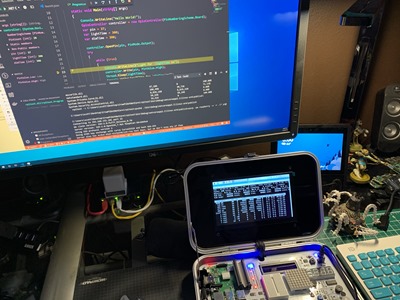
The CrowPi from Elecrow is an amazing STEM KitI've written about running .NET Core on Raspberry Pis before, although support was initially limited. Now that Linux ARM32 is a supported distro, what else can we do?

We can certainly quickly and easily install Docker on a Raspberry Pi and be running C# and .NET Core programs in minutes. We can run .NET Core in a stack of Raspberry Pis as a Kubernetes Cluster, making our own tiny cloud and install a serverless platform in it like OpenFaas!

If you have a Raspberry Pi 3 with Raspbian on it like I do, check out https://dotnet.microsoft.com/download/dotnet-core/2.2 and note that last part of the URL. You can ask for /2.1, /2.0, etc, just in case you're reading this post in the future, like tomorrow. ;) Everything is always at https://dotnet.microsoft.com/download/archives so you can tell what's Current and what's not.

For example, if I end up here https://dotnet.microsoft.com/download/thank-you/dotnet-sdk-2.2.102-linux-arm32-binaries I can grab the exact blob URL from the "try again" link and then wget it on my Raspberry Pi. You'll want to get a few prerequisites first. Note these blob links change when new stuff comes out, so you'll want to double check to get latest.

sudo apt-get install curl libunwind8 gettext

wget https://download.visualstudio.microsoft.com/download/pr/9650e3a6-0399-4330-a363-1add761127f9/14d80726c16d0e3d36db2ee5c11928e4/dotnet-sdk-2.2.102-linux-arm.tar.gz
wget https://download.visualstudio.microsoft.com/download/pr/9d049226-1f28-4d3d-a4ff-314e56b223c5/f67ab05a3d70b2bff46ff25e2b3acd2a/aspnetcore-runtime-2.2.1-linux-arm.tar.gz

I got the Linux ARM 32-bit SDK as well as the ASP.NET Runtime so I have those packages available for any web apps I choose to make.

Then we'll extract. You can set it up as a user off of $HOME or in /opt/dotnet and then link to /usr/local/bin.

mkdir -p $HOME/dotnet && tar zxf dotnet-sdk-2.2.102-linux-arm.tar.gz -C $HOME/dotnet

export DOTNET_ROOT=$HOME/dotnet
export PATH=$PATH:$HOME/dotnet

Don't forget to untar the ASP.NET Runtime as well.

tar zxf aspnetcore-runtime-2.2.1-linux-arm.tar.gz -C $HOME/dotnet

Cool. You will want to add the PATH to your profile if you want it to survive restarts. Then run "dotnet --info" to see if it works.

pi@crowpi:~ $ dotnet --info

.NET Core SDK (reflecting any global.json):
Version: 2.2.102

Runtime Environment:
OS Name: raspbian
OS Version: 9
OS Platform: Linux
RID: linux-arm
Base Path: /home/pi/dotnet/sdk/2.2.102/

Host (useful for support):
Version: 2.2.1

.NET Core SDKs installed:
2.2.102 [/home/pi/dotnet/sdk]

.NET Core runtimes installed:
Microsoft.AspNetCore.All 2.2.1 [/home/pi/dotnet/shared/Microsoft.AspNetCore.All]
Microsoft.AspNetCore.App 2.2.1 [/home/pi/dotnet/shared/Microsoft.AspNetCore.App]
Microsoft.NETCore.App 2.2.1 [/home/pi/dotnet/shared/Microsoft.NETCore.App]

Looks good.

At this point I have BOTH the .NET Core runtime (for running stuff) as well as all the ASP.NET runtime for web apps or little microservices AND the .NET SDK which means I can actually compile code (slowly) on the Pi itself. It's up to me/you. If you aren't ever going to develop (compile code) on the Raspberry Pi, you can just install the runtime, but I think it's nice to be prepared.

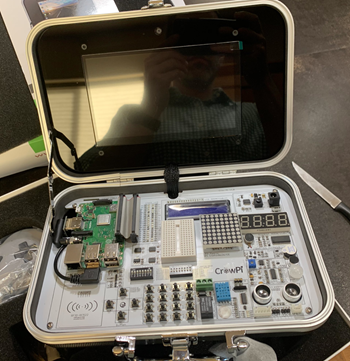
I am installing all this on a wonderful Raspberry Pi kit called a "CrowPi." They had a successful KickStarter and are now selling a Raspberry Pi Educational Kit with an attached custom board with dozens of components. Rather than having to connect motion sensors, soud sensors, touch sensors, switches, buttons, and carry around a bunch of wires, you can experiment and play with stuff in a very organized case that also has a 7inch HDMI touch screen. They also have 21 great Python Video Courses on their YouTube Channel on how to get started with hardware. It's a joy of a device. More on that later.

NOTE: I talked to the #CrowPi people and they gave me an Amazon COUPON that's ~$70 off! The coupon is 8EMCVI56 and will work until Jan 31, add it during checkout. The Advanced Kit is at https://amzn.to/2SVtXl2 #ref and includes everything, touchscreen, keyboard, mouse, power, SNES controllers, motors, etc. I will be doing a full review soon. Short review is, it's amazing.

Now that .NET Core is installed, I can start exploring the fun happening over at https://github.com/dotnet/iot. It's filled with lots of new functionality inside of System.Device.Gpio. Remember that GPIO means "General Purpose Input/Output" which, on a Raspberry Pi, is connected to a ribbon cable on the CrowPi with lots of cool sensors ready to go!

I could build my Raspberry Pi apps on my Windows/Mac/Linux machine and I'll find it much faster to compile. Then I can "scp" (secure copy) it over to the Pi. It's nice to point out that Windows 10 includes scp.exe now by default!

In this example, by adding -r linux-arm I'm copying a complete self-contained app over the Pi, so don't actually need to install .NET Core like I did above. If instead, I didn't use -r (to declare a specific runtime) then I would need to make sure I've got the right versions on my dev box vs my RPi, so consider what's best for you.

Here I am in my Windows machine that also has the same version of the .NET Core SDK installed. I'm in .rpitest with a console app I made with "dotnet new console." Now I want to build and copy it over to the Pi.

dotnet publish -r linux-arm

cd binDebugnetcore2.1linux-armpublish
scp -r . pi@crowpi:/home/pi/Desktop/rpitest

From the Pi, I'll need to "sudo chmod +x" the rpitest application to make sure it is executable.

There's a brilliant video from Cam Soper that shows you in great detail how to run .NET Core 2.x on a Raspberry Pi and I recommend you check it out as well.

IoT devices expose much more than serial ports. They typically expose multiple kinds of pins that can be programmatically used to read sensors, drive LED/LCD/eInk displays and communicate with our devices. .NET Core now has APIs for GPIO, PWM, SPI, and I²C pin types.

These APIs are available via the System.Device.GPIO NuGet package. It will be supported for .NET Core 2.1 and later releases. There's some basic samples here https://github.com/dotnet/iot/blob/master/samples/README.md to start with.

From Microsoft:

Most of our effort has been spent on supporting these APIs in Raspberry Pi 3. We plan to support other devices, like the Hummingboard. Please tell us which boards are important to you. We are in the process of testing Mono on the Raspberry Pi Zero.

For now System.Device.Gpio is a prelease so you'll want to add a nuget.config to your project with the path to the dailies:

<?xml version="1.0" encoding="utf-8"?>

<configuration>
<packageSources>
<clear />
<add key="myget.org" value="https://dotnet.myget.org/F/dotnet-core/api/v3/index.json" />
<add key="nuget.org" value="https://api.nuget.org/v3/index.json" />
</packageSources>
</configuration>

Add a reference to System.Device.Gpio or (at the time of this writing) version 0.1.0-prerelease.19065.1. Now let's do something!

Here I'm just blinking this LED!

Console.WriteLine("Hello World!");

GpioController controller = new GpioController(PinNumberingScheme.Board);
var pin = 37;
var lightTime = 300;

controller.OpenPin(pin, PinMode.Output);
try {
while (true) {
controller.Write(pin, PinValue.High);
Thread.Sleep(lightTime);
controller.Write(pin, PinValue.Low);
Thread.Sleep(lightTime);
}
}
finally {
controller.ClosePin(pin);
}

Yay! Step zero works! Every cool IoT projects starts with a blinking LED!

Blinking LEDs ZOMG

Do be aware that System.Device.Gpio is moving VERY fast and some of this code and the samples may not work if namespaces or class names change. It'll settle down soon.

Great stuff though! Go get involved over at https://github.com/dotnet/iot as they are actively working on drivers/abstractions for Windows, Linux, etc and you could even submit a PR for a device like an LCD or simple sensor! I've only been playing for an hour but I will report back as I try new experiments with my kids.


Sponsor: Preview the latest JetBrains Rider with its Assembly Explorer, Git Submodules, SQL language injections, integrated performance profiler and more advanced Unity support.


© 2018 Scott Hanselman. All rights reserved.
     

Announcing the Azure DevOps Bug Bounty Program

$
0
0

It is my pleasure to announce another exciting expansion of the Microsoft Bounty Programs. Today, we are adding a Bug Bounty program for Azure DevOps in partnership with the Microsoft Security Response Center (MSRC) to our suite of Bounty programs.

Our Bug Bounty program rewards independent security researchers who find flaws and report them to us responsibly. We’ll publicly recognize the researchers who report these security issues, and for high-severity bugs we’ll present payments of up to $20,000 USD.

These rewards help motivate researchers to find security vulnerabilities in our services and let us correct them before they’re exploited by attackers. You can find the details of our Bug Bounty program with MSRC.

Security has always been a passion of mine, and I see this program as a natural complement to our existing security framework. We’ll continue to employ careful code reviews and examine the security of our infrastructure. We’ll still run our security scanning and monitoring tools. And we’ll keep assembling a red team on a regular basis to attack our own systems to identify weaknesses.

If you’re interested in the way our team approaches security and how we continue to evolve our thinking and practices, then I’d encourage you to watch the video of my talk “Mindset shift to a DevSecOps culture.”

This Bug Bounty program will help us provide the highest level of security for our customers, protect customer data, and ensure the availability of Azure DevOps. I’m looking forward to seeing what we learn from working more closely with the security community.

Help us help you! What desktop apps are you bringing to .NET Core 3.0?

$
0
0

Windows Desktop applications are coming to .NET Core. The recently released .NET Core 3.0 Preview 1 version includes WinForms and WPF support.

To make .NET Core 3.0 viable for as many of you as possible, we have created a survey to understand the types of desktop applications you want to build with .NET Core. Based on the information you provide, we may contact some of you (if you agree) to collaborate on your .NET Core 3.0 efforts. We’ll learn from working with you how to improve the experience and documentation for bringing desktop applications to .NET Core.

There are many reasons to choose .NET Core for building desktop apps, such as:

  • More deployment options (like the ability to install multiple versions of .NET Core. side-by-side as well as publish self-contained apps).
  • Better high DPI support.
  • More frequent updates.
  • Improved performance.
  • Benefiting from the open-source community.
  • New features that are only available on .NET Core (such as Span<T>).

Take survey!

The survey should take about 3 minutes to complete.

See also

HDInsight now supported in Azure CLI as a public preview

$
0
0

We recently introduced support for HDInsight in Microsoft Azure CLI as a public preview. With the addition of the new HDInsight command group, you can now utilize all of the features and benefits that come with the familiar cross-platform Azure CLI to manage your HDInsight clusters.

Key Features

  • Cluster CRUD: Create, delete, list, resize, and show properties for your HDInsight clusters.
  • Script actions: Execute script actions, list and delete persistent script actions, promote ad-hoc script executions to persistent script actions, and show the execution history of script actions on HDInsight clusters.
  • Operations Management Suite (OMS): Enable, disable, and show the status of OMS/Log Analytics integration on HDInsight clusters.
  • Applications: Create, delete, list, and show properties for applications on your HDInsight clusters.
  • Core usage: View available core counts by region before deploying large clusters.

Azure CLI benefits

  • Cross platform: Use Azure CLI on Windows, macOS, Linux, or the Azure Cloud Shell in a browser to manage your HDInsight clusters with the same commands and syntax across platforms.
  • Tab completion and interactive mode: Autocomplete command and parameter names as well as subscription-specific details like resource group names, cluster names, and storage account names. Don't remember your 88-character storage account key off the top of your head? Azure CLI can tab complete that as well!
  • Customize output: Make use of Azure CLI's globally available arguments to show verbose or debug output, filter output using the JMESPath query language, and change the output format between json, tab-separated values, or ASCII tables, and more.

Getting started

  1. Install Azure CLI for Windows, macOS, or Linux. Alternatively, you can use Azure Cloud Shell to use Azure CLI in a browser.
  2. Log in using the az login command.
  3. Run az account show to view your currently active subscription.
  4. If you want to change your active subscription, run az account set -s <Subscription Name>

  5. Take a look at our reference documentation, “az hdinsight” or run az hdinsight -h to see a full list of supported HDInsight commands and descriptions and start using Azure CLI to manage your HDInsight clusters.

Try HDInsight now

We hope you will take full advantage of HDInsight support in Azure CLI and we are excited to see what you will build with Azure HDInsight. Read this developer guide and follow the quick start guide to learn more about implementing these pipelines and architectures on Azure HDInsight. Stay up-to-date on the latest Azure HDInsight news and features by following us on Twitter #AzureHDInsight and @AzureHDInsight. For questions and feedback, reach out to AskHDInsight@microsoft.com.

About HDInsight

Azure HDInsight is an easy, cost-effective, enterprise-grade service for open source analytics that enables customers to easily run popular open source frameworks including Apache Hadoop, Spark, Kafka, and others. The service is available in 27 public regions and Azure Government Clouds in the US and Germany. Azure HDInsight powers mission-critical applications in a wide variety of sectors and enables a wide range of use cases including ETL, streaming, and interactive querying.

Dynamic mission planning for drones with Azure Maps

$
0
0

Real-time location intelligence is critical for business operations. From getting real-time road data, to building asset-tracking solutions for navigating drone fleets. Today, we’re excited to highlight a customer, AirMap, whose software solutions rely on Azure Maps for real-time location intelligence in a new frontier of technology called dynamic mission planning for drones.

AirMap is the leading global airspace management platform for drones. AirMap’s Unmanned Traffic Management (UTM) platform enables the deployment and operations of safe, efficient, and advanced drone operations for enterprises and drone solution providers. Since 2017, AirMap has been part of the Microsoft Ventures portfolio and has chosen Microsoft Azure as its trusted cloud for its cloud-based UTM platform. AirMap offers open, standardized APIs and SDKs that make it easy for software developers to integrate AirMap’s intelligence services and capabilities into third party applications. This includes situational awareness of flight conditions, airspace advisories, and global airspace regulations. The AirMap developer platform also offers easy access to AirMap’s global network of airspace authorities, who offer notification, authorization, and more to drone operators on the AirMap UTM platform.

AirMap map screenshot

Figure 1: AirMap dynamically renders polygons representing different geographic areas subject to airspace regulations.

When faced with the decision of selecting location intelligence services, AirMap didn’t have to venture far with Azure Maps offering world-class geospatial capabilities natively in Azure. This allowed for seamless, secure, and scalable integration with AirMap’s existing Azure solution.

“The speed and performance of Azure Maps is a strong complement to AirMap’s safety-critical airspace intelligence services.”

- Andreas Lamprecht, Chief Technology Officer, AirMap

AirMap utilized the vector tile service (Figure 1) on Azure Maps to create an AirMap contextual airspace plugin for Azure Maps. This plugin allows users to view and interact with AirMap’s contextual airspace advisory layers, rendered on dynamic map tiles from Azure Maps. The Azure Maps custom vector tile service supported AirMap’s high performance needs of visualizing a large data set with custom data-driven styling. The Azure intelligent cloud platform provides the ideal infrastructure for operating AirMap’s complex and real-time tracking solutions. The AirMap widget for Azure Maps enables developers to include drone-specific data and capabilities into a variety of Azure solutions, which is critical for safe drone operation. Azure Maps developers can further enrich map visualization by adding imagery captured by drones using image layers. Other Azure Maps capabilities include satellite imagery, search, and routing which can be used to implement solutions for agriculture, construction sites, insurance firms, and many other industries that will increasingly leverage drone technology.

To get started, you can install the AirMap contextual airspace plugin for Azure Maps.

Build an Azure IoT application with Cloud Explorer for Visual Studio

$
0
0

What we’ve heard and experienced ourselves is that when building applications, you have a frictionless experience when your code editor and tools are integrated and seamless. Yet when developing IoT apps, you often need to manage connected devices and send test messages between the device and IoT Hub at the same time that you’re debugging and working on your code. You’ll likely spend time switching between windows or even screens to monitor the messaging and many components of your development.

To ensure that the tools you need are close at hand, we’ve updated the Cloud Explorer for Visual Studio extension for IoT developers to enable you to view your Azure IoT Hubs, inspect their properties, and perform other actions from within Visual Studio. Cloud Explorer is installed by default if you selected the Azure Workload when installing Visual Studio. To access the latest features, you need to upgrade to Microsoft Visual Studio 2017 Update 9 or later, then download and install the latest extension from Visual Studio marketplace.

Here are some of the new features to help IoT developers easily interact with Azure IoT Hub, and the devices connected to it:

  • Interact with Azure IoT Hub
    • Send D2C messages to IoT Hub
    • Monitor D2C messages sent to IoT Hub
    • Send C2D messages to device
    • Monitor C2D messages sent to device
    • Invoke Direct Method
    • View and update device twin
  • Device management
    • List devices
    • Get device info
    • Create and delete devices
  • IoT Edge development support
    • Create IoT Edge deployment for device
    • List modules
    • View and update module twin

To learn more about what the IoT Hub enables and how to use the latest, check out the IoT Hub documentation.

Easy to Set Up

After you’ve installed Cloud Explorer, you can open Cloud Explorer view from Visual Studio menu View → Cloud Explorer. Sign in to your Azure account by clicking the Account Management icon if you haven’t done this before.

Expand Your subscription → IoT Hubs → Your IoT Hub, the device list will be shown under your IoT Hub node. Select one IoT Hub or device to inspect its properties or perform actions against the resource.

Now you have learned how to access your Azure IoT Hub resources.

Try the Tutorials

If you want to discover the Cloud Explorer features further, we offer the following walkthroughs where you will perform common IoT Hub management actions. To explore advanced or specific IoT scenarios, head over to check out our IoT Hub documentation, where we’re always adding new projects and tutorials.

Your feedback is also very important for us to keep improving and making it even easier to develop your IoT applications. Please share your thoughts with us by suggesting a feature or reporting an issue in our Developer Community

Chaoyi Yuan, Software Engineer

Chaoyi is a software engineer working on IoT tools. He’s currently focus on providing great tools for Visual Studio and Visual Studio Code users.

Using Background Intelligent Transfer Service (BITS) from .NET

$
0
0

About BITS and downloading and uploading files

Programs nowadays often need to download files and data from the internet – maybe they need new content, new configurations, or the latest updates. The Windows Background Intelligent Transfer Service (BITS) is an easy way for programs to ask Windows to download files from or upload files to a remote HTTP or SMB file server. BITS will handle problems like network outages, expensive networks (when your user is on a cell plan and is roaming), and more.

In this blog post I’ll show how you can easily use BITS from a C# or other .NET language program. To use BITS from C++ using its native COM interface, see the GitHub sample at https://github.com/Microsoft/Windows-classic-samples/tree/master/Samples/BacgroundIntelligenceTransferServicePolicy. Your program can create new downloads from and uploads to HTTP web servers and SMB file servers. Your program can also monitor BITS downloads and uploads. If your program runs as admin, you can monitor all the BITS traffic on a machine. If you run just as a user, you can only monitor your own BITS traffic.

The companion program from this blog post, the BITS Manager program, is available both as source code on GitHub at https://github.com/Microsoft/BITS-Manager and as a ready-to-run executable at https://github.com/Microsoft/BITS-Manager/releases.

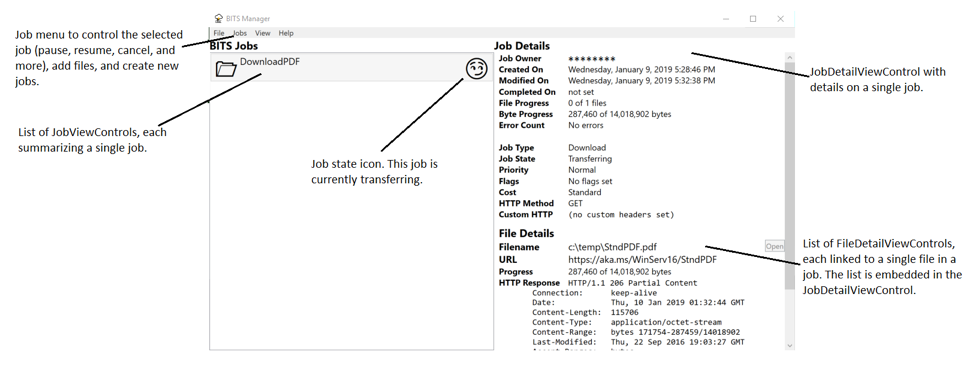
The BITS Manager program

What all can BITS do?

The most common use of BITS is to download files from the internet. But dig beneath the covers and you’ll find that the “Intelligent” in BITS is well earned!

BITS is careful about the user’s experience

Many downloads (and uploads) need to make forward progress, but also want to be nice to the user and not interfere with the user’s other work. BITS works to make sure that downloads and uploads don’t happen on costed networks and that the background downloads and uploads don’t hurt the user’s foreground experience. BITS does this by looking at both the computer’s available network bandwidth and information about the local network. For uploads BITS will enable LEDBAT (when available). LEDBAT is a new congestion control algorithm that’s built into newer versions of Windows and Windows Server. You can also set different priorities for your transfers so that the more important downloads and uploads happen first.

BITS gives you control over transfer operations. You can specify what your cost requirements are to enable transfers on expensive (roaming) networks and the priority of each download or upload. You can set a transfer to be a foreground priority transfer and have the transfer happen right away or set your transfer to be a low priority transfer and be extra nice to your user. See https://docs.microsoft.com/en-us/windows/desktop/Bits/best-practices-when-using-bits for BITS best practices.

BITS can be managed by an IT department

An enterprise IT department might have a preference about how much bandwidth to allocate to background transfers at different times of the day or might want to control how long a transfer is allowed to take. BITS has rich Group Policy and MDM policies for just these scenarios. See https://docs.microsoft.com/en-us/windows/client-management/mdm/policy-csp-bits for more details on controlling BITS with MDM and https://docs.microsoft.com/en-us/windows/desktop/Bits/group-policies for the available Group Policies.

Quick start: download a file from the web

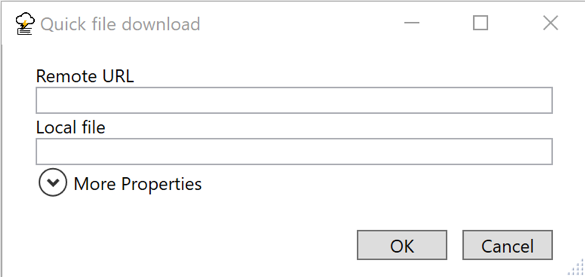
To download a file from the web using the BITS Manager sample program, select JobsàQuick File Download. The file download dialog pops up:

Quick file download in the BITS Manager sample program.

Type in a URL to download. The Local file field will be automatically updated with a potential download filename taken from the segments portion of the URL. When you tap OK, a BITS job will be created, the remote URL and local file will be added to the job, and the job will be resumed. The job will then automatically download as appropriate and will be switched to a final state at the end.

To have your program download a file with BITS, you need to create a BITS manager, create a job, add the URL and the local file names, and then resume the job. Then you need to wait until the file is done transferring and then complete the job. These steps are shown in this snippet.

In addition to this code, a version 1.5 BITSReference DLL has been added to the C# project’s references, and a using directive added to the C# file.

Sample Code


private BITS.IBackgroundCopyJob DownloadFile(string URL, string filename)
    {
        // The _mgr value is set like this: _mgr = new BITS.BackgroundCopyManager1_5();
        if (_mgr == null)
        {
            return null;
        }

        BITS.GUID jobGuid;
        BITS.IBackgroundCopyJob job;
        _mgr.CreateJob("Quick download", BITS.BG_JOB_TYPE.BG_JOB_TYPE_DOWNLOAD,
            out jobGuid, out job);
        try
        {
            job.AddFile(URL, filename);
        }
        catch (System.Runtime.InteropServices.COMException ex)
        {
            MessageBox.Show(
                String.Format(Properties.Resources.ErrorBitsException, 
                    ex.HResult, 
                    ex.Message),
                Properties.Resources.ErrorTitle
                );
            job.Cancel();
            return job;
        }
        catch (System.UnauthorizedAccessException)
        {
            MessageBox.Show(Properties.Resources.ErrorUnauthorizedAccessMessage,
                Properties.Resources.ErrorUnauthorizedAccessTitle);
            job.Cancel();
            return job;
        }
        catch (System.ArgumentException ex)
        {
            MessageBox.Show(
                String.Format(Properties.Resources.ErrorMessage, ex.Message),
                Properties.Resources.ErrorTitle
                );
            job.Cancel();
            return job;
        }

        try
        {
            SetJobProperties(job); // Set job properties as needed
            job.SetNotifyFlags(
                (UInt32)BitsNotifyFlags.JOB_TRANSFERRED
                + (UInt32)BitsNotifyFlags.JOB_ERROR);
            job.SetNotifyInterface(this); 
            // Will call JobTransferred, JobError, JobModification based on notify flags
            job.Resume();
        }
        catch (System.Runtime.InteropServices.COMException ex)
        {
            MessageBox.Show(
                String.Format(
                    Properties.Resources.ErrorBitsException, 
                    ex.HResult, 
                    ex.Message),
                Properties.Resources.ErrorTitle
                );
            job.Cancel();
        }
        // Unless there was an error, the job is now running. We can exit 
        // and it will continue automatically.
        return job; // Return the job that was created
    }

    public void JobTransferred(BITS.IBackgroundCopyJob pJob)
    {
        pJob.Complete();
    }

    public void JobError(BITS.IBackgroundCopyJob pJob, BITS.IBackgroundCopyError pError)
    {
        pJob.Cancel();
    }

    public void JobModification(BITS.IBackgroundCopyJob pJob, uint dwReserved)
    {
        // JobModification has to exist to satisfy the interface. But unless
        // the call to SetNotifyInterface includes the BG_NOTIFY_JOB_MODIFICATION flag,
        // this method won't be called.
    }

You have to resume the job at the start because all jobs start off suspended, and you have to complete the job so that BITS removes it from its internal database of jobs. The full life cycle of a BITS job is explained at https://docs.microsoft.com/en-us/windows/desktop/Bits/life-cycle-of-a-bits-job.

Using BITS from C#

Connecting COM-oriented BITS and .NET

In this sample, the .NET code uses .NET wrappers for the BITS COM interfaces. The wrappers are in the generated BITSReference DLL files. The BITSReference DLL files are created using the MIDL and TLBIMP tools on the BITS IDL (Interface Definition Language) files. The IDL files, MIDL and TLBIMP are all part of the Windows SDK. The steps are fully defined in the BITS documentation at https://docs.microsoft.com/en-us/windows/desktop/Bits/bits-dot-net.

The automatically defined wrapper classes can be recreated at any time so that you can easily make use of the latest updates to the BITS APIs without depending on a third-party wrapper library.

The sample uses several different versions of the BITSReference DLL files. As the numbers increase, more features are available. The 1_5 version is suitable for running on Windows 7 SP1; the 5_0 version is usable in all versions of Windows 10.

If you don’t want to build your own reference DLL file, you can use the ones that were used to build the sample. They are copied over when you install the sample program and will be in the same directory as the sample EXE.

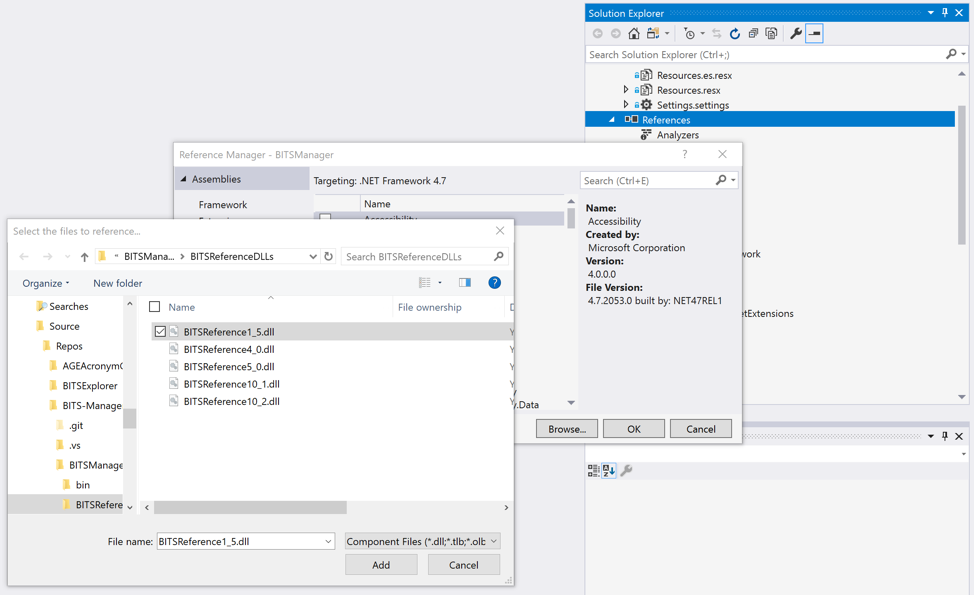
Add the BITSReference DLLs as references

In Visual Studio 2017, in the Solution Explorer:

  1. Right-click References and click “Add Reference …”
  2. In the Reference Manager dialog that pops up, click the “Browse…” button on the bottom-right of the dialog.
  3. In the “Select the files to reference…” file picker that pops up, navigate to the DLL (BITSReference1_5.dll) and click “Add.” The file picker dialog will close.
  4. In the “Reference Manager” dialog box, the DLL should be added to the list of possible references and will be checked. Click OK to add the reference.

Keep adding until you’ve added all the reference DLLs that you’ll be using.

Adding the BITSReference DLLs as references

Add using directives

In your code it’s best to add a set of using directives to your C# file. Once you do this, switching to a new version of BITS becomes much easier. The sample has four different using directives for different versions of BITS. BITS 1.5 is usable even on Windows 7 machines and has many of the basic BITS features, so that’s a good starting point for your code. The BITS What’s New documentation at https://docs.microsoft.com/en-us/windows/desktop/Bits/what-s-new contains a list of the changes to BITS. In the BITS Manager sample program, BITS4 is used for the HTTP options, BITS5 is used for job options like Dynamic and cost flags, and BITS10_2 is used for the custom HTTP verb setting.


// Set up the BITS namespaces
using BITS = BITSReference1_5;
using BITS4 = BITSReference4_0;
using BITS5 = BITSReference5_0;
using BITS10_2 = BITSReference10_2;

Make a BITS IBackgroundCopyManager

The BITS IBackgroundCopyManager interface is the universal entry point into all the BITS classes like the BITS jobs and files. In the sample BITS Manager program, a single _mgr object is created when the main window loads in MainWindow.xaml.cs.


    _mgr = new BITS.BackgroundCopyManager1_5();

The _mgr object type is an IBackgroundCopyManager interface; that interface is implemented by the BackgroundCopyManager1_5 class. Each of the different BITS reference DLL versions have classes whose name includes a version number. For example, the BITS 10.2 reference DLL calls the class BackgroundCopyManager10_2. Only the class names are changed; the interface names are the same.

Create a job and add a file to a job

Create a new BITS job using the IBackgroundCopyManager interface and the CreateJob() method. The CreateJob() method takes in a string of the job name (it doesn’t have to be unique) and returns a filled-in BITS Job GUID as the unique identifier and a filled in IBackgroundCopyJob object. All versions of the manager will make the original BITS 1.0 version of the job. If you need a new version of the job object, see the section on “Using newer BITS features” (hint: it’s just a cast).

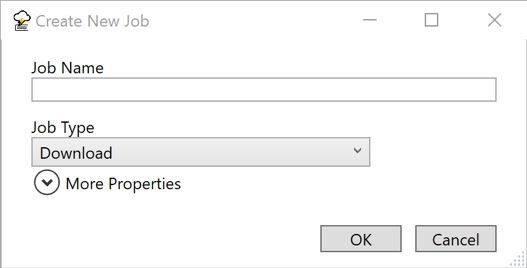
Create a new job screen.

In the sample code, jobs are created in the MainWindow.xaml.cs file in the OnMenuCreateNewJob() method (it’s called when you use the New Job menu entry) and in the QuickFileDownloadWindow.xaml.cs file. Since we’ve already seen the quick file download code earlier, here’s the code that’s called when you use the “New Job” menu:


BITS.GUID jobId;
    BITS.IBackgroundCopyJob job;
    _mgr.CreateJob(jobName, jobType, out jobId, out job);
    try
    {
        dlg.SetJobProperties(job);
    }
    catch (System.Runtime.InteropServices.COMException ex)
    {
        // No need to cancel; the job will show up in the job list and
        // will be selected. The user should deal with it as they see fit.
        MessageBox.Show(
            String.Format(Properties.Resources.ErrorBitsException, 
                ex.HResult, 
                ex.Message),
            Properties.Resources.ErrorTitle
            );
    }

    RefreshJobList();

In the code, the dlg variable is a CreateNewJobWindow dialog that pops up a window that lets you enter in the job name and job properties. Once a job is created (with _mgr.CreateJob), the dialog has a SetJobProperties method to fill in the job property values. You must specify in the code that jobId and job are both out parameters.

Jobs are always created without any files and in a suspended state.

BITS jobs are always on a per-account basis; this means that when a single user has several programs that all use BITS, all of the jobs from all of the programs will be displayed. If you need to write a program that makes some BITS jobs and sometime later modifies them (for example, to complete them), you should keep track of the job GUID values.

To add a file to a job, call Job.AddFile(remoteUri, localFile) where the remoteUri is a string with the remote filename, and the localFile is a string with the local file. To start a transfer, call job.Resume(). BITS will then decide when it’s appropriate to start the job.

Enumerating Jobs and Files

The BITS interfaces to enumerate (list) jobs and files can be tricky the first time you use them. The key is that you first make an enumerator object and then you keep calling Next() on it until you don’t get a job or file out. The example makes an enumerator for just the user’s BITS jobs; the complete code is below. The _mgr object is an instance of the IBackgroundCopyManager interface.


    BITS.IEnumBackgroundCopyJobs jobsEnum = null;
    uint njobFetched = 0;
    BITS.IBackgroundCopyJob job = null;

    _mgr.EnumJobs(0, out jobsEnum); // The 0 means get just the user’s jobs
    do
    {
        jobsEnum.Next(1, out job, ref njobFetched);
        if (njobFetched > 0)
        {
            // Do something with the job
        }
    }
    while (njobFetched > 0);

Listing files is very similar but uses a job’s EnumFiles() to get the enumerator. The EnumFiles() method just takes in the IBackgroundCopyFile object; there aren’t any additional settings.

Be notified when a job is modified or completed

BITS has several ways to let you know when a job is modified or complete. The easiest notification mechanism is to call Job.SetNotifyInterface(IBackgroundCopyCallback callback). The callback object needs to implement the IBackgroundCopyCallback interface; that interface has three methods that you will need to implement.

You must first declare that your class implements the callback:


    public partial class QuickFileDownloadWindow : Window, BITS.IBackgroundCopyCallback 

After you make the job, call SetNotifyFlags and SetNotifyInterface:


job.SetNotifyFlags(
        (UInt32)BitsNotifyFlags.JOB_TRANSFERRED
        + (UInt32)BitsNotifyFlags.JOB_ERROR);
   job.SetNotifyInterface(this); 
// Will call JobTransferred, JobError, JobModification based on the notify flags

You will also need to implement the callback. The JobTransferred and JobError callbacks are set up to call the job.Complete and job.Cancel methods to move the job into a final state.


    public void JobTransferred(BITS.IBackgroundCopyJob pJob)
    {
        pJob.Complete();
    }

    public void JobError(BITS.IBackgroundCopyJob pJob, BITS.IBackgroundCopyError pError)
    {
        pJob.Cancel();
    }

    public void JobModification(BITS.IBackgroundCopyJob pJob, uint dwReserved)
    {
        // JobModification has to exist to satisfy the interface. But unless
        // the call to SetNotifyInterface includes the BG_NOTIFY_JOB_MODIFICATION flag,
        // this method won't be called.
    }

In the sample code, the QuickFileDownloadWindow.xaml.cs file demonstrates how to use the IBackgroundCopyCallback interface. The UI of the sample code is updated by the main polling loop but could have been updated by the callbacks.

You can also register a command line for BITS to execute when the file is transferred. This lets you re-run your program after the transfer is complete. See the BITS IBackgroundCopyJob2::SetNotifyCmdLine() method for more information.

Use a downloaded file

Once you’ve got a file downloaded, the next thing you’ll want to do is use it. The IBackgroundCopyFile’s GetLocalName(string) method is how you get the path of the downloaded file. Before you can use it, the job must be in the ACKNOWLEDGED final state. If the job is in the CANCELLED final state, the result file won’t exist. Alternately, if you set the job as a high performance job (using the IBackgroundCopyJob5.SetProperty() method), the file will be available while it’s being downloaded, or you can access the temporary file by looking at the result from a call to the file’s GetTemporaryName() method. In all cases, if BITS isn’t done with the file, you must open it with a file share Write flag.

In the sample code, the FileDetailViewControl.xaml.cs OnOpenFile() method gets the local name of the file and then uses the .NET System.Diagnostics.Process.Start() method to have the operating system open the file with the appropriate program.


    string Filename;
    _file.GetLocalName(out Filename);
    try
    {
        System.Diagnostics.Process.Start(Filename);
    }
    catch (System.ComponentModel.Win32Exception ex)
    {
        MessageBox.Show(String.Format(Properties.Resources.ErrorMessage, ex.Message),
            Properties.Resources.ErrorTitle);
    }

Using newer BITS features

You’ll find that you often have a BITS 1.0 version of an object and need a more recent one to use more recent BITS features.

For example, when you make a job object with the IBackgroundCopyManager.CreateJob() method, the resulting job is always a version 1.0 job. To make a newer version, use a .NET cast to convert from an older type object to a newer type object. The cast will automatically call a COM QueryInterface as appropriate.

In this example, there’s a BITS IBackgroundCopyJob object named “job”, and we want to convert it to an IBackgroundCopyJob5 object named “job5” so that we can call the BITS 5.0 GetProperty method. We just cast to the IBackgroundCopyJob5 type like this:


var job5 = job as BITS5.IBackgroundCopyJob5;

The job5 variable will be initialized by .NET by using the correct QueryInterface. It’s important to note that .NET doesn’t know about the real relationship between the BITS interfaces. If you ask for the wrong kind of interface, .NET will try to make it for you and fail, and set job5 to null.

Try it out yourself today!

There are plenty more features of BITS for you to use. Complete details are in the docs.microsoft.com documentation. The BITS Manager sample is available as a downloadable executable in the releases link on GitHub. The complete source code is also available including the BITSReferenceDLL files that it uses. Help for using the BITS Manager and to explain the source code organization is in the BITS-Manager GitHub Wiki.

If you prefer coding in C or C++, the documentation will point you to the existing samples.

Good luck, and happy Background File Transfers!

The post Using Background Intelligent Transfer Service (BITS) from .NET appeared first on Windows Developer Blog.
Van Arsdel Sample App Released!

$
0
0

We’re excited to announce the public release of our feature showcase sample app, Van Arsdel!

The Van Arsdel, Ltd. end-to-end UWP sample app makes extensive use of the improved density and new controls in the Windows UI Library as well as powerful underlying features of the UX framework and composition.

This complete sample demonstrates the features in the 1809 SDK and is built on top of WinUI 2.0, giving you a full immersive example of how to build a rich, productive experience (in this case, selling lamps).

The app is available on the Microsoft Store and its source can be downloaded on GitHub.

Spotlight Features

Van Arsdel uses many new and exciting features that were launched in the latest release, some of which include controls that were requested from our community.

Horizontal Navigation View

Example of Horizontal Navigation View.

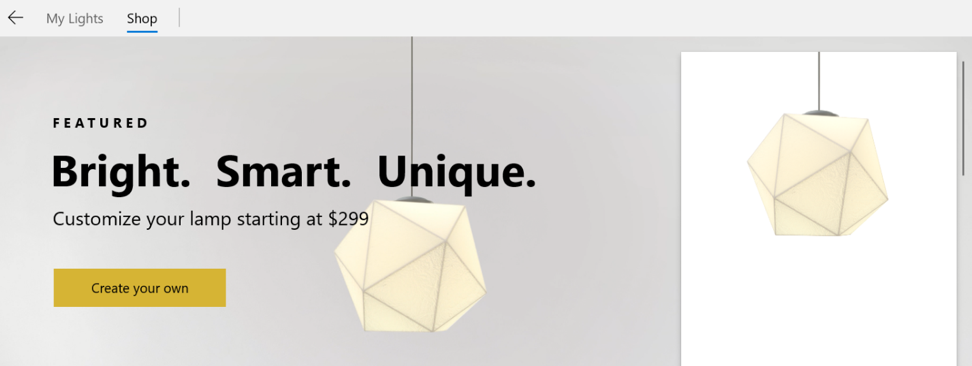
The sample app sports a sleek horizontal NavigationView with an in-line back button and Pivot-like visuals while maintaining a compact and CommandBar-like feel.

This particular NavigationView has also been modified to add “tabs” of new lamps when you click “Create your own” on the shop page:

Addition of tabs to NavigationView.

If you’re curious about how to develop a similar experience for your app, please check out the GitHub for the source on how we did this!

Compact UI Density

Example of Compact UI density.

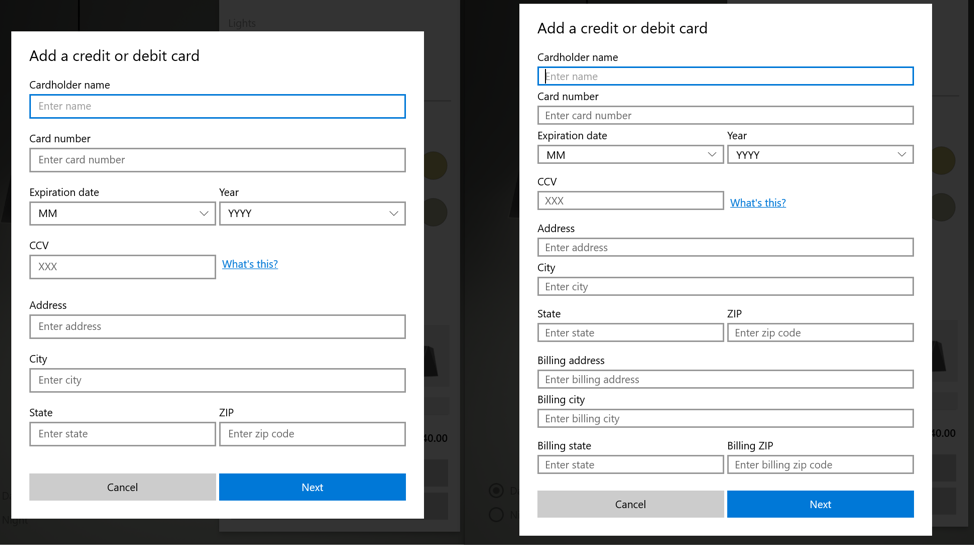
XAML has also become more compact in the latest release! Van Arsdel sports two, more compact versions of our controls.

One version is our new standard sizing and the other is our new Compact Density sizing. Both can be viewed on the “Create your own” lamp page when you click the “Buy” button. Shift-clicking that same button will reveal the Compact Density mode (seen above on the right).

Command Bar Flyout

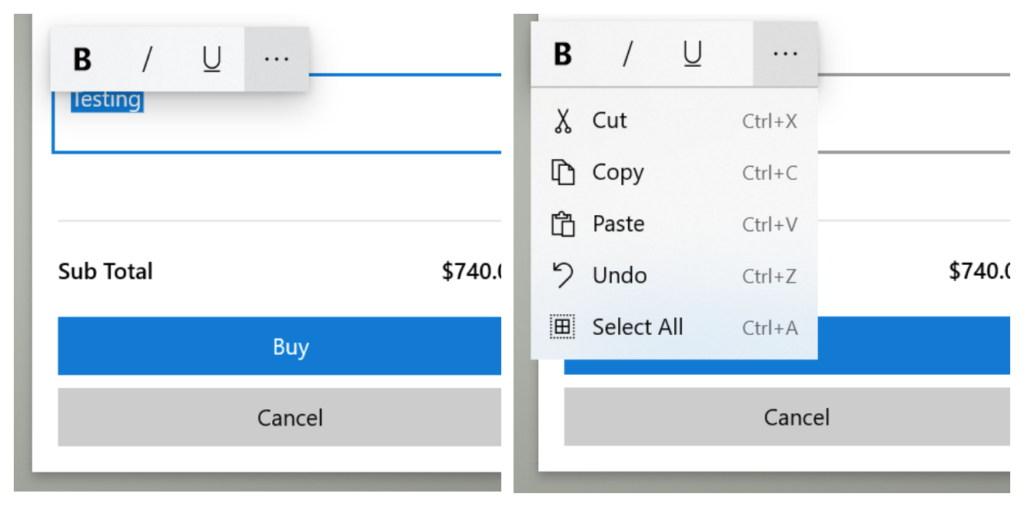
Example of Command Bar Flyout.

Controls can now be much more robust with the ability to display a new control called CommandBarFlyout! This control works very similarly to our standard CommandBar control – even taking AppBarButtons within it! – but this new control also allows for MenuFlyoutItems to be placed in the overflow menu; in this case, enabling a more complete text input experience.

Learn More

To learn more about these exciting new controls, be sure to check out our design guidance site.

The post Van Arsdel Sample App Released! appeared first on Windows Developer Blog.


Top Stories from the Microsoft DevOps Community – 2019.01.18

$
0
0

Lots of big news coming from the Azure DevOps team this week: we’ve announced a bounty for security researchers and announced a partnership with Service Now. But there’s also some great reading coming from the Azure DevOps community – here’s some of the nice articles that I found this week:

DTAP is dead
Wouter de Kort argues that the traditional deployment flow from Development to Test to Acceptance environment to Production (DTAP) is too restrictive, and doesn’t always make sense in a modern DevOps pipeline.

Azure Cost Insights Widget (Video)
Want to see your Azure spending right from your Azure DevOps dashboard? There’s a widget for that. Kees Schollaart put together this video to introduce the Azure Cost Insights widget.

The dev.azure.com URL
If you’ve been using Azure DevOps since before it was Azure DevOps, you might still have “visualstudio.com” in your URLs. Want the shiny new “dev.azure.com” URLs? Matteo Emili shows you how to get them.

Creating a Windows Container Build Agent for Azure Pipelines
Sure we provide build agents for you, hosted in Azure, but you can also run your own. If you want to, be sure to automate that configuration; Jakob Ehn shows you how to build a container with your build agent inside.

Azure DevOps: What is?
If you’re just getting started with Azure DevOps, or if you’re only using one product like Azure Pipelines, you might not know all the different features. Samuel Luciano has a quick introduction to Azure DevOps and all it has to offer.

As always, if you’ve written an article about Azure DevOps or find some great content about DevOps on Azure then let me know! I’m @ethomson on Twitter.

Remote debugging with VS Code on Windows to a Raspberry Pi using .NET Core on ARM

$
0
0

I've been playing with my new "CrowPi" from Elecrow. It's a great Raspberrry Pi STEM kit that is entirely self-contained in a small case. It includes a touch screen and a TON of sensors, LCDs, matrix display, sensors, buzzers, breadboard, etc.

NOTE: I talked to the #CrowPi people and they gave me an Amazon COUPON that's ~$70 off! The coupon is 8EMCVI56 and will work until Jan 31, add it during checkout. The Advanced Kit is at https://amzn.to/2SVtXl2 #ref and includes everything, touchscreen, keyboard, mouse, power, SNES controllers, motors, etc. I will be doing a full review soon. Short review is, it's amazing.

I was checking out daily builds of the new open source .NET Core System.Device.Gpio that lets me use C# to talk to the General Purpose Input/Output pins (GPIO) on the Raspberry Pi. However, my "developer's inner loop" was somewhat manual. The developer's inner loop is that "write code, run code, change code" loop that we all do. If you find yourself typing repetitive commands that deploy or test your code but don't write new code, you'll want to try to optimize that inner loop and get it down to one keystroke (or zero in the case of automatic test).

Rasbperry Pi Debugging with VS CodeIn my example, I was writing my code in Visual Studio Code on my Windows machine, building the code locally, then running a "publish.bat" that would scp (secure copy) the resulting binaries over to the Raspberry Pi. Then in another command prompt that was ssh'ed into the Pi, I would chmod the resulting binary and run it. This was tedious and annoying, however as programmers sometimes we stop noticing it and just put up with the repetitive motion.

A good (kind of a joke, but not really) programmer rule of thumb is - if you do something twice, automate it.

I wanted to be able not only to make the deployment automatic, but also ideally I'd be able to interactively debug my C#/.NET Core code remotely. That means I'm writing C# in Visual Studio Code on my Windows machine, I hit "F5" to start a debug session and my app is compiled, published, run, and I attached to a remote debugger running on the Raspberry Pi, AND I'm dropped into a debugging session with a breakpoint set. All with one keystroke. This is common practice with local apps, but for remote apps - and ones that span two CPU architectures - it can take a smidge of setup.

Starting with instructions here: https://github.com/OmniSharp/omnisharp-vscode/wiki/Attaching-to-remote-processes and here: https://github.com/OmniSharp/omnisharp-vscode/wiki/Remote-Debugging-On-Linux-Arm and a little help from Jose Perez Rodriguez at work, here's what I came up with.

Setting up Remote Debugging from Visual Code on Windows to a Raspberry Pi running C# and .NET Core

First, I'm assuming you've got .NET Core on both your Windows machine and Raspberry Pi. You've also installed Visual Studio Code on you Windows machine and you've installed the C# extension.

On the Raspberry Pi

I'm ssh'ing into my Pi from Windows 10. Windows 10 includes ssh out of the box now, but you can also ssh from WSL (Windows Subsystem for Linux).

  1. Install the VS remote debugger on your Pi by running this command:
    curl -sSL https://aka.ms/getvsdbgsh | /bin/sh /dev/stdin -v latest -l ~/vsdbg
  2. ​To debug you will need to run the program as root, so we'll need to be able to remote launch the program as root as well. For this, we need to first set a password for the root user in your pi, which you can do by running:
    sudo passwd root
  3. Then we need to enable ssh connections using root, by running :
    sudo nano /etc/ssh/sshd_config        
    and adding a line that reads:
    PermitRootLogin yes
  4. reboot the pi: sudo reboot

VSDbg looks like this getting installed:

pi@crowpi:~/Desktop/rpitest$ curl -sSL https://aka.ms/getvsdbgsh | /bin/sh /dev/stdin -v latest -l ~/vsdbg

Info: Creating install directory
Using arguments
Version : 'latest'
Location : '/home/pi/vsdbg'
SkipDownloads : 'false'
LaunchVsDbgAfter : 'false'
RemoveExistingOnUpgrade : 'false'
Info: Using vsdbg version '16.0.11220.2'
Info: Previous installation at '/home/pi/vsdbg' not found
Info: Using Runtime ID 'linux-arm'
Downloading https://vsdebugger.azureedge.net/vsdbg-16-0-11220-2/vsdbg-linux-arm.zip
Info: Successfully installed vsdbg at '/home/pi/vsdbg'

At this point I've got vsdbg installed. You can go read about the MI Debug Engine here. "The Visual Studio MI Debug Engine ("MIEngine") provides an open-source Visual Studio Debugger extension that works with MI-enabled debuggers such as gdb, lldb, and clrdbg."

On the Windows Machine

Note that there are a half dozen ways to do this. Since I had a publish.bat already that looked like this, after installing putty with "choco install putty" on my Windows machine. I'm a big fan of pushd and popd and I'll tell you this, they aren't used or known enough.

dotnet publish -r linux-arm /p:ShowLinkerSizeComparison=true 

pushd .binDebugnetcoreapp2.1linux-armpublish
pscp -pw raspberry -v -r .* pi@crowpi.lan:/home/pi/Desktop/rpitest
popd

On Windows, I want to add two things to my .vscode folder. I'll need a launch.json that has my "Launch target" and I'll need some tasks in my tasks.json to support that. I added the "publish" task myself. My publish task calls out to publish.bat. It could also do the stuff above if I wanted. Note that I made publish "dependsOn" build, and I removed/cleared problemMatcher. If you wanted, you could write a regEx that would detect if the publish failed.

{

"version": "2.0.0",
"tasks": [
{
"label": "build",
"command": "dotnet",
"type": "process",
"args": [
"build",
"${workspaceFolder}/rpitest.csproj"
],
"problemMatcher": "$msCompile"
},
{
"label": "publish",
"type": "shell",
"dependsOn": "build",
"presentation": {
"reveal": "always",
"panel": "new"
},
"options": {
"cwd": "${workspaceFolder}"
},
"windows": {
"command": "${cwd}\publish.bat"
},
"problemMatcher": []
}
]
}

Then in my launch.json, I have this to launch the remote console. This can be a little confusing because it's mixing paths that are local to Windows with paths that are local to the Raspberry Pi. For example, pipeProgram is using the Chocolatey installation of Putty's Plink. But program and args and cwd are all remote (or local to) the Raspberry Pi.

"configurations": [

{
"name": ".NET Core Launch (remote console)",
"type": "coreclr",
"request": "launch",
"preLaunchTask": "build",
"program": "/home/pi/dotnet/dotnet",
"args": ["/home/pi/Desktop/rpitest/rpitest.dll"],
"cwd": "/home/pi/Desktop/rpitest",
"stopAtEntry": false,
"console": "internalConsole",
"pipeTransport": {
"pipeCwd": "${workspaceFolder}",
"pipeProgram": "${env:ChocolateyInstall}\bin\PLINK.EXE",
"pipeArgs": [
"-pw",
"raspberry",
"root@crowpi.lan"
],
"debuggerPath": "/home/pi/vsdbg/vsdbg"
}
}

Note the debugger path lines up with the location above that we installed vsdbg.

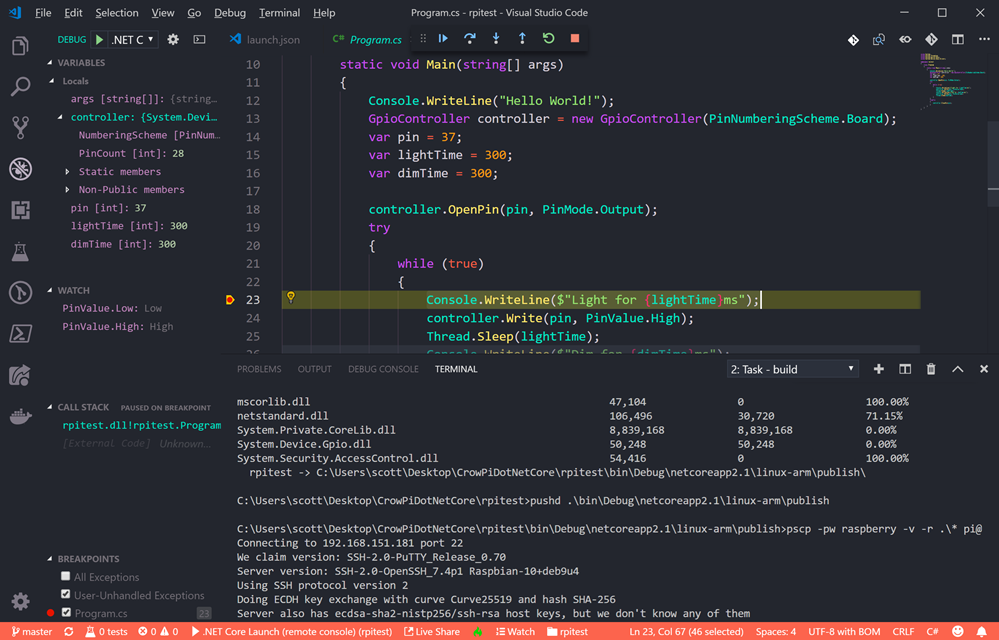
Remote debugging with VS Code on Windows to a Raspberry Pi using .NET Core

It's worth pointing out that while I'm doing this for C# it's not C# specific. You could setup remote debugging with VS Code using these building blocks with any environment.

The result here is that my developer's inner loop is now just pressing F5! What improvements would YOU make?


Sponsor: Preview the latest JetBrains Rider with its Assembly Explorer, Git Submodules, SQL language injections, integrated performance profiler and more advanced Unity support.


© 2018 Scott Hanselman. All rights reserved.
     

Azure Cognitive Services adds important certifications, greater availability, and new unified key

$
0
0

One of the most important considerations when choosing an AI service is security and regulatory compliance. Can you trust that the AI is being processed with the high standards and safeguards that you come to expect with hardened, durable software systems?

Cognitive Services today includes 14 generally available products. Below is an overview of current certifications in support of greater security and regulatory compliance for your business.

Added industry certifications and compliance

Significant progress has been made in meeting major security standards. In the past six months, Cognitive Services added 31 certifications across services and will continue to add more in 2019. With these certifications, hundreds of healthcare, manufacturing, and financial use cases are now supported. 

The following certifications have been added:

  • ISO 20000-1:2011, ISO 27001:2013, ISO 27017:2015, ISO 27018:2014, and ISO 9001:2015 certification
  • HIPAA BAA
  • HITRUST CSF certification
  • SOC 1 Type 2, SOC 2 Type 2, and SOC 3 attestation
  • PCI DSS Level 1 attestation

For additional details on industry certifications and compliance for Cognitive Services, visit the Overview of Microsoft Azure Compliance page.

Enhanced data storage commitments

Cognitive Services now offers more assurances for where customer data is stored at rest. These assurances have been enabled by graduating several Cognitive Services to Microsoft Azure Core Services. The first services to make Azure Core Service commitments (effective January 1, 2019) are Content Moderator, Computer Vision, Face, Text Analytics, and QnA Maker.

For your reference, you can learn more about Microsoft Azure Core Services through the Online Services Terms (OST).

Greater regional availability

Additionally, more customers around the world can now take advantage of these intelligence services that are closer to their data. The global footprint for Cognitive Services has expanded over the past several months — going from 15 to 25 Azure data center regions.

For further reference, visit the Azure product availability page for the complete list where Cognitive Services are now available.

Simplified experience with a unified API key

When building large AI systems, many use cases require multiple Cognitive Services and as such, there are efficiencies in adding more services using a single key. Recently, we launched a new bundle of multiple services, enabling the use of a single API key for most of our generally available services: Computer Vision, Content Moderator, Face, Text Analytics, Language Understanding, and Translator Text. Now developers can provision all these services in 21 Azure regions around the world1. More regions and APIs will be added to this unified service throughout 2019.

Get started today by creating a Cognitive Service resource in the Azure portal. To learn more, watch the latest “This Week in Cognitive,” video on using the unified key.

If you haven’t yet started using Cognitive Services for your business, you can try it for free. Visit the Cognitive Services page to learn more.

1 Note: When a unified key resource is provisioned, the services that are regional will be provisioned in the selected region. Services that are non-regional will still be provisioned globally even though they can now be accessed using the unified key and API endpoint.

Azure.Source – Volume 66

$
0
0

Now in preview

Azure Monitor logs in Grafana - now in public preview

Grafana offers great dashboarding capabilities, rich visualizations, and integrations with over 40 data sources. Grafana integration is now available in preview for Microsoft Azure Monitor logs. This integration is achieved through the new Log Analytics plugin, now available as part of the Azure Monitor data source. If you’re already using Grafana for your dashboards, this new plugin can help you create a single pane of glass for your various monitoring needs. The new plugin enables you to display any data available in Log Analytics, such as logs related to virtual machine performance, security, Azure Active Directory which has recently integrated with Log Analytics, and many other log types including custom logs.

HDInsight now supported in Azure CLI as a public preview

Support for HDInsight in Microsoft Azure CLI is now available in public preview. With the addition of the new HDInsight command group, you can now utilize all of the features and benefits that come with the familiar cross-platform Azure CLI to manage your HDInsight clusters.With the addition of the new HDInsight command group, you can now utilize all of the features and benefits that come with the familiar cross-platform Azure CLI to manage your HDInsight clusters. Azure HDInsight is an easy, cost-effective, enterprise-grade service for open source analytics that enables customers to easily run popular open source frameworks including Apache Hadoop, Spark, Kafka, and others.

Also in preview

Now generally available

News and updates

Microsoft Azure portal January 2019 update

This month we’re bringing you updates that improve the ease of navigation of the landing page, add to dashboard tile features, and increase functionality in Azure Container Instances. The new Azure portal home page is a quick and easy entry point into Azure, and includes a link to Azure.Source to help you keep current with what’s new in Azure. With the Azure portal, you can test features in preview by visiting preview.portal.azure.com.

Screenshot of the new Azure portal home page


AI is the new normal: Recap of 2018

Get a recap of the top 10 Azure AI highlights from 2018, across AI Services, tools and frameworks, and infrastructure at a glance. AI catalyzes digital transformation. Microsoft believes in making AI accessible so that developers, data scientists and enterprises can build systems that augment human ingenuity to tackle meaningful challenges. AI is the new normal. Microsoft has more than 20 years of AI research applied to our products and services. Everyone can now access this AI through simple, yet powerful productivity tools such as Excel and Power BI. In continual support of bringing AI to all, Microsoft introduced new AI capabilities for Power BI. These features enable all Power BI users to discover hidden, actionable insights in their data and drive better business outcomes with easy-to-use AI.

Our 2019 Resolution: Help you transform your 2008 server applications with Azure!

At Microsoft, with the end of support for 2008 servers looming, we’ve been thinking about how we can help you with your server refresh journey. we believe that the 3 reasons why Azure is the best place to transform your 2008 server applications are: security, innovation, and cost savings. The end of support for SQL Server 2008/R2 is now less than six months away on July 9th, 2019 and support ends for Windows Server 2008/R2 on January 14th, 2020. Windows 7, Office 2010 and Exchange Server are also ending their extended support soon. Microsoft and our partners are here to help you in every step of the way.

Microsoft Azure obtains Korea-Information Security Management System (K-ISMS) certification

Microsoft helps organizations all over the world comply with national, regional, and industry-specific regulatory requirements. The K-ISMS certification was introduced by the Korea Internet and Security Agency (KISA) and is designed to ensure the security and privacy of data in the region through a stringent set of control requirements. Achieving this certification means Azure customers in South Korea can more easily demonstrate adherence to local legal requirements for protection of key digital information assets and meet KISA compliance standards more easily. KISA established the K-ISMS to safeguard the information technology infrastructure within Korea. This helps organizations implement and operate information security management systems that facilitate effective risk management and enable them to apply best practice security measures.

Additional news and updates

Technical content

Azure Backup for virtual machines behind an Azure Firewall

Learn more about the Azure Backup for SQL Server on Azure backup capability, which was made available in June, 2018 in public preview. This workload backup capability is built as an infrastructure-less, Pay as You Go (PAYG) service that leverages native SQL backup and restore APIs to provide a comprehensive solution to backup SQL servers running in Azure IaaS VMs. Azure Backup protects the data in your VMs by safely storing it in your Recovery Services Vault. Backup of SQL Servers running inside an Azure VM requires the backup extension to communicate with the Azure Backup service in order to upload backup and emit monitoring information. Azure Backup and Azure Firewall complement each other well to provide a complete protection to your resources and data in Azure.

Screenshot of editing an application rule collection in Azure Backup

Create alerts to proactively monitor your data factory pipelines

Organizations want to reduce the risk of data integration activity failures and the impact it cause to other downstream processes. Manual approaches to monitoring data integration projects are inefficient and time consuming. As a result, organizations want to have automated processes to monitor and manage data integration projects to remove inefficiencies and catch issues before they affect the entire system. Organizations can now improve operational productivity by creating alerts on data integration events (success/failure) and proactively monitor with Azure Data Factory. Creating alerts will ensure 24/7 monitoring of your data integration projects and make sure that you are notified of issues before they potentially corrupt your data or affect downstream processes. This helps your organizations to be more agile and increase confidence in your overall data integration processes. Learn more in this episode of Azure Friday, Monitor your Azure Data Factory pipelines proactively with alerts:

Azure IoT automatic device management helps deploying firmware updates at scale

Automatic device management in Azure IoT Hub automates many of the repetitive and complex tasks of managing large device fleets over the entirety of their lifecycles. The Azure IoT DevKit over-the-air (OTA) firmware update project is a great implementation of automatic device management. With automatic device management, you can target a set of devices based on their properties, define a desired configuration, and let IoT Hub update devices whenever they come into scope. This post highlights some of the ways you can kickstart your own implementation of the firmware update use case.

Pix2Story: Neural storyteller which creates machine-generated story in several literature genre

As one of Microsoft’s AI Lab projects, Pix2Story is a neural-storyteller web application on Azure that enables you to upload a picture and get a machine-generated story based on several literature genres. The idea is to obtain the captions from the uploaded picture and feed them to the Recurrent Neural Network model to generate the narrative based on the genre and the picture. Source code is available in GitHub so that you can train your own model.

Azure Data Explorer plugin for Grafana dashboards

Grafana is a leading open source software designed for visualizing time series analytics. It is an analytics and metrics platform that enables you to query and visualize data and create and share dashboards based on those visualizations. Combining Grafana’s beautiful visualizations with Azure Data Explorer’s snappy ad hoc queries over massive amounts of data, creates impressive usage potential. This post depicts the benefits of using Grafana for building dashboards on top of your Azure Data Explorer datasets. The Grafana and Azure Data Explorer teams have created a dedicated plugin which enables you to connect to and visualize data from Azure Data Explorer using its intuitive and powerful Kusto Query Language. Additional connectors and plugins to analytics tools and services will be added in the weeks to come.

Additional technical content

Azure shows

The Azure Podcast | Episode 262 - Operationalizing Cosmos DB

John Kozell, a Principal Consultant at Microsoft and an expert in all things Azure Cosmos DB, especially when it comes to the Enterprise world. He gives us some unique perspectives on what Enterprises should do in order to make effective use of Azure Cosmos DB to and also meet their compliance and operational goals.

Block Talk | Azure Blockchain Workbench 1.6 Highlights

In this episode, we dive into some of the new features available in Workbench 1.6, such as application versioning and troubleshooting.

Internet of Things Show | Build workflows with Azure IoT Central connector for Microsoft Flow

Learn about how to send a message to your Microsoft Teams channel when a rule is fired in your IoT Central app using Microsoft Flow. We'll cover what is Microsoft Flow, and go through how to build workflows easily using the hundreds of connectors available.

AI Show | Using Cognitive Services in Containers

In this video we will talk about our new capability that allows developers to deploy some of our cognitive services as containers. Get ready for the intelligent edge. Process data in the cloud or on device at the edge, the choice is yours.

The Open Source Show | Intro to Service Meshes: Data Planes, Control Planes, and More

Armon Dadgar (@armon), HashiCorp CTO and co-founder joins Aaron Schlesinger (@arschles) to school him on all things service meshes. You'll understand what a service mesh actually does, when and why it makes sense to use them, the role of observability, and the differences between data planes and control planes (and what's relevant to app developers). Armon makes concepts real with specific examples and analogies, Aaron sees how to easily apply it to his favorite project (Kubernetes, of course) and they sign off with their favorite resources, so you can apply to your apps.

Azure Friday | Using HashiCorp Consul to connect Kubernetes clusters on Azure

HashiCorp Consul is a distributed service mesh to connect, secure, and configure services across any runtime platform and public or private cloud. In this episode, Scott Hanselman is joined by HashiCorp's Geoffrey Grossenbach who uses Helm to install a Consul server to Azure Kubernetes Service (AKS) cluster. Next, he deploys and secures a pair of microservices with Consul.

Azure Friday | Run Azure Functions from Azure Data Factory pipelines

Azure Functions is a serverless compute service that enables you to run code on-demand without having to explicitly provision or manage infrastructure. Using Azure Functions, you can run a script or piece of code in response to a variety of events. Azure Data Factory (ADF) is a managed data integration service in Azure that enables you to iteratively build, orchestrate, and monitor your Extract Transform Load (ETL) workflows. Azure Functions is now integrated with ADF, enabling you to run an Azure function as a step in your data factory pipelines.

This Week On Channel 9 | TWC9: Alexa Azure DevOps Skills, Hacking Your Career, ML.NET 0.9, 6502 Assembly in VS Code, and more

This week on Channel 9, Christina Warren is reliving the days of Tom from MySpace, while also breaking down the latest developer news.

The Xamarin Show | Azure Blockchain Development Kit for Mobile Apps

This week, James is joined by friend of the show Marc Mercuri, Program Manager on the Azure Blockchain Development Kit Team, who introduces us to the world of blockchain. He shows us a full end to end scenario of why and how you would use blockchain in applications. He then walks us through the new Azure Blockchain Development Kit that simplifies development using blockchain for web and mobile with some fantastic Xamarin mobile apps.

Azure Tips and Tricks | How to deploy Azure Logic Apps through Visual Studio 2017

Learn how to deploy Azure Logic Apps from Visual Studio 2017 with just a few clicks. Once you've downloaded the Visual Studio extension, you can easily deploy your logic apps straight into the cloud.

Thumbnail from Azure Tips and Tricks video on How to deploy Azure Logic Appsthrough Visual Studio 2017 from YouTube

The Azure DevOps Podcast | Greg Leonardo on Architecting, Developing, and Deploying the Azure Way - Episode 019

In today’s episode, Greg Leonardo, a Cloud Architect at Campus Management Corp. and Webonology, and Jeffrey Palermo discuss the components of Greg’s new book and dive deep into topics such as; architecture, app service environments, web apps, web jobs, Windows Containers, and more.

Events

Cloud Commercial Communities webinar and podcast newsletter - January 2019

Each month, the Cloud Commercial Communities hosts webinars and podcasts that cover core programs, updates, trends, and technologies that Microsoft partners and customers need to know so that they can increase success in using Microsoft Azure and Dynamics. Check out this post for information and links to three live webinars and several podcasts that are available this month, as well as recaps on webinars and podcasts from last month.

Azure Site Recovery team is hosting an Ask Me Anything session

The Azure Site Recovery (ASR) team will host a special Ask Me Anything (AMA) session on Twitter, Tuesday, January 22, 2019 from 8:30 AM to 10:00 AM Pacific Standard Time. You can tweet to @AzSiteRecovery or @AzureSupport with #ASR_AMA. With an AMA, you’ll get answers directly from the team and have a conversation with the people who build these products and services.

Microsoft Ignite | The Tour

Learn new ways to code, optimize your cloud infrastructure, and modernize your organization with deep technical training. Join us at the place where developers and tech professionals continue learning alongside experts. Explore the latest developer tools and cloud technologies and learn how to put your skills to work in new areas. Connect with our community to gain practical insights and best practices on the future of cloud development, data, IT, and business intelligence. Find a city near you and register today. In February, the tour visits London, Sydney, Hong Kong, and Washington, DC.

Customers and partners

Dynamic mission planning for drones with Azure Maps

This post highlights a customer, AirMap, whose software solutions rely on Azure Maps for real-time location intelligence in a new frontier of technology called dynamic mission planning for drones. AirMap is the leading global airspace management platform for drones. AirMap’s Unmanned Traffic Management (UTM) platform enables the deployment and operations of safe, efficient, and advanced drone operations for enterprises and drone solution providers.

Example map of the Los Angeles area overlayed with polygons representing different geographic areas subject to airspace regulations.

Azure Marketplace new offers – Volume 29

The Azure Marketplace is the premier destination for all your software needs – certified and optimized to run on Azure. Find, try, purchase, and provision applications & services from hundreds of leading software providers. You can also connect with Gold and Silver Microsoft Cloud Competency partners to help your adoption of Azure. In the first half of December we published 60 new offers that successfully met the onboarding criteria.


A Cloud Guru's Azure This Week - 18 January 2019

This time on Azure This Week, Lars talks about Azure Data Box Disk which is in general availability, new Azure Migrate and Azure Site Recovery enhancements for cloud migration and multi-modal topic inferencing with Azure Video Indexer.

Thumbnail from A Cloud Guru's Azure This Week - 18 January 2019 on YouTube

Export data in near real-time from Azure IoT Central

$
0
0

We are happy to share that you can now export data to Azure Event Hubs and Azure Service Bus in near real-time from your Azure IoT Central app! Previously, Continuous Data Export enabled exporting your IoT Central measurements, devices, and device templates data to your Azure Blob Storage account once every minute for cold path storage and analytics. Now you can export this data in near real-time to your Azure Event Hubs and Azure Service Bus instances for analytics and monitoring.

For example, an energy company wants to understand and predict trends in energy consumption in different areas over time of day and throughout the week. With electrical equipment connected to IoT Central, they can use Continuous Data Export to export their IoT data to Azure Event Hubs. They run their deployed machine learning models to gain insight over consumption and perform anomaly detection by connecting their Event Hubs to Azure Databricks. They can run highly custom rules for detecting specific outages by sending data from Event Hubs to Azure Stream Analytics. For long term data storage, they can continue to use Continuous Data Export to store all of their device data in Azure Blob Storage.

CDE for blog post

Continuous Data Export in Azure IoT Central

New capabilities

These are the new features and changes to Continuous Data Export in Azure IoT Central:

  • New export destinations include Azure Event Hubs and Azure Service Bus, in addition to Azure Blob Storage.
  • Export to all supported destinations using a valid connection string, including destinations that are in a different subscription than your IoT Central app.
  • Create up to 5 exports per app.
  • Export is available in both Trial apps and Pay-As-You-Go apps.
  • Continuous Data Export has moved! Find it in the left navigation menu.

Get started

For more information about Continuous Data Export and how to set it up, visit the documentation “Export your data in Azure IoT Central.” You can use your existing Blob Storage, Event Hubs, or Service Bus instance, or create a new instance.

Next steps

Use the new features in Continuous Data Export to export data to your own Azure Event Hubs, Azure Service Bus, and Azure Blob Storage instances for custom warm path and cold path processing, and analytics on your IoT data.

  • Have ideas or suggestions for new features? Post it on Uservoice.
  • Have feedback or questions? Don’t hesitate to write us at iotcfeedback@microsoft.com.
  • To explore the full set of features and capabilities start your free trial and learn more on the IoT Central website.
  • Check out our documentation including tutorials to connect your first device.
  • To learn more about the Azure IoT portfolio including the latest news, visit the Microsoft Azure IoT page.

HDInsight Metastore Migration Tool open source release now available

$
0
0

We are excited to share the release of the Microsoft Azure HDInsight Metastore Migration Tool (HMMT), an open-source script that can be used for applying bulk edits to the Hive metastore.

The HDInsight Metastore Migration Tool is a low-latency, no-installation solution for challenges related to data migrations in Azure HDInsight. There are many reasons why a Hive data migration may need to take place. You may need to protect your data by enabling secure transfer on your Azure storage accounts. Perhaps you will be migrating your Hive tables from WASB to Azure Data Lake Storage (ADLS) Gen2 as part of your upgrade from HDInsight 3.6 to 4.0. Or you may have decided to organize the locations of your databases, tables, and user-defined functions (UDF) to follow a cohesive structure. With HMMT, these migration scenarios and many others no longer require manual intervention.

HMMT handles Hive metadata migration scenarios in a quick, safe, and controllable environment. This blog post is divided into three sections. First, the background to HMMT is outlined with respect to the Hive metastore and Hive storage patterns. The second section covers the design of HMMT and describes initial setup steps. Finally, some sample migrations are described and solved with HMMT as a demonstration of its usage and value.

Background

The Hive metastore

The Hive metastore is a SQL database for Hive metadata such as table, database, and user defined function storage locations. The Hive metastore is provisioned automatically when an HDInsight cluster is created. Alternatively, an existing SQL database may be used to persist metadata across multiple clusters. The existing SQL database is then referred to as an external metastore. HMMT is intended to be used against external metastores to persist metadata migrations over time and across multiple clusters.

Hive storage uniform resource identifiers

Hive storage URIs sample

For each Hive table, database, or UDF available to the cluster, the Hive metastore keeps a record of that artifact’s location in external storage. Artifact locations are persisted in a Windows Azure Storage Blob or in Azure Data Lake Storage. Each location is represented as an Azure storage uniform resource identifier (URI), which describes the account-type, account, container, and subcontainer path that the artifact lives in. The above diagram describes the schema used to represent Hive table URIs. The same schema pattern applies to Hive databases and UDFs. 

Suppose a Hive query is executed against table1. Hive will first attempt to read the table contents from the corresponding storage entry found in the Hive metastore. Hive supports commands for displaying and updating a table’s storage location:

Example command for displaying and updating a table’s storage location

Changing the storage location of a table requires the execution of an update command corresponding to the table of interest. If multiple table locations are to be changed, multiple update commands must be executed. Since storage locations must be updated manually, wholesale changes to the metastore can be an error-prone and time-consuming task. The location update story concerning non-table artifacts is even less favorable - the location of a database or UDF cannot be changed from within Hive. Therefore, the motivation behind releasing HMMT to the public is to provide a pain-free way to update the storage location of Hive artifacts. HMMT directly alters the Hive metastore, which is the fastest (and only) way to make changes to Hive artifacts at scale.

How HMMT works

HMMT generates a series of SQL commands that will directly update the Hive metastore based on the input parameters. Only storage URIs that match the input parameters will be affected by the script. The tool can alter any combination of Hive storage accounts, account-types, containers, and subcontainer paths. Note that HMMT is exclusively supported on HDInsight 3.6 and onwards.

Start using HMMT right away by downloading it directly from the Microsoft HDInsight GitHub page. HMMT requires no installation. Make sure the script itself is run from an IP address that is whitelisted to the Hive metastore SQL Server. HMMT can be run from any UNIX command-line that has one of the supported query clients installed. The script does not necessarily need to be run from within the HDInsight cluster. Initially supported clients are Beeline and SqlCmd. Since Beeline is supported, HMMT can be run directly from any HDInsight cluster headnode.

Disclaimer: Since HMMT directly alters the contents of the Hive metastore, it is recommended to use the script with caution and care. When executing the script, the post-migration contents of the metastore will be shown as console output in order to describe the potential impact of the execution. For the specified migration parameters to take effect, the flag “liverun” must be passed to the HMMT command. The tool launches as a dry run by default. In addition, it is strongly recommended to keep backups of the Hive metastore even if you do not intend to use HMMT. More information regarding Hive metastore backups can be found at the end of this blog.

Usage examples

HMMT supports a wide variety of use cases related to the migration and organization of Hive metadata. The benefit of HMMT is that the tool provides an easy way to make sure that the Hive metastore reflects the results of a data migration. HMMT may also be executed against a set of artifacts in anticipation of an upcoming data migration. This section demonstrates the usage and value of HMMT using two examples. One example will cover a table migration related to secure storage transfer, and the other will describe the process to migrate Hive UDF JAR metadata.

Example 1: Enabling secure transfer

Suppose your Hive tables are stored across many different storage accounts, and you have recently enabled secure transfer on a selection of these accounts. Since enabling secure transfer does not automatically update the Hive metastore, the storage URIs must be modified to reflect the change (for example, from WASB to WASBS). With your IP whitelisted and a supported client installed, HMMT will update all matching URIs with the following command:

Command for updating all matching URIs with HMMT

  • The first four arguments passed to the script correspond to the SQL server, database, and credentials used to access the metastore.
  • The next four arguments correspond to the ‘source’ attributes to be searched for. In this case the script will affect WASB accounts Acc1, Acc2 and Acc3. There will be no filtering for the container or subcontainer path. HMMT supports WASB, WASBS, ABFS, ABFSS, and ADL as storage migration options.
  • The target flag represents the table in the Hive metastore to be changed. The table SDS stores Hive table locations. Other table options include DBS for Hive databases, FUNC_RU for Hive UDFs, and SKEWED_COL_VALUE_LOC_MAP for a skewed store of Hive tables.
  • The Query Client flag corresponds to the query command line tool to be used. In this case, the client of choice is Apache Beeline.

The remaining flags correspond to the ‘destination’ attributes for affected URIs. In this case, all matching URIs specified by the source options will have their account type moved to WASBS. Up to one entry per destination flag is permitted. The values of these flags are merged together to form the post-migration URI pattern.

This sample script command will only pick up table URIs corresponding to WASB accounts, where the account name is “Acc1”, “Acc2”, or “Acc3.” The container and path options are left as a wildcard, meaning that every table under any of these three accounts will have its URI adjusted. The adjustment made by the script is to set the storage type to WASBS. No other aspects of the table URIs will be affected.

Example 2: UDF JAR organization

In this example, suppose you have loaded many UDFs into Hive over time. UDFs are implemented in JAR files, which may be stored in various account containers depending on which cluster the JAR was introduced from. As a result, the table FUNC_RU will have many entries across a variety of account containers and paths. If you wanted to clean up the locations of UDF JARs, you could do so using this command: Command to clean up the directory of UDF JARs

This command will pick up UDF JAR URIs, which are exclusively found in the table FUNC_RU, in the WASB storage account “Acc1” for any container and subcontainer path. Once the script is complete, the Hive metastore will show that all JARs from that account can be found in the /jarfiles/ directory under the container “jarstoragecontainer."

Feedback and contributions

We would love to get your feedback. Please reach us with any feature requests, suggestions, and inquiries at askhdinsight@microsoft.com. We also encourage feature asks and source-code contributions to HMMT itself via the HDInsight GitHub repository.

Other resources

Azure Backup now supports PowerShell and ACLs for Azure Files

$
0
0

We are excited to reveal a set of new features for backing up Microsoft Azure file shares natively using Azure Backup. All backup-related features have also been released to support file shares connected to Azure File Sync.

Azure files with NTFS ACLs

Azure Backup now supports preserving and restoring new technology file system (NTFS) access control lists (ACL) for Azure files in preview. Starting in 2019, Azure Backup automatically started capturing your file ACLs when backing up file shares. When you need to go back in time, the file ACLs are also restored along with the files and folders.

Use Azure Backup with PowerShell

You can now script your backups for Azure File Shares using PowerShell. Make use of the PowerShell commands to configure backups, take on-demand backups, or even restore files from your file shares protected by Azure Backup.

We have enabled on-demand backups that can retain your snapshots for 10 years using PowerShell. Schedulers can be used to run on-demand PowerShell scripts with chosen retention and thus take snapshots at regular intervals every week, month, or year. Please refer to the limitations of on-demand backups using Azure backup.

If you are looking for sample scripts, please write to AskAzureBackupTeam@microsoft.com. We have created a sample script using Azure Automation runbook that enables you to schedule backups on a periodic basis and retain them even up to 10 years.

Manage backups

A key enabler we introduced last year was the ability to “Manage backups” right from the Azure Files portal. As soon as you configure protection for a file share using Azure Backup, the “Snapshots” button on your Azure Files portal changes to “Manage backups.”

When you configure file sharing using Azure Backup, the "snapshots" button changes to "Manage backups."

Using “Manage backups,” you can take on-demand backups, restore files shares, or individual files and folders, and even change the policy used for scheduling backups. You can also go to the Recovery Services Vault that backs up the file share and edit policies used to backup Azure File shares.

Email alerts

Backup alerts for the backup and restored jobs of Azure File shares has been enabled. The alerting capability allows you to configure notifications of job failures to chosen email addresses.

Best practices

Accidental deletion of data can happen for storage accounts, file shares, and snapshots taken by Azure Backup. It is a best practice to lock your storage accounts that have Azure Backup enabled to ensure your restores points are not deleted. Also, warnings are displayed before protected file shares or snapshots created by Azure Backup are deleted. This helps you to prevent data loss through accidental deletion.

Related links and additional content


Connecting Node-RED to Azure IoT Central

$
0
0

Today I want to show how simple it is to connect a temperature/humidity sensor to Azure IoT Central using a Raspberry Pi and Node-RED.

As many of you know, Raspberry Pi is a small, single-board computer. Its low cost, low power nature makes it a natural fit for IoT projects. Node-RED is a flow-based, drag and drop programming tool designed for IoT. It enables the creation of robust automation flows in a web browser, simplifying IoT project development.

For my example, I’m using a Raspberry Pi 3 Model B and a simple DHT22 temperature and humidity sensor, but it should work with other models of the Pi. If you have a different kind of sensor, you should be able to adapt the guide below to use it, provided you can connect Node-RED to your sensor.

Configuring Azure IoT Central

  1. Create an app.
  2. Create a new device template.
    • Temp (temp)
    • Humidity (humidity)
  3. Create a real device and get the DPS connection information.
  4. Use dps-keygen to provision the device and get a device connection string.
    • Identify the three parts of the resulting connection string and save them for later.

Connecting the DHT22 sensor

Before we can get data from our DHT22 sensor, we need to connect it to the pi. The DHT22 typically has three pins broken out, but some of them have four. If you have one with four, check the datasheet to confirm which pins are voltage (may be shown as +, VCC or VDD), data (or signal), and ground.

With the pi powered off, use jumper wires to connect your DHT22 as shown below:

Use jumper wires to connect your DHT22

NOTE: The power jumper (red) should go to 3.3V, data jumper (yellow) should go to GPIO4 and the ground jumper (black) should go to ground. Some boards are different, so double-check your connections!

Installing required software

I started by installing Raspbian Lite using the guide. Then, I installed Node-RED. At this point you should be able to open a browser and visit http://raspberrypi.lan:1880 to see the Node-RED interface. Next, install the Azure IoT Hub nodes for Node-RED. The easiest way to do this is from the Node-RED interface, using the Manage Palette command.

Install the DHT22 nodes. Unfortunately, since this node has some lower-level hardware requirements, it can’t be installed through the Manage Palette command. Please follow the instructions using the link above.

Configuring the flow

Now that you have Node-RED up and running on your pi, you’re ready to create your flow. By default, Node-RED should already have a flow called “Flow 1,” but if you can easily create a new one by selecting the (+) icon above the canvas.

Starting the flow with the inject node

The first node we will add to this flow is an input node. For this example, we will use the inject node which simply injects an arbitrary JSON document into the flow. From the input section in the palette, drag the node from the palette on the left onto the canvas. Then, double select it to open the configuration window. Set the node properties as shown below:

Starting the flow with the inject node

This node will simply inject a JSON object where the payload is set to a timestamp. We don’t really care about that value. This is just a simple way to kick off the flow.

Getting data from the DHT22

In the Node-RED palette, find the rpi dht22 node and drag it onto the canvas. Double click on it to open the configuration window, and set the node properties as shown below:

The rpi dht22 node configuration window

Connect the inject node to the rpi dht22 node by dragging the little handle from one to the other.

Reformatting the message

The JSON message produced by the DHT22 node isn’t formatted correctly for sending to Azure IoT, so we need to fix that. We will use the change node to do this, so drag it out from the palette onto the canvas and connect it to the DHT22 node. Double click on it to open the configuration window and set the node properties as shown below:

How to edit the change node

For the functional part of this node, we will use JSONata, which is a query and transformation language for JSON documents. After selecting the JSONata type in the to selector, select the […] button to open the editor and enter the following:

Expression editor

Here we are extracting the temperature and humidity values from the input JSON message and putting them inside the data element in the resulting JSON message. We’re also adding the device ID and shared access key which you got from the Device Connection String earlier.

Sending the data to Azure IoT Central

Now that we’ve got the JSON message ready, find the Azure IoT Hub node in the palette and drag it onto the canvas. Again, double click on it to open the configuration window and set the properties as shown here:

Azure IoT Hub node

Confirming your message and debugging

The final node we will add to our flow is a debug node, which simply outputs the message it is given to the debug panel in Node-RED. Connect it to the end of the flow (after Azure IoT Hub) and set the name to “Hub Response.”

If you’re interested in seeing the JSON message at any point in the flow, you can add more debug nodes anywhere you want. You can enable or disable the output of a debug node by selecting the little box on the right side of the node.

The flow

Here is what your flow should look like. I’ve added a couple of extra debug nodes while developing this flow, but you can see that only the Hub Response node is enabled.

The flow

Before you can run the flow, you need to deploy it from the workspace. To do this select the red Deploy button at the top right of the Node-RED screen. Then, simply select the little box on the left of the every minute node and it will start. Since we configured that node to run every minute, it will continue to send messages to Azure IoT Central until you stop it by either disabling the flow or redeploying.

Pop back over to your IoT Central app and you should start seeing data within a minute or so.

IoT Central App

As you can see, connecting Node-RED to Azure IoT Central is pretty simple. This is a great way to quickly prototype and experiment with different sensors and message payloads without having to write any code! You can also use this approach for creating gateways or protocol translators so you can easily connect almost anything to Azure IoT Central.

Appendix: Flow source

If you want to just copy-paste the whole thing in instead of building it up yourself, you can import the following JSON into Node-RED and just update the three values from your Device Connection String (see the instructions above).

[{"id":"9e47273a.f12738", "type":"tab", "label":"DHT22-IoTC", "disabled":false, "info":""}, {"id":"b3d8f5b6.a243b8", "type":"debug", "z":"9e47273a.f12738", "name":"Hub Response", "active":true, "tosidebar":true, "console":false, "tostatus":false, "complete":"true", "x":740, "y":340, "wires":[]}, {"id":"117b0c09.6b3a04", "type":"azureiothub", "z":"9e47273a.f12738", "name":"Azure IoT Hub", "protocol":"mqtt", "x":520, "y":340, "wires":[["b3d8f5b6.a243b8"]]}, {"id":"ee333823.1d33a8", "type":"inject", "z":"9e47273a.f12738", "name":"", "topic":"", "payload":"", "payloadType":"date", "repeat":"60", "crontab":"", "once":false, "onceDelay":"", "x":210, "y":120, "wires":[["38f14b0d.96eb14"]]}, {"id":"38f14b0d.96eb14", "type":"rpi-dht22", "z":"9e47273a.f12738", "name":"", "topic":"rpi-dht22", "dht":22, "pintype":"0", "pin":4, "x":400, "y":120, "wires":[["f0bfed44.e988b"]]}, {"id":"f0bfed44.e988b", "type":"change", "z":"9e47273a.f12738", "name":"", "rules":[{"t":"set", "p":"payload", "pt":"msg", "to":"{t "deviceId":"{YOUR DEVICE ID} ", t "key":"{YOUR KEY}", t "protocol":"mqtt", t "data": {t "temp": $number(payload), t "humidity": $number(humidity)t t }tt}", "tot":"jsonata"}], "action":"", "property":"", "from":"", "to":"", "reg":false, "x":280, "y":340, "wires":[["117b0c09.6b3a04", "db5b70be.81e2a"]]}, {"id":"db5b70be.81e2a", "type":"debug", "z":"9e47273a.f12738", "name":"Payload", "active":true, "tosidebar":true, "console":false, "tostatus":false, "complete":"payload", "x":500, "y":420, "wires":[]}]

Do good and get mapping with Missing Maps

$
0
0

When disaster hits, be it a natural disaster, epidemic, poverty or other crisis, first responders rely on GIS data to access the areas impacted.

Missing MapsMissing Maps is an open-source collaborative effort founded by the American Red Cross, British Red Cross, Medicine Sans Frontiers, and the Humanitarian OpenStreetMap team where volunteers help to map areas in an effort to ensure that many of the places previously missing from maps can be located and reached.

Millions of edits are made to OpenStreetMap by thousands of volunteers and members of the OpenStreetMap community.

Moved by the Missing Maps objective, “To map the most vulnerable places in the developing world, in order that international and local NGOs and individuals can use the maps and data to better respond to crises affecting the areas,” teams at Microsoft are contributing time, resources and technical expertise to the project.

Since initiating the program at Microsoft, over four thousand employees have been trained in contributing to OpenStreetMap at hundreds of mapathons across the company. With the goal to “put 200 million people ‘on the map’ by 2021,” we hope you are inspired to get involved too! 

To learn more about Missing Maps and to start mapping, go to www.missingmaps.org

- Bing Maps Team

Azure DevOps Server 2019 RC2 now available

$
0
0

Today, we released Azure DevOps Server 2019 RC2. This is our last planned prerelease before our final release of Azure DevOps Server 2019. RC2 includes some new features since RC1. You can upgrade from Azure DevOps Server 2019 RC1 or previous versions of TFS. You can find the full details in our release notes.

Here are some key links:
Azure DevOps Server 2019 RC2 ISO
Azure DevOps Server 2019 RC2 Web Install
Release Notes

Here are some highlights of the new features:

Link GitHub Enterprise commits and pull requests to Azure Boards work items
Teams can now integrate their GitHub Enterprise repositories with Azure Boards. By connecting GitHub and Azure Boards, you can get all of the features like backlogs, boards, sprint planning tools, multiple work item types and still have a workflow that integrates with developer workflows in GitHub.

Configure builds using YAML
Automate your continuous integration pipeline using a YAML file checked into your repo. This Configuration as Code allows you to have versioning and tracing for your build configurations. For more information, a complete reference for the YAML schema can be found here.

Draft pull requests
In order to prevent pull requests from being completed before they’re ready and to make it easy to create work in progress, we now support draft pull requests.

We’d love for you to install this release candidate and provide any feedback at Developer Community.

Windows 10 SDK Preview Build 18317 available now!

$
0
0

Today, we released a new Windows 10 Preview Build of the SDK to be used in conjunction with Windows 10 Insider Preview (Build 18317 or greater). The Preview SDK Build 18317 contains bug fixes and under development changes to the API surface area.

The Preview SDK can be downloaded from developer section on Windows Insider.

For feedback and updates to the known issues, please see the developer forum. For new developer feature requests, head over to our Windows Platform UserVoice.

Things to note:

  • This build works in conjunction with previously released SDKs and Visual Studio 2017. You can install this SDK and still also continue to submit your apps that target Windows 10 build 1809 or earlier to the Microsoft Store.
  • The Windows SDK will now formally only be supported by Visual Studio 2017 and greater. You can download the Visual Studio 2017 here.
  • This build of the Windows SDK will install ONLY on Windows 10 Insider Preview builds.
  • In order to assist with script access to the SDK, the ISO will also be able to be accessed through the following URL: https://go.microsoft.com/fwlink/?prd=11966&pver=1.0&plcid=0x409&clcid=0x409&ar=Flight&sar=Sdsurl&o1=18317 once the static URL is published.

Tools Updates

Message Compiler (mc.exe)

  • The “-mof” switch (to generate XP-compatible ETW helpers) is considered to be deprecated and will be removed in a future version of mc.exe. Removing this switch will cause the generated ETW helpers to expect Vista or later.
  • The “-A” switch (to generate .BIN files using ANSI encoding instead of Unicode) is considered to be deprecated and will be removed in a future version of mc.exe. Removing this switch will cause the generated .BIN files to use Unicode string encoding.
  • The behavior of the “-A” switch has changed. Prior to Windows 1607 Anniversary Update SDK, when using the -A switch, BIN files were encoded using the build system’s ANSI code page. In the Windows 1607 Anniversary Update SDK, mc.exe’s behavior was inadvertently changed to encode BIN files using the build system’s OEM code page. In the 19H1 SDK, mc.exe’s previous behavior has been restored and it now encodes BIN files using the build system’s ANSI code page. Note that the -A switch is deprecated, as ANSI-encoded BIN files do not provide a consistent user experience in multi-lingual systems.

Breaking Changes

Change to effect graph of the AcrylicBrush

In this Preview SDK, we’ll be adding a blend mode to the effect graph of the AcrylicBrush called Luminosity. This blend mode will ensure that shadows do not appear behind acrylic surfaces without a cutout. We will also be exposing a LuminosityBlendOpacity API available for tweaking that allows for more AcrylicBrush customization.

By default, for those that have not specified any LuminosityBlendOpacity on their AcrylicBrushes, we have implemented some logic to ensure that the Acrylic will look as similar as it can to current 1809 acrylics. Please note that we will be updating our default brushes to account for this recipe change.

TraceLoggingProvider.h  / TraceLoggingWrite

Events generated by TraceLoggingProvider.h (e.g. via TraceLoggingWrite macros) will now always have Id and Version set to 0.

Previously, TraceLoggingProvider.h would assign IDs to events at link time. These IDs were unique within a DLL or EXE, but changed from build to build and from module to module.

API Updates, Additions and Removals

Additions:

 
namespace Windows.AI.MachineLearning {
  public sealed class LearningModelSession : IClosable {
    public LearningModelSession(LearningModel model, LearningModelDevice deviceToRunOn, LearningModelSessionOptions learningModelSessionOptions);
  }
  public sealed class LearningModelSessionOptions
  public sealed class TensorBoolean : IClosable, ILearningModelFeatureValue, IMemoryBuffer, ITensor {
    void Close();
    public static TensorBoolean CreateFromBuffer(long[] shape, IBuffer buffer);
    public static TensorBoolean CreateFromShapeArrayAndDataArray(long[] shape, bool[] data);
    IMemoryBufferReference CreateReference();
  }
  public sealed class TensorDouble : IClosable, ILearningModelFeatureValue, IMemoryBuffer, ITensor {
    void Close();
    public static TensorDouble CreateFromBuffer(long[] shape, IBuffer buffer);
    public static TensorDouble CreateFromShapeArrayAndDataArray(long[] shape, double[] data);
    IMemoryBufferReference CreateReference();
  }
  public sealed class TensorFloat : IClosable, ILearningModelFeatureValue, IMemoryBuffer, ITensor {
    void Close();
    public static TensorFloat CreateFromBuffer(long[] shape, IBuffer buffer);
    public static TensorFloat CreateFromShapeArrayAndDataArray(long[] shape, float[] data);
    IMemoryBufferReference CreateReference();
  }
  public sealed class TensorFloat16Bit : IClosable, ILearningModelFeatureValue, IMemoryBuffer, ITensor {
    void Close();
    public static TensorFloat16Bit CreateFromBuffer(long[] shape, IBuffer buffer);
    public static TensorFloat16Bit CreateFromShapeArrayAndDataArray(long[] shape, float[] data);
    IMemoryBufferReference CreateReference();
  }
  public sealed class TensorInt16Bit : IClosable, ILearningModelFeatureValue, IMemoryBuffer, ITensor {
    void Close();
    public static TensorInt16Bit CreateFromBuffer(long[] shape, IBuffer buffer);
    public static TensorInt16Bit CreateFromShapeArrayAndDataArray(long[] shape, short[] data);
    IMemoryBufferReference CreateReference();
  }
  public sealed class TensorInt32Bit : IClosable, ILearningModelFeatureValue, IMemoryBuffer, ITensor {
    void Close();
    public static TensorInt32Bit CreateFromBuffer(long[] shape, IBuffer buffer);
    public static TensorInt32Bit CreateFromShapeArrayAndDataArray(long[] shape, int[] data);
    IMemoryBufferReference CreateReference();
  }
 public sealed class TensorInt64Bit : IClosable, ILearningModelFeatureValue, IMemoryBuffer, ITensor {
    void Close();
    public static TensorInt64Bit CreateFromBuffer(long[] shape, IBuffer buffer);
    public static TensorInt64Bit CreateFromShapeArrayAndDataArray(long[] shape, long[] data);
    IMemoryBufferReference CreateReference();
  }
  public sealed class TensorInt8Bit : IClosable, ILearningModelFeatureValue, IMemoryBuffer, ITensor {
    void Close();
    public static TensorInt8Bit CreateFromBuffer(long[] shape, IBuffer buffer);
    public static TensorInt8Bit CreateFromShapeArrayAndDataArray(long[] shape, byte[] data);
    IMemoryBufferReference CreateReference();
  }
  public sealed class TensorString : IClosable, ILearningModelFeatureValue, IMemoryBuffer, ITensor {
    void Close();
    public static TensorString CreateFromShapeArrayAndDataArray(long[] shape, string[] data);
    IMemoryBufferReference CreateReference();
  }
  public sealed class TensorUInt16Bit : IClosable, ILearningModelFeatureValue, IMemoryBuffer, ITensor {
    void Close();
    public static TensorUInt16Bit CreateFromBuffer(long[] shape, IBuffer buffer);
    public static TensorUInt16Bit CreateFromShapeArrayAndDataArray(long[] shape, ushort[] data);
    IMemoryBufferReference CreateReference();
  }
  public sealed class TensorUInt32Bit : IClosable, ILearningModelFeatureValue, IMemoryBuffer, ITensor {
    void Close();
    public static TensorUInt32Bit CreateFromBuffer(long[] shape, IBuffer buffer);
    public static TensorUInt32Bit CreateFromShapeArrayAndDataArray(long[] shape, uint[] data);
    IMemoryBufferReference CreateReference();
  }
  public sealed class TensorUInt64Bit : IClosable, ILearningModelFeatureValue, IMemoryBuffer, ITensor {
    void Close();
    public static TensorUInt64Bit CreateFromBuffer(long[] shape, IBuffer buffer);
    public static TensorUInt64Bit CreateFromShapeArrayAndDataArray(long[] shape, ulong[] data);
    IMemoryBufferReference CreateReference();
  }
  public sealed class TensorUInt8Bit : IClosable, ILearningModelFeatureValue, IMemoryBuffer, ITensor {
    void Close();
    public static TensorUInt8Bit CreateFromBuffer(long[] shape, IBuffer buffer);
    public static TensorUInt8Bit CreateFromShapeArrayAndDataArray(long[] shape, byte[] data);
    IMemoryBufferReference CreateReference();
  }
}
namespace Windows.ApplicationModel {
  public sealed class Package {
    StorageFolder EffectiveLocation { get; }
    StorageFolder MutableLocation { get; }
  }
}
namespace Windows.ApplicationModel.AppService {
  public sealed class AppServiceConnection : IClosable {
    public static IAsyncOperation<StatelessAppServiceResponse> SendStatelessMessageAsync(AppServiceConnection connection, RemoteSystemConnectionRequest connectionRequest, ValueSet message);
  }
  public sealed class AppServiceTriggerDetails {
    string CallerRemoteConnectionToken { get; }
  }
  public sealed class StatelessAppServiceResponse
  public enum StatelessAppServiceResponseStatus
}
namespace Windows.ApplicationModel.Background {
  public sealed class ConversationalAgentTrigger : IBackgroundTrigger
}
namespace Windows.ApplicationModel.Calls {
  public sealed class PhoneLine {
    string TransportDeviceId { get; }
    void EnableTextReply(bool value);
  }
  public enum PhoneLineTransport {
    Bluetooth = 2,
  }
  public sealed class PhoneLineTransportDevice
}
namespace Windows.ApplicationModel.Calls.Background {
  public enum PhoneIncomingCallDismissedReason
  public sealed class PhoneIncomingCallDismissedTriggerDetails
  public enum PhoneTriggerType {
    IncomingCallDismissed = 6,
  }
}
namespace Windows.ApplicationModel.Calls.Provider {
  public static class PhoneCallOriginManager {
    public static bool IsSupported { get; }
  }
}
namespace Windows.ApplicationModel.ConversationalAgent {
  public sealed class ConversationalAgentSession : IClosable
  public sealed class ConversationalAgentSessionInterruptedEventArgs
  public enum ConversationalAgentSessionUpdateResponse
  public sealed class ConversationalAgentSignal
  public sealed class ConversationalAgentSignalDetectedEventArgs
  public enum ConversationalAgentState
 public sealed class ConversationalAgentSystemStateChangedEventArgs
  public enum ConversationalAgentSystemStateChangeType
}
namespace Windows.ApplicationModel.Preview.Holographic {
  public sealed class HolographicKeyboardPlacementOverridePreview
}
namespace Windows.ApplicationModel.Resources {
  public sealed class ResourceLoader {
    public static ResourceLoader GetForUIContext(UIContext context);
  }
}
namespace Windows.ApplicationModel.Resources.Core {
  public sealed class ResourceCandidate {
    ResourceCandidateKind Kind { get; }
  }
  public enum ResourceCandidateKind
  public sealed class ResourceContext {
    public static ResourceContext GetForUIContext(UIContext context);
  }
}
namespace Windows.ApplicationModel.UserActivities {
  public sealed class UserActivityChannel {
    public static UserActivityChannel GetForUser(User user);
  }
}
namespace Windows.Devices.Bluetooth.GenericAttributeProfile {
  public enum GattServiceProviderAdvertisementStatus {
    StartedWithoutAllAdvertisementData = 4,
  }
  public sealed class GattServiceProviderAdvertisingParameters {
    IBuffer ServiceData { get; set; }
  }
}
namespace Windows.Devices.Enumeration {
  public enum DevicePairingKinds : uint {
    ProvidePasswordCredential = (uint)16,
  }
  public sealed class DevicePairingRequestedEventArgs {
    void AcceptWithPasswordCredential(PasswordCredential passwordCredential);
  }
}
namespace Windows.Devices.Input {
  public sealed class PenDevice
}
namespace Windows.Devices.PointOfService {
  public sealed class JournalPrinterCapabilities : ICommonPosPrintStationCapabilities {
    bool IsReversePaperFeedByLineSupported { get; }
    bool IsReversePaperFeedByMapModeUnitSupported { get; }
    bool IsReverseVideoSupported { get; }
    bool IsStrikethroughSupported { get; }
    bool IsSubscriptSupported { get; }
    bool IsSuperscriptSupported { get; }
  }
  public sealed class JournalPrintJob : IPosPrinterJob {
    void FeedPaperByLine(int lineCount);
    void FeedPaperByMapModeUnit(int distance);
    void Print(string data, PosPrinterPrintOptions printOptions);
  }
  public sealed class PaymentDevice : IClosable
  public sealed class PaymentDeviceCapabilities
  public sealed class PaymentDeviceConfiguration
  public sealed class PaymentDeviceGetConfigurationResult
  public sealed class PaymentDeviceOperationResult
  public sealed class PaymentDeviceTransactionRequest
  public sealed class PaymentDeviceTransactionResult
  public sealed class PaymentMethod
  public enum PaymentMethodKind
  public enum PaymentOperationStatus
  public enum PaymentUserResponse
  public sealed class PosPrinter : IClosable {
    IVectorView<uint> SupportedBarcodeSymbologies { get; }
    PosPrinterFontProperty GetFontProperty(string typeface);
  }
  public sealed class PosPrinterFontProperty
  public sealed class PosPrinterPrintOptions
  public sealed class ReceiptPrinterCapabilities : ICommonPosPrintStationCapabilities, ICommonReceiptSlipCapabilities {
    bool IsReversePaperFeedByLineSupported { get; }
    bool IsReversePaperFeedByMapModeUnitSupported { get; }
   bool IsReverseVideoSupported { get; }
    bool IsStrikethroughSupported { get; }
    bool IsSubscriptSupported { get; }
    bool IsSuperscriptSupported { get; }
  }
  public sealed class ReceiptPrintJob : IPosPrinterJob, IReceiptOrSlipJob {
    void FeedPaperByLine(int lineCount);
    void FeedPaperByMapModeUnit(int distance);
    void Print(string data, PosPrinterPrintOptions printOptions);
    void StampPaper();
  }
  public struct SizeUInt32
  public sealed class SlipPrinterCapabilities : ICommonPosPrintStationCapabilities, ICommonReceiptSlipCapabilities {
    bool IsReversePaperFeedByLineSupported { get; }
    bool IsReversePaperFeedByMapModeUnitSupported { get; }
    bool IsReverseVideoSupported { get; }
    bool IsStrikethroughSupported { get; }
    bool IsSubscriptSupported { get; }
    bool IsSuperscriptSupported { get; }
  }
  public sealed class SlipPrintJob : IPosPrinterJob, IReceiptOrSlipJob {
    void FeedPaperByLine(int lineCount);
    void FeedPaperByMapModeUnit(int distance);
    void Print(string data, PosPrinterPrintOptions printOptions);
  }
}
namespace Windows.Devices.PointOfService.Provider {
  public sealed class PaymentDeviceCloseTerminalRequest
  public sealed class PaymentDeviceCloseTerminalRequestEventArgs
  public sealed class PaymentDeviceConnection : IClosable
  public sealed class PaymentDeviceConnectionTriggerDetails
  public sealed class PaymentDeviceConnectorInfo
  public sealed class PaymentDeviceGetTerminalsRequest
  public sealed class PaymentDeviceGetTerminalsRequestEventArgs
  public sealed class PaymentDeviceOpenTerminalRequest
  public sealed class PaymentDeviceOpenTerminalRequestEventArgs
  public sealed class PaymentDevicePaymentAuthorizationRequest
  public sealed class PaymentDevicePaymentAuthorizationRequestEventArgs
  public sealed class PaymentDevicePaymentRequest
  public sealed class PaymentDevicePaymentRequestEventArgs
  public sealed class PaymentDeviceReadCapabilitiesRequest
  public sealed class PaymentDeviceReadCapabilitiesRequestEventArgs
  public sealed class PaymentDeviceReadConfigurationRequest
  public sealed class PaymentDeviceReadConfigurationRequestEventArgs
  public sealed class PaymentDeviceRefundRequest
  public sealed class PaymentDeviceRefundRequestEventArgs
  public sealed class PaymentDeviceVoidTokenRequest
  public sealed class PaymentDeviceVoidTokenRequestEventArgs
  public sealed class PaymentDeviceVoidTransactionRequest
  public sealed class PaymentDeviceVoidTransactionRequestEventArgs
  public sealed class PaymentDeviceWriteConfigurationRequest
  public sealed class PaymentDeviceWriteConfigurationRequestEventArgs
}
namespace Windows.Globalization {
  public sealed class CurrencyAmount
}
namespace Windows.Graphics.DirectX {
  public enum DirectXPrimitiveTopology
}
namespace Windows.Graphics.Holographic {
  public sealed class HolographicCamera {
    HolographicViewConfiguration ViewConfiguration { get; }
  }
  public sealed class HolographicDisplay {
    HolographicViewConfiguration TryGetViewConfiguration(HolographicViewConfigurationKind kind);
  }
  public sealed class HolographicViewConfiguration
  public enum HolographicViewConfigurationKind
}
namespace Windows.Management.Deployment {
  public enum AddPackageByAppInstallerOptions : uint {
    LimitToExistingPackages = (uint)512,
  }
  public enum DeploymentOptions : uint {
    RetainFilesOnFailure = (uint)2097152,
  }
}
namespace Windows.Media.Devices {
 public sealed class InfraredTorchControl
  public enum InfraredTorchMode
  public sealed class VideoDeviceController : IMediaDeviceController {
    InfraredTorchControl InfraredTorchControl { get; }
  }
}
namespace Windows.Media.Miracast {
  public sealed class MiracastReceiver
  public sealed class MiracastReceiverApplySettingsResult
  public enum MiracastReceiverApplySettingsStatus
  public enum MiracastReceiverAuthorizationMethod
  public sealed class MiracastReceiverConnection : IClosable
  public sealed class MiracastReceiverConnectionCreatedEventArgs
  public sealed class MiracastReceiverCursorImageChannel
  public sealed class MiracastReceiverCursorImageChannelSettings
  public sealed class MiracastReceiverDisconnectedEventArgs
  public enum MiracastReceiverDisconnectReason
  public sealed class MiracastReceiverGameControllerDevice
  public enum MiracastReceiverGameControllerDeviceUsageMode
  public sealed class MiracastReceiverInputDevices
  public sealed class MiracastReceiverKeyboardDevice
  public enum MiracastReceiverListeningStatus
  public sealed class MiracastReceiverMediaSourceCreatedEventArgs
  public sealed class MiracastReceiverSession : IClosable
  public sealed class MiracastReceiverSessionStartResult
  public enum MiracastReceiverSessionStartStatus
  public sealed class MiracastReceiverSettings
  public sealed class MiracastReceiverStatus
  public sealed class MiracastReceiverStreamControl
  public sealed class MiracastReceiverVideoStreamSettings
  public enum MiracastReceiverWiFiStatus
  public sealed class MiracastTransmitter
  public enum MiracastTransmitterAuthorizationStatus
}
namespace Windows.Networking.Connectivity {
  public enum NetworkAuthenticationType {
    Wpa3 = 10,
    Wpa3Sae = 11,
  }
}
namespace Windows.Networking.NetworkOperators {
  public sealed class ESim {
    ESimDiscoverResult Discover();
    ESimDiscoverResult Discover(string serverAddress, string matchingId);
    IAsyncOperation<ESimDiscoverResult> DiscoverAsync();
    IAsyncOperation<ESimDiscoverResult> DiscoverAsync(string serverAddress, string matchingId);
  }
  public sealed class ESimDiscoverEvent
  public sealed class ESimDiscoverResult
  public enum ESimDiscoverResultKind
}
namespace Windows.Networking.PushNotifications {
  public static class PushNotificationChannelManager {
    public static event EventHandler<PushNotificationChannelsRevokedEventArgs> ChannelsRevoked;
  }
  public sealed class PushNotificationChannelsRevokedEventArgs
}
namespace Windows.Perception.People {
  public sealed class EyesPose
  public enum HandJointKind
  public sealed class HandMeshObserver
  public struct HandMeshVertex
  public sealed class HandMeshVertexState
  public sealed class HandPose
  public struct JointPose
  public enum JointPoseAccuracy
}
namespace Windows.Perception.Spatial {
  public struct SpatialRay
}
namespace Windows.Perception.Spatial.Preview {
  public sealed class SpatialGraphInteropFrameOfReferencePreview
  public static class SpatialGraphInteropPreview {
    public static SpatialGraphInteropFrameOfReferencePreview TryCreateFrameOfReference(SpatialCoordinateSystem coordinateSystem);
    public static SpatialGraphInteropFrameOfReferencePreview TryCreateFrameOfReference(SpatialCoordinateSystem coordinateSystem, Vector3 relativePosition);
    public static SpatialGraphInteropFrameOfReferencePreview TryCreateFrameOfReference(SpatialCoordinateSystem coordinateSystem, Vector3 relativePosition, Quaternion relativeOrientation);
  }
}
namespace Windows.Security.Authorization.AppCapabilityAccess {
  public sealed class AppCapability
  public sealed class AppCapabilityAccessChangedEventArgs
  public enum AppCapabilityAccessStatus
}
namespace Windows.Security.DataProtection {
  public enum UserDataAvailability
  public sealed class UserDataAvailabilityStateChangedEventArgs
  public sealed class UserDataBufferUnprotectResult
  public enum UserDataBufferUnprotectStatus
  public sealed class UserDataProtectionManager
  public sealed class UserDataStorageItemProtectionInfo
  public enum UserDataStorageItemProtectionStatus
}
namespace Windows.Storage.AccessCache {
  public static class StorageApplicationPermissions {
    public static StorageItemAccessList GetFutureAccessListForUser(User user);
    public static StorageItemMostRecentlyUsedList GetMostRecentlyUsedListForUser(User user);
  }
}
namespace Windows.Storage.Pickers {
  public sealed class FileOpenPicker {
    User User { get; }
    public static FileOpenPicker CreateForUser(User user);
  }
  public sealed class FileSavePicker {
    User User { get; }
    public static FileSavePicker CreateForUser(User user);
  }
  public sealed class FolderPicker {
    User User { get; }
    public static FolderPicker CreateForUser(User user);
  }
}
namespace Windows.System {
  public sealed class DispatcherQueue {
    bool HasThreadAccess { get; }
  }
  public enum ProcessorArchitecture {
    Arm64 = 12,
    X86OnArm64 = 14,
  }
}
namespace Windows.System.Profile {
  public static class AppApplicability
  public sealed class UnsupportedAppRequirement
  public enum UnsupportedAppRequirementReasons : uint
}
namespace Windows.System.RemoteSystems {
  public sealed class RemoteSystem {
    User User { get; }
    public static RemoteSystemWatcher CreateWatcherForUser(User user);
    public static RemoteSystemWatcher CreateWatcherForUser(User user, IIterable<IRemoteSystemFilter> filters);
  }
  public sealed class RemoteSystemApp {
    string ConnectionToken { get; }
    User User { get; }
  }
  public sealed class RemoteSystemConnectionRequest {
    string ConnectionToken { get; }
    public static RemoteSystemConnectionRequest CreateFromConnectionToken(string connectionToken);
    public static RemoteSystemConnectionRequest CreateFromConnectionTokenForUser(User user, string connectionToken);
  }
  public sealed class RemoteSystemWatcher {
    User User { get; }
  }
}
namespace Windows.UI {
  public sealed class UIContentRoot
  public sealed class UIContext
}
namespace Windows.UI.Composition {
  public enum CompositionBitmapInterpolationMode {
    MagLinearMinLinearMipLinear = 2,
    MagLinearMinLinearMipNearest = 3,
    MagLinearMinNearestMipLinear = 4,
    MagLinearMinNearestMipNearest = 5,
    MagNearestMinLinearMipLinear = 6,
    MagNearestMinLinearMipNearest = 7,
    MagNearestMinNearestMipLinear = 8,
    MagNearestMinNearestMipNearest = 9,
  }
  public sealed class CompositionGraphicsDevice : CompositionObject {
    CompositionMipmapSurface CreateMipmapSurface(SizeInt32 sizePixels, DirectXPixelFormat pixelFormat, DirectXAlphaMode alphaMode);
  }
  public sealed class CompositionMipmapSurface : CompositionObject, ICompositionSurface
  public sealed class CompositionProjectedShadow : CompositionObject
  public sealed class CompositionProjectedShadowCaster : CompositionObject
  public sealed class CompositionProjectedShadowCasterCollection : CompositionObject, IIterable<CompositionProjectedShadowCaster>
  public enum CompositionProjectedShadowDrawOrder
  public sealed class CompositionProjectedShadowLegacyCaster : CompositionObject
  public sealed class CompositionProjectedShadowLegacyCasterCollection : CompositionObject, IIterable<CompositionProjectedShadowLegacyCaster>
  public sealed class CompositionProjectedShadowLegacyReceiver : CompositionObject
  public sealed class CompositionProjectedShadowLegacyReceiverUnorderedCollection : CompositionObject, IIterable<CompositionProjectedShadowLegacyReceiver>
  public sealed class CompositionProjectedShadowLegacyScene : CompositionObject
  public enum CompositionProjectedShadowPolicy
  public sealed class CompositionProjectedShadowReceiver : CompositionObject, IIterable<CompositionProjectedShadow>
  public sealed class CompositionRadialGradientBrush : CompositionGradientBrush
  public class CompositionTransform : CompositionObject
  public sealed class CompositionVisualSurface : CompositionObject, ICompositionSurface
  public sealed class Compositor : IClosable {
    CompositionProjectedShadow CreateProjectedShadow();
    CompositionProjectedShadowCaster CreateProjectedShadowCaster();
    CompositionProjectedShadowLegacyCaster CreateProjectedShadowLegacyCaster();
    CompositionProjectedShadowLegacyReceiver CreateProjectedShadowLegacyReceiver();
    CompositionProjectedShadowLegacyScene CreateProjectedShadowLegacyScene();
    CompositionRadialGradientBrush CreateRadialGradientBrush();
    CompositionVisualSurface CreateVisualSurface();
  }
  public interface ICompositorPartner_ProjectedShadow
  public interface ICompositorPartner_ProjectedShadowLegacy
  public interface IVisualElement
  public class Visual : CompositionObject {
    CompositionProjectedShadowReceiver ReceivedShadows { get; }
  }
}
namespace Windows.UI.Composition.Interactions {
  public enum InteractionBindingAxisModes : uint
  public sealed class InteractionTracker : CompositionObject {
    public static InteractionBindingAxisModes GetBindingMode(InteractionTracker boundTracker1, InteractionTracker boundTracker2);
    public static void SetBindingMode(InteractionTracker boundTracker1, InteractionTracker boundTracker2, InteractionBindingAxisModes axisMode);
  }
  public sealed class InteractionTrackerCustomAnimationStateEnteredArgs {
    bool IsFromBinding { get; }
  }
  public sealed class InteractionTrackerIdleStateEnteredArgs {
    bool IsFromBinding { get; }
  }
  public sealed class InteractionTrackerInertiaStateEnteredArgs {
    bool IsFromBinding { get; }
  }
  public sealed class InteractionTrackerInteractingStateEnteredArgs {
    bool IsFromBinding { get; }
  }
  public class VisualInteractionSource : CompositionObject, ICompositionInteractionSource {
    public static VisualInteractionSource CreateFromIVisualElement(IVisualElement source);
  }
}
namespace Windows.UI.Composition.Scenes {
  public enum SceneAlphaMode
  public enum SceneAttributeSemantic
  public sealed class SceneBoundingBox : SceneObject
  public class SceneComponent : SceneObject
  public sealed class SceneComponentCollection : SceneObject, IIterable<SceneComponent>, IVector<SceneComponent>
  public enum SceneComponentType
  public class SceneMaterial : SceneObject
  public class SceneMaterialInput : SceneObject
  public sealed class SceneMesh : SceneObject
  public sealed class SceneMeshMaterialAttributeMap : SceneObject, IIterable<IKeyValuePair<string, SceneAttributeSemantic>>, IMap<string, SceneAttributeSemantic>
  public sealed class SceneMeshRendererComponent : SceneRendererComponent
  public sealed class SceneMetallicRoughnessMaterial : ScenePbrMaterial
  public sealed class SceneModelTransform : CompositionTransform
  public sealed class SceneNode : SceneObject
  public sealed class SceneNodeCollection : SceneObject, IIterable<SceneNode>, IVector<SceneNode>
  public class SceneObject : CompositionObject
  public class ScenePbrMaterial : SceneMaterial
  public class SceneRendererComponent : SceneComponent
  public sealed class SceneSurfaceMaterialInput : SceneMaterialInput
  public sealed class SceneVisual : ContainerVisual
  public enum SceneWrappingMode
}
namespace Windows.UI.Core {
  public sealed class CoreWindow : ICorePointerRedirector, ICoreWindow {
    UIContext UIContext { get; }
  }
}
namespace Windows.UI.Core.Preview {
  public sealed class CoreAppWindowPreview
}
namespace Windows.UI.Input {
  public class AttachableInputObject : IClosable
  public enum GazeInputAccessStatus
  public sealed class InputActivationListener : AttachableInputObject
  public sealed class InputActivationListenerActivationChangedEventArgs
  public enum InputActivationState
}
namespace Windows.UI.Input.Preview {
  public static class InputActivationListenerPreview
}
namespace Windows.UI.Input.Spatial {
  public sealed class SpatialInteractionManager {
    public static bool IsSourceKindSupported(SpatialInteractionSourceKind kind);
  }
  public sealed class SpatialInteractionSource {
    HandMeshObserver TryCreateHandMeshObserver();
    IAsyncOperation<HandMeshObserver> TryCreateHandMeshObserverAsync();
  }
  public sealed class SpatialInteractionSourceState {
    HandPose TryGetHandPose();
  }
  public sealed class SpatialPointerPose {
    EyesPose Eyes { get; }
    bool IsHeadCapturedBySystem { get; }
  }
}
namespace Windows.UI.Notifications {
  public sealed class ToastActivatedEventArgs {
    ValueSet UserInput { get; }
  }
  public sealed class ToastNotification {
    bool ExpiresOnReboot { get; set; }
  }
}
namespace Windows.UI.ViewManagement {
  public sealed class ApplicationView {
    string PersistedStateId { get; set; }
    UIContext UIContext { get; }
    WindowingEnvironment WindowingEnvironment { get; }
   public static void ClearAllPersistedState();
    public static void ClearPersistedState(string key);
    IVectorView<DisplayRegion> GetDisplayRegions();
  }
  public sealed class InputPane {
    public static InputPane GetForUIContext(UIContext context);
  }
  public sealed class UISettings {
    bool AutoHideScrollBars { get; }
    event TypedEventHandler<UISettings, UISettingsAutoHideScrollBarsChangedEventArgs> AutoHideScrollBarsChanged;
  }
  public sealed class UISettingsAutoHideScrollBarsChangedEventArgs
}
namespace Windows.UI.ViewManagement.Core {
  public sealed class CoreInputView {
    public static CoreInputView GetForUIContext(UIContext context);
  }
}
namespace Windows.UI.WindowManagement {
  public sealed class AppWindow
  public sealed class AppWindowChangedEventArgs
  public sealed class AppWindowClosedEventArgs
  public enum AppWindowClosedReason
  public sealed class AppWindowCloseRequestedEventArgs
  public sealed class AppWindowFrame
  public enum AppWindowFrameStyle
  public sealed class AppWindowPlacement
  public class AppWindowPresentationConfiguration
  public enum AppWindowPresentationKind
  public sealed class AppWindowPresenter
  public sealed class AppWindowTitleBar
  public sealed class AppWindowTitleBarOcclusion
  public enum AppWindowTitleBarVisibility
  public sealed class CompactOverlayPresentationConfiguration : AppWindowPresentationConfiguration
  public sealed class DefaultPresentationConfiguration : AppWindowPresentationConfiguration
  public sealed class DisplayRegion
  public sealed class FullScreenPresentationConfiguration : AppWindowPresentationConfiguration
  public sealed class WindowingEnvironment
  public sealed class WindowingEnvironmentAddedEventArgs
  public sealed class WindowingEnvironmentChangedEventArgs
  public enum WindowingEnvironmentKind
  public sealed class WindowingEnvironmentRemovedEventArgs
}
namespace Windows.UI.WindowManagement.Preview {
  public sealed class WindowManagementPreview
}
namespace Windows.UI.Xaml {
  public class UIElement : DependencyObject, IAnimationObject, IVisualElement {
    Vector3 ActualOffset { get; }
    Vector2 ActualSize { get; }
    Shadow Shadow { get; set; }
    public static DependencyProperty ShadowProperty { get; }
    UIContext UIContext { get; }
    XamlRoot XamlRoot { get; set; }
  }
  public class UIElementWeakCollection : IIterable<UIElement>, IVector<UIElement>
  public sealed class Window {
    UIContext UIContext { get; }
  }
  public sealed class XamlRoot
  public sealed class XamlRootChangedEventArgs
}
namespace Windows.UI.Xaml.Controls {
  public sealed class DatePickerFlyoutPresenter : Control {
    bool IsDefaultShadowEnabled { get; set; }
    public static DependencyProperty IsDefaultShadowEnabledProperty { get; }
  }
  public class FlyoutPresenter : ContentControl {
    bool IsDefaultShadowEnabled { get; set; }
    public static DependencyProperty IsDefaultShadowEnabledProperty { get; }
  }
  public class InkToolbar : Control {
    InkPresenter TargetInkPresenter { get; set; }
    public static DependencyProperty TargetInkPresenterProperty { get; }
  }
  public class MenuFlyoutPresenter : ItemsControl {
    bool IsDefaultShadowEnabled { get; set; }
    public static DependencyProperty IsDefaultShadowEnabledProperty { get; }
  }
  public class RichEditBox : Control {
    void CopySelectionToClipboard();
    void CutSelectionToClipboard();
    void PasteFromClipboard();
  }
  public sealed class TimePickerFlyoutPresenter : Control {
    bool IsDefaultShadowEnabled { get; set; }
    public static DependencyProperty IsDefaultShadowEnabledProperty { get; }
  }
  public class TwoPaneView : Control
  public enum TwoPaneViewMode
  public enum TwoPaneViewPriority
  public enum TwoPaneViewTallModeConfiguration
  public enum TwoPaneViewWideModeConfiguration
}
namespace Windows.UI.Xaml.Controls.Maps {
  public sealed class MapControl : Control {
    bool CanTiltDown { get; }
    public static DependencyProperty CanTiltDownProperty { get; }
    bool CanTiltUp { get; }
    public static DependencyProperty CanTiltUpProperty { get; }
    bool CanZoomIn { get; }
    public static DependencyProperty CanZoomInProperty { get; }
    bool CanZoomOut { get; }
    public static DependencyProperty CanZoomOutProperty { get; }
  }
  public enum MapLoadingStatus {
    DownloadedMapsManagerUnavailable = 3,
  }
}
namespace Windows.UI.Xaml.Controls.Primitives {
  public sealed class AppBarTemplateSettings : DependencyObject {
    double NegativeCompactVerticalDelta { get; }
    double NegativeHiddenVerticalDelta { get; }
    double NegativeMinimalVerticalDelta { get; }
  }
  public sealed class CommandBarTemplateSettings : DependencyObject {
    double OverflowContentCompactYTranslation { get; }
    double OverflowContentHiddenYTranslation { get; }
    double OverflowContentMinimalYTranslation { get; }
  }
  public class FlyoutBase : DependencyObject {
    bool IsConstrainedToRootBounds { get; }
    bool ShouldConstrainToRootBounds { get; set; }
    public static DependencyProperty ShouldConstrainToRootBoundsProperty { get; }
    XamlRoot XamlRoot { get; set; }
  }
  public sealed class Popup : FrameworkElement {
    bool IsConstrainedToRootBounds { get; }
    bool ShouldConstrainToRootBounds { get; set; }
    public static DependencyProperty ShouldConstrainToRootBoundsProperty { get; }
  }
}
namespace Windows.UI.Xaml.Core.Direct {
  public enum XamlPropertyIndex {
    AppBarTemplateSettings_NegativeCompactVerticalDelta = 2367,
    AppBarTemplateSettings_NegativeHiddenVerticalDelta = 2368,
    AppBarTemplateSettings_NegativeMinimalVerticalDelta = 2369,
    CommandBarTemplateSettings_OverflowContentCompactYTranslation = 2384,
    CommandBarTemplateSettings_OverflowContentHiddenYTranslation = 2385,
    CommandBarTemplateSettings_OverflowContentMinimalYTranslation = 2386,
    FlyoutBase_ShouldConstrainToRootBounds = 2378,
    FlyoutPresenter_IsDefaultShadowEnabled = 2380,
    MenuFlyoutPresenter_IsDefaultShadowEnabled = 2381,
    Popup_ShouldConstrainToRootBounds = 2379,
    ThemeShadow_Receivers = 2279,
    UIElement_ActualOffset = 2382,
    UIElement_ActualSize = 2383,
    UIElement_Shadow = 2130,
  }
  public enum XamlTypeIndex {
    ThemeShadow = 964,
  }
}
namespace Windows.UI.Xaml.Documents {
  public class TextElement : DependencyObject {
    XamlRoot XamlRoot { get; set; }
  }
}
namespace Windows.UI.Xaml.Hosting {
  public sealed class ElementCompositionPreview {
    public static UIElement GetAppWindowContent(AppWindow appWindow);
    public static void SetAppWindowContent(AppWindow appWindow, UIElement xamlContent);
  }
}
namespace Windows.UI.Xaml.Input {
  public sealed class FocusManager {
    public static object GetFocusedElement(XamlRoot xamlRoot);
  }
  public class StandardUICommand : XamlUICommand {
    StandardUICommandKind Kind { get; set; }
  }
}
namespace Windows.UI.Xaml.Media {
  public class AcrylicBrush : XamlCompositionBrushBase {
    IReference<double> TintLuminosityOpacity { get; set; }
    public static DependencyProperty TintLuminosityOpacityProperty { get; }
  }
  public class Shadow : DependencyObject
  public class ThemeShadow : Shadow
  public sealed class VisualTreeHelper {
    public static IVectorView<Popup> GetOpenPopupsForXamlRoot(XamlRoot xamlRoot);
  }
}
namespace Windows.UI.Xaml.Media.Animation {
  public class GravityConnectedAnimationConfiguration : ConnectedAnimationConfiguration {
    bool IsShadowEnabled { get; set; }
  }
}
namespace Windows.Web.Http {
  public sealed class HttpClient : IClosable, IStringable {
    IAsyncOperationWithProgress<HttpRequestResult, HttpProgress> TryDeleteAsync(Uri uri);
    IAsyncOperationWithProgress<HttpRequestResult, HttpProgress> TryGetAsync(Uri uri);
    IAsyncOperationWithProgress<HttpRequestResult, HttpProgress> TryGetAsync(Uri uri, HttpCompletionOption completionOption);
    IAsyncOperationWithProgress<HttpGetBufferResult, HttpProgress> TryGetBufferAsync(Uri uri);
    IAsyncOperationWithProgress<HttpGetInputStreamResult, HttpProgress> TryGetInputStreamAsync(Uri uri);
    IAsyncOperationWithProgress<HttpGetStringResult, HttpProgress> TryGetStringAsync(Uri uri);
    IAsyncOperationWithProgress<HttpRequestResult, HttpProgress> TryPostAsync(Uri uri, IHttpContent content);
    IAsyncOperationWithProgress<HttpRequestResult, HttpProgress> TryPutAsync(Uri uri, IHttpContent content);
    IAsyncOperationWithProgress<HttpRequestResult, HttpProgress> TrySendRequestAsync(HttpRequestMessage request);
    IAsyncOperationWithProgress<HttpRequestResult, HttpProgress> TrySendRequestAsync(HttpRequestMessage request, HttpCompletionOption completionOption);
  }
  public sealed class HttpGetBufferResult : IClosable, IStringable
  public sealed class HttpGetInputStreamResult : IClosable, IStringable
  public sealed class HttpGetStringResult : IClosable, IStringable
  public sealed class HttpRequestResult : IClosable, IStringable
}
namespace Windows.Web.Http.Filters {
  public sealed class HttpBaseProtocolFilter : IClosable, IHttpFilter {
    User User { get; }
    public static HttpBaseProtocolFilter CreateForUser(User user);
  }
}

The post Windows 10 SDK Preview Build 18317 available now! appeared first on Windows Developer Blog.

.NET Framework January 22, 2018 Preview of Cumulative Update for Windows 10 version 1809 and Windows Server 2019

$
0
0

Today, we are releasing the January 22, 2018 Preview of .NET Framework Cumulative Update for Windows 10 version 1809 and Windows Server 2019.

For more information about the new Cumulative Updates for .NET Framework for Windows 10 version 1809 and Windows Server 2019 please refer to this recent announcement.

Quality and Reliability

This release contains the following quality and reliability improvements.

CLR

Addresses a garbage collection issue in JIT-compiled code. [672191]

SQL

Mitigatecompatibility breaks seen in some System.Data.SqlClient usage scenarios. [721209]

WCF

Addressed a race condition with IIS hosted net.tcp WCF services when the portsharing service is restarted which resulted in the service being unavailable. [663905]

Getting the Update

The Security and Quality Rollup is available via Windows Update, Windows Server Update Services, and Microsoft Update Catalog.

Microsoft Update Catalog

You can get the update via the Microsoft Update Catalog. For Windows 10, .NET Framework updates are part of the Windows 10 Monthly Rollup.

The following table is for Windows 10 and Windows Server 2016+ versions.


Product Version Preview of Quality Rollup KB
Windows 10 1809 (October 2018 Update) Catalog
4481031
.NET Framework 3.5, 4.7.2 4481031


Viewing all 10804 articles
Browse latest View live


<script src="https://jsc.adskeeper.com/r/s/rssing.com.1596347.js" async> </script>