Microsoft Office 365 is now available for organizations and enterprises from our new cloud datacenter regions in Switzerland.
The post Microsoft Office 365 now available from new Swiss datacenter regions appeared first on Microsoft 365 Blog.
Microsoft Office 365 is now available for organizations and enterprises from our new cloud datacenter regions in Switzerland.
The post Microsoft Office 365 now available from new Swiss datacenter regions appeared first on Microsoft 365 Blog.
A few months ago, we posted a survey to gather feedback on your experience with metrics in Azure Portal. Thank you for participation and providing valuable suggestions! We appreciate your input, whether you are working on a hobby project, in a governmental organization, or any size company—small to huge.
We want to share some of the insights we gained from the survey and highlight some of the features that we delivered based on your feedback. These features include:
One of the key pieces of feedback we heard was about the resource picker panel. You said that being able to select only one resource at a time when choosing a scope is too limiting. Now you can select multiple resources across resources groups in a subscription.
Many of you asked for ability to configure the sort order based on dimension values, and for control over the maximum number of timeseries shown on the chart. Those who asked, explained that for some metrics, such as “Available memory” and “Remaining disk space,” they want to see the timeseries with smallest values, while for other metrics, including “CPU Utilization” or “Count of Failures,” showing the timeseries with highest values make more sense. To make it possible, we expanded the dimension splitter selector with Sort order and Limit count inputs.

Charts with multiple timeseries over the long period, especially with short time grain are based on queries that return lots of datapoints. Unfortunately, processing too many datapoints may slow down chart interactions. To ensure the best performance, we used to apply a hard limit on the number of datapoints per chart, prompting users to lower the time range or to increase the time grain when the query returns too much data.
Some of you found the old experience frustrating. You said that that occasionally you might want to plot charts with lots of datapoints, regardless of performance. Based on your suggestions, we changed the way we handle the limit. Instead of blocking chart rendering, we now display a message that suggests that the metrics query will return a lot of data, but letting your proceed anyways (with a friendly reminder that you might need to wait longer for the chart to display).

High-density charts from lots of datapoints can be useful to visualize the outliers, as shown in this example:

A small but useful improvement was made based on your feedback that the chart legends often wouldn’t fit on the chart, making it hard to interpret the data. This was almost always happening with the charts pinned to dashboards and rendered in the tight space of dashboard tiles, or on screens that have smaller resolution. To solve the problem, we now let you scroll the legend until you find the data you need:

Let us know how we're doing and what more you'd like to see. Please stay tuned for more information on these and other new features in the coming months. We are continuously addressing pain points and making improvements based on your input.
If you have any questions or comments before our next survey, please use the feedback button on the Metrics blade. Don’t feel shy about giving us a shout out if you like a new feature or are excited about the direction we’re headed. Smiles are just as important in influencing our plans as frowns!
R 3.6.2, the latest update to the R language, is now available for download on Windows, Mac and Linux.
As a minor release, R 3.6.2 makes only small improvements to R, including some new options for dot charts and better handling of missing values when using running medians as a smoother on charts. It also includes several bug fixes and performance improvements.
But big changes are coming to R with version 4.0.0, which is expected to be released not long after R's official 20th birthday on February 29, 2020. (The CelebRation 2020 conference will mark the occasion in Copenhagen.) The R Core team has announced previews of some of the changes, which include:
An enhanced reference counting system. When you delete an object in R, it will usually releases the associated memory back to the operating system. Likewise, if you copy an object with y <- x, R won't allocate new memory for y unless x is later modified. In current versions of R, however, that system breaks down if there are more than 2 references to any block of memory. Starting with R 4.0.0, all references will be counted, and so R should reclaim as much memory as possible, reducing R's overall memory footprint. This will have no impact on how you write R code, but this change make R run faster, especially on systems with limited memory and with slow storage systems.
Normalization of matrix and array types. Conceptually, a matrix is just a 2-dimensional array. But current versions of R handle matrix and 2-D array objects differently in some cases. In R 4.0.0, matrix objects will formally inherit from the array class, eliminating such inconsistencies.
A refreshed color palette for charts. The base graphics palette for current versions of R (shown as R3 below) features saturated colors that vary considerably in brightness (for example, yellow doesn't display as prominently as red). In R 4.0.0, the palette R4 below will be used, with colors of consistent luminance that are easier to distinguish, especially for viewers with color deficiencies. Additional palettes will make it easy to make base graphics charts that match the color scheme of ggplot2 and other graphics systems.
Many other smaller changes are in the works too. See the NEWS file for the upcoming R release for details.
R developer page: NEWS file for upcoming R release
Docker containers provide a consistent development environment for building, testing, and deployment. The virtualized OS, file system, environment settings, libraries, and other dependencies are all encapsulated and shipped as one image that can be shared between developers and machines. This is especially useful for C++ cross-platform developers because you can target a container that runs a different operating system than the one on your development machine.
In this blog post we’re going to use Visual Studio’s native CMake support to build a simple Linux application in a Linux docker container over SSH. This post focuses on creating your first docker container and building from Visual Studio. If you’re interested in learning more about Docker as a tool to configure reproducible build environments, check out our post on using multi-stage containers for C++ development.
This workflow leverages Visual Studio’s native support for CMake, but the same instructions can be used to build a MSBuild-based Linux project in Visual Studio.
First, we’ll set-up a Linux docker container on Windows. You will need to download the Docker Desktop Client for Windows and create a docker account if you haven’t already. See Install Docker Desktop on Windows for download information, system requirements, and installation instructions.
We’ll get started by pulling down an image of the Ubuntu OS and running a few commands. From the Windows command prompt run:
> docker pull ubuntu
This will download the latest image of Ubuntu from Docker. You can see a list of your docker images by running:
> docker images

Next, we’ll use a Dockerfile to create a custom image based on our local image of Ubuntu. Dockerfiles contain the commands used to assemble an image and allow you to automatically reproduce the same build environment from any machine. See Dockerfile reference for more information on authoring your own Dockerfiles. The following Dockerfile can be used to install Visual Studio’s required build tools and configure SSH. CMake is also a required dependency but I will deploy statically linked binaries directly from Visual Studio in a later step. Use your favorite text editor to create a file called ‘Dockerfile’ with the following content.
# our local base image
FROM ubuntu

LABEL description="Container for use with Visual Studio"

# install build dependencies
RUN apt-get update && apt-get install -y g++ rsync zip openssh-server make

# configure SSH for communication with Visual Studio
RUN mkdir -p /var/run/sshd

RUN echo 'PasswordAuthentication yes' >> /etc/ssh/sshd_config &&
   ssh-keygen -A

# expose port 22
EXPOSE 22
We can then build an image based on our Dockerfile by running the following command from the directory where your Dockerfile is saved:
> docker build -t ubuntu-vs .
Next, we can run a container derived from our image:
> docker run -p 5000:22 -i -t ubuntu-vs /bin/bash
The -p flag is used to expose the container’s internal port to the host. If this step was successful, then you should automatically attach to the running container. You can stop your docker container at any time and return to the command prompt using the exit command. To reattach, run docker ps -a, docker start <container-ID>, and docker attach <container-ID> from the command prompt.
Lastly, we will interact with our docker container directly to start SSH and create a user account to use with our SSH connection. Note that you can also enable root login and start SSH from your Dockerfile if you want to avoid any manual and container-specific configuration. Replace <user-name> with the username you would like to use and run:
> service ssh start
> useradd -m -d /home/<user-name> -s /bin/bash -G sudo <user-name>
> passwd <user-name>
The -m and -d flags create a user with the specified home directory, and the -s flag sets the user’s default shell.
You are now ready to connect to your container from Visual Studio.
Make sure you have Visual Studio 2019 and the Linux development with C++ workload installed.
Open Visual Studio 2019 a create a new CMake Project. CMake is cross-platform and allows you to configure an application to run on both Windows and Linux.
Once the IDE has loaded, you can add a SSH connection to your Linux docker container the same way you would add any other remote connection. Navigate to the Connection Manager (Tools > Options > Cross Platform > Connection Manager) and select “Add” to add a new remote connection.
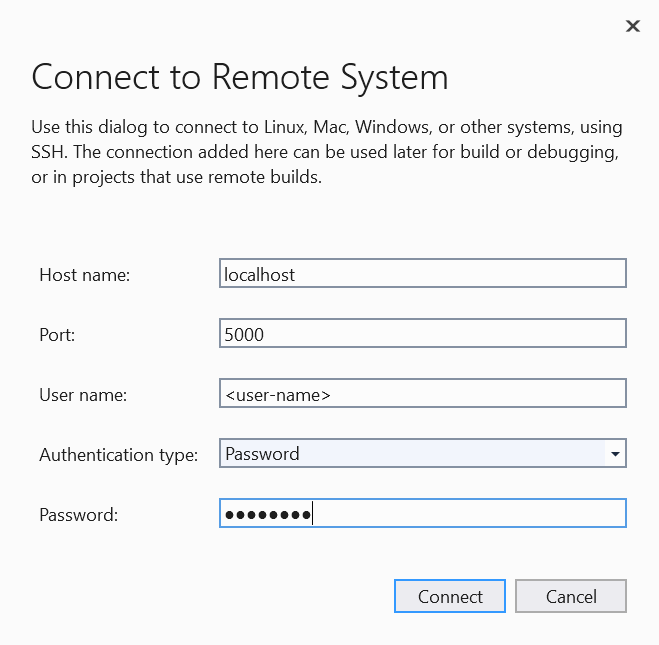
Your host name should be “localhost”, the port should be whatever you are using for your SSH connection (in this example we’re using 5000), and your username and password should match the user account that you just created for your container.
At this point the project behaves like any other CMake project in Visual Studio. To configure and build the console application in our Linux container navigate to “Manage Configurations…” in the configuration drop-down.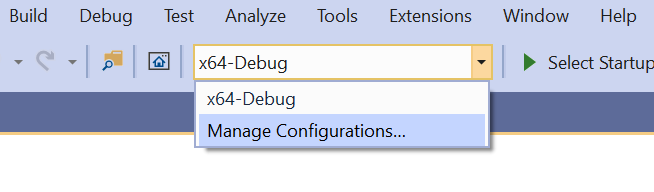
You can then select the green plus sign in the CMake Settings Editor to add a new “Linux-Debug” configuration. Make sure that the remote machine name of your Linux configuration matches the remote connection we created for our Linux docker container.

Save the CMake Settings Editor (ctrl + s) and select your new Linux configuration from the configuration drop-down to kick off a CMake configuration. If you don’t already have CMake installed on your docker container, then Visual Studio will prompt you to deploy statically linked binaries directly to your remote connection as a part of the configure step.
At this point you can build your application in your Linux docker container directly from Visual Studio. Additional build settings (including custom toolchain files, CMake variables, and environment variables) can be configured in the CMake Settings Editor. The underlying CMakeSettings.json file can store multiple build configurations and can be checked into source control and shared between team members.
This post showed you how to build a C++ application in a Linux docker container with Visual Studio. Stay tuned for our next post, where will we show you how to copy the build artifacts back to your local Windows machine and debug using gdbserver on a second remote system.
Do you have feedback on our Linux tooling or CMake support in Visual Studio? We’d love to hear from you to help us prioritize and build the right features for you. We can be reached via the comments below, Developer Community, email (visualcpp@microsoft.com), and Twitter (@VisualC).
The post Build C++ Applications in a Linux Docker Container with Visual Studio appeared first on C++ Team Blog.
It is the holiday season, and the bright lights are everywhere. In the technology world, I hope you’re seeing more green than red lights in your Azure Pipelines status badges!
Monitor Azure DevOps workflows and pipelines with Datadog
Pipeline status monitoring is an important part of the software delivery lifecycle. You can now monitor Azure DevOps in Datadog, seeing data live in an event stream! The integration can be configured in minutes, and allows you to monitor Azure Pipelines as well as other types of events, such as work item or repository activity. Thank you, Steve Harrington, Rogan Ferguson and Shashank Barsin for creating this overview!
Automating Build Pipeline Creation using Azure DevOps Services REST API
While you can configure all of your pipelines through the UI, Azure DevOps also offers a full REST API that allows you to automate the workflow. Ryan Buchanan was facing a particular problem – the need to create a large number of similar pipelines. This post demonstrates a PowerShell script used to automate the REST API calls for creating the Azure Pipelines. Thank you, Ryan!
Canary Deployments with Just Azure DevOps
Canary releases are very useful, especially when it comes to applications deployed on container orchestrators. In this blog, Yuri Burger details how to create canary releases for Kubernetes apps using Azure Pipelines. This implementation does not use the new canary deployment strategy yet, but does have gated approvals, which is certainly helpful!
What Is Azure Pipelines A Primer
In this new video series, Mickey Gousset starts with an overview of general CI/CD and Azure Pipelines concepts, and then continues with deeper dives into Azure YAML Pipeline features. Subscribe to Mickey’s channel for more upcoming videos!
CI/CD for Go App with Azure Pipelines
And if you are in the mood for a longer video, here is an excellent presentation on how to build, test and deploy a Go Web API using Azure DevOps. Thanks, Rainer Stropek!
If you’ve written an article about Azure DevOps or find some great content about DevOps on Azure, please share it with the #AzureDevOps hashtag on Twitter!
The post Top Stories from the Microsoft DevOps Community – 2019.12.13 appeared first on Azure DevOps Blog.
As announced in October, Bing is adopting the new Microsoft Edge as the engine to run JavaScript and render web pages. We have already switched to Microsoft Edge for thousands of web sites “under the hood”. This evolution was transparent for most of the sites and we carefully tested to check whether each website is rendering fine on switching to Microsoft Edge. Over the coming months, we will scale this migration to cover all the sites.
So far, we were crawling using an existing bingbot user-agents. With this change, we will start the transition to a new bingbot user-agent, first for sites which require it for rendering and then gradually and carefully to all sites.
Bingbot user-agents today
Mozilla/5.0 (compatible; bingbot/2.0; +http://www.bing.com/bingbot.htm) Mozilla/5.0 (iPhone; CPU iPhone OS 7_0 like Mac OS X) AppleWebKit/537.51.1 (KHTML, like Gecko) Version/7.0 Mobile/11A465 Safari/9537.53 (compatible; bingbot/2.0; +http://www.bing.com/bingbot.htm) Mozilla/5.0 (Windows Phone 8.1; ARM; Trident/7.0; Touch; rv:11.0; IEMobile/11.0; NOKIA; Lumia 530) like Gecko (compatible; bingbot/2.0; +http://www.bing.com/bingbot.htm)
In addition to the existing user-agents listed above, following are the new evergreen Bingbot user-agents
DesktopMozilla/5.0 AppleWebKit/537.36 (KHTML, like Gecko; compatible; bingbot/2.0; +http://www.bing.com/bingbot.htm) Chrome/W.X.Y.Z Safari/537.36 Edg/W.X.Y.Z
MobileMozilla/5.0 (Linux; Android 6.0.1; Nexus 5X Build/MMB29P) AppleWebKit/537.36 (KHTML, like Gecko) Chrome/W.X.Y.Z Mobile Safari/537.36 Edg/W.X.Y.Z (compatible; bingbot/2.0; +http://www.bing.com/bingbot.htm)
We are committing to regularly update our web page rendering engine to the most recent stable version of Microsoft Edge thus making the above user agent strings to be evergreen. Thus, "W.X.Y.Z" will be substituted with the latest Microsoft Edge version we're using, for example “80.0.345.0".
How to test your web site
For most web sites, there is nothing to worry as we will carefully test the sites to dynamically render fine before switching them to Microsoft Edge and our new user-agent.
We invite you to install and test the new Microsoft Edge to check if your site looks fine with it. If it does then you will not be affected by the change. You can also register your site on Bing Webmaster Tools to get insights about your site, to be notified if we detect issues and to investigate your site using our upcoming tools based on our new rendering engine.
We look forward to sharing more details in the future.
Thanks,
Fabrice Canel
Principal Program Manager
Microsoft - Bing
We introduced the preview of bursting support on Azure Premium SSD Disks, and new disk sizes 4/8/16 GiB on both Premium & Standard SSDs at Microsoft Ignite in November. We would like to share more details about it. With bursting, eligible Premium SSD disks can now achieve up to 30x of the provisioned performance target, better handling for spiky workloads. If you have workloads running on-premises with less predictable disk traffic, you can migrate to Azure and improve your overall performance taking advantage of bursting support.
Disk bursting is enforced on a credit based system, where you will accumulate credits when traffic is below provisioned target and consume credit when it exceeds provisioned. You can best leverage the capability in these scenarios below:
With this preview release, we lower the entry cost of cloud adoption with smaller disk sizes and make our disk offerings more performant leveraging burst support. Start leveraging these new disk capabilities to build your most performant, robust and cost-efficient solution on Azure today!
Create new managed disks on the burst applicable sizes using the Azure portal, Powershell, or command-line interface (CLI) now! You can find the specifications of burst eligible and new disk sizes in the table below. The preview regions that support bursting and new disk sizes are listed in our Azure Disks frequently asked questions article. We are actively extending the preview support to more regions.
Bursting capability is supported on Premium SSD managed disks only. It will be enabled by default for all new deployments in the supported regions. For existing disks of the applicable sizes, you can enable bursting with either of the two options: detach and re-attach the disk or stop and restart the attached VM. To learn more details on how bursting works, please refer to this "What disk types are available in Azure?" article.
|
Burst Capable Disks |
Disk Size |
Provisioned IOPS per disk |
Provisioned Bandwidth per disk |
Max Burst IOPS per disk |
Max Burst Bandwidth per disk |
Max Burst Duration at Peak Burst Rate |
|
P1 – New |
4 GiB |
120 |
25 MiB/sec |
3,500 |
170 MiB/sec |
30 mins |
|
P2 – New |
8 GiB |
120 |
25 MiB/sec |
3,500 |
170 MiB/sec |
30 mins |
|
P3 – New |
16 GiB |
120 |
25 MiB/sec |
3,500 |
170 MiB/sec |
30 mins |
|
P4 |
32 GiB |
120 |
25 MiB/sec |
3,500 |
170 MiB/sec |
30 mins |
|
P6 |
64 GiB |
240 |
50 MiB/sec |
3,500 |
170 MiB/sec |
30 mins |
|
P10 |
128 GiB |
500 |
100 MiB/sec |
3,500 |
170 MiB/sec |
30 mins |
|
P15 |
256 GiB |
1,100 |
125 MiB/sec |
3,500 |
170 MiB/sec |
30 mins |
|
P20 |
512 GiB |
2,300 |
150 MiB/sec |
3,500 |
170 MiB/sec |
30 mins |
Here are the new disk sizes introduced on Standard SSD Disks. The performance targets define the max IOPS and bandwidth you can achieve on these sizes. Compared to Premium SSD Disks above, the disk IOPS and bandwidth offered are not provisioned. For your performance sensitive workloads or single instance deployment, we recommend you leverage Premium SSDs.
|
Disk Size |
Max IOPS per disk |
Max Bandwidth per disk |
|
|
E1 – New |
4 GiB |
120 |
25 MB/sec |
|
E2 – New |
8 GiB |
120 |
25 MB/sec |
|
E3 – New |
16 GiB |
120 |
25 MB/sec |
Visit our service website to explore the Azure Disk Storage portfolio. To learn about pricing, you can visit the Azure Managed Disks pricing page.
We look forward to hearing your feedback on the new disk sizes. Please email us at AzureDisks@microsoft.com.
Last month, we announced .NET support for Jupyter notebooks, and showed how to use them to work with .NET for Apache Spark and ML.NET. Today, we’re announcing the preview of a DataFrame type for .NET to make data exploration easy. If you’ve used Python to manipulate data in notebooks, you’ll already be familiar with the concept of a DataFrame. At a high level, it is an in-memory representation of structured data. In this blog post, I’m going to give an overview of this new type and how you can use it from Jupyter notebooks. To play along, fire up a .NET Jupyter Notebook in a browser.
DataFrame stores data as a collection of columns. Let’s populate a DataFrame with some sample data and go over the major features. The full sample can be found on Github(C# and F#). To follow along in your browser, click here and navigate to csharp/Samples/DataFrame-Getting Started.ipynb(or fsharp/Samples/DataFrame-Getting Started.ipynb). To get started, let’s import the Microsoft.Data.Analysis package and namespace into our .NET Jupyter Notebook (make sure you’re using the C# or F# kernel):

Let’s make three columns to hold values of types DateTime, int and string.
PrimitiveDataFrameColumn<DateTime> dateTimes = new PrimitiveDataFrameColumn<DateTime>("DateTimes"); // Default length is 0.
PrimitiveDataFrameColumn<int> ints = new PrimitiveDataFrameColumn<int>("Ints", 3); // Makes a column of length 3. Filled with nulls initially
StringDataFrameColumn strings = new StringDataFrameColumn("Strings", 3); // Makes a column of length 3. Filled with nulls initially
PrimitiveDataFrameColumn is a generic column that can hold primitive types such as int, float, decimal etc. A StringDataFrameColumn is a specialized column that holds string values. Both the column types can take a length parameter in their contructors and are filled with null values initially. Before we can add these columns to a DataFrame though, we need to append three values to our dateTimes column. This is because the DataFrame constructor expects all its columns to have the same length.
// Append 3 values to dateTimes
dateTimes.Append(DateTime.Parse("2019/01/01"));
dateTimes.Append(DateTime.Parse("2019/01/01"));
dateTimes.Append(DateTime.Parse("2019/01/02"));
Now we’re ready to create a DataFrame with three columns.
DataFrame df = new DataFrame(dateTimes, ints, strings); // This will throw if the columns are of different lengths
One of the benefits of using a notebook for data exploration is the interactive REPL. We can enter df into a new cell and run it to see what data it contains. For the rest of this post, we’ll work in a .NET Jupyter environment. All the sample code will work in a regular console app as well though.

We immediately see that the formatting of the output can be improved. Each column is printed as an array of values and we don’t see the names of the columns. If df had more rows and columns, the output would be hard to read. Fortunately, in a Jupyter environment, we can write custom formatters for types. Let’s write a formatter for DataFrame.
using Microsoft.AspNetCore.Html;
Formatter<DataFrame>.Register((df, writer) =>
{
    var headers = new List<IHtmlContent>();
    headers.Add(th(i("index")));
    headers.AddRange(df.Columns.Select(c => (IHtmlContent) th(c.Name)));
    var rows = new List<List<IHtmlContent>>();
    var take = 20;
    for (var i = 0; i < Math.Min(take, df.Rows.Count); i++)
    {
        var cells = new List<IHtmlContent>();
        cells.Add(td(i));
        foreach (var obj in df.Rows[i])
        {
            cells.Add(td(obj));
        }
        rows.Add(cells);
    }

    var t = table(
        thead(
            headers),
        tbody(
            rows.Select(
                r => tr(r))));

    writer.Write(t);
}, "text/html");
This snippet of code register a new DataFrame formatter. All subsequent evaluations of df in a notebook will now output the first 20 rows of a DataFrame along with the column names. In the future, the DataFrame type and other libraries that target Jupyter as one of their environments will be able to ship with their formatters.

Sure enough, when we re-evaluate df, we see that it contains the three columns we created previously. The formatting makes it much easier to inspect our values. There’s also a helpful index column in the output to quickly see which row we’re looking at. Let’s modify our data by indexing into df:
df[0, 1] = 10; // 0 is the rowIndex, and 1 is the columnIndex. This sets the 0th value in the Ints columns to 10

We can also modify the values in the columns through indexers defined on PrimitiveDataFrameColumn and StringDataFrameColumn:
// Modify ints and strings columns by indexing
ints[1] = 100;
strings[1] = "Foo!";

One caveat to keep in mind here is the data type of the value passed in to the indexers. We passed in the right data types to the column indexers in our sample: an integer value of 100 to ints[1] and a string "Foo!" to string[1]. If the data types don’t match, an exception will be thrown. For cases where the type of data in the columns is not obvious, there is a handy DataType property defined on each column. The Info method displays the DataType and Length properties of each column:

The DataFrame and DataFrameColumn classes expose a number of useful APIs: binary operations, computations, joins, merges, handling missing values and more. Let’s look at some of them:
// Add 5 to Ints through the DataFrame
df["Ints"].Add(5, inPlace: true);

// We can also use binary operators. Binary operators produce a copy, so assign it back to our Ints column
df["Ints"] = (ints / 5) * 100;

All binary operators are backed by functions that produces a copy by default. The + operator, for example, calls the Add method and passes in false for the inPlace parameter. This lets us elegantly manipulate data using operators without worrying about modifying our existing values. For when in place semantics are desired, we can set the inPlace parameter to true in the binary functions.
In our sample, df has null values in its columns. DataFrame and DataFrameColumn offer an API to fill nulls with values.
df["Ints"].FillNulls(-1, inPlace: true);
df["Strings"].FillNulls("Bar", inPlace: true);

DataFrame exposes a Columns property that we can enumerate over to access our columns and a Rows property to access our rows. We can index Rows to access each row. Here’s an example that accesses the first row:
DataFrameRow row0 = df.Rows[0];

To inspect our values better, let’s write a formatter for DataFrameRow that displays values in a single line.
using Microsoft.AspNetCore.Html;
Formatter<DataFrameRow>.Register((dataFrameRow, writer) =>
{
    var cells = new List<IHtmlContent>();
    cells.Add(td(i));
    foreach (var obj in dataFrameRow)
    {
        cells.Add(td(obj));
    }

    var t = table(
        tbody(
            cells));

    writer.Write(t);
}, "text/html");

To enumerate over all the rows in a DataFrame, we can write a simple for loop. DataFrame.Rows.Count returns the number of rows in a DataFrame and we can use the loop index to access each row.
for (long i = 0; i < df.Rows.Count; i++)
{
       DataFrameRow row = df.Rows[i];
}
Note that each row is a view of the values in the DataFrame. Modifying the values in the row object modifies the values in the DataFrame. We do however lose type information on the returned row object. This is a consequence of DataFrame being a loosely typed data structure.
Let’s wrap up our DataFrame API tour by looking at the Filter, Sort, GroupBy methods:
// Filter rows based on equality
PrimitiveDataFrameColumn<bool> boolFilter = df["Strings"].ElementwiseEquals("Bar");
DataFrame filtered = df.Filter(boolFilter);

ElementwiseEquals returns a PrimitiveDataFrameColumn<bool> filled with a true for every row that equals "Bar" in the Strings column, and a false when it doesn’t equal "Bar". In the df.Filter call, each row corresponding to a true value in boolFilter selects a row out of df. The resulting DataFrame contains only these rows.
// Sort our dataframe using the Ints column
DataFrame sorted = df.Sort("Ints");
// GroupBy
GroupBy groupBy = df.GroupBy("DateTimes");

The GroupBy method takes in the name of a column and creates groups based on unique values in the column. In our sample, the DateTimes column has two unique values, so we expect one group to be created for 2019-01-01 00:00:00Z and one for 2019-01-02 00:00:00Z.
// Count of values in each group
DataFrame groupCounts = groupBy.Count();
// Alternatively find the sum of the values in each group in Ints
DataFrame intGroupSum = groupBy.Sum("Ints");

The GroupBy object exposes a set of methods that can called on each group. Some examples are Max(), Min(), Count() etc. The Count() method counts the number of values in each group and return them in a new DataFrame. The Sum("Ints") method sums up the values in each group.
Finally, when we want to work with existing datasets, DataFrame exposes a LoadCsv method.
DataFrame csvDataFrame = DataFrame.LoadCsv("path/to/file.csv");
Another cool feature of using a DataFrame in a .NET Jupyter environment is charting. XPlot.Plotly is one option to render charts. We can import the XPlot.Plotly namespace into our notebook and create interactive visualizations of the data in our DataFrame. Let’s populate a PrimitiveDataFrameColumn<double> with a normal distribution and plot a histogram of the samples:
#r "nuget:MathNet.Numerics,4.9.0"
using XPlot.Plotly;
using System.Linq;
using MathNet.Numerics.Distributions;

double mean = 0;
double stdDev = 0.1;
MathNet.Numerics.Distributions.Normal normalDist = new Normal(mean, stdDev);

PrimitiveDataFrameColumn<double> doubles = new PrimitiveDataFrameColumn<double>("Normal Distribution", normalDist.Samples().Take(1000));
display(Chart.Plot(
    new Graph.Histogram()
    {
        x = doubles,
        nbinsx = 30
    }
));

We first create a PrimitiveDataFrameColumn<double> by drawing 1000 samples from a normal distribution and then plot a histogram with 30 bins. The resulting chart is interactive! Hovering over the chart reveals the underlying data and lets us inspect each value precisely.
We’ve only explored a subset of the features that DataFrame exposes. Append, Join, Merge, and Aggregations are supported. Each column also implements IEnumerable<T?>, so users can write LINQ queries on columns. The custom DataFrame formatting code we wrote has a simple example. The complete source code(and documentation) for Microsoft.Data.Analysis lives on GitHub. In a follow up post, I’ll go over how to use DataFrame with ML.NET and .NET for Spark. The decision to use column major backing stores (the Arrow format in particular) allows for zero-copy in .NET for Spark User Defined Functions (UDFs)!
We always welcome the community’s feedback! In fact, please feel free to contribute to the source code. We’ve made it easy for users to create new column types that derive from DataFrameColumn to add new functionality. Support for structs such as DateTime and user defined structs is also not as complete as primitive types such as int, float etc. We believe this preview package allows the community to do data analysis in .NET. Try out DataFrame in a .NET Jupyter Notebook and let us know what you think!
The post An Introduction to DataFrame appeared first on .NET Blog.
Starting today, the Microsoft Edge Addons store is now open for submissions for all developers. This is where users will find your extensions for the new Microsoft Edge. You can submit your extensions today by visiting the Partner Center Developer Dashboard.
In most cases, existing extensions built for Chromium will work without any modifications in the new Microsoft Edge. Check out our developer documentation to learn more about Microsoft Edge-specific APIs, tips on submitting your extension, and other helpful information. The extension submission program is in its preview phase and we are excited to hear and incorporate your feedback.
As we move towards the general availability of the new Microsoft Edge on January 15th, 2020, we will no longer accept new submissions for Microsoft Edge Legacy (EdgeHTML-based) extensions after December 17th, 2019. We will continue to accept updates for your existing extensions.
We recommend you prioritize building new extensions for the new Chromium-based Microsoft Edge, and continue to support your existing EdgeHTML-based extensions to ensure a quality experience for active users.
Developers who have given consent for Microsoft to migrate their EdgeHTML extension listings to the new Microsoft Edge should begin to see their extensions available in the new Addons store experience in Microsoft Edge. If you publish an EdgeHTML extension and have not received any communication regarding its migration or are unsure of its status, please contact us at ExtensionPartnerOps@microsoft.com.
If you have already received a confirmation from us regarding migration, we encourage you to log on to the Partner Center Developer Dashboard to validate your access to the extension, and verify whether you can update it. Once the migration is complete, ownership and management will be completely transferred to you, and Microsoft will not be responsible for updating or maintaining your extension.
We will migrate users’ extensions from the current version of Microsoft Edge when they update to the new Microsoft Edge (starting January 15th). Extensions will only be migrated for users if they are already available on the Microsoft Edge Addons store at the time of switching to the new browser.
We recommend that developers update your existing EdgeHTML extensions for Chromium and publish them via the new portal as soon as possible, so your existing customers will not face any interruptions when they update to the new Microsoft Edge.
You can check out our initial developer documentation today, and expect to see more coming soon. If you have any additional questions about the extension submission process, please contact Microsoft Edge Addons Developer Support.
It’s a great time to build for the web, and we look forward to collaborating with you on our new browser!
– Killian McCoy, Program Manager 2
– Pratyusha Avadhanula, Senior Program Manager
The post Get started building extensions for the new Microsoft Edge appeared first on Microsoft Edge Blog.
I updated one of my websites from ASP.NET Core 2.2 to the latest LTS (Long Term Support) version of ASP.NET Core 3.1 this week. Now I want to do the same with my podcast site AND move it to Linux at the same time. Azure App Service for Linux has some very good pricing and allowed me to move over to a Premium v2 plan from Standard which gives me double the memory at 35% off.
My podcast has historically run on ASP.NET Core on Azure App Service for Windows. How do I know if it'll run on Linux? Well, I'll try it see!
I use WSL (Windows Subsystem for Linux) and so should you. It's very likely that you have WSL ready to go on you machine and you just haven't turned it on. Combine WSL (or the new WSL2) with the Windows Terminal and you're in a lovely spot on Windows with the ability to develop anything for anywhere.
First, let's see if I can run my existing ASP.NET Core podcast site (now updated to .NET Core 3.1) on Linux. I'll start up Ubuntu 18.04 on Windows and run dotnet --version to see if I have anything installed already. You may have nothing. I have 3.0 it seems:
$ dotnet --version

3.0.100
Ok, I'll want to install .NET Core 3.1 on WSL's Ubuntu instance. Remember, just because I have .NET 3.1 installed in Windows doesn't mean it's installed in my Linux/WSL instance(s). I need to maintain those on my own. Another way to think about it is that I've got the win-x64 install of .NET 3.1 and now I need the linux-x64 one.
dotnet publish -r linux-x64" and then scp the resulting complete published files over to Linux/WSL. It depends on how I want to divide responsibility. Do I want to build on Windows and run on Linux/Linux? Or do I want to build and run from Linux. Both are valid, it just depends on your choices, patience, and familiarity.
I'll head over to https://dotnet.microsoft.com/download and get .NET Core 3.1 for Ubuntu. If you use apt, and I assume you do, there's some preliminary setup and then it's a simple
sudo apt-get install dotnet-sdk-3.1
No sweat. Let's "dotnet build" and hope for the best!
It might be surprising but if you aren't doing anything tricky or Windows-specific, your .NET Core app should just build the same on Windows as it does on Linux. If you ARE doing something interesting or OS-specific you can #ifdef your way to glory if you insist.
Bonus points if you have Unit Tests - and I do - so next I'll run my unit tests and see how it goes.
OPTION: I write things like build.ps1 and test.ps1 that use PowerShell as PowerShell is on Windows already. Then I install PowerShell (just for the scripting, not the shelling) on Linux so I can use my .ps1 scripts everywhere. The same test.ps1 and build.ps1 and dockertest.ps1, etc just works on all platforms. Make sure you have a shebang
#!/usr/bin/pwshat the top of your ps1 files so you can just run them (chmod +x) on Linux.
I run test.ps1 which runs this command
dotnet test /p:CollectCoverage=true /p:CoverletOutputFormat=lcov /p:CoverletOutput=./lcov .hanselminutes.core.tests
with coverlet for code coverage and...it works! Again, this might be surprising but if you don't have any hard coded paths, make any assumptions about a C: drive existing, and avoid the registry and other Windows-specific things, things work.
Test Run Successful.

Total tests: 23

     Passed: 23

 Total time: 9.6340 Seconds


Calculating coverage result...

  Generating report './lcov.info'


+--------------------------+--------+--------+--------+

| Module                   | Line   | Branch | Method |

+--------------------------+--------+--------+--------+

| hanselminutes.core.Views | 60.71% | 59.03% | 41.17% |

+--------------------------+--------+--------+--------+

| hanselminutes.core       | 82.51% | 81.61% | 85.39% |

+--------------------------+--------+--------+--------+
I can build, I can test, but can I run it? What about running and testing in containers?
I'm running WSL2 on my system and I've doing all this in Ubuntu 18.04 AND I'm running the Docker WSL Tech Preview. Why not see if I can run my tests under Docker as well? From Docker for Windows I'll enabled the Experimental WSL2 support and then from the Resources menu, WSL Integration I'll enable Docker within my Ubuntu 18.04 instance (your instances and their names will be your own).
I can confirm it's working with "docker info" under WSL and talking to a working instance. I should be able to run "docker info" in BOTH Windows AND WSL.
$ docker info

Client:

 Debug Mode: false


Server:

 Containers: 18

  Running: 18

  Paused: 0

  Stopped: 0

 Images: 31

 Server Version: 19.03.5

 Storage Driver: overlay2

  Backing Filesystem: extfs

...snip...
Cool. I remembered I also I needed to update my Dockerfile as well from the 2.2 SDK on the Docker hub to the 3.1 SDK from Microsoft Container Registry, so this one line change:
#FROM microsoft/dotnet:2.2-sdk AS build

FROM mcr.microsoft.com/dotnet/core/sdk:3.1 as build
as well as the final runtime version for the app later in the Dockerfile. Basically make sure your Dockerfile uses the right versions.
#FROM microsoft/dotnet:2.1-aspnetcore-runtime AS runtime

FROM mcr.microsoft.com/dotnet/core/aspnet:3.1 AS runtime
I also volume mount the tests results so there's this offensive If statement in the test.ps1. YES, I know I should just do all the paths with / and make them relative.
#!/usr/bin/pwsh
docker build --pull --target testrunner -t podcast:test .
if ($IsWindows)
{
 docker run --rm -v d:githubhanselminutes-coreTestResults:/app/hanselminutes.core.tests/TestResults podcast:test
}
else
{
 docker run --rm -v ~/hanselminutes-core/TestResults:/app/hanselminutes.core.tests/TestResults podcast:test
}
Regardless, it works and it works wonderfully. Now I've got tests running in Windows and Linux and in Docker (in a Linux container) managed by WSL2. Everything works everywhere. Now that it runs well on WSL, I know it'll work great in Azure on Linux.
This was pretty simple as well.
I'll blog in detail how I build andd eploy the sites in Azure DevOps and how I've moved from .NET 2.2 with Classic "Wizard Built" DevOps Pipelines to a .NET Core 3.1 and a source control checked-in YAML pipeline next week.
The short version is, make a Linux App Service Plan (remember that an "App Service Plan " is a VM that you don't worry about. See in the pick below that the Linux Plan has a penguin icon. Also remember that you can have as many apps inside your plan as you'd like (and will fit in memory and resources). When you select a "Stack" for your app within Azure App Service for Linux you're effectively selecting a Docker Image that Azure manages for you.
I started by deploying to staging.mydomain.com and trying it out. You can use Azure Front Door or CloudFlare to manage traffic and then swap the DNS. I tested on Staging for a while, then just changed DNS directly. I waited a few hours for traffic to drain off the Windows podcast site and then stopped it. After a day or two of no traffic I deleted it. If I did my job right, none of you noticed the site moved from Windows to Linux, from .NET Core 2.2 to .NET Core 3.1. It should be as fast or faster with no downtime.
Here's a snap of my Azure Portal. As of today, I've moved my home page, my blood sugar management portal, and my podcast site all onto a single Linux App Service Plan. Each is hosted on GitHub and each is deploying automatically with Azure DevOps.
Next big migration to the cloud will be this blog which still runs .NET Framework 4.x. I'll blog how the podcast gets checked into GitHub then deployed with Azure DevOps next week.
What cool migrations have YOU done lately, Dear Reader?
Sponsor: Like C#? We do too! That’s why we've developed a fast, smart, cross-platform .NET IDE which gives you even more coding power. Clever code analysis, rich code completion, instant search and navigation, an advanced debugger... With JetBrains Rider, everything you need is at your fingertips. Code C# at the speed of thought on Linux, Mac, or Windows. Try JetBrains Rider today!
Since releasing Microsoft Azure IoT Edge, we have seen many customers using IoT Edge automatic deployments to deploy workloads to the edge at scale. IoT Edge automatic deployments handle the heavy lifting of deploying modules to the relevant Azure IoT Edge devices and allow operators to keep a close eye on status to quickly address any problems. Customers love the benefits and have given us feedback on how to make automatic deployments even better through greater flexibility and seamless experiences. Today, we are sharing a set of enhancements to IoT Edge automatic deployments that are a direct result of this feedback. These enhancements include layered deployments, deploying marketplace modules from the Azure portal and other UI updates, and module support for automatic device configurations.
Layered deployments are a new type of IoT Edge automatic deployments that allow developers and operators to independently deploy subsets of modules. This avoids the need to create an automatic deployment for every combination of modules that may exist across your device fleet. Microsoft Azure IoT Hub evaluates all applicable layered deployments to determine the final set of modules for a given IoT Edge device. Layered deployments have the same basic components as any automatic deployment. They target devices based on tags in the device twins and provide the same functionality around labels, metrics, and status reporting. Layered deployments also have priorities assigned to them, but instead of using the priority to determine which deployment is applied to a device, the priority determines how multiple deployments are ranked on a device. For example, if two layered deployments have a module or a route with the same name, the layered deployment with the higher priority will be applied while the lower priority is overwritten.

This first illustration shows how all modules need to be included in each regular deployment, requiring a separate deployment for each target group.

This second illustration shows how layered deployments allow modules to be deployed independently to each target group, with a lower overall number of deployments.
There are updates throughout the IoT Edge automatic deployments UI in the Azure portal. For example, you can now select modules from Microsoft Azure Marketplace from directly within the create deployment experience. The Azure Marketplace features many Azure IoT Edge modules built by Microsoft and partners.

Automatic device management in Azure IoT Hub automates many of the repetitive and complex tasks of managing large device fleets by using automatic device configurations to update and report status on device twin properties. We have heard from many of you that you would like the equivalent functionality for configuring module twins, and are happy to share that this functionality is now available.
Processing Big data in real-time is an operational necessity for many businesses. Azure Stream Analytics is Microsoft’s serverless real-time analytics offering for complex event processing.
We are excited and humbled to announce that Microsoft has been named a leader in The Forrester Wave™: Streaming Analytics, Q3 2019. Microsoft believes this report truly reflects the market momentum of Azure Stream Analytics, satisfied customers, a growing partner ecosystem and the overall strength of our Azure cloud platform. You can access the full report here.

The Forrester Wave™: Streaming Analytics, Q3 2019
Forrester Wave™: Streaming Analytics, Q3 2019 report evaluated streaming analytics offerings from 11 different solution providers and we are honored to share that that Forrester has recognized Microsoft as a Leader in this category. Azure Stream Analytics received the highest possible score in 12 different categories including Ability to execute, Administration, Deployment, Solution Roadmap, Customer adoption and many more.
The report states, “Microsoft Azure Stream Analytics has strengths in scalability, high availability, deployment, and applications. Azure Stream Analytics is an easy on-ramp for developers who already know SQL. Zero-code integration with over 15 other Azure services makes it easy to try and therefore adopt, making the product the real-time backbone for enterprises needing real-time streaming applications on the Azure cloud. Additionally, through integration with IoT Hub and Azure Functions, it offers seamless interoperability with thousands of devices and business applications.”
Whether you have millions of IoT devices streaming data to Azure IoT Hub or have apps sending critical telemetry events to Azure Event Hubs, it only takes a few clicks to connect multiple sources and sinks to create an end-to-end pipeline.
One of the biggest advantages of Stream Analytics is the simple SQL-based query language with its powerful temporal constraints to analyze data in motion. Familiarity with SQL language is enough to author powerful queries. Additionally, Azure Stream Analytics supports language extensibility via C# and JavaScript user-defined functions (UDFs) or user-defined aggregates to perform complex calculations as part of a Stream Analytics query.
Stream Analytics contains a wide array of analytic capabilities such as native support for geospatial functions, built-in callouts to custom machine learning (ML) models for real-time scoring, built-in ML models for Anomaly Detection, Pattern matching, and more to help developers easily tackle complex scenarios while staying in a familiar context.
Azure Stream Analytics helps bring real-time insights and analytics capabilities closer to where your data originates. Customers can easily enable new scenarios with true hybrid architectures for stream processing and run the same query in the cloud or on the IoT edge.
We understand it is critical for businesses to prevent data loss and have business continuity. Stream Analytics guarantees event processing with a 99.9 percent availability service-level agreement (SLA) at the minute level, which is unparalleled in the industry.
Stream Analytics is a fully managed serverless (PaaS) offering on Azure. There is no infrastructure to worry about, and no servers, virtual machines, or clusters to manage. We do all the heavy lifting for you in the background. You can instantly scale up or scale-out the processing power from one to hundreds of streaming units for any job.
Stream Analytics guarantees “exactly once” event processing and at least once delivery of events. It has built-in recovery capabilities in case the delivery of an event fails. So, you never have to worry about your events getting dropped.
There is a strong and growing developer community that supports Stream Analytics. Learn how to get started and build a real-time fraud detection system.
“Continuing our Azure reliability series to be as transparent as possible about key initiatives underway to keep improving availability, today we turn our attention to Azure Active Directory. Microsoft Azure Active Directory (Azure AD) is a cloud identity service that provides secure access to over 250 million monthly active users, connecting over 1.4 million unique applications and processing over 30 billion daily authentication requests. This makes Azure AD not only the largest enterprise Identity and Access Management solution, but easily one of the world’s largest services. The post that follows was written by Nadim Abdo, Partner Director of Engineering, who is leading these efforts.” - Mark Russinovich, CTO, Azure
Our customers trust Azure AD to manage secure access to all their applications and services. For us, this means that every authentication request is a mission critical operation. Given the critical nature and the scale of the service, our identity team’s top priority is the reliability and security of the service. Azure AD is engineered for availability and security using a truly cloud-native, hyper-scale, multi-tenant architecture and our team has a continual program of raising the bar on reliability and security.
Engineering a service of this scale, complexity, and mission criticality to be highly available in a world where everything we build on can and does fail is a complex task.
Our resilience investments are organized around the set of reliability principles below:

Our availability work adopts a layered defense approach to reduce the possibility of customer visible failure as much as possible; if a failure does occur, scope down the impact of that failure as much as possible, and finally, reduce the time it takes to recover and mitigate a failure as much as possible.
Over the coming weeks and months, we dive deeper into how each of the principles is designed and verified in practice, as well as provide examples of how they work for our customers.
Azure AD is a global service with multiple levels of internal redundancy and automatic recoverability. Azure AD is deployed in over 30 datacenters around the world leveraging Azure Availability Zones where present. This number is growing rapidly as additional Azure Regions are deployed.
For durability, any piece of data written to Azure AD is replicated to at least 4 and up to 13 datacenters depending on your tenant configuration. Within each data center, data is again replicated at least 9 times for durability but also to scale out capacity to serve authentication load. To illustrate—this means that at any point in time, there are at least 36 copies of your directory data available within our service in our smallest region. For durability, writes to Azure AD are not completed until a successful commit to an out of region datacenter.
This approach gives us both durability of the data and massive redundancy—multiple network paths and datacenters can serve any given authorization request, and the system automatically and intelligently retries and routes around failures both inside a datacenter and across datacenters.
To validate this, we regularly exercise fault injection and validate the system’s resiliency to failure of the system components Azure AD is built on. This extends all the way to taking out entire datacenters on a regular basis to confirm the system can tolerate the loss of a datacenter with zero customer impact.
As mentioned, Azure AD itself is architected with multiple levels of internal resilience, but our principle extends even further to have resilience in all our external dependencies. This is expressed in our no single point of failure (SPOF) principle.
Given the criticality of our services we don’t accept SPOFs in critical external systems like Distributed Name Service (DNS), content delivery networks (CDN), or Telco providers that transport our multi-factor authentication (MFA), including SMS and Voice. For each of these systems, we use multiple redundant systems configured in a full active-active configuration.
Much of that work on this principle has come to completion over the last calendar year, and to illustrate, when a large DNS provider recently had an outage, Azure AD was entirely unaffected because we had an active/active path to an alternate provider.
Azure AD is already a massive system running on over 300,000 CPU Cores and able to rely on the massive scalability of the Azure Cloud to dynamically and rapidly scale up to meet any demand. This can include both natural increases in traffic, such as a 9AM peak in authentications in a given region, but also huge surges in new traffic served by our Azure AD B2C which powers some of the world’s largest events and frequently sees rushes of millions of new users.
As an added level of resilience, Azure AD over-provisions its capacity and a design point is that the failover of an entire datacenter does not require any additional provisioning of capacity to handle the redistributed load. This gives us the flexibility to know that in an emergency we already have all the capacity we need on hand.
Safe deployment ensures that changes (code or configuration) progress gradually from internal automation to internal to Microsoft self-hosting rings to production. Within production we adopt a very graduated and slow ramp up of the percentage of users exposed to a change with automated health checks gating progression from one ring of deployment to the next. This entire process takes over a week to fully rollout a change across production and can at any time rapidly rollback to the last well-known healthy state.
This system regularly catches potential failures in what we call our ‘early rings’ that are entirely internal to Microsoft and prevents their rollout to rings that would impact customer/production traffic.
To support the health checks that gate safe deployment and give our engineering team insight into the health of the systems, Azure AD emits a massive amount of internal telemetry, metrics, and signals used to monitor the health of our systems. At our scale, this is over 11 PetaBytes a week of signals that feed our automated health monitoring systems. Those systems in turn trigger alerting to automation as well as our team of 24/7/365 engineers that respond to any potential degradation in availability or Quality of Service (QoS).
Our journey here is expanding that telemetry to provide optics of not just the health of the services, but metrics that truly represent the end-to-end health of a given scenario for a given tenant. Our team is already alerting on these metrics internally and we’re evaluating how to expose this per-tenant health data directly to customers in the Azure Portal.
A good analogy to better understand Azure AD are the compartments in a submarine, designed to be able to flood without affecting either other compartments or the integrity of the entire vessel.
The equivalent for Azure AD is a fault domain, the scale units that serve a set of tenants in a fault domain are architected to be completely isolated from other fault domain’s scale units. These fault domains provide hard isolation of many classes of failures such that the ‘blast radius’ of a fault is contained in a given fault domain.
Azure AD up to now has consisted of five separate fault domains. Over the last year, and completed by next summer, this number will increase to 50 fault domains, and many services, including Azure Multi-Factor Authentication (MFA), are moving to become fully isolated in those same fault domains.
This hard-partitioning work is designed to be a final catch all that scopes any outage or failure to no more than 1/50 or ~2% of our users. Our objective is to increase this even further to hundreds of fault domains in the following year.
The principles above aim to harden the core Azure AD service. Given the critical nature of Azure AD, we’re not stopping there—future posts will cover new investments we’re making including rolling out in production a second and completely fault-decorrelated identity service that can provide seamless fallback authentication support in the event of a failure in the primary Azure AD service.
Think of this as the equivalent to a backup generator or uninterruptible power supply (UPS) system that can provide coverage and protection in the event the primary power grid is impacted. This system is completely transparent and seamless to end users and is now in production protecting a portion of our critical authentication flows for a set of M365 workloads. We’ll be rapidly expanding its applicability to cover more scenarios and workloads.
We look forward to sharing more on our Azure Active Directory Identity Blog, hearing your questions and topics of interest for future posts.
Last month, we kicked-off a challenge for our developer community to build a solution using ASP.NET Core and the new .NET Core features in Visual Studio for Mac. We were delighted to hear from so many of you and we were excited to receive many projects built from scratch using some of the control libraries we highlighted. Check out some of the submissions that came our way:

Thanks to all of you who took part in this challenge – we’re reaching out to get you the sweet, sweet swag that was mentioned as a perk of participating.
We’d also like to say thank you to the .NET Core component library partners that took part in this challenge by contributing licenses to the prize list and for their continued support of .NET Core developers on Mac:
The currently released Visual Studio for Mac v8.3 has full support for .NET Core 3.0. Our v8.4 release, now available in preview, adds support for .NET Core 3.1, Blazor, and ASP.NET Core scaffolding. You can read more about it in the announcement post from last week.
If you have any feedback on this, or any, version of Visual Studio for Mac, we invite you to leave them in the comments below this post or to reach out to us on Twitter at @VisualStudioMac. If you run into issues while using Visual Studio for Mac, you can use Report a Problem to notify the team. In addition to product issues, we also welcome your feature suggestions on the Visual Studio Developer Community website.
The post Achievement Unlocked: Visual Studio for Mac ASP.NET Core Challenge Completed appeared first on Visual Studio Blog.
The North American Aerospace Defense Command (NORAD) is preparing for their annual tradition of tracking Santa around the globe. As NORAD conducts its primary mission of defending Canadian and United States airspace, they take on the supplementary mission of tracking Santa's journey for the holidays.
Much like Santa and his Elves, NORAD gets help from volunteers, partners and Microsoft Employees who will be joining the crew at the Peterson Airforce Base to ensure Santa's safe travels around the globe!
Working with Cesium, a platform for developers to build web-based 3D map apps, NORAD has built a 3D tracker that displays Santa's whereabouts. The 3D tracker app uses Bing Maps satellite imagery to give a realistic texture to the 3D globe rendered by the CesiumJS library.![]()
For devices that do not support 3D, the app falls back to a 2D map using the Bing Maps API. That map displays a pin marking Santa’s current location for you to follow. You can also learn more about each location Santa visits by clicking on an icon that brings up Wikipedia articles and Santa Cam videos that you can play.
Join the world-wide countdown to the big trip with NORAD, play some games and see Santa's location on a Bing Map by visiting https://www.noradsanta.org/.
Wishing you and yours a wonderful holiday season!
- The Bing Maps Team
Today, we released a new Windows 10 Preview Build of the SDK to be used in conjunction with Windows 10 Insider Preview (Build 19041 or greater). The Preview SDK Build 19041 contains bug fixes and under development changes to the API surface area.
The Preview SDK can be downloaded from the developer section on Windows Insider.
For feedback and updates to the known issues, please see the developer forum. For new developer feature requests, head over to our Windows Platform UserVoice.
We have stood up a NuGet feed for the flighted builds of the SDK. You can now test preliminary builds of the Windows 10 WinRT API Pack, as well as a microsoft.windows.sdk.headless.contracts NuGet package.
We use the following feed to flight our NuGet packages.
Microsoft.Windows.SDK.Contracts which can be used with to add the latest Windows Runtime APIs support to your .NET Framework 4.5+ and .NET Core 3.0+ libraries and apps.
The Windows 10 WinRT API Pack enables you to add the latest Windows Runtime APIs support to your .NET Framework 4.5+ and .NET Core 3.0+ libraries and apps.
Microsoft.Windows.SDK.Headless.Contracts provides a subset of the Windows Runtime APIs for console apps excludes the APIs associated with a graphical user interface. This NuGet is used in conjunction with
Windows ML container development. Check out the Getting Started guide for more information.
Removal of api-ms-win-net-isolation-l1-1-0.lib
In this release api-ms-win-net-isolation-l1-1-0.lib has been removed from the Windows SDK. Apps that were linking against api-ms-win-net-isolation-l1-1-0.lib can switch to OneCoreUAP.lib as a replacement.
Removal of IRPROPS.LIB
In this release irprops.lib has been removed from the Windows SDK. Apps that were linking against irprops.lib can switch to bthprops.lib as a drop-in replacement.
Removal of WUAPICommon.H and WUAPICommon.IDL
In this release we have moved ENUM tagServerSelection from WUAPICommon.H to wupai.h and removed the header. If you would like to use the ENUM tagServerSelection, you will need to include wuapi.h or wuapi.idl.
The following APIs have been added to the platform since the release of Windows 10 SDK, version 1903, build 18362.
namespace Windows.AI.MachineLearning {
  public sealed class LearningModelSessionOptions {
    bool CloseModelOnSessionCreation { get; set; }
  }
}
namespace Windows.ApplicationModel {
  public sealed class AppInfo {
    public static AppInfo Current { get; }
    Package Package { get; }
    public static AppInfo GetFromAppUserModelId(string appUserModelId);
    public static AppInfo GetFromAppUserModelIdForUser(User user, string appUserModelId);
  }
  public interface IAppInfoStatics
  public sealed class Package {
    StorageFolder EffectiveExternalLocation { get; }
    string EffectiveExternalPath { get; }
    string EffectivePath { get; }
    string InstalledPath { get; }
    bool IsStub { get; }
    StorageFolder MachineExternalLocation { get; }
    string MachineExternalPath { get; }
    string MutablePath { get; }
    StorageFolder UserExternalLocation { get; }
    string UserExternalPath { get; }
    IVectorView<AppListEntry> GetAppListEntries();
    RandomAccessStreamReference GetLogoAsRandomAccessStreamReference(Size size);
  }
}
namespace Windows.ApplicationModel.AppService {
  public enum AppServiceConnectionStatus {
    AuthenticationError = 8,
    DisabledByPolicy = 10,
    NetworkNotAvailable = 9,
    WebServiceUnavailable = 11,
  }
  public enum AppServiceResponseStatus {
    AppUnavailable = 6,
    AuthenticationError = 7,
    DisabledByPolicy = 9,
    NetworkNotAvailable = 8,
    WebServiceUnavailable = 10,
  }
  public enum StatelessAppServiceResponseStatus {
    AuthenticationError = 11,
    DisabledByPolicy = 13,
    NetworkNotAvailable = 12,
    WebServiceUnavailable = 14,
  }
}
namespace Windows.ApplicationModel.Background {
  public sealed class BackgroundTaskBuilder {
    void SetTaskEntryPointClsid(Guid TaskEntryPoint);
  }
  public sealed class BluetoothLEAdvertisementPublisherTrigger : IBackgroundTrigger {
    bool IncludeTransmitPowerLevel { get; set; }
    bool IsAnonymous { get; set; }
    IReference<short> PreferredTransmitPowerLevelInDBm { get; set; }
    bool UseExtendedFormat { get; set; }
  }
  public sealed class BluetoothLEAdvertisementWatcherTrigger : IBackgroundTrigger {
    bool AllowExtendedAdvertisements { get; set; }
  }
}
namespace Windows.ApplicationModel.ConversationalAgent {
  public sealed class ActivationSignalDetectionConfiguration
  public enum ActivationSignalDetectionTrainingDataFormat
  public sealed class ActivationSignalDetector
  public enum ActivationSignalDetectorKind
  public enum ActivationSignalDetectorPowerState
  public sealed class ConversationalAgentDetectorManager
  public sealed class DetectionConfigurationAvailabilityChangedEventArgs
  public enum DetectionConfigurationAvailabilityChangeKind
  public sealed class DetectionConfigurationAvailabilityInfo
  public enum DetectionConfigurationTrainingStatus
}
namespace Windows.ApplicationModel.DataTransfer {
  public sealed class DataPackage {
    event TypedEventHandler<DataPackage, object> ShareCanceled;
  }
}
namespace Windows.Devices.Bluetooth {
  public sealed class BluetoothAdapter {
    bool IsExtendedAdvertisingSupported { get; }
    uint MaxAdvertisementDataLength { get; }
  }
}
namespace Windows.Devices.Bluetooth.Advertisement {
  public sealed class BluetoothLEAdvertisementPublisher {
    bool IncludeTransmitPowerLevel { get; set; }
    bool IsAnonymous { get; set; }
    IReference<short> PreferredTransmitPowerLevelInDBm { get; set; }
    bool UseExtendedAdvertisement { get; set; }
  }
  public sealed class BluetoothLEAdvertisementPublisherStatusChangedEventArgs {
    IReference<short> SelectedTransmitPowerLevelInDBm { get; }
  }
  public sealed class BluetoothLEAdvertisementReceivedEventArgs {
    BluetoothAddressType BluetoothAddressType { get; }
    bool IsAnonymous { get; }
    bool IsConnectable { get; }
    bool IsDirected { get; }
    bool IsScannable { get; }
    bool IsScanResponse { get; }
    IReference<short> TransmitPowerLevelInDBm { get; }
  }
  public enum BluetoothLEAdvertisementType {
    Extended = 5,
  }
  public sealed class BluetoothLEAdvertisementWatcher {
    bool AllowExtendedAdvertisements { get; set; }
  }
  public enum BluetoothLEScanningMode {
    None = 2,
  }
}
namespace Windows.Devices.Bluetooth.Background {
  public sealed class BluetoothLEAdvertisementPublisherTriggerDetails {
    IReference<short> SelectedTransmitPowerLevelInDBm { get; }
  }
}
namespace Windows.Devices.Display {
  public sealed class DisplayMonitor {
    bool IsDolbyVisionSupportedInHdrMode { get; }
  }
}
namespace Windows.Devices.Input {
  public sealed class PenButtonListener
  public sealed class PenDockedEventArgs
  public sealed class PenDockListener
  public sealed class PenTailButtonClickedEventArgs
  public sealed class PenTailButtonDoubleClickedEventArgs
  public sealed class PenTailButtonLongPressedEventArgs
  public sealed class PenUndockedEventArgs
}
namespace Windows.Devices.Sensors {
 public sealed class Accelerometer {
    AccelerometerDataThreshold ReportThreshold { get; }
  }
  public sealed class AccelerometerDataThreshold
  public sealed class Barometer {
    BarometerDataThreshold ReportThreshold { get; }
  }
  public sealed class BarometerDataThreshold
  public sealed class Compass {
    CompassDataThreshold ReportThreshold { get; }
  }
  public sealed class CompassDataThreshold
  public sealed class Gyrometer {
    GyrometerDataThreshold ReportThreshold { get; }
  }
  public sealed class GyrometerDataThreshold
  public sealed class Inclinometer {
    InclinometerDataThreshold ReportThreshold { get; }
  }
  public sealed class InclinometerDataThreshold
  public sealed class LightSensor {
    LightSensorDataThreshold ReportThreshold { get; }
  }
  public sealed class LightSensorDataThreshold
  public sealed class Magnetometer {
    MagnetometerDataThreshold ReportThreshold { get; }
  }
  public sealed class MagnetometerDataThreshold
}
namespace Windows.Foundation.Metadata {
  public sealed class AttributeNameAttribute : Attribute
  public sealed class FastAbiAttribute : Attribute
  public sealed class NoExceptionAttribute : Attribute
}
namespace Windows.Globalization {
  public sealed class Language {
    string AbbreviatedName { get; }
    public static IVector<string> GetMuiCompatibleLanguageListFromLanguageTags(IIterable<string> languageTags);
  }
}
namespace Windows.Graphics.Capture {
  public sealed class GraphicsCaptureSession : IClosable {
    bool IsCursorCaptureEnabled { get; set; }
  }
}
namespace Windows.Graphics.DirectX {
  public enum DirectXPixelFormat {
    SamplerFeedbackMinMipOpaque = 189,
    SamplerFeedbackMipRegionUsedOpaque = 190,
  }
}
namespace Windows.Graphics.Holographic {
  public sealed class HolographicFrame {
    HolographicFrameId Id { get; }
  }
  public struct HolographicFrameId
  public sealed class HolographicFrameRenderingReport
  public sealed class HolographicFrameScanoutMonitor : IClosable
  public sealed class HolographicFrameScanoutReport
  public sealed class HolographicSpace {
    HolographicFrameScanoutMonitor CreateFrameScanoutMonitor(uint maxQueuedReports);
  }
}
namespace Windows.Management.Deployment {
  public sealed class AddPackageOptions
  public enum DeploymentOptions : uint {
    StageInPlace = (uint)4194304,
  }
  public sealed class PackageManager {
    IAsyncOperationWithProgress<DeploymentResult, DeploymentProgress> AddPackageByUriAsync(Uri packageUri, AddPackageOptions options);
    IVector<Package> FindProvisionedPackages();
    PackageStubPreference GetPackageStubPreference(string packageFamilyName);
    IAsyncOperationWithProgress<DeploymentResult, DeploymentProgress> RegisterPackageByUriAsync(Uri manifestUri, RegisterPackageOptions options);
    IAsyncOperationWithProgress<DeploymentResult, DeploymentProgress> RegisterPackagesByFullNameAsync(IIterable<string> packageFullNames, RegisterPackageOptions options);
    void SetPackageStubPreference(string packageFamilyName, PackageStubPreference useStub);
   IAsyncOperationWithProgress<DeploymentResult, DeploymentProgress> StagePackageByUriAsync(Uri packageUri, StagePackageOptions options);
  }
  public enum PackageStubPreference
  public enum PackageTypes : uint {
    All = (uint)4294967295,
  }
  public sealed class RegisterPackageOptions
  public enum RemovalOptions : uint {
    PreserveRoamableApplicationData = (uint)128,
  }
  public sealed class StagePackageOptions
  public enum StubPackageOption
}
namespace Windows.Media.Audio {
  public sealed class AudioPlaybackConnection : IClosable
  public sealed class AudioPlaybackConnectionOpenResult
  public enum AudioPlaybackConnectionOpenResultStatus
  public enum AudioPlaybackConnectionState
}
namespace Windows.Media.Capture {
  public sealed class MediaCapture : IClosable {
    MediaCaptureRelativePanelWatcher CreateRelativePanelWatcher(StreamingCaptureMode captureMode, DisplayRegion displayRegion);
  }
  public sealed class MediaCaptureInitializationSettings {
    Uri DeviceUri { get; set; }
    PasswordCredential DeviceUriPasswordCredential { get; set; }
  }
  public sealed class MediaCaptureRelativePanelWatcher : IClosable
}
namespace Windows.Media.Capture.Frames {
  public sealed class MediaFrameSourceInfo {
    Panel GetRelativePanel(DisplayRegion displayRegion);
  }
}
namespace Windows.Media.Devices {
  public sealed class PanelBasedOptimizationControl
  public sealed class VideoDeviceController : IMediaDeviceController {
    PanelBasedOptimizationControl PanelBasedOptimizationControl { get; }
 }
}
namespace Windows.Media.MediaProperties {
  public static class MediaEncodingSubtypes {
    public static string Pgs { get; }
    public static string Srt { get; }
    public static string Ssa { get; }
    public static string VobSub { get; }
  }
  public sealed class TimedMetadataEncodingProperties : IMediaEncodingProperties {
    public static TimedMetadataEncodingProperties CreatePgs();
    public static TimedMetadataEncodingProperties CreateSrt();
    public static TimedMetadataEncodingProperties CreateSsa(byte[] formatUserData);
    public static TimedMetadataEncodingProperties CreateVobSub(byte[] formatUserData);
  }
}
namespace Windows.Networking.BackgroundTransfer {
  public sealed class DownloadOperation : IBackgroundTransferOperation, IBackgroundTransferOperationPriority {
    void RemoveRequestHeader(string headerName);
    void SetRequestHeader(string headerName, string headerValue);
  }
  public sealed class UploadOperation : IBackgroundTransferOperation, IBackgroundTransferOperationPriority {
    void RemoveRequestHeader(string headerName);
    void SetRequestHeader(string headerName, string headerValue);
  }
}
namespace Windows.Networking.Connectivity {
  public enum NetworkAuthenticationType {
    Owe = 12,
  }
}
namespace Windows.Networking.NetworkOperators {
  public sealed class NetworkOperatorTetheringAccessPointConfiguration {
    TetheringWiFiBand Band { get; set; }
    bool IsBandSupported(TetheringWiFiBand band);
    IAsyncOperation<bool> IsBandSupportedAsync(TetheringWiFiBand band);
  }
  public sealed class NetworkOperatorTetheringManager {
    public static void DisableNoConnectionsTimeout();
    public static IAsyncAction DisableNoConnectionsTimeoutAsync();
    public static void EnableNoConnectionsTimeout();
    public static IAsyncAction EnableNoConnectionsTimeoutAsync();
    public static bool IsNoConnectionsTimeoutEnabled();
  }
  public enum TetheringWiFiBand
}
namespace Windows.Networking.PushNotifications {
  public static class PushNotificationChannelManager {
    public static event EventHandler<PushNotificationChannelsRevokedEventArgs> ChannelsRevoked;
  }
  public sealed class PushNotificationChannelsRevokedEventArgs
  public sealed class RawNotification {
    IBuffer ContentBytes { get; }
  }
}
namespace Windows.Security.Authentication.Web.Core {
  public sealed class WebAccountMonitor {
    event TypedEventHandler<WebAccountMonitor, WebAccountEventArgs> AccountPictureUpdated;
  }
}
namespace Windows.Security.Isolation {
  public sealed class IsolatedWindowsEnvironment
  public enum IsolatedWindowsEnvironmentActivator
  public enum IsolatedWindowsEnvironmentAllowedClipboardFormats : uint
  public enum IsolatedWindowsEnvironmentAvailablePrinters : uint
  public enum IsolatedWindowsEnvironmentClipboardCopyPasteDirections : uint
  public struct IsolatedWindowsEnvironmentContract
  public struct IsolatedWindowsEnvironmentCreateProgress
  public sealed class IsolatedWindowsEnvironmentCreateResult
  public enum IsolatedWindowsEnvironmentCreateStatus
  public sealed class IsolatedWindowsEnvironmentFile
  public static class IsolatedWindowsEnvironmentHost
  public enum IsolatedWindowsEnvironmentHostError
  public sealed class IsolatedWindowsEnvironmentLaunchFileResult
  public enum IsolatedWindowsEnvironmentLaunchFileStatus
  public sealed class IsolatedWindowsEnvironmentOptions
  public static class IsolatedWindowsEnvironmentOwnerRegistration
  public sealed class IsolatedWindowsEnvironmentOwnerRegistrationData
  public sealed class IsolatedWindowsEnvironmentOwnerRegistrationResult
  public enum IsolatedWindowsEnvironmentOwnerRegistrationStatus
  public sealed class IsolatedWindowsEnvironmentProcess
  public enum IsolatedWindowsEnvironmentProcessState
  public enum IsolatedWindowsEnvironmentProgressState
  public sealed class IsolatedWindowsEnvironmentShareFolderRequestOptions
  public sealed class IsolatedWindowsEnvironmentShareFolderResult
  public enum IsolatedWindowsEnvironmentShareFolderStatus
  public sealed class IsolatedWindowsEnvironmentStartProcessResult
  public enum IsolatedWindowsEnvironmentStartProcessStatus
  public sealed class IsolatedWindowsEnvironmentTelemetryParameters
  public static class IsolatedWindowsHostMessenger
  public delegate void MessageReceivedCallback(Guid receiverId, IVectorView<object> message);
}
namespace Windows.Storage {
  public static class KnownFolders {
    public static IAsyncOperation<StorageFolder> GetFolderAsync(KnownFolderId folderId);
    public static IAsyncOperation<KnownFoldersAccessStatus> RequestAccessAsync(KnownFolderId folderId);
    public static IAsyncOperation<KnownFoldersAccessStatus> RequestAccessForUserAsync(User user, KnownFolderId folderId);
  }
  public enum KnownFoldersAccessStatus
  public sealed class StorageFile : IInputStreamReference, IRandomAccessStreamReference, IStorageFile, IStorageFile2, IStorageFilePropertiesWithAvailability, IStorageItem, IStorageItem2, IStorageItemProperties, IStorageItemProperties2, IStorageItemPropertiesWithProvider {
    public static IAsyncOperation<StorageFile> GetFileFromPathForUserAsync(User user, string path);
  }
  public sealed class StorageFolder : IStorageFolder, IStorageFolder2, IStorageFolderQueryOperations, IStorageItem, IStorageItem2, IStorageItemProperties, IStorageItemProperties2, IStorageItemPropertiesWithProvider {
    public static IAsyncOperation<StorageFolder> GetFolderFromPathForUserAsync(User user, string path);
  }
}
namespace Windows.Storage.Provider {
  public sealed class StorageProviderFileTypeInfo
  public sealed class StorageProviderSyncRootInfo {
    IVector<StorageProviderFileTypeInfo> FallbackFileTypeInfo { get; }
  }
  public static class StorageProviderSyncRootManager {
    public static bool IsSupported();
  }
}
namespace Windows.System {
  public sealed class UserChangedEventArgs {
    IVectorView<UserWatcherUpdateKind> ChangedPropertyKinds { get; }
  }
  public enum UserWatcherUpdateKind
}
namespace Windows.UI.Composition.Interactions {
  public sealed class InteractionTracker : CompositionObject {
    int TryUpdatePosition(Vector3 value, InteractionTrackerClampingOption option, InteractionTrackerPositionUpdateOption posUpdateOption);
  }
  public enum InteractionTrackerPositionUpdateOption
}
namespace Windows.UI.Input {
  public sealed class CrossSlidingEventArgs {
    uint ContactCount { get; }
  }
  public sealed class DraggingEventArgs {
    uint ContactCount { get; }
  }
  public sealed class GestureRecognizer {
    uint HoldMaxContactCount { get; set; }
    uint HoldMinContactCount { get; set; }
    float HoldRadius { get; set; }
    TimeSpan HoldStartDelay { get; set; }
    uint TapMaxContactCount { get; set; }
    uint TapMinContactCount { get; set; }
    uint TranslationMaxContactCount { get; set; }
    uint TranslationMinContactCount { get; set; }
  }
  public sealed class HoldingEventArgs {
    uint ContactCount { get; }
    uint CurrentContactCount { get; }
  }
  public sealed class ManipulationCompletedEventArgs {
    uint ContactCount { get; }
    uint CurrentContactCount { get; }
  }
  public sealed class ManipulationInertiaStartingEventArgs {
    uint ContactCount { get; }
  }
  public sealed class ManipulationStartedEventArgs {
    uint ContactCount { get; }
  }
  public sealed class ManipulationUpdatedEventArgs {
    uint ContactCount { get; }
    uint CurrentContactCount { get; }
  }
  public sealed class RightTappedEventArgs {
    uint ContactCount { get; }
  }
  public sealed class SystemButtonEventController : AttachableInputObject
  public sealed class SystemFunctionButtonEventArgs
  public sealed class SystemFunctionLockChangedEventArgs
  public sealed class SystemFunctionLockIndicatorChangedEventArgs
  public sealed class TappedEventArgs {
    uint ContactCount { get; }
  }
}
namespace Windows.UI.Input.Inking {
  public sealed class InkModelerAttributes {
    bool UseVelocityBasedPressure { get; set; }
  }
}
namespace Windows.UI.Text {
  public enum RichEditMathMode
  public sealed class RichEditTextDocument : ITextDocument {
    void GetMath(out string value);
    void SetMath(string value);
    void SetMathMode(RichEditMathMode mode);
  }
}
namespace Windows.UI.ViewManagement {
  public sealed class UISettings {
    event TypedEventHandler<UISettings, UISettingsAnimationsEnabledChangedEventArgs> AnimationsEnabledChanged;
    event TypedEventHandler<UISettings, UISettingsMessageDurationChangedEventArgs> MessageDurationChanged;
  }
  public sealed class UISettingsAnimationsEnabledChangedEventArgs
  public sealed class UISettingsMessageDurationChangedEventArgs
}
namespace Windows.UI.ViewManagement.Core {
  public sealed class CoreInputView {
    event TypedEventHandler<CoreInputView, CoreInputViewHidingEventArgs> PrimaryViewHiding;
    event TypedEventHandler<CoreInputView, CoreInputViewShowingEventArgs> PrimaryViewShowing;
  }
  public sealed class CoreInputViewHidingEventArgs
  public enum CoreInputViewKind {
    Symbols = 4,
  }
  public sealed class CoreInputViewShowingEventArgs
  public sealed class UISettingsController
}
The post Windows 10 SDK Preview Build 19041 available now! appeared first on Windows Developer Blog.
Following up on my post last week on moving from App Service on Windows to App Service on Linux, I wanted to make sure I had a clean CI/CD (Continuous Integration/Continuous Deployment) pipeline for all my sites. I'm using Azure DevOps because it's basically free. You get 1800 build minutes a month FREE and I'm not even close to using it with three occasionally-updated sites building on it.
Last Post: I updated one of my websites from ASP.NET Core 2.2 to the latest LTS (Long Term Support) version of ASP.NET Core 3.1 this week. I want to do the same with my podcast site AND move it to Linux at the same time. Azure App Service for Linux has some very good pricing and allowed me to move over to a Premium v2 plan from Standard which gives me double the memory at 35% off.
Setting up on Azure DevOps is easy and just like signing up for Azure you'll use your Microsoft ID. Mine is my gmail/gsuite, in fact. You can also login with GitHub creds. It's also nice if your project makes NuGet packages as there's an integrated NuGet Server that others can consume libraries from downstream before (if) you publish them publicly.
I set up one of my sites with Azure DevOps a while back in about an hour using their visual drag and drop Pipeline system which looked like this:
There's some controversy as some folks REALLY like the "classic" pipeline while others like the YAML (Yet Another Markup Language, IMHO) style. YAML doesn't have all the features of the original pipeline yet, but it's close. It's primary advantage is that the pipeline definition exists as a single .YAML file and can be checked-in with your source code. That way someone (you, whomever) could import your GitHub or DevOps Git repository and it includes everything it needs to build and optionally deploy the app.
The Azure DevOps team is one of the most organized and transparent teams with a published roadmap that's super detailed and they announce their sprint numbers in the app itself as it's updated which is pretty cool.
When YAML includes a nice visual interface on top of it, it'll be time for everyone to jump but regardless I wanted to make my sites more self-contained. I may try using GitHub Actions at some point and comparing them as well.
If you have one, you can go to an existing pipeline in DevOps and click View YAML and get some YAML that will get you most of the way there but often includes some missing context or variables. The resulting YAML in my opinion isn't going to be as clean as what you can do from scratch, but it's worth looking at.
In decided to disable/pause my original pipeline and make a new one in parallel. Then I opened them side by side and recreated it. This let me learn more and the result ended up cleaner than I'd expected.

The YAML editor has a half-assed (sorry) visual designer on the right that basically has Tasks that will write a little chunk of YAML for you, but:
But it does provide a catalog of options and it does jumpstart things. Here's my YAML to build and publish a zip file (artifact) of my podcast site. Note that my podcast site is three projects, the site, a utility library, and some tests. I found these docs useful for building ASP.NET Core apps.
Here it is:
trigger:

- main


pool:

  vmImage: 'ubuntu-latest'


variables:

  buildConfiguration: 'Release'


steps:

    - task: UseDotNet@2

      displayName: ".NET Core 3.1.x"

      inputs:

        version: '3.1.x'

        packageType: sdk


    - task: UseDotNet@2

      inputs:

        version: '3.1.x'

    - script: dotnet build --configuration $(buildConfiguration)

      displayName: 'dotnet build $(buildConfiguration)'


    - task: DotNetCoreCLI@2

      displayName: "Test"

      inputs:

        command: test

        projects: '**/*tests/*.csproj'

        arguments: '--configuration $(buildConfiguration)'


    - task: DotNetCoreCLI@2

      displayName: "Publish"

      inputs:

        command: 'publish'

        publishWebProjects: true

        arguments: '-r linux-x64 --configuration $(BuildConfiguration) --output $(Build.ArtifactStagingDirectory)'

        zipAfterPublish: true


    - task: PublishBuildArtifacts@1

      displayName: "Upload Artifacts"

      inputs:

        pathtoPublish: '$(Build.ArtifactStagingDirectory)'

        artifactName: 'hanselminutes'
Next I move to the release pipeline. Now, you can also do the actual Azure Publish to a Web App/App Service from a YAML Build Pipeline. I suppose that's fine if your site/project is simple. I wanted to have dev/test/staging so I have a separate Release Pipeline.
The Release Pipelines system in Azure DevOps can pull an "Artifact" from anywhere - GitHub, DevOps itself natch, Jenkins, Docker Hub, whatever. I set mine up with a Continuous Deployment Trigger that makes a new release every time a build is available. I could also do Releases manually, with specific tags, scheduled, or gated if I'd liked.

Mine is super easy since it's just a website. It's got a single task in the Release Pipeline that does an Azure App Service Deploy. I can also deploy to a slot like Staging, then check it out, and then swap to Production later.
There's nice integration between Azure DevOps and the Azure Portal so I can see within Azure in the Deployment Center of my App Service that my deployments are working:
I've found this all to be a good use of my staycation and even though I'm just a one-person company I've been able to get a very nice automated build system set up at very low cost (GitHub free account for a private repo, 1800 free Azure DevOps minutes, and an App Service for Linux plan) A basic starts at $13 with 1.75Gb of RAM but I'm planning on moving all my sites over to a single big P1v2 with 3.5G of RAM and an SSD for around $80 a month. That should get all of my ~20 sites under one roof for a price/perf I can handle.
Sponsor: Like C#? We do too! That’s why we've developed a fast, smart, cross-platform .NET IDE which gives you even more coding power. Clever code analysis, rich code completion, instant search and navigation, an advanced debugger... With JetBrains Rider, everything you need is at your fingertips. Code C# at the speed of thought on Linux, Mac, or Windows. Try JetBrains Rider today!

The Developer Economics Q4 2019 Survey is now open! Every year more than 40,000 developers around the world participate in this survey, so this is a chance to be part of something big and share your experience as a developer and your view of the future of the software industry. Take the survey now or first read answers to the questions below.
The survey is for all developers, whether you’re a professional, a hobbyist, or a student; building front-end, back-end, or full stack; working on desktop, web, gaming, cloud, mobile, IoT, AR/VR, machine learning, or data science.
There are some perks to go with your participation. Have a look at what you can get our hands on:
The Q2 2019 State of the Nation report delved into a wide range of topics from career paths of developers who considered themselves introverts vs. extroverts (not everyone in the C-suite is an extrovert) to the most popular tools for cross-platform development (React Native and Xamarin).
This is an independent survey from SlashData, an analyst firm in the developer economy that tracks global software developer trends. We’re interested in seeing the reports that come from this survey, and we want to ensure the broadest developer audience participates.
Of course, any data collected by this survey is between you and SlashData. You should review their Terms & Conditions page to learn more about the awarding of prizes, their data privacy policy, and how SlashData will handle your personal data.
The survey is open until Jan. 17, 2020.
The survey is available in English, Chinese, Spanish, Portuguese, Vietnamese, Russian, Japanese, or Korean.
The post Participate in the Developer Economics Survey appeared first on Windows Developer Blog.
A few months ago, we posted a survey to gather feedback on your experience with metrics in Azure Portal. Thank you for participation and for providing valuable suggestions!
We want to share some of the insights we gained from the survey and highlight some of the features that we delivered based on your feedback. These features include:
One of the key pieces of feedback we heard was about the resource picker panel. You said that being able to select only one resource at a time when choosing a scope is too limiting. Now you can select multiple resources across resource groups in a subscription.

Many of you asked for the ability to configure the sort order based on dimension values, and for control over the maximum number of timeseries shown on the chart. Those who asked explained that for some metrics, including available memory and remaining disk space, they want to see the timeseries with smallest values, while for other metrics, including CPU utilization or count of failures, showing the timeseries with highest values make more sense. To address your feedback, we expanded the dimension splitter selector with Sort order and Limit count inputs.

Charts with multiple timeseries over the long period, especially with short time grain are based on queries that return lots of datapoints. Unfortunately, processing too many datapoints may slow down chart interactions. To ensure the best performance, we used to apply a hard limit on the number of datapoints per chart, prompting users to lower the time range or to increase the time grain when the query returns too much data.
Some of you found the old experience frustrating. You said that occasionally you might want to plot charts with lots of datapoints, regardless of performance. Based on your suggestions, we changed the way we handle the limit. Instead of blocking chart rendering, we now display a message that suggests that the metrics query will return a lot of data, but will let you proceed anyways (with a friendly reminder that you might need to wait longer for the chart to display).

High-density charts from lots of datapoints can be useful to visualize the outliers, as shown in this example:

A small but useful improvement was made based on your feedback that the chart legends often wouldn’t fit on the chart, making it hard to interpret the data. This was almost always happening with the charts pinned to dashboards and rendered in the tight space of dashboard tiles, or on screens that have a smaller resolution. To solve the problem, we now let you scroll the legend until you find the data you need:

Let us know how we're doing and what more you'd like to see. Please stay tuned for more information on these and other new features in the coming months. We are continuously addressing pain points and making improvements based on your input.
If you have any questions or comments before our next survey, please use the feedback button on the Metrics blade. Don’t feel shy about giving us a shout out if you like a new feature or are excited about the direction we’re headed. Smiles are just as important in influencing our plans as frowns.


