Quantcast
Channel: Category Name
Viewing all 10804 articles
Browse latest View live

NoSQL .NET Core development using an local Azure DocumentDB Emulator

$
0
0

I was hanging out with Miguel de Icaza in New York a few weeks ago and he was sharing with me his ongoing love affair with a NoSQL Database called Azure DocumentDB. I've looked at it a few times over the last year or so and though it was cool but I didn't feel like using it for a few reasons:

  • Can't develop locally - I'm often in low-bandwidth or airplane situations
  • No MongoDB support - I have existing apps written in Node that use Mongo
  • No .NET Core support - I'm doing mostly cross-platform .NET Core apps

Miguel told me to take a closer look. Looks like things have changed! DocumentDB now has:

  • Free local DocumentDB Emulator - I asked and this is the SAME code that runs in Azure with just changes like using the local file system for persistence, etc. It's an "emulator" but it's really the essential same core engine code. There is no cost and no sign in for the local DocumentDB emulator.
  • MongoDB protocol support - This is amazing. I literally took an existing Node app, downloaded MongoChef and copied my collection over into Azure using a standard MongoDB connection string, then pointed my app at DocumentDB and it just worked. It's using DocumentDB for storage though, which gives me
    • Better Latency
    • Turnkey global geo-replication (like literally a few clicks)
    • A performance SLA with <10ms read and <15ms write (Service Level Agreement)
    • Metrics and Resource Management like every Azure Service
  • DocumentDB .NET Core Preview SDK that has feature parity with the .NET Framework SDK.

There's also Node, .NET, Python, Java, and C++ SDKs for DocumentDB so it's nice for gaming on Unity, Web Apps, or any .NET App...including Xamarin mobile apps on iOS and Android which is why Miguel is so hype on it.

Azure DocumentDB Local Quick Start

I wanted to see how quickly I could get started. I spoke with the PM for the project on Azure Friday and downloaded and installed the local emulator. The lead on the project said it's Windows for now but they are looking for cross-platform solutions. After it was installed it popped up my web browser with a local web page - I wish more development tools would have such clean Quick Starts. There's also a nice quick start on using DocumentDB with ASP.NET MVC.

NOTE: This is a 0.1.0 release. Definitely Alpha level. For example, the sample included looks like it had the package name changed at some point so it didn't line up. I had to change "Microsoft.Azure.Documents.Client": "0.1.0" to "Microsoft.Azure.DocumentDB.Core": "0.1.0-preview" so a little attention to detail issue there. I believe the intent is for stuff to Just Work. ;)

Nice DocumentDB Quick Start

The sample app is a pretty standard "ToDo" app:

ASP.NET MVC ToDo App using Azure Document DB local emulator

The local Emulator also includes a web-based local Data Explorer:

image

A Todo Item is really just a POCO (Plain Old CLR Object) like this:

namespace todo.Models
{
    using Newtonsoft.Json;
    public class Item
    {
        [JsonProperty(PropertyName = "id")]
        public string Id { get; set; }
        [JsonProperty(PropertyName = "name")]
        public string Name { get; set; }
        [JsonProperty(PropertyName = "description")]
        public string Description { get; set; }
        [JsonProperty(PropertyName = "isComplete")]
        public bool Completed { get; set; }
    }
}

The MVC Controller in the sample uses an underlying repository pattern so the code is super simple at that layer - as an example:

[ActionName("Index")]
public async Task Index()
{
var items = await DocumentDBRepository.GetItemsAsync(d => !d.Completed);
return View(items);
}

[HttpPost]
[ActionName("Create")]
[ValidateAntiForgeryToken]
public async Task CreateAsync([Bind("Id,Name,Description,Completed")] Item item)
{
if (ModelState.IsValid)
{
await DocumentDBRepository.CreateItemAsync(item);
return RedirectToAction("Index");
}

return View(item);
}

The Repository itself that's abstracting away the complexities is itself not that complex. It's like 120 lines of code, and really more like 60 when you remove whitespace and curly braces. And half of that is just initialization and setup. It's also DocumentDBRepository so it's a generic you can change to meet your tastes and use it however you'd like.

The only thing that stands out to me in this sample is the loopp in GetItemsAsync that's hiding potential paging/chunking. It's nice you can pass in a predicate but I'll want to go and put in some paging logic for large collections.

public static async Task GetItemAsync(string id)
{
    try
    {
        Document document = await client.ReadDocumentAsync(UriFactory.CreateDocumentUri(DatabaseId, CollectionId, id));
        return (T)(dynamic)document;
    }
    catch (DocumentClientException e)
    {
        if (e.StatusCode == System.Net.HttpStatusCode.NotFound){
            return null;
        }
        else {
            throw;
        }
    }
}
public static async Task> GetItemsAsync(Expression> predicate)
{
    IDocumentQuery query = client.CreateDocumentQuery(
        UriFactory.CreateDocumentCollectionUri(DatabaseId, CollectionId),
        new FeedOptions { MaxItemCount = -1 })
        .Where(predicate)
        .AsDocumentQuery();
    List results = new List();
    while (query.HasMoreResults){
        results.AddRange(await query.ExecuteNextAsync());
    }
    return results;
}
public static async Task CreateItemAsync(T item)
{
    return await client.CreateDocumentAsync(UriFactory.CreateDocumentCollectionUri(DatabaseId, CollectionId), item);
}
public static async Task UpdateItemAsync(string id, T item)
{
    return await client.ReplaceDocumentAsync(UriFactory.CreateDocumentUri(DatabaseId, CollectionId, id), item);
}
public static async Task DeleteItemAsync(string id)
{
    await client.DeleteDocumentAsync(UriFactory.CreateDocumentUri(DatabaseId, CollectionId, id));
}

I'm going to keep playing with this but so far I'm pretty happy I can get this far while on an airplane. It's really easy (given I'm preferring NoSQL over SQL lately) to just through objects at it and store them.

In another post I'm going to look at RavenDB, another great NoSQL Document Database that works on .NET Core that s also Open Source.


Sponsor: Big thanks to Octopus Deploy! Do you deploy the same application multiple times for each of your end customers? The team at Octopus have taken the pain out of multi-tenant deployments. Check out their latest 3.4 release


© 2016 Scott Hanselman. All rights reserved.
     

Bing Celebrates the Spirit of Giving this December

$
0
0
Can’t wait to share some holiday cheer? Starting December 1, the Bing homepage transforms into a delight-delivery device: each day of December will reveal a new seasonal treat. Just click the gift icon to turn on the holiday calendar, then come back to Bing each day to discover what daily holiday wonders await.
 
Delighters include the ability to customize your Bing homepage with festive decorations, features to share such as beautiful holiday images and ecards, music to make your days merry and bright, winter-themed games to entertain, and more holiday wonder than you can fit into the Abominable Snowman’s stocking. (Reindeer cats, anyone?)


We want to celebrate this time of generosity by first drawing attention to six of the many amazing nonprofits that Microsoft works with: Code.org, Paralyzed Veterans of America, Mercy Corps, Special Olympics, City Year, and Global Citizen. We’ll be highlighting these organizations on special days in the Bing holiday homepage calendar throughout the month and asking our users to share their support for these amazing nonprofits and the work they do by sharing the message we’ve provided when you click on these special giving days from the calendar.


We’re kicking off the start of holiday homepage December 1 by celebrating the work of Mercy Corps. Mercy Corps provides global humanitarian aid to people in crisis. To show your support for the work Mercy Corps does and to express your hope for a happy new year for all, share the message that appears when you click Facebook or Twitter from the pop-up on day one.
 
Learn more about our Share & Give campaign.

Join us at Bing.com this December as we count down to the end of the year by making every day this month an opportunity for joy and delight. Celebrate the holidays with us as a chance to give not because we’re supposed to, but because it feels good. Kindness and goodwill can happen all the time—we’re just taking the month of December to celebrate and pass it on.
 
Happy holidays!
The Bing Elves


Azure Notebooks now support F#

$
0
0

Last week I blogged about the availability of the new Data Storage and Data Science workloads in Visual Studio 2017 RC. The Data Science workload specifically provides support for the following:

These three languages and their corresponding stacks cover just about every data processing, technical computing, analytics and machine learning scenario imaginable.

For the past few months, the free Azure Notebooks service has supported R and Python. We are pleased to announce the availability of our first edition of preview support for the F# language to match the Visual Studio Data Science workload.

Azure Notebooks

In 2015 we added Azure Notebooks to Azure ML Studio, a powerful canvas for development and deployment of Machine Learning models.   Azure Notebooks are based on the open source Project Jupyter, a toolchain that allows you to create and share documents that contain live code, equations, visualizations, and explanatory text. Azure Notebooks offer free-for-use execution of notebook content, access to high-performance data center resources, and allow you to share your notebooks with friends and colleagues with a single link.

F#

F# is an open source, cross-platform language well suited for notebook-style programming.  One of the key characteristics of F# is its ability to span the spectrum from scripting (including notebook-style literate programming) to large-scale, robust software development, including web programming and cloud service implementation.  F# executes as native code through .NET compilation and interoperates with all C# and .NET libraries.  A huge package system of .NET libraries is available through NuGet, many of which are useful as components in analytical services.  Through its indentation-aware syntax and type inference, F# approaches the succinctness and clarity of Python, while remaining a strongly-typed programming language suitable for writing accurate, robust code.  While F# usage is smaller than Python and R, F# brings a unique blend of characteristics to the Cortana Intelligence and Machine Learning toolchain, and can interoperate with these languages either directly or through service implementations.

Through a collaboration with the F# community and F# experts at Microsoft, we have been able to add F# support to Azure Notebooks.  To try out your first F# notebook, please see our notebook:

  • Introducing F# and Azure Notebooks
    • Click the notebook
    • Sign in with your Microsoft account (Outlook/Hotmail/Xbox/…)
    • Click the Open in Jupyter button
    • Run the whole notebook with “Cell | Run All” or
    • Run one cell at a time using Shift-Enter

If you know F#, and would like to learn more about Azure Notebooks, please see:

F# Jupyter Kernel

Today’s release includes the ability to edit and execute F# code in Azure Notebooks, including integrated markdown. Execution is through Mono in Docker containers on Linux (Ubuntu). This release includes some limited in-browser auto-complete support. We plan to roll out further improvements to our F# support incrementally – please send us your feedback and issues.  We also plan to add more samples and content.  We are certain that Azure Notebooks will be a popular way of surfacing F# content to broad audiences.  If you are working with F# in the data science area and would like to share some of the notebooks you create with us, please either link them in the comments below or email nbhelp@microsoft.com.

F# support in Azure Notebooks is built on the hard work of the F# community including the open source components iFSharp, FSharp.Compiler.Service, FsLab, MathNet.Numerics, Paket, Mono and of course the F# language and compiler itself, as well as Jupyter, Docker and Linux.  Many thanks to all the contributors who have contributed to these components.

Conclusion

With the addition of F# to the Azure Notebook service, you have a well-rounded playground for various data processing and analysis scenarios. You can:

  1. Learn Python, R, F#
  2. Give a class or seminar to 100s of people with zero installation
  3. Take one of the various Machine Learning courses
  4. Build ML models and deploy them to Azure for production

So take the sample F# notebook for a test drive and see what this powerful language can do for you!

Support & FAQ

General FAQ: https://notebooks.azure.com/faq

Filing bugs on github: https://github.com/Microsoft/AzureNotebooks

Direct mail to team: nbhelp@microsoft.com

User Voice: https://visualstudio.uservoice.com

Shahrokh Mortazavi, Partner PM, Visual Studio Cloud Platform Tools

Shahrokh Mortazavi runs the Data Science Developer Tools teams at Microsoft, focused on Python, R, and Jupyter Notebooks. Previously, he was in the High Performance Computing group at Microsoft. He worked on the Phoenix Compiler tool chain (code gen, analysis, JIT) at Microsoft Research and, prior to that, over a 10 year period led Sun Microsystems’ Code Generation & Optimization compiler backend teams.

Reengage your customers with UWP ad campaigns and push notifications

$
0
0

We’re pleased to announce that all developers can now use new features in Windows Dev Center to engage with customers of their UWP apps.  Developers can build segments of their customers and use them to create custom retargeting and reengagement ad campaigns for their UWP apps or send push notifications. Until recently, these powerful monetization and engagement capabilities were only available to Windows Dev Center Insiders.

What are retargeting and reengagement ad campaigns?

A retargeting ad campaign is type of advertising campaign that helps you reach a specific group of your customers who have taken a certain action with your UWP app.

For example, if some portion of your customers have spent more than $10 on add-ons, you could retarget that specific group of customers with a custom ad campaign that drives them to a unique page within your app that offers them a special discount on a premium add-on. This helps you target high-value customers.

A reengagement ad campaign is a type of advertising campaign that helps you reach a specific group of your customers who meet a certain level of engagement with your app.

For example, you can create an ad campaign to target users who installed the app in the past three days (new users) with a special offer to WOW them in the first week. This will help decrease the customer churn rate which is usually high in the first week after app install.

Both types of campaigns enable you to deliver the right message to the right set of customers, at the right time. This helps you better achieve your campaign goals and make the most of your advertising budget.

What are segmentation and targeted push notifications?

Engaging with your customers at the right time and with the right targeted message is key to your success as an app developer. With our customer segmentation feature, you can send push notifications to all of your customers or only to a subset of your Windows 10 customers who meet the criteria you’ve defined in a customer segment. With a push notification, you engage and encourage your customers to take an action, such as rating an app, buying an add-on, trying a new feature or downloading another app.

Why should I use these kinds of campaigns?

Studies have shown that acquiring a new customer is anywhere from five to 25 times more expensive than retaining an existing one. That’s why once you’ve acquired a customer it’s important to reengage with him or her regularly so you cultivate a loyal fan base that uses your app frequently and that’s open to making additional purchases.

How do I get started?

At a high level, there are two steps to creating an engagement campaign.

  1. Use the Windows Dev Center dashboard to create a customer segment that includes the kinds of customers you want to target.

You can choose from a variety of customer criteria, such as Acquisition source, Acquisitions, Demographic, Rating, Store acquisitions, Store purchases and Store spend.

Note that for privacy reasons, the Windows Dev Center doesn’t show developers any personally identifiable information about the specific customers in a segment.

  1. Use the dashboard to create an ad campaign for your app. In the Campaign objective section, be sure to choose the Increase engagement in your app

Give it a try and if you’ve got suggestions for how we can make these features even more useful to you, please let us know at Windows Developer Feedback.

The post Reengage your customers with UWP ad campaigns and push notifications appeared first on Building Apps for Windows.

The week in .NET – On .NET on MyGet – FlexViewer – I Expect You To Die

$
0
0

To read last week’s post, see The week in .NET – Cosmos on On.NET, GongSolutions.WPF.DragDrop, Transistor.

On .NET

Last week, we had Xavier Decoster and Maarten Belliauw from MyGet on the show:

This week, we won’t record a new show, and instead I’ll post some of the videos I recorded during the MVP summit.

Package of the week: FlexViewer by ComponentOne

There are many ways to do reporting with .NET, and choosing one can be daunting. ComponentOne build, maintains, and supports a full lineup of components, including reporting. FlexViewer is an interactive report viewing component that works in WinForms, UWP, and MVC, with support for PDF, HTML, Office, and more. Their web site has a new four-minute tutorial to get you started.

FlexViewer

Game of the week: I Expect You To Die

I Expect You To Die is a puzzle game built for virtual reality. Become an elite secret agent as you attempt to survive the deadliest of situations to complete your missions. Each mission will require superb problem-solving skills, intellect and agility. I Expect You to Die can be played seated with the use of telekinesis to grab objects out of your reach. As the name suggests – you will die. A lot. Each puzzle can be solved several different ways, and each death will help bring you closer to completing your mission.

I Expect You To Die

I Expect You To Die was created Shell Games using C# and Unity. It is available for Oculus Rift and will release for PlayStation VR on December 13th.

User group meeting of the week: Using C# for Data Access in Seattle

The .NET Developer Association – Westside – Seattle user group will have a presentation on data access in C# on Tuesday, December 6.

.NET

ASP.NET

F#

Check out the F# Advent Calendar for loads of great F# blog posts for the month of December.

Check out F# Weekly for more great content from the F# community.

Xamarin

Azure

Games

And this is it for this week!

Contribute to the week in .NET

As always, this weekly post couldn’t exist without community contributions, and I’d like to thank all those who sent links and tips. The F# section is provided by Phillip Carter, the gaming section by Stacey Haffner, and the Xamarin section by Dan Rigby.

You can participate too. Did you write a great blog post, or just read one? Do you want everyone to know about an amazing new contribution or a useful library? Did you make or play a great game built on .NET?
We’d love to hear from you, and feature your contributions on future posts:

This week’s post (and future posts) also contains news I first read on The ASP.NET Community Standup, on Weekly Xamarin, on F# weekly, and on Chris Alcock’s The Morning Brew.

Agent-based deployment in Release Management

$
0
0

Agent-based deployment in Release Management

Our approach in Release management so far has been to integrate with various deployment tools and platforms while providing rich control over the flow of bits, traceability, and auditability.

When it comes to PaaS deployments, we have first-class integration with Azure, platform abstracts out the complexity. For IaaS deployments, we have provided the ability to run scripts on a proxy agent or on the target servers using remote scripting tasks.  Though it’s not always that hard to deploy to a single target, the promise of continuous value delivery relies on the ability to continuously publish updated versions of an application across a variety of environments for various purposes each having multitude of targets/roles, which can be very difficult to perform and manage.

We have been working on adding robust in-the-box multi-machine deployment pipeline using Release Management. Where you can orchestrate  deployments across multiple nodes, perform rolling updates while ensuring high availability of the application throughout. Agent based deployment capability relies on the same build and deployment agents. However, unlike the current approach, where you install the build and deployment agents on a set of proxy servers in an agent pool and drive deployments to remote target servers, you can install the agent on each of your target servers directly, and then drive rolling deployment to those servers.

With this you can use the same proven cross-platform agent and its pull-based execution model to easily drive deployments on a large number of servers no matter which domain they are on, without having to worry about the myriad of pre-requisites.

Before we get started, here are some concepts you need to get familiar with:

Deployment Group (aka Machine Group)

Deployment group is a logical group of targets (machines) with agents installed on each of them. They also specify the security context. For example, ‘Dev’, ‘Test’, ‘UAT’, and ‘Production’ – each of them having one or more physical/virtual machines.

Phase

Each Phase represents a composite step in build or release process. It is a logical group of tasks that contains everything that is required to support that step. A Phase has a run characteristic, it can be run against an ‘Agent queue’ or a ‘Deployment Group’ or just call out to an external service by pausing the workflow  – ‘Server phase’.

Let’s get started with agent based deployment in release. Here are a couple of screenshots to explain how this experience is shaping up.

  • Create your ‘Deployment Group’ by installing and configuring ‘build and deployment agents’. Note: In the screenshots below, they are still being referred to as ‘Machine Groups’createdeploymentgroup
  • Monitor the targets under the deployment groups tab in Release hub. You can even track the deployments on each machine. You can tag the machine in the group so that you can deploy to the targets having ‘specific’ tags. For example, you can have few of them tagged as ‘Web’ and direct your web packages to be delivered to them using ‘Tags’ feature in phase properties. deploymentgroupreleases
  • Deploy to the targets in the deployment group using phase control.deploytodeploymenggroup

Deployment group phase

A bit more on deployment group phase, as mentioned before deployment phase targets a deployment group. Additionally, it lets you target a subset of machines in the group with help of ‘Tags’.

‘Deployment Configuration’ enables rolling deployment to the targets in the deployment group. Deployment configuration specifies the percentage of targets that are being deployed to and inturn computes the targets that must remain available at any time during deployment.

For example, Deploy to ‘1/2 of the targets in parallel’ –  If the deployment group had 10 targets, it attempts to deploy to 5 targets in parallel. Once the deployment to ‘5’ is successful, it attempts deployment on the remaining ‘5’ targets. The overall deployment will succeed if the deployment to 5 or more targets succeed else the deployment fails.

Bootstraping agents: We have made bootstrapping the agents on the target simpler. You can just copy-paste the command-let appropriate for the OS and it will take care of downloading, installation and confiuring the agent against the deployment group. It even has an option to generate the command-let with ‘Personal Access Token’ so that you don’t have to.

  • If it is Azure, you can do it on-demand using Team Services extension for the VM or use Azure PowerShell/CLI to add the extension which will bootstrap the deployment agent.
  • You can automate using resource extension in the Azure template json.
  • We plan to enhance ‘Azure Resource Group’ task to dynamically bootstrap agents on the newly provisioned / pre-existing Virtual Machines on Azure.teamservicesagent

Push, Pull deployments

We have taken a new approach with Team Services. It is an approach that has both the models, push and pull: i) proxy agent based model where user has the power of orchestration. And ii) pull-agent on the targets participating in the orchestration driven by Release Management. 

Got feedback?

Agent based deployment feature is currently in early adopter phase, if you would like to participate or If you have suggestions on how can we make agent-based deployment better for you? Here is how you can get in touch with us

Announcing TypeScript 2.1

$
0
0

We spread ourselves thin, but this is the moment you’ve been awaiting – TypeScript 2.1 is here!

For those who are unfamiliar, TypeScript is a language that brings you all the new features of JavaScript, along with optional static types. This gives you an editing experience that can’t be beat, along with stronger checks against typos and bugs in your code.

This release comes with features that we think will drastically reduce the friction of starting new projects, make the type-checker much more powerful, and give you the tools to write much more expressive code.

To start using TypeScript you can use NuGet, or install it through npm:

npm install -g typescript

You can also grab the TypeScript 2.1 installer for Visual Studio 2015 after getting Update 3.

Visual Studio Code will usually just prompt you if your TypeScript install is more up-to-date, but you can also follow instructions to use TypeScript 2.1 now with Visual Studio Code or our Sublime Text Plugin.

We’ve written previously about some great new things 2.1 has in store, including downlevel async/await and significantly improved inference, in our announcement for TypeScript 2.1 RC, but here’s a bit more about what’s new in 2.1.

Async Functions

It bears repeating: downlevel async functions have arrived! That means that you can use async/await and target ES3/ES5 without using any other tools.

Bringing downlevel async/await to TypeScript involved rewriting our emit pipeline to use tree transforms. Keeping parity meant not just that existing emit didn’t change, but that TypeScript’s emit speed was on par as well. We’re pleased to say that after several months of testing, neither have been impacted, and that TypeScript users should continue to enjoy a stable speedy experience.

Object Rest & Spread

We’ve been excited to deliver object rest & spread since its original proposal, and today it’s here in TypeScript 2.1. Object rest & spread is a new proposal for ES2017 that makes it much easier to partially copy, merge, and pick apart objects. The feature is already used quite a bit when using libraries like Redux.

With object spreads, making a shallow copy of an object has never been easier:

let copy = { ...original };

Similarly, we can merge several different objects so that in the following example, merged will have properties from foo, bar, and baz.

let merged = { ...foo, ...bar, ...baz };

We can even add new properties in the process:

let nowYoureHavingTooMuchFun = {
    hello: 100,...foo,
    world: 200,...bar,
}

Keep in mind that when using object spread operators, any properties in later spreads “win out” over previously created properties. So in our last example, if bar had a property named world, then bar.world would have been used instead of the one we explicitly wrote out.

Object rests are the dual of object spreads, in that they can extract any extra properties that don’t get picked up when destructuring an element:

let { a, b, c, ...defghijklmnopqrstuvwxyz } =alphabet;

keyof and Lookup Types

Many libraries take advantage of the fact that objects are (for the most part) just a map of strings to values. Given what TypeScript knows about each value’s properties, there’s a set of known strings (or keys) that you can use for lookups.

That’s where the keyof operator comes in.

interfacePerson {
    name:string;
    age:number;
    location:string;
}let propName:Person;

The above is equivalent to having written out

let propName:"name"|"age"|"location";

This keyof operator is actually called an index type query. It’s like a query for keys on object types, the same way that typeofcan be used as a query for types on values.

The dual of this is indexed access types, also called lookup types. Syntactically, they look exactly like an element access, but are written as types:

interfacePerson {
    name:string;
    age:number;
    location:string;
}let a:Person["age"];

This is the same as saying that n gets the type of the name property in Person. In other words:

let a:number;

When indexing with a union of literal types, the operator will look up each property and union the respective types together.

// Equivalent to the type 'string | number'let nameOrAge:Person["name"|"age"];

This pattern can be used with other parts of the type system to get type-safe lookups, serving users of libraries like Ember.

function get<T, KextendsT>(obj:T, propertyName:K):T[K] {returnobj[propertyName];
}let x = { foo: 10, bar: "hello!" };let foo =get(x, "foo"); // has type 'number'let bar =get(x, "bar"); // has type 'string'let oops =get(x, "wargarbl"); // error!

Mapped Types

Mapped types are definitely the most interesting feature in TypeScript 2.1.

Let’s say we have a Person type:

interfacePerson {
    name:string;
    age:number;
    location:string;
}

Much of the time, we want to take an existing type and make each of its properties entirely optional. With Person, we might write the following:

interfacePartialPerson {
    name?:string;
    age?:number;
    location?:string;
}

Notice we had to define a completely new type.

Similarly, we might want to perform a shallow freeze of an object:

interfaceFrozenPerson {readonly name:string;readonly age:number;readonly location:string;
}

Or we might want to create a related type where all the properties are booleans.

interfaceBooleanifiedPerson {
    name:boolean;
    age:boolean;
    location:boolean;
}

Notice all this repetition – ideally, much of the same information in each variant of Person could have been shared.

Let’s take a look at how we could write BooleanifiedPerson with a mapped type.

typeBooleanifiedPerson= {
    [Pin"name"|"age"|"location"]:boolean
};

Mapped types are produced by taking a union of literal types, and computing a set of properties for a new object type. They’re like list comprehensions in Python, but instead of producing new elements in a list, they produce new properties in a type.

In the above example, TypeScript uses each literal type in "name" | "age" | "location", and produces a property of that name (i.e. properties named name, age, and location). P gets bound to each of those literal types (even though it’s not used in this example), and gives the property the type boolean.

Right now, this new form doesn’t look ideal, but we can use the keyof operator to cut down on the typing:

typeBooleanifiedPerson= {
    [PinkeyofPerson]:boolean
};

And then we can generalize it:

typeBooleanify<T>= {
    [PinkeyofT]:boolean
};typeBooleanifiedPerson=Booleanify<Person>;

With mapped types, we no longer have to create new partial or readonly variants of existing types either.

// Keep types the same, but make every property optional.typePartial<T>= {
    [PinkeyofT]?:T[P];
};// Keep types the same, but make each property to be read-only.typeReadonly<T>= {readonly [PinkeyofT]:T[P];
};

Notice how we leveraged TypeScript 2.1’s new indexed access types here by writing out T[P].

So instead of defining a completely new type like PartialPerson, we can just write Partial. Likewise, instead of repeating ourselves with FrozenPerson, we can just write Readonly!

Partial, Readonly, Record, and Pick

Originally, we planned to ship a type operator in TypeScript 2.1 named partial which could create an all-optional version of an existing type.
This was useful for performing partial updates to values, like when using React‘s setState method to update component state. Now that TypeScript has mapped types, no special support has to be built into the language for partial.

However, because the Partial and Readonly types we used above are so useful, they’ll be included in TypeScript 2.1. We’re also including two other utility types as well: Record and Pick. You can actually see how these types are implemented within lib.d.ts itself.

Easier Imports

TypeScript has traditionally been a bit finnicky about exactly how you can import something. This was to avoid typos and prevent users from using packages incorrectly.

However, a lot of the time, you might just want to write a quick script and get TypeScript’s editing experience. Unfortunately, it’s pretty common that as soon as you import something you’ll get an error.

The code `import * as lodash from

“But I already have that package installed!” you might say.

The problem is that TypeScript didn’t trust the import since it couldn’t find any declaration files for lodash. The fix is pretty simple:

npm install --save @types/lodash

But this was a consistent point of friction for developers. And while you can still compile & run your code in spite of those errors, those red squiggles can be distracting while you edit.

So we focused on on that one core expectation:

But I already have that package installed!

and from that statement, the solution became obvious. We decided that TypeScript needs to be more trusting, and in TypeScript 2.1, so long as you have a package installed, you can use it.

Do be careful though – TypeScript will assume the package has the type any, meaning you can do anything with it. If that’s not desirable, you can opt in to the old behavior with --noImplicitAny, which we actually recommend for all new TypeScript projects.

Enjoy!

We believe TypeScript 2.1 is a full-featured release that will make using TypeScript even easier for our existing users, and will open the doors to empower new users. 2.1 has plenty more including sharing tsconfig.json options, better support for custom elements, and support for importing helper functions, all which you can read about on our wiki.

As always, we’d love to hear your feedback, so give 2.1 a try and let us know how you like it! Happy hacking!

December Hosted Build Image Updates

$
0
0

Over the next few days we will roll out a new build image with the following software updates.

  • .NET Core 1.1
  • Android SDK v25
  • Azure CLI 0.10.7
  • Azure PS 3.1.0
  • Azure SDK 2.9.6
  • Cmake 3.7.1
  • Git for Windows 2.10.2
  • Git LFS 1.5.2
  • Node 6.9.1
  • Service Fabric SDK 2.3.311
  • Service Fabric 5.3.311
  • Typescript 2.0.6 for Visual Studio 2015
  • Permissions changes to allow building of .NET 3.5 ASP.NET Web Forms projects

For a full list of software see https://www.visualstudio.com/en-us/docs/build/admin/agents/hosted-pool#software-on-the-hosted-build-server


Conversion options for bringing your existing desktop app to the Universal Windows Platform using the Desktop Bridge

$
0
0

With this summer’s release of the Windows 10 Anniversary update and the recent announcement of the Store supporting apps built with the Desktop Bridge technology, we are receiving much interest from many customers wanting to participate. Many developers are seeing the value of the new Windows 10 app packaging technology that enables your app to cleanly install, uninstall and update, as well as get full access to UWP APIs including Live Tiles, Cortana, notifications and more.

However, the conversion process can be intimidating if you are not familiar with your application’s footprint on the system and the technology it uses. This article is intended to educate you on the options for converting your app’s installation into a Windows app package.

Background

Before we begin to list the options and their various pros and cons, it helps to understand a little about what makes up a Windows app package and how an existing application runs under the Desktop Bridge environment. In the context of the Desktop Bridge, the key parts of an app package, also known as a “.appx” file, has the following:

  • Application files– these are the files your app requires to execute and are usually placed in the root of the package. Typically these are the same files that are installed in the application’s folder under “C:\Program Files” or “C:\Program Files (x86).” In the Universal Windows Platform (UWP), package is placed in an app specific directory under “C:\Program Files\WindowsApps” and are secured to prevent tampering.
  • xml– this file is used by the Windows Store to validate the package contents and identity of the publisher, and it is used by the deployment pipeline to install the application. The purpose of the manifest is to make everything about the installation of a package declarative and thus handled by the system. A key pillar is that no user code is executed at deployment time.
  • dat – If the application writes to the registry at install time, or the app expects certain registry keys to be set when it starts, this information must be stored in a local application hive. At runtime, this hive is mounted and merged with the system registry so the application sees a merged view. The isolation provided by this model allows for no-impact install and uninstall guarantees provided by the UWP packaging model for apps in the Windows Store.
  • Virtual File System, VFS (optional)– If the application places files in other locations outside its typical product folder, i.e, c:\windows\system32, these files should be placed under the VFS folder. At runtime, the VFS is mounted and merged with the actual file system on disk so the application is presented with a merged view. The isolation provided by this model allows for no-impact install and uninstall guarantees provided by the UWP packaging model for apps in the Windows Store.

After you understand the essential parts that are required for a UWP package, the next step that will influence the conversion is understanding how the application impacts the system – what files are installed where, and what registry entries does the application installer write. Depending on how much a developer knows about their application installer, they can make the decision on the best approach.

Don’t know what your setup package does?

Desktop App Converter

The Desktop App Converter (DAC) is the first option most developers are exposed to, as it requires very little knowledge of the application’s installer. The DAC leverages an isolated environment to install the application. While the install is happening, the isolated environment captures all file system and registry access within that environment and saves the deltas to disk.

The DAC then processes the deltas, filtering out changes made by the OS itself (the isolated environment is similar to a light weight VM running the OS and so there are services, filesystem and registry access happening while the installer is running), and locates your application via shortcuts registered in that environment by the installer. The DAC saves the installer-specific changes, creates the manifest file and sample image assets, and builds the UWP package if specified.

The benefits of this approach are:

  • Straightforward if you know your installer’s silent or unattended setup flags.
  • The DAC can be used to create an initial package, and the output (the PackageFiles folder) can be manually updated with new binaries and rebuilt when there are updates to the application. There is no need to re-run the DAC unless there are significant changes to the installer.

The caveats are:

  • First-time acquisition and setup of the DAC and its base image can take some time.
  • Requires the developer to be familiar with their installer, at least enough to know if it supports a silent or unattended mode. Some installers are not very clear on how to do this and can require a lot of trial and error to figure this out, which is beyond the scope of this article.
  • If the installer hangs, it can be a challenge to get the installer log files for debugging.
  • The file and registry filtering takes a conservative approach to remove system activity because installers can have a broad impact to the system. This approach was taken to ensure the greatest level of compatibility. Developers should review the virtual file system and registry and remove entries that are not associated with their application.

The Desktop App Converter itself can be downloaded from the Windows Store. For more information, please check out the documentation on the Windows Dev Center.

XCopy Deployment?

Manual Packaging

If an application setup is very simple and does not require registry entries nor copying files to protected locations, then a manual packaging option is the most straightforward.  This solution is common for single executable tools or “xcopy” deployments. Typically, all that is required is to place the application files in a folder, and to create an AppManifest.xml with the proper fields updated to identify the publisher and the app executable. Step-by-step instructions for manual packaging can be found on the Windows Dev Center and a sample can be found on GitHub.

Need to support both MSI and Windows 10?

Install technology partners with .appx packaging support

We’ve been working with our partners that build setup technologies to add support for directly building Windows app packages (.appx file) with their tools. These tools will create the app manifest and produce the app package as part of their build process. The key benefit these solutions provide is the ability to maintain one installer code base that will produce an MSI installer typically used in older versions of Windows (e.g. Windows 7), as well as build a no-impact install package for Windows 10 (i.e., .appx file for Windows 10). More information can be found at:

Additionally, Embarcadero has announced support for the Desktop Bridge in RAD Studio, which lets you directly output a Windows app package through the build process.

In summary, the best option depends on how complex the application is and much a developer knows about their existing installation methodology. Whether you have an installer with unknown setup technology, a simple xcopy install, or an application that already has existing assets in a given installer technology, there are approaches to meet your needs.

For more information on the Desktop Bridge, please visit the Windows Dev Center.

Ready to submit your app to the Windows Store? Let us know!

The post Conversion options for bringing your existing desktop app to the Universal Windows Platform using the Desktop Bridge appeared first on Building Apps for Windows.

Awesome, legal, wireless retrogaming with a Hyperkin 5 and 8bitdo's nes30pro

$
0
0

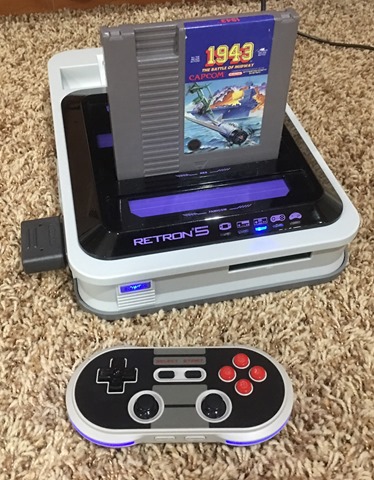
Hyperkin Retron 5 is amazing with an 8bitdo nes30pro!My kids and I are big fans of retrogaming. We have a whole collection of real consoles including N64, Dreamcast, PS2, Genesis, and more. However, playing these older consoles on new systems often involves a bunch of weird AV solutions to get HDMI out to your TV. Additionally, most retro controllers don't have a wire that's long enough for today's 55" and larger flatscreens.

We wanted a nice solution that would let us play a bunch of our games AND include a wireless controller option. Here's the combination of products that we ended up with for retrogaming this Christmas season.

Hyperkin Retro Console

There's a company called Hyperkin that makes a series of retro-consoles. They've got the Hyperkin Retron 2, Hyperkin Retron  3, and my favorite (and the one YOU should get) the Hyperkin Retron 5. You'd think the Hyperkin 5 would let you play five consoles, but it actually lets you play NES, SNES, Super Famicom, Genesis, Mega Drive, Famicom, Game Boy, Game Boy Color, and GBA (Gameboy advance) cartridges on one system. It has five slots. ;)

Everyone's talking about how they can't find the NES Classic Edition. I'd spend that money on a Hyperkin and then go out and buy a few actual game carts from your local retro gaming shop.

I like the Hyperkin Retron 5 over the lesser models for a few reasons.

  • It outputs HDMI natively for all it's emulated consoles.
  • It's got great firmware that is updated fairly often.
  • Its firmware has video features like adding fake CRT scanlines for authenticity (we like playing that way)
  • It supports cheats ;)
  • It's got multiple, real ports that support your existing console gamepads
  • You can use one system's controller for another. For example, a SNES gamepad on an NES game.

The only bad things about the Hyperkin Retron 5 is that the included controller kind of sucks and with all console games, you need to be fairly careful inserting and removing the cartridges.

8bitdo NES30 Pro Game Controller

You might assume the 8bitdo NES30 Pro Game Controller would be a cheap overseas knockoff controller but it's REALLY well made and it's REALLY more useful than I realized when I got it!

8bitdo controller

There are a number of these controllers from this company. The NES30 is nice but the NES30 Pro includes two analog sticks while still keeping the classic style. Think of it as almost a portable Xbox 360 controller! In fact, when you plug it into your PC with a USB cable it shows up as an Xbox 360 controller! That means it works great for Steam games. I've been carrying it in my bag on trips and gaming on my laptop.

for-pcThe build quality of the pad is great, but it's the extendable firmware that really makes the 8bitdo NES30 Pro shine. It has support to act as a Wiimote and even custom firmware for a...wait for it...Retron 5 mode! This means you can use this controller as a replacement for the Retron and play all the consoles it supports.

Even better, the 8bitdo NES30 Pro Game Controller also supports iOS, Android, etc. It's really just about perfect. My only complaint is that you have to turn it on while holding certain buttons in order to start in the various modes. So there's Bluetooth mode, iOS mode, Xbox mode, etc. Not a huge deal, but I've printed out the manual to keep it all straight.

8bitdo Controller Wireless Receiver

Here's where the magic happened. Because the 8bitdo NES30 Pro is a Bluetooth device, there's wireless receivers available for it for most consoles! If you have an NES or you managed to find an NES Classic, there's an 8bitdo Retro Receiver for NES.

However, I recommend you get the 8bitdo Bluetooth SNES Retro Receiver and plug it into the Hyperkin Retron 5. This, for us, has been the sweet spot. It works great with all games and we've got HDMI output from the Retron while still being able to sit back on the couch and game. You can also get two if you like and play multiplayer. As for power, the receiver needs just 100mA and leeches that power from the SNES port.

Even better, this Retro Receiver lets you use existing controllers as wireless controllers to whatever! So you can use your Wii U or PS3 controllers (since they are Bluetooth!) and retrogame with those.

If that wasn't awesome enough, the Retro Receiver can act as a generic "X-Input" controller for your PC or Mac. You plug an included Micro-USB cable into it and then pair your PS3, PS4, or Wii Remote into your computer and use it!

To be clear, I have no relationship with the 8bitdo company but everything they make is gold.


Sponsor: Big thanks to Redgate! Help your team write better, shareable SQL faster. Discover how your whole team can write better, shareable SQL faster with a free trial of SQL Prompt. Write, refactor and share SQL effortlessly, try it now!


© 2016 Scott Hanselman. All rights reserved.
     

ICYMI – Build 14986, BUILD 2017, and Windows 10 on ARM-based computers!?

$
0
0

What a time to be a Windows developer.

This week we got a new Windows Insider Preview Build, new options added to the Desktop Bridge, expanded access to customer segmentation and notifications, and finally some big news coming from the Windows Hardware Engineer Conference (also known as WinHec 2016). More details below!

Windows 10 Insider Preview Build 14986

In the latest Insider Preview Build, you’ll find a treasure chest of updates. Our favorites include improvements to Cortana, the Windows Game Bar, Ink and enhancements to the Windows 10 experience in Asia. Click the link in the above title to read the blog post!

Desktop Bridge – Options for bringing Win32 Apps to the UWP

Use the Desktop App Converter to gain access to UWP APIs and simplify your app’s installation process with Windows 10 app packaging technology.

Customer Segmentation and Notifications

Developers can build customer segments and use the segments to create custom retargeting and reengagement ad campaigns for their UWP apps. Additionally, devs can use these segments to send push notifications. Previously this ability was only available to Windows Insiders. So on that note, we hope you enjoy it!

Windows 10 on ARM-based Computers (!)

It’s not too good to be true, nor is it some sort of developer witchcraft. It’s real and represents a huge step forward in mobile technology. Here’s a preview of what Windows 10 looks like on a Qualcomm Snapdragon processor.

And last, but not least…

BUILD 2017 dates and location announced!

And that’s it! We’re excited to get the BUILD 2017 ball rolling, and as always, tweet us @WindowsDev with any questions or feedback.

Download Visual Studio to get started.

The Windows team would love to hear your feedback.  Please keep the feedback coming using our Windows Developer UserVoice site. If you have a direct bug, please use the Windows Feedback tool built directly into Windows 10.

The post ICYMI – Build 14986, BUILD 2017, and Windows 10 on ARM-based computers!? appeared first on Building Apps for Windows.

Exploring Wyam - a .NET Static Site Content Generator

$
0
0

It's a bit of a renaissance out there when it comes to Static Site Generators. There's Jekyll and GitBook, Hugo and Hexo. Middleman and Pelican, Brunch and Octopress. There's dozens, if not hundreds of static site content generators, and "long tail is long."

Wyam is a great .NET based open source static site generator

Static Generators a nice for sites that DO get updated with dynamic content, but just not updated every few minutes. That means a Static Site Generator can be great for documentation, blogs, your brochure-ware home page, product catalogs, resumes, and lots more. Why install WordPress when you don't need to hit a database or generate HTML on every page view? Why not generate your site only when it changes?

I recently heard about a .NET Core-based open source generator called Wyam and wanted to check it out.

Wyam is a simple to use, highly modular, and extremely configurable static content generator that can be used to generate web sites, produce documentation, create ebooks, and much more.

Wyam is a module system with a pipeline that you can configure and chain processes together however you like. You can generate HTML from Markdown, from Razor, even XSLT2 - anything you like, really. Wyam also integrates nicely into your continuous build systems like Cake and others, so you can also get the Nuget Tools package for Wyam.

There's a few ways to get Wyam but I downloaded the setup.exe from GitHub Releases. You can also just get a ZIP and download it to any folder. When I ran the setup.exe it flashed (I didn't see a dialog, but it's beta so I'll chalk it up to that) and it installed to C:\Users\scott\AppData\Local\Wyam with what looked like the Squirrel installer from GitHub and Paul Betts.

Wyam has a number of nice features that .NET Folks will find useful.

Let's see what I can do with http://wyam.io in just a few minutes!

Scaffolding a Blog

Wyam has a similar command line syntax as dotnet.exe and it uses "recipes" so I can say --recipe Blog and I'll get:

C:\Users\scott\Desktop\wyamtest>wyam new --recipe Blog
Wyam version 0.14.1-beta

,@@@@@ /@\ @@@@@
@@@@@@ @@@@@| $@@@@@h
$@@@@@ ,@@@@@@@ g@@@@@P
]@@@@@M g@@@@@@@ g@@@@@P
$@@@@@ @@@@@@@@@ g@@@@@P
j@@@@@ g@@@@@@@@@p ,@@@@@@@
$@@@@@g@@@@@@@@B@@@@@@@@@@@P
`$@@@@@@@@@@@` ]@@@@@@@@@`
$@@@@@@@P` ?$@@@@@P
`^`` *P*`
**NEW**
Scaffold directory C:/Users/scott/Desktop/wyamtest/input does not exist and will be created
Installing NuGet packages
NuGet packages installed in 101813 ms
Recursively loading assemblies
Assemblies loaded in 2349 ms
Cataloging classes
Classes cataloged in 277 ms

One could imagine recipes for product catalogs, little league sites, etc. You can make your own custom recipes as well.

I'll make a config.wyam file with this inside:

Settings.Host = "test.hanselman.com";
GlobalMetadata["Title"] = "Scott Hanselman";
GlobalMetadata["Description"] = "The personal wyam-made blog of Scott Hanselman";
GlobalMetadata["Intro"] = "Hi, welcome to my blog!";

Then I'll run wyam with:

C:\Users\scott\Desktop\wyamtest>wyam -r Blog
Wyam version 0.14.1-beta
**BUILD**
Loading configuration from file:///C:/Users/scott/Desktop/wyamtest/config.wyam
Installing NuGet packages
NuGet packages installed in 30059 ms
Recursively loading assemblies
Assemblies loaded in 368 ms
Cataloging classes
Classes cataloged in 406 ms
Evaluating configuration script
Evaluated configuration script in 2594 ms
Root path:
file:///C:/Users/scott/Desktop/wyamtest
Input path(s):
file:///C:/Users/scott/.nuget/packages/Wyam.Blog.CleanBlog.0.14.1-beta/content
theme
input
Output path:
output
Cleaning output path output
Cleaned output directory
Executing 7 pipelines
Executing pipeline "Pages" (1/7) with 8 child module(s)
Executed pipeline "Pages" (1/7) in 221 ms resulting in 13 output document(s)
Executing pipeline "RawPosts" (2/7) with 7 child module(s)
Executed pipeline "RawPosts" (2/7) in 18 ms resulting in 1 output document(s)
Executing pipeline "Tags" (3/7) with 10 child module(s)
Executed pipeline "Tags" (3/7) in 1578 ms resulting in 1 output document(s)
Executing pipeline "Posts" (4/7) with 6 child module(s)
Executed pipeline "Posts" (4/7) in 620 ms resulting in 1 output document(s)
Executing pipeline "Feed" (5/7) with 3 child module(s)
Executed pipeline "Feed" (5/7) in 134 ms resulting in 2 output document(s)
Executing pipeline "RenderPages" (6/7) with 3 child module(s)
Executed pipeline "RenderPages" (6/7) in 333 ms resulting in 4 output document(s)
Executing pipeline "Resources" (7/7) with 1 child module(s)
Executed pipeline "Resources" (7/7) in 19 ms resulting in 14 output document(s)
Executed 7/7 pipelines in 2936 ms

I can also run it with -t for different themes, like "wyam -r Blog -t Phantom":

Wyam supports themes

As with most Static Site Generators I can start with a markdown file like "first-post.md" and included name value pairs of metadata at the top:

Title: First Post
Published: 2016-01-01
Tags: Introduction
---
This is my first post!

If I'm working on my site a lot, I could run Wyam with the -w (WATCH) switch and then edit my posts in Visual Studio Code and Wyam will WATCH the input folder and automatically run over and over, regenerating the site each time I change the inputs! A nice little touch, indeed.

There's a lot of cool examples at https://github.com/Wyamio/Wyam/tree/develop/examples that show you how to generate RSS, do pagination, use Razor but still generate statically, as well as mixing Razor for layouts and Markdown for posts.

The AdventureTime sample is fairly sophisticated (be sure to read the comments in the config.wyam for gotcha) example that includes a custom Pipeline, use of Yaml for front matter, and mixes markdown and Razor.

There's also a ton of modules you can use to extend the build however you like. For example, you could have source images be large and then auto-generate thumbnails like this:

Pipelines.Add("Images",
ReadFiles("*").Where(x => x.Contains("images\\") && new[] { ".jpg", ".jpeg", ".gif", ".png"}.Contains(Path.GetExtension(x))),
Image()
.SetJpegQuality(100).Resize(400,209).SetSuffix("-thumb"),
WriteFiles("*")
);

There's a TON of options. You could even use Excel as the source data for your site, generate CSVs from the Excel OOXML and then generate your site from those CSVs. Sounds crazy, but if you run a small business or non-profit you could quickly make a nice workflow for someone to take control of their own site!

GOTCHA: When generating a site locally your initial reaction may be to open the /output folder and open the index.html in your local browser. You MAY be disappointed with you use a static site generator. Often they generate absolute paths for CSS and Javascript so you'll see a lousy version of your website locally. Either change your templates to generate relative paths OR use a staging site and look at your sites live online. Even better, use the Wyam "preview web server" and run Wyam with a "-p" argument and then visit http://localhost:5080 to see your actual site as it will show up online.

Wyam looks like a really interesting start to a great open source project. It's got a lot of code, good docs, and it's easy to get started. It also has a bunch of advanced features that would enable me to easily embed static site generation in a dynamic app. From the comments, it seems that Dave Glick is doing most of the work himself. I'm sure he'd appreciate you reaching out and helping with some issues.

As always, don't just send a PR without talking and working with the maintainers of your favorite open source projects. Also, ask if they have issues that are friendly to http://www.firsttimersonly.com.


Sponsor: Big thanks to Redgate! Help your team write better, shareable SQL faster. Discover how your whole team can write better, shareable SQL faster with a free trial of SQL Prompt. Write, refactor and share SQL effortlessly, try it now!


© 2016 Scott Hanselman. All rights reserved.
     

Updating Visual Studio 2017 Release Candidate

$
0
0

We announced the availability of Visual Studio 2017 Release Candidate a few weeks ago at Connect(); 2016. For those of you who tried it, let me start by saying, “Thanks!” Already you’ve submitted several hundred issues and requests and we’re using your feedback and the telemetry on the product to improve it greatly.

We’ve been busily fixing issues (including many of those you reported) and today we are sharing an update to the RC. Take a look at the Visual Studio 2017 Release Notes and Known Issues for the full list of what’s available in this updated RC. Here are a couple I’d like to call out:

  • To start, there are many bug fixes, including fixing an issue in Git syncing in Team Explorer that led to “Could not load current branch,” some crashes and hangs in loading large projects, and some bugs in Go To All.
  • We now have offline help available by installing the Help Viewer component in the Visual Studio installer.
  • You can now add and remove multiple user interface languages at any time using the Visual Studio installer on the Language Pack tab. You can select the current user interface language among those installed using Tools > Options > International Settings.
  • We improved the .NET Core and Docker workload. It’s still in preview, but we made the csproj file easier to read, added new commands to the .NET Core command-line (CLI) tools, and made many bug fixes. See the .NET blog for details.
  • We improved the Developer Analytics Tools. CodeLens now shows exceptions that have occurred during local debug sessions for projects with the Application Insights SDK and it can show the impact an exception has had on users.

We’re continuing to iterate on the release candidate and will post more updates, so we definitely want your feedback. For problems, let us know via the Report a Problem option in the upper right corner of the VS title bar. Track your feedback on the developer community portal. For suggestions, let us know through UserVoice.

John Montgomery, Director of Program Management for Visual Studio
@JohnMont

John is responsible for product design and customer success for all of Visual Studio, C++, C#, VB, JavaScript, and .NET. John has been at Microsoft for 18 years, working in developer technologies the whole time.

Updating Visual Studio 2017 RC – .NET Core Tooling improvements

$
0
0

This post was co-authored by Joe Morris, a Senior Program Manager on the .NET Team and David Carmona, a Principal Program Manager Lead on the .NET Team.

Today, an update to Visual Studio 2017 RC was announced. As part of this update, we have made several enhancements and bug fixes to the .NET Core tools that are part of Visual Studio 2017. For previous information about these tools you can read our original blog post announcing the initial RC release of Visual Studio 2017.

Summary

This update contains many enhancements and bug fixes to the early alpha we released with Visual Studio 2017 RC. Despite this great progress, it is still a preview. For an up to date list of issues that we are working on, please see our GitHub page. The top areas addressed in this update are:

  • csproj file simplification: .NET Core project files now use an even more simplified syntax, making them easier to read. Also, csproj file editing in the IDE has been improved.
  • CLI commands added: New commands added for adding (add p2p) and removing (remove p2p) project to project references.
  • Overall quality improved: Bug fixes in xproj to csproj migration, project to project references, NuGet, MSBuild and ASP.NET Core with Docker.

csproj file simplification

.NET Core csproj files have been simplified, making them easier to read. Snippets shown below demonstrate the simplification.

.NET Core Console application

Previous:

Simplified:

ASP.NET Core Web application

Previous:

Simplified:

As you can see, it is lot more shorter and easier to read. Note: A few of the simplifications to the project files are not included in the update that we are making available today, but we plan to include them in a later update.

In the simplified csproj syntax, notice that the SDK is no longer a package reference, instead it is now a project attribute. This attribute signifies the set of tooling which defines the type of the project and is used to build and run it.

In the early alpha release, the SDK was a NuGet package that had to be restored before a .NET Core or ASP.NET Core project could be used.  Now, we preinstall the tooling when you install Visual Studio 2017 RC with the “.NET Core and Docker (Preview)” workload, and it is consumed directly by MSBuild without requiring a package restore.

We are investigating further improvements to the SDK attribute feature, such as support for third party SDKs and specifying which version of an SDK is required.

In addition to the simplification of csproj syntax, we also fixed two major annoyances that were present in the early alpha release:

  • Squiggles in csproj file don’t show up anymore when you open the newly created csproj file created using IDE or CLI.
  • When editing a csproj project file, changes made through the UI (solution explorer, package manager etc.) are reflected in the open editor.

Upgrading from RC

Project templates used by Visual Studio and .NET CLI to create new .NET Core or ASP.NET Core projects now use the simplified csproj syntax. However, there is no auto conversion from the previous RC csproj syntax to the new simplified syntax. If you created .NET Core or ASP.NET Core projects using the previous release of Visual Studio 2017 RC, then you need to update the csproj file to the simplified syntax by hand editing the project file. Please refer to Release Notes to on how to do this, where clear examples are explained.

CLI enhancements

  • Added the dotnet add p2p command, for adding project to project references.
  • Added the dotnet remove p2p command, for removing project to project references from the project file.
  • dotnet new templates are updated to reflect the simplified csproj syntax.
  • Added verbosity control to build, pack, publish, restore & test using –v | –verbosity. The verbosity levels map to MSBuild verbosity levels.

Bug fixes

  • Migration from xproj to csproj
    • Migration of projects that have P2P references is no longer broken.
    • Removed PostPublishScript target.
    • Removed post-migration reference to dotnet-test-mstest.
    • Fixed migration output issues.
    • Migration adds RIDs when migrating projects with .NET Framework TFM.
    • Migration no longer migrates the reference to dotnet-test-xunit if project.json contains it.
  • Project to Project References
    • Referencing from a UWP project is no longer blocked.
    • Referencing from regular csproj no longer gives warnings.
    • TargetFramework dropdown in the project properties page works.
  • NuGet
    • Restore hang fixes and stability improvements.
    • Pack now uses the correct version range for dependency projects.
    • Restore now adds correct project dependency version for command line restore.
  • MSBuild
    • Improvement to incremental builds for C# and VB projects that use wildcards that ensures a rebuild when a source file is deleted.
  • ASP.NET Core Tooling
    • Entity Framework Core commands such as Add-Migration and Update-Database can now be invoked using NuGet Package Manager Console.
    • To successfully restore Bower packages, you no longer need to have Git installed globally or manually reference Git in Tools-Options.
    • Can successfully debug ASP.NET Core Web Applications with Windows Authentication.
  • Docker
    • When provisioning an Azure Docker registry and App Service plan, it no longer requires a new resource group to be created in the same region as the App Service plan.
    • Improved the usability of creating a new Azure resource group.

Thanks for trying out this latest update of Visual Studio 2017! We’re continuing to iterate on the release candidate and will post more updates, so we definitely want your feedback. For problems, let us know via the Report a Problem option in the upper right corner of the VS title bar. Track your feedback on the developer community portal. For suggestions, let us know through UserVoice.

Known Issues

For an up to date list of .NET Core and ASP.NET Core tooling known issues, please see our GitHub page.

The Visual Studio Modeling SDK is now available with Visual Studio 2017

$
0
0

You might want to use the Visual Studio Modeling SDK if you have one of these requirements:

  • Create Graphical or Form-Based modeling designers. For these, you can use the DSL Tools
  • Enable transformation of T4 templates part of the build. For these you can use the T4 SDK
  • Bulk-index assemblies in the Code Index underlying Code Map. For this you can use the Code Index SDK (embedded in the Modeling SDK)

The Modeling SDK changed its name several times during the last ten years: starting from the ‘DSL Tools’ in 2007, it grew to become ‘Visualization and Modeling SDK’ (VSVm SDK) in 2010. At that time, the SDK also contained UML extensibility. Finally, the name was a bit long and therefore it was shorted to ‘Modeling SDK’ in 2012. With previous versions of Visual Studio, regardless of its name, we used to release the Modeling SDK as a separate download.

We are pleased to announce that, from this Visual Studio 2017 RC update, the Visual Studio Modeling SDK will be released as part of Visual Studio itself (in all editions of Visual Studio).

How to install the components of the Modeling SDK?

Previously, the DSL Tools, T4 SDK and Code Index SDK were all shipped as part of the Modeling SDK.

In VS2017, the T4 SDK is installed with the T4 runtime as part of the Text Template Transformation optional component, which is itself installed by default with many Visual Studio workloads

The DSL Tools and Code Index SDK are installed as part of the DSL tools optional component (the component will be renamed to the Modeling SDK in a future Visual Studio RC update, as this is the name under which you have known it for several years). you can find this component in the Visual Studio Extension development workload in every edition of Visual Studio

clip_image002

Known issues

For the next update of Visual Studio 2017 RC we are slightly improving the experience:

  • When you use the “Add New Project …” dialog, the DSL Tools project template is currently located under “Other Project Types | Extensibility”. And now, it’s the only one in this category. We are moving it to be under “C# | Extensibility” with the other Visual Studio SDK content, where it makes more sense
    clip_image004
  • The DSLProjectMigrationTool, (which transforms a DSL Tools solution created for previous versions of Visual Studio, to Visual Studio 2017) will also be added to the release.

You want to know more?

You can find more information on these features:


December Update for the Visual Studio Code C/C++ extension

$
0
0

At //Build this year we launched the C/C++ extension for Visual Studio Code. Keeping with the monthly release cadence and goal to continuously respond to your feedback, this December update introduces the following features:

If you haven’t already provided us feedback, please take this quick survey to help shape this extension for your needs. The original blog post has already been updated with these new feature additions. Let’s learn more about each one of them now!

Debugger Visualizations by default with Pretty Printing for GDB users

Pretty printers can be used to make the output of GDB more usable and hence debugging easier. ‘launch.json’ now comes pre-configured with Pretty Printing enabled as a result of the ‘-enable-pretty-printing’ flag in the ‘setupCommands’ section. This flag is passed to GDB MI enabling Pretty Printing.

debug1

To demonstrate the advantages of pretty printing let’s take the following example.

#include
#include
#include

using namespace std;

int main()
{
vector testvector(5,1.0);
string str = “Hello World”;
cout << str;
return 0;
}

In a live debugging session let us evaluate ‘str’ and ‘testvector’ without pretty printing enabled:

debug2

Look at the value for ‘str’ and ‘testvector’. It looks very cryptic…

Let us now evaluate ‘str’ and ‘testvector’ with pretty printing enabled:

debug3

There is some instant gratification right there!

There is a selection of pre-defined pretty printers for STL containers which come as a part of the default GDB distribution. You can also create your very own pretty printer by following this guide.

Ability to map source files during debugging

Visual Studio Code displays code files during debugging based on what the debugger returns as the path of the code file. The debugger embeds source location during compilation but if you debug an executable with source files that have been moved, Visual Studio Code will display a message stating that the code file cannot be found. An example of this is when your debugging session occurs on a machine different from where the binaries are compiled . You can now use the ‘sourceFileMap’ option to override the paths returned by the debugger and replace it with directories that you specify.

#include "stdafx.h"
#include "..\bar\shape.h"
int main()
{
      shape triangle;
      triangle.getshapetype();
      return 0;
}

Let us assume post compilation the directory ‘bar’ was moved, this would mean when we are stepping into ‘triangle.getshapetype()’ function, the mapping source file ‘shape.cpp’ would not be found. This can now be fixed by using the ‘sourceFileMap’ option in your launch.json file as shown below:

debug4

We currently require that both the key and the value be a full path and not a relative path. You may use as many key/value pairs as you would like. They are parsed from first to last and the first match it finds, it will use the replacement value. In entering the mappings, it would be best to start with the most specific to the least specific. You may also specify the full path to a file to change the mapping.

Update your extension now!

If you are already using the C/C++ extension, you can update your extension easily by using the extensions tab. This will display any available updates for your currently installed extensions. To install the update, simply click the Update button in the extension window.

Please refer to the original blog post for links to documentation and for more information about the overall experience of Visual Studio Code C/C++. Please help us by continuing to file issues at our Github page and keep trying out this experience and if you would like to shape the future of this extension please join our Cross-Platform C++ Insiders group, where you can speak with us directly and help make this product the best for your needs.

How to recreate the TFVC team project folder

$
0
0

We’ve had a handful of support calls lately from customers who deleted their team project folder in TFVC. tf.exe makes it easy to do, but not easy to undo. Fortunately, the fix is straightforward, and Will Lennon has written it up in a blog post. With Will’s permission, I’m reblogging the contents below.


TF.exe makes it easy to destroy a TFVC team project folder, but if you do it’s not as easy to recreate it.

You can destroy all TFVC data in a team project by running  tf.exe destroy $/

Then if you try to navigate TFVC in a web browser, you’ll see an error like this:

TFS.WebApi.Exception: The items requested either do not exist on the server at the specified versions, or you do not have permission to access them.

If you decide you want to add back the team project folder, you cannot use tf.exe to do it.  There is no cmdline equivalent to recreate that team project folder.  If you try tf.exe add you’ll see an error like this:

TF10169: Unsupported pending change attempted on team project folder $/projectName.  Use the Project Creation Wizard in Team Explorer to create a project or the Team Project deletion tool to delete one.

That error message isn’t helpful when you already have a team project with this name and only the TFVC project folder is missing.

To fix this, you’ll need to use the TFS client OM.  Here is a PowerShell script that will recreate the team project folder.  You will need to run this on a machine that has Visual Studio installed. The running user must also have administrator permissions to your TFS collection.

Note that this script will recreate the project folder, but it will not recreate the build and lab templates that are created when a project is created but were destroyed when they ran tf.exe destroy. If you want those templates, you can copy them from any existing project.

You will need to update the $accountName and $projectName variables below. If you install Visual Studio in a non-default path, you’ll also need to update the $path and $path2 variables.  $accountName could be a VSTS account URL or an on-premises TFS collection URL.

$accountName = "https://.visualstudio.com"
$projectName = ""
$path = "C:\Program Files (x86)\Microsoft Visual Studio 14.0\Common7\IDE\CommonExtensions\Microsoft\TeamFoundation\Team Explorer"
$path2 = "C:\Program Files (x86)\Microsoft Visual Studio 14.0\Common7\IDE\PrivateAssemblies"
Add-Type -Path "$path\Microsoft.TeamFoundation.Client.dll"
Add-Type -Path "$path\Microsoft.TeamFoundation.VersionControl.Client.dll"
Add-Type -Path "$path\Microsoft.TeamFoundation.VersionControl.Common.dll"
Add-Type -Path "$path2\Microsoft.IdentityModel.Clients.ActiveDirectory.dll"
Add-Type -Path "$path\Microsoft.VisualStudio.Services.Client.dll"
$tpc = [Microsoft.TeamFoundation.Client.TfsTeamProjectCollectionFactory]::GetTeamProjectCollection($accountName)
$vc = $tpc.GetService([Microsoft.TeamFoundation.VersionControl.Client.VersionControlServer])
$options = New-Object Microsoft.TeamFoundation.VersionControl.Client.TeamProjectFolderOptions($projectName)
$vc.CreateTeamProjectFolder($options)


Designing and Prototyping Apps with Adobe Experience Design CC (Beta)

$
0
0

Adobe Experience Design CC (Beta) or Adobe XD, is a new creative tool from Adobe for designing high-fidelity prototypes of websites and mobile apps.  You can try a new public preview released today of Adobe XD on Windows 10.

Why Adobe XD?

A well-designed app often starts out with a sketch, a rough prototype, something that can be shared with stakeholders. But the challenge has always been that to get something testable and demonstrable, you needed to do some coding, you needed to get developers involved in building a prototype that might get thrown away.  But once you have developers investing in coding, they are reluctant to change the code – even if that’s the right thing to do based on the feedback from your prototype.  In his book The Inmates are Running the Asylum, Alan Cooper discusses just this challenge.  That’s where Adobe XD comes in – it is a tool expressly designed for building quick prototypes as well as high-fidelity user experience designs.  With Adobe XD, anyone can create wireframes, interactive prototypes, and high-fidelity designs of apps and websites.  Once you have your prototype, you then can import the visuals into Visual Studio or the IDE of your choice to start building out the final application.

Below is a quick walk-through of using Adobe XD.

Designing a User Experience

To give you an idea of how to use Adobe XD to design quick prototypes, I am going to walk you through the process that I am going through to redesign an app and create a quick prototype with Adobe XD.  I have found that having an interactive prototype with transitions and multiple screens is much more effective at illustrating a user journey than a storyboard of screen images.  I am designing a new version of an app, Architecture, that I originally built for Windows but now I’m using Xamarin to make a cross-platform version that works on Windows, iOS and Android.  Having studied architecture in college, I have always loved the field.  Quite often, I start off with a rough sketch in my journal but that isn’t typically something that is interactive or in a state that can be shared with enough fidelity, so I use XD.

When I start it up, Adobe XD greets me with a blank canvas where I want to place artboards, one for each screen of my app. To place artboards on the canvas, I press the artboard button (the last icon on the left toolbar) – then I see options for various device form factors, including options for iOS, Android, Surface and Web.

To start, I pick a few screen sizes by tapping on Android Mobile, iPhone and Surface Pro 4 on in the property inspector on the right and blank artboards for each format are created on the design canvas.

To start my design I first focus on designing a map page which would show a map of the user’s current location and notable buildings nearby. I grab a screenshot of San Francisco in a folder on my PC and drag it onto each page, resizing it.  Once I place an image onto a page, any overflow is hidden once I deselect the image.  This is very helpful as I design multiple screen sizes in parallel.

Now I want to focus on one of the designs to add some more detail, in this case, the Android design on the left.  I navigate around the artboard by using the trackpad on my computer, panning with two fingers and zooming in and out on the trackpad by pinching and expanding gestures.  This is similar to the interaction method for XD on macOS.  In this initial preview of XD for Windows, touch and pen support are not enabled yet on the design canvas but they do work on the toolbar and in the property inspector.10Ty team is working closely with the XD team to enable a great experience for pen and touch with Adobe XD that will be ready later in 2017.

I’ve started by adding three red boxes for architectural landmarks in San Francisco, and three boxes at the bottom that will work as buttons for UI interactions.  As I draw each button, XD puts snapping guidelines in to help me position the buttons relative to each other.  I ignore the guidelines to show that by selecting all three buttons and pressing the align bottom button at the top of the property inspector (the pane on the right), I can quickly align the buttons and set them all to have the same width and height in the property task pane.  I can then distribute the buttons horizontally using the hotkey Ctrl-Shift-H.  You can also distribute objects horizontally and vertically using the distribute icons in the property inspector.

I then use the text tool to add placeholder icons to the buttons, taking advantage of the Segoe MDL2 Assets Font (use the Character Map app that comes with Windows) for graphics for the Buildings, Locate Me, and Add buttons.  In a few minutes, I get my ideas out and start a first page of my Architecture app.  Now I want to add another page that would be used to browse a list of buildings by pressing the first button on the first page.  I add another Android mobile page by clicking on the artboard button and selecting a new Android mobile page.  A new artboard page is now placed on my design canvas right below the page I’m working on.  Since this page is for browsing a list of buildings, I start with a design of what each building in the list would look like.  I drag an image of a building from my desktop onto a square and it automatically resizes and crops the image to the square.

After finishing that first item design, I select all of the elements for the building and press the Repeat Grid button on the right and then drag the handle that appeared on the bottom of the rectangle to the bottom of the page, repeating the element.

While I’m dragging the repeat grid, I see the items building instantly and hints showing me the spacing between the items.  Once I look at the items together, it becomes clear that I don’t need the frame around the items and the spacing is a bit wide. All I need to do is select the prototypical items at the top of the list and edit the that item – the changes are replicated throughout the list. To change the spacing, I put my cursor between the items and the pink spacing guide appears. By dragging that, I change the spacing between the items and see the results instantly.

The last thing I want to do on this page is to use different images and text for each building in the list.  To do this, I just grab some images that I have in a folder on my PC and drop them on one of the images in the list.  I also have a text file with the names of the buildings that I drag onto the “Building Name” text.  I instantly have a list of items with unique text images and text, a perfect design for the Xamarin ImageCell element when I’m ready to code this.

Now that I have two related pages, I want to connect them so I have a prototype that starts on the map page and then shows the Buildings page when the user clicks on the Buildings button.  I do that in the Adobe XD Prototyping interface by pressing the Prototype button at the top of the window. I start by clicking on the Buildings button on the maps page and the button is highlighted in blue and a blue arrow appears on the right of the button.  All I do is drag and drop that arrow onto the Building page and a connection is made – I can set the transition type, easing type and duration – very easy.

To test that action, I press the desktop preview button (Play button) in the upper right of the application window and a new window with the map page pops up.  I can then press the Buildings button and see the transition as the app preview shows the Buildings page. I can also drag that preview page to another screen if I have an extended desktop and I can even make changes in the design view while the preview is running.  Once you are done with the design prototype, you can easily export the artboards as images that developers could use as starting points for app development.

As a last step, I exported the artboards as PNG images and opened them up in Visual Studio to start the process of laying out the Xaml for my app:

“Design at the Speed of Thought”

Adobe looked at making XD enable “design at the speed of thought” and through this short walk-through, I hope you get the idea that adding the app to your toolbox will help you design, prototype, test and refine your designs quickly and fluidly.

The Technology Behind Adobe XD

Working with Adobe to bring an app of this sophistication and quality will help other developers prepare for Windows 10. Through close collaboration on this app, we have taken much of the feedback from the Adobe developers to make the Universal Windows Platform even better.

Adobe XD on Windows is a UWP app using XAML, C++, JavaScript, and ANGLE striving for a best-in-class Windows UWP experience while sharing as much code as possible with their Mac version. As Adobe has a very high quality bar for app development, the app is testable through automated tests using the Adobe first released Adobe XD earlier this year on the Mac as a public preview and through that preview, Adobe got input that enabled them to make it the best app for designing user experiences.  That feedback went into making both the Mac and Windows versions of XD even better.  Interestingly, Adobe is taking advantage of some of the new functionality in the Windows Anniversary Edition to enable them to release Adobe XD through their Creative Cloud app (how you get Photoshop, Illustrator Lightroom and other creative apps today) instead of the Windows Store.

Help Shape Adobe XD on Windows

Now that you can start using Adobe XD on Windows, please try it and submit your feedback to Adobe through their UserVoice site and help shape the future of Adobe XD on Windows 10. This is just the beginning.

  • Read Adobe’s blog post about today’s release of Adobe XD on Windows 10.
  • Try the Adobe XD public preview (all you need is a Windows 10 PC running the Anniversary Edition and a free Adobe ID or Creative Cloud account).
  • Provide feedback to Adobe on any topic but we’re especially interested in understanding how would you want to use pen and touch in Adobe XD and how you would want to use the new Surface Dial? How would you use pen and touch simultaneously with Adobe XD?  What other apps  and services would you want Adobe XD to connect with? What kinds of extensibility would make Adobe XD even better for your designer-developer workflow?

Get started today with Adobe XD on Windows 10 with the public preview today.

The post Designing and Prototyping Apps with Adobe Experience Design CC (Beta) appeared first on Building Apps for Windows.

December 2016 Update for .NET Core 1.0

$
0
0

December 2016 Updates for .NET Core 1.0

Today, we are releasing a new set of reliability and quality updates for .NET Core 1.0. This month’s update is our second Long Term Support (LTS) update and includes updated versions of multiple packages in .NET Core, ASP.NET Core and Entity Framework Core. We recommend everyone moves to this update immediately.

How to obtain the updates

.NET Core 1.0.3 fixes

For more information on the change, please see the .NET Core 1.0.3 release notes.

Debugging

  • Visual Studio Remote Debugger with CoreCLR executables on Nano server does not work. 7316
  • Generate symbol packages for CoreCLR binaries. 5832

WinHttpHandler Fixes:

  • Nonstandard HTTP authentication responses. 11452, 11456
  • Basic authentication with default credentials. 11266
  • Uri escaping for HTTP requests. 11156
  • WinHttpRequestState objects leak during HTTP resends. 11693

ASP.NET Core Fixes

  • Exception page showing only method names in the call stack. 335
  • ActionResults returned from controller actions rendered as JSON, instead of executed. 5344
  • Html.ValidationSummary helper throwing exception when model binding a collection. 5157
  • WebHost.Run() completes before ApplicationStopping. 873
  • AntiForgeryValidation attribute conflict with CookieAuthenticationEvents OnRedirectToLogin event handler. 1009
  • UvException (Error -4047 EPIPE broken pipe) timing out HTTP requests. 1208, 1207
  • UserSecrets causes design-time tools to crash. 543

Entity Framework Core Fixes

  • Query: Regression: GroupBy multiple keys throws exception in 1.0.1. 6620
  • Select with Ternary Operator/CASE-WHEN Server Side Evaluation. 6598
  • Query: Including a collection doesn’t close the connection. 6581
  • Query: Take() with Include() generates incorrect SQL. 6530
  • Query: Include() for related collections are dropped when use Skip(). 6492
  • Query: Port Include() performance improvement to 1.0.2. 6760
  • Tools: Better ConfigureDesignTimeServices entry point. 5617
  • Query: Entities not being released due to leak in query caching. 6737

If you are having trouble, we want to know about it. Please report issues on GitHub issue – 391.

Thanks to everyone who reported issues and contributed!

.NET Framework December Monthly Rollup is Now Available

$
0
0

Today we are releasing a new Security and Quality Rollup and Security Only Update for the .NET Framework. This release resolves a security vulnerability and includes two new quality and reliability improvements. The Security and Quality Rollup is available via Windows Update, Windows Server Update Services and Microsoft Update Catalog. The Security Only Update is available via Windows Server Update Services and Microsoft Update Catalog.

You can read more about the recent changes to how the .NET Framework receives updates on the .NET Framework Monthly Rollups Explained post.

Security

This release resolves a vulnerability in Microsoft .NET 4.6.2 Framework’s Data Provider for SQL Server. A security vulnerability exists in Microsoft .NET Framework 4.6.2 that could allow an attacker to access information that is defended by the Always Encrypted feature. The security update addresses the vulnerability by correcting the way .NET Framework handles the developer-supplied key, and thus properly defends the data. This security update is rated Important for Microsoft .NET Framework 4.6.2. To learn more about the vulnerability, see Microsoft Security Bulletin MS16-155.

Quality and Reliability

Common Language Runtime

When an application uses unaligned block initialization, for example, from managed C++, the code generated on AVX2 hardware has an error. As a result, if the JIT uses a register other than xmm0 for the source, an incorrect encoding will be used. This improvement applies .NET Framework 4.6 and 4.6.1.

Windows Presentation Foundation

A memory leak may occur for certain scenarios when an application includes a D3DImage control. For example, if you started an application, changed both the size and content of the image and then ran the application through Remote Desktop. This improvement applies .NET Framework 4.5.2, 4.6 and 4.6.1.

More Information

Additional information on what is included in each of the rollups along with the applicable operating systems can be found on their associated knowledge base articles, listed below.

Security and Quality Rollup

KB Article.NET VersionOperating System
3210142.NET Frameworks 3.5, 4.5.2, and 4.6Windows Vista SP2 and Windows Server 2008 SP2
3205402.NET Frameworks 3.5, 4.5.2, 4.6, 4.6.1, and 4.6.2Windows 7 and Windows Server 2008 R2
3205403.NET Frameworks 3.5, 4.5.2, 4.6, 4.6.1, and 4.6.2Windows Server 2012
3205404.NET Frameworks 3.5, 4.5.2, 4.6, 4.6.1, and 4.6.2Windows 8.1 and Windows Server 2012 R2

Security Only Update

KB Article.NET VersionOperating System
3205406.NET Framework 4.6.2Windows 7 and Windows Server 2008 R2
3205407.NET Framework 4.6.2Windows Server 2012
3205410.NET Framework 4.6.2Windows 8.1 and Windows Server 2012 R2
Viewing all 10804 articles
Browse latest View live